

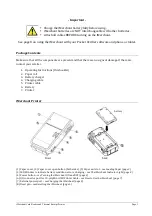


iMerchant Card Reader and Thermal Receipt Printer
Page 8
How to Use Pocket Verifier
Pocket Verifier is the iMerchant-‐aware application that you can use with the iMerchant.
When you first attach the cables to the iMerchant and your device, and then power on the
iMerchant, your devices will see if you have an iMerchant-‐aware application. If none exists, you will
be given the option to download the Pocket Verifier application.
Pocket verifier is a universal application that can work on both your phone and tablet.
To quickly get started with Pocket Verifier, follow the steps below to make your first sale.
A complete user guide, screenshots, tutorials, and quick-‐start videos are also available at
http://merchantanywhere.com/ios
Using Pocket Verifier for the iPhone/iPod
1.
Locate the Verifier app on your phone and launch it.
2.
It first launch, the Sale screen will appear.
3.
Tap the Settings tab to enter your account information and to set your options, then return to
the Sales screen by tapping the Sale tab.
4.
Attach the iMerchant and turn it on.
5.
When the printer icon appears, swipe a credit card through the iMerchant. A single beep will
indicate a successful read.
6.
Enter an Amount, then tap Done.
7.
Tap the More Actions button (right button on the top toolbar) and select Printer Service
Receipt to print a receipt where your customer can enter a tip. To print a cash receipt, only
enter the Name and amount.
8.
Tap the Charge Sale button.
9.
Pocket Verifier will contact the payment gateway to process the sale and then display the
Approved Transaction screen. If Autoprint Approvals is turned on in the options, then an
approved receipt will be printed upon completion. To print a receipt manually, tap the Print
button. Alternatively, you can send an email receipt by tapping on the Email icon.
If the sales location message appears, tap on it to see the geo-‐tagged location of your sale.
When the map is showing, an email receipt will also attach this image to the email.
10.
Tap the Done button and return back to the Sales screen to make your next sale.
Using Pocket Verifier for the iPad
1.
Locate the Verifier app on your tablet and launch it.
2.
It first launch, the New Sales Order screen will appear and the Sales History will be empty.
(A = All Items, S = Sold Items, P = Pending Items)
3.
Tap the (settings) button to enter your account information and to set your options.
4.
Attach the iMerchant and turn it on.
5.
When the
Ready to Swipe Card
and printer icon appear, swipe a card through the iMerchant.
6.
Enter an Amount.
7.
Tap the Service Receipt button to print a service receipt where your customer can enter a tip.
If you are printing a cash sale, you only need to enter the Name and amount.
8.
Tap the Charge Sale button.
9.
Pocket Verifier will contact the payment gateway and after a brief pause, display the
Approved Sale. If Autoprint Approvals is turned on in the options, then an approved receipt
will be printed. To print a receipt manually, tap the Print Receipt button on the toolbar for
approved sales.
Содержание iMerchant
Страница 2: ......


