


ENGLISH
INSTRUCTIONS FOR USE
12
909 5853 000(3)2008-11
Micromatic™ M17B
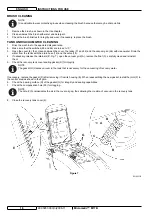
Squeegee installation
Install the squeegee (11) and fasten it with the handwheels (12), then connect the vacuum hose (22) to the squeegee.
6.
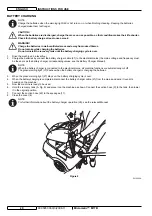
Solution tank
fi
lling
Use the
fi
ller neck (45) to
fi
ll the tank (32) with a solution suitable for the work to be performed. Do not
fi
ll the solution tank
7.
completely, leave few inches from the edge. Always follow the dilution instructions on the label of the chemical product used to
prepare the solution. The solution temperature must not exceed 40°C.
CAUTION!
Use only low-foam and non-
fl
ammable detergents, intended for automatic scrubber applications.
Adjustments
Using the knob (3), adjust the handlebar (2) to the most comfortable position.
8.
MACHINE START AND STOP
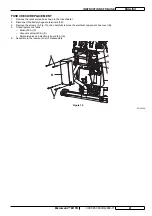
Starting the machine
Prepare the machine as shown in the previous paragraph.
1.
Lower the squeegee (11) with the lever (19).
2.
Turn the solution
fl
ow control lever (4) to one of the following positions, according to the type of cleaning to be performed:
3.
Smart solutions: when the lever (4) is turned to Smart solutions (5), the machine works in a special condition of
•
programmed water economy usage; as the water
fl
ow is set and constant, the machine can work with a washing autonomy
of 70-80 minutes (0.3 liters/min average).
Variable system: when the lever is turned to the left (variable
fl
ow) the
fl
ow rate can increase up to 1 liters/min.
•
In no case it is possible to close completely the water
fl
ow to the brushes during operation.
•
While keeping the hand on the handlebar (2), start the machine by turning the brush/pad-holder switch and the vacuum system
4.
switch (65 and 66) to “I”.
NOTE
If the green warning light (62) turns on, the batteries are ready to be used. If the yellow or red warning light (63 or 64)
turns on, it is necessary to charge the battery (see the procedure in Maintenance chapter).
Stopping the machine
Turn the brush/pad-holder switch and the vacuum system switch (65 and 66) to “0”.
5.
Lift the squeegee with the lever (19).
6.
Insert the positioning pin (24) and lift the brush/pad-holder by activating the transport/parking device (23a).
7.