background image

4

61287781F1-13A

S

ETTING


OR

 C

HANGING

 Y

OUR

 424RG’

S

 W

IRELESS

 S

ERVICE

Your 424RG is factory-provisioned for both the 2.4GHZ service and the faster 5.0GHz service. Use the following procedures to reset or 
customize your wireless service.

NOTE

:

The wireless setting of the 424RG must match the wireless setting of any wireless device that connects to the 424RG

If you configure the 424RG from a wireless computer and you change the router SSID or security setting, you will lose your wireless 
connection when you click 

Save

. You must then change your computer’s wireless settings to match the 424RG’s new settings. To 

avoid this situation, use a computer that is directly connected to the 424RG using an Ethernet cable. 

Setting or Changing Your 2.4GHz Wireless Service

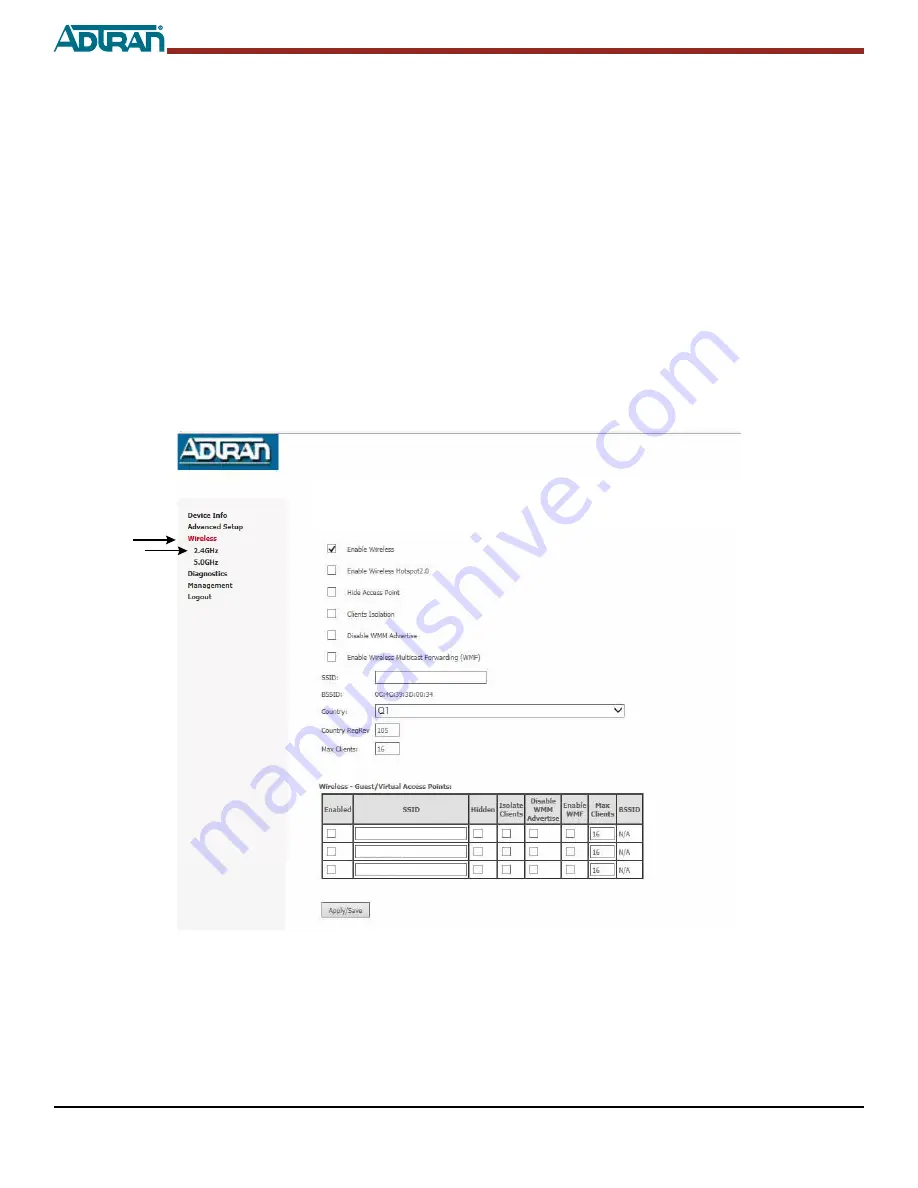
Follow the steps below to set up or change your 2.4GHz wireless service.

1. Select 

Wireless

 and

 2.4GHz

 from the side menu; This displays the 

Wireless 2.4GHz - Basic

 menu (

Figure 3

).

2. By default, Wireless service is 

Enabled

.

3. If you want to provision a new 2.4GHz SSID name, highlight the entry in the window next to 

SSID

 and enter a new SSID 

designation. (Note: An SSID designation should not exceed 32 characters in length and is case-sensitive.)

4. Select 

Apply/Save.

Figure 3. Wireless 2.4GHz - Basic

ADTN2.4_Guest1

ADTN2.4_Guest3

ADTN2.4_Guest2

Wireless 2.4 GHz - Basic

This page allows you to configure basic features of the wireless interface. You can enable or disable the wireless LAN interface, hide the network 
from active scans, set the wireless newtork name (also known as SSID) and restrict the channel set based on country requirements.
Click “Apply/Save” to configure the basic wireless options.

ADTN2.4G

ADTN2.4G_Guest1

ADTN2.4G_Guest2

ADTN2.4G_Guest3

Logout

Содержание 424RG ONT

Страница 1: ...he following CAUTION Never set the 424RG on its side while powered up This may cause overheating and damage the unit Always use the stand that was provided during the initial installation The 424RG mu...

Страница 2: ...following procedure 1 Turn on your computer 2 Access the Internet using the Internet Browser software on your computer 3 The default IP address 192 168 1 254 works with all Internet WEB Browsers This...

Страница 3: ...twork connection status The upper box contains information that is stored on the 424RG The lower box contains information retrieved from the DHCP server when the IP address is assigned to the 424RG Fi...

Страница 4: ...rvice Follow the steps below to set up or change your 2 4GHz wireless service 1 Select Wireless and 2 4GHz from the side menu This displays the Wireless 2 4GHz Basic menu Figure 3 2 By default Wireles...

Страница 5: ...tion should not exceed 32 characters in length and is case sensitive 4 If you want to provision a new SSID for Video Service simply highlight the entry in the SSID field and enter a new SSID designati...

Страница 6: ...the following steps 1 With Figure 4 on page 5 displayed select 2 4GHz and then Security Figure 5 will be displayed 2 In the window adjacent to Enable WPS select the check mark so Enable is displayed...

Страница 7: ...should be Enabled set as Factory Default If it is not in the window adjacent to Enable WPS select the check mark so Enable is displayed 3 If you want to change the Network Authentication type for 5 0...

Страница 8: ...you can use the WPS button to set either 2 4 or 5 0GHz wireless service To enable these services perform one of the following 2 4GHz Service If you have devices that support WPS press and hold the WPS...

Страница 9: ...played 2 If you want to provision a new SSID name for a Guest SSID select the Enabled check box adjacent to the first entry in the SSID column in the Wireless Guest Virtual Access Points table For exa...

Страница 10: ...10 61287781F1 13A...

Отзывы: