background image


15

Quick Setup Wizard 

The Quick Setup Wizard provides an installation guide from cable attaching to the initialization 
of management. Please follow up the steps below to proceed. 
 

Note: If you’ve run the wizard before and there is currently any existing shortcut for accessing/ 
managing the device, please delete them to run the Quick Setup Wizard successfully.     

 
Starting the Express Setup Wizard: 


Insert the provided utility CD into your CD-ROM. The main menu pops up automatically. 
You may read the user’s manual by clicking “View User’s Manual” or start the Setup Wizard by 
clicking “Quick Setup Wizard” 

Note:

 If the auto-run program is not activated, please click on “My Computer”  “CD-Drive” 

then click the AUTORUN icon to start the main menu. 


Содержание NAS-806-EF

Страница 1: ...to the following two conditions 1 this device may not cause harmful interference and 2 this device must accept any interference received including interference that may cause undesired operation CE M...

Страница 2: ...23 SETUP THE PERSONAL SERVER 23 Home Page 24 Home 25 NETWORKING 27 Host Name 27 IP address 28 SuperUser Password 29 IP Filter 30 MAC Filter 31 ADMINISTRATION 32 Restart System 32 Format HD 33 Factory...

Страница 3: ...2 TROUBLE SHOOTING GUIDE 53 SPECIFICATION 55...

Страница 4: ...rovides one 10 100Mbps Ethernet port Auto MDI MDIX supported for network connection WEB based User Interface UI for easy configuration Supports ATA ATAPI 6 HD Supports all 3 5 IDE HD up to 250GB with...

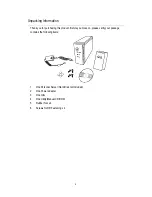
Страница 5: ...sing this product Before you move on please verify your package contains the following items 1 One Personal Server Hard Disk not Included 2 One Power adapter 3 One QIG 4 One Utility Manual CD ROM 5 Ru...

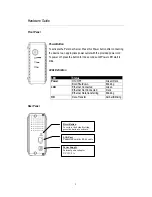
Страница 6: ...for two seconds until Power LED start to blink LEDs Definition LED Status ON OFF Green Dark Power Boot Shutdown Blinking Ethernet Connected Green Ethernet Not Connected Dark LAN Ethernet Data transfer...

Страница 7: ...e following chapter indicates how to configure an IP address for your PC Users that have got a specified IP please skip this chapter to Hard Disk Installation for the next step How to configure the TC...

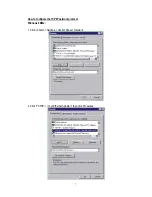
Страница 8: ...7 How to configure the TCP IP network protocol Windows 98 Me 1 Click on Start Settings Control Panel Network 2 Click TCP IP Your Ethernet Adaptor then click Properties...

Страница 9: ...dress and click on Specify an IP Address 4 Type in the IP address State the subnet mask to be 255 255 255 0 5 Click OK and OK Now the system may ask for your Windows disc follow the steps then restart...

Страница 10: ...9 How to configure the TCP IP network protocol Windows 2000 1 Click on Start Settings Network and dial up connections 2 Choose local area Connection and click Properties...

Страница 11: ...10 3 Click on Internet protocol TCP IP then click properties 5 Select use the following IP address State the subnet mask to be 255 255 255 0 Click OK and OK then restart your computer...

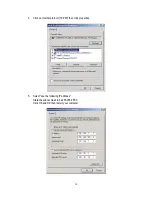
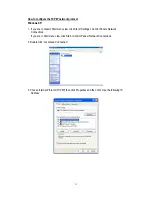
Страница 12: ...Start menu view click Start Settings Control Panel Network Connections If you are in Start menu view click Start Control Panel Network Connections 2 Double click Local Area Connection 3 Choose Interne...

Страница 13: ...that you chose earlier The subnet mask is entered automatically on Windows XP Click OK Now the IP setting of your PC is completed Please refer to the following guide to finish the Hard Disk installati...

Страница 14: ...er operation mode Note that the jumper locations differ from each HD for the correct Jumper settings please refer to your Hard Disk manual for detail information 4 Insert the IDE connector into the ID...

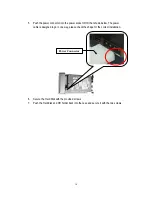
Страница 15: ...shown below The power cable is designed to go in one way please check the shape for the correct installation 6 Secure the Hard Disk with the provided screws 7 Push the Hard disk and HD holder back in...

Страница 16: ...accessing managing the device please delete them to run the Quick Setup Wizard successfully Starting the Express Setup Wizard Insert the provided utility CD into your CD ROM The main menu pops up auto...

Страница 17: ...16 Step1 Activate The Utility software Click Quick Setup Wizard to activate the setup utility The startup Manu Please Click Next to continue Welcome page...

Страница 18: ...rear panel Connect the power cord to an appropriate outlet Press the power button to activate the Personal Server and confirm that the device is well powered by examining the LEDs on the front panel P...

Страница 19: ...18 Step3 Scan network HD in your network Click Next to proceed the Personal Server scanning Click next to proceed the Personal Server scanning HD scanning please wait...

Страница 20: ...ntly cannot access this Personal Server with the present network settings 1 Adjust the network settings of the Personal Server to make it to be accessible by the PC 2 Create two shortcuts to access an...

Страница 21: ...20 Setting Please note that how the two shortcuts function Please refer to next page for further introduction Click OK to setup your Personal Server by Web based UI or Click Cancel to Continue...

Страница 22: ...al Server please refer to the next page for management guide Note Express Setup Wizard will detect your HD content but only for the 1st Partition Icons Created Note If an unformatted or no hard disk i...

Страница 23: ...to Read Write the share Folder only Guest Read Only The account is allowed to Read the share Folder only Note 1 As default the Share folder is created automatically in the Personal Server and can be...

Страница 24: ...er icon on your desktop screen The Username and Password Required window appears Enter admin in the User Name location default value Enter admin in the Password location default value Click OK button...

Страница 25: ...24 Home Page The Personal Server is managed via a web based graphical user interface GUI that can be accessed with a standard HTML HTTP v1 0 compliant browser The Home page...

Страница 26: ...ification of the Personal Server shows on My Neighborhood IP address the IP address of the Personal Server Version the Firmware Version Configuration Click the hyper link of each management items to q...

Страница 27: ...Server Samba Users the number of members who is currently using the Personal Server FTP Users the number of members who is currently using the Personal Server by FTP client Check if the Unicode been l...

Страница 28: ...filtering function After setting the Personal Server will be shown on My Neighborhood Host Name Item Configuration Host Name Identification of the Personal Server shown on your My Neighborhood Work Gr...

Страница 29: ...lient Click No to disable IP Address IP address of the Personal Server Subnet Mask The Subnet Mask must be compatible with the other devices on your network Gateway Enter the Router or Gateway IP on y...

Страница 30: ...is used to access the Web based UI to Setup the Personal Server Item Configuration SuperUser name Username of the Personal Server administrator to access the Web based UI Old Password Enter your old...

Страница 31: ...IP addresses are allowed to access the Personal Server 2 Allowed Setup the IP addresses that are allowed to access the Personal Server Only the configured IP addresses have the right to access the Pe...

Страница 32: ...MAC addresses are allowed to access the Personal Server 2 Allowed Setup the MAC addresses that are allowed to access the Personal Server Only the configured MAC addresses have the right to access the...

Страница 33: ...system Format the Hard disk Restore the default setting Update the latest Firmware Adjust the system time Support the correct code pages in SAMBA for character set Restart System To Restart the Person...

Страница 34: ...EXT3 format You will have to format the HD or replace a HD with EXT3 format Caution All partitions on your HD will be format and all your DATA will be erased To format the Hard disk click Yes to acti...

Страница 35: ...t configuration click Yes to enact Don t power off the device during the process Firmware upgrade To upgrade the Firmware 1 Click Browse 2 Select the file for Firmware updating 3 Click Apply Caution D...

Страница 36: ...lick Save The correct time will be applied by next boot Character Set Unicode is work for being compatible with most fonts around the world thus prevents errors from fonts difference To install Unicod...

Страница 37: ...on 2 Enter the User Name New password Confirm password User description 3 Decide the FTP Access and Accessed Level When FTP Access is enabled those users are allowed to access FTP with their own usern...

Страница 38: ...se the default folder for the user 5 Click Apply to save Change the User configuration 1 Click the User Name link for example all 2 Enter the New Password confirm Password and Description to change th...

Страница 39: ...38 Delete User Remove the certain user account to ban the right from accessing the Personal Server 1 Fill in check boxes to select users that you want remove 2 Click Delete to remove...

Страница 40: ...users Add Folder To add a new Folder for file sharing 1 Click Add to add a new Folder 2 Enter the Folder Name and Description 3 Click Apply to Save Delete Folder To remove a folder and the files withi...

Страница 41: ...er Non access The User is not allowed to access the folder Read only The user is allowed to read files only in this folder Read write The User is allowed to read and write files to or from this folder...

Страница 42: ...ort Number as your demand Enter the FTP Port number A default port number 21 is configured if there is no specified number been configured Note Port 80 is not allowed to setup for it has been configur...

Страница 43: ...place the data you are going to download Please note that the folder should be within the folder that contains the Torrent files Ex Create a folder named BT in the P2P folder 4 Start downloading For...

Страница 44: ...wnloaded data should be also in the folder share 3 BitTorrent Configuration File You can specify any name for the file The file is for recording the download information which helps to resume interrup...

Страница 45: ...h item is shown as following 1 Sel The check box for users to select the desired download task 2 Torrent File Names and status hyperlink for each Torrent file 3 D L Downloaded percentage 4 Size MB The...

Страница 46: ...er you specified as the download folder Select the files that waiting for download then click add 2 Select the files for download then click next 3 Specify the folder for placing downloaded data then...

Страница 47: ...owed time to process a download task The task will be terminated as the time passed Max Peers Count Setup the MAX Peers when proceeding up download Min Peers Count Setup the Min Peers when proceeding...

Страница 48: ...information will be shown on the downloading column Select a file in the check box then click Inactive if you want to terminate a download task You can also click on the hyperlink of the torrent file...

Страница 49: ...to enable Specify a port number from 1 65535 WEB Folder is the location where you place your HTML files Note 1 As default the Port 80 is not allowed to setup for it has been configured as the port fo...

Страница 50: ...ession the Internal Host IP should be configured as the IP address of this Personal Server and the value of Port should be correspond to the port number of the WEB server or FTP server you configured...

Страница 51: ...easy and reliable service of Personal Server Multiple Users Backup For Windows 2000 XP Users the OS provide an accessory system tool for data backup Backup Please follow the steps as the reference to...

Страница 52: ...FTP feature and want to transfer video data of IP camera back to the Personal Server to fulfill the needs of remote monitoring Remote Backup FTP To use the FTP please choose a FTP supported Browser ex...

Страница 53: ...ommand users are allowed to download files without keeping your PC powered on WebServer For users wish to share files via their website the embedded Webserver provides a easier solution Users don t ne...

Страница 54: ...hange another HD The HD jumper is not set as Master Your HD jumper should be set to Master Different Hard Disk has different jumper settings please refer to your Hard Disk manual for more information...

Страница 55: ...peration system Please get access to the management interface Add a new user which use the username the same with your operation system Get access to the HD and double click a folder Fill in the passw...

Страница 56: ...e Default Button Connection speed 10 100Mbps Support Hard Diskette One removable 3 5 external HD ATA Diagnostic LEDs Power On Boot or Shutdown Green Blinking LAN Ethernet Act Link Green HD Hard Disk d...

Отзывы: