6 • Installation
You are now ready to install the PXI-7931
.
2.3 Mechanical Drawing
Figure 1: ADLINK Switch Module
ADLINK switch module is packaged in a Eurocard form factor compliant with
PXI Specifications measuring 160 mm in length and 100 mm in height (not
including connectors). A 62-pin connector is located at the front panel for wiring
purposes and the J1/J2 IEC connectors in the rear are used to link the chassis
backplane. With its modular, rugged, and high shock resistant mechanical
features, the switch module functions exceptionally well in any harsh
environment application.
2.4 Installing the switch module into a PXI Platform
To insert the ADLINK PXI switch module, align the module’s edge with the card
guide in the PXI chassis. Slide the switch module into the chassis, until
resistance is felt from the PXI connector. Push the ejector upwards and fully
insert the switch module into the chassis. Once inserted, a “click” can be heard
from the ejector latch. Tighten the screws on the front panel.
Содержание PXI-7931
Страница 10: ...4 Introduction This page intentionally left blank...
Страница 13: ...Installation 7 Figure 2 Installing the switch module into a PXI platform...
Страница 14: ...This page intentionally left blank 8 Installation...
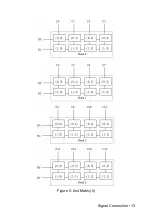
Страница 19: ...Signal Connection 13 Figure 5 2x4 Matrix II...
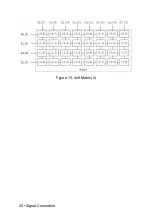
Страница 26: ...20 Signal Connection Figure 13 4x8 Matrix II...


