background image

Quick guide 

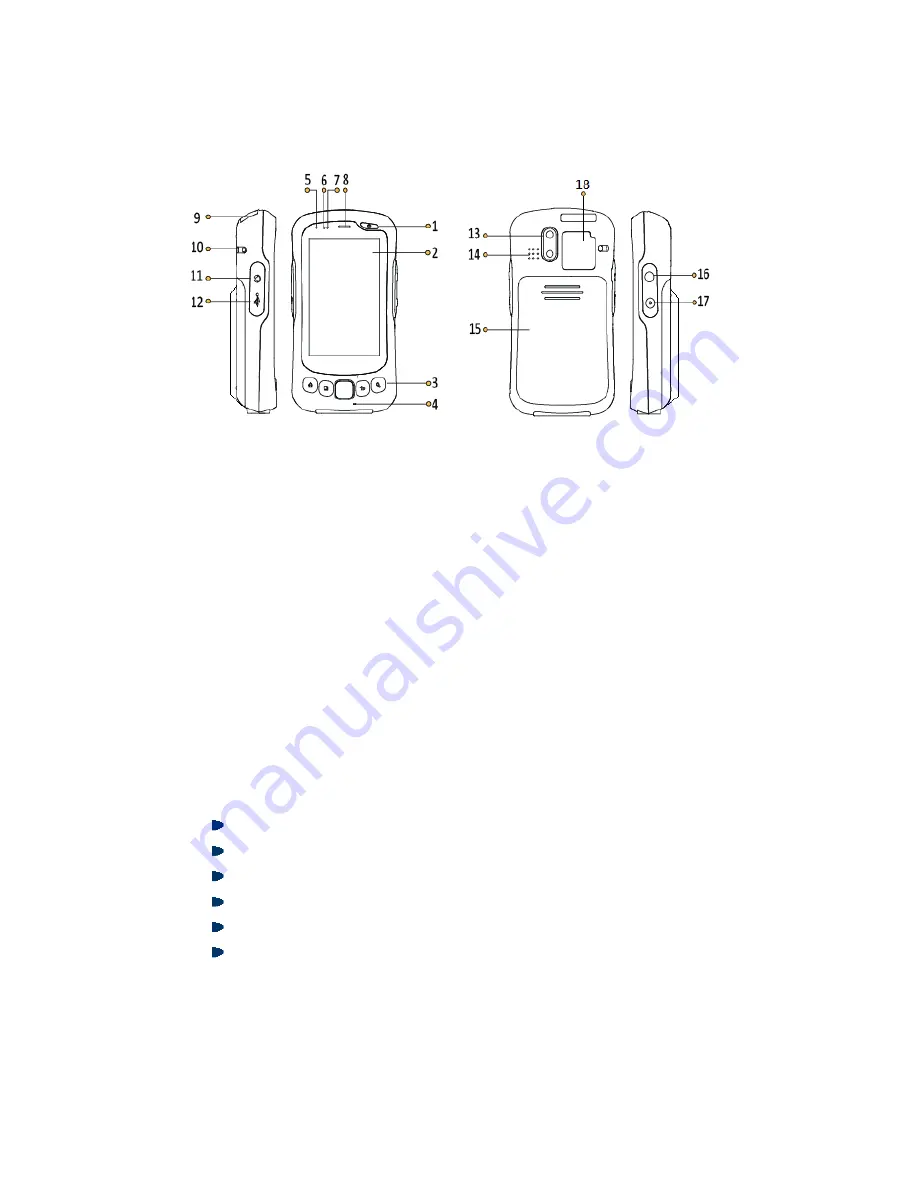
IMX-3000 layout 


1  Power key 

Proximity sensor 

13  Camera and Flash LED 

2  LCD & Touch panel 

Receiver 

14  Speaker 

3  Function key area 

Scan window 

15  Battery cover 

4  Microphone 

10  Lanyard 

16  Volume up 

5  Power LED 

11  Headset slot 

17  Volume down 

6  Light sensor 

12  USB port 

18  NFC antenna 


Package of Contents 


The IMX-3000 is packaged with the components listed below. If any of the items in the 

contents list are missing or damaged, retain the shipping carton and packing material and 

contact the dealer for inspection. Please obtain authorization before returning any product to 

ADLINK. 


IMX-3000 Handheld Computer x1 pcs 


Li-ion Battery x 1pcs 


AC Adapter and plugs x 1set 


Hand rope x 1 pcs 


USB cable x 1 pcs 


Quick guide x 1 pcs

Содержание IMX-3000

Страница 1: ...1 IMX 3000 Rugged Handheld Device User s Manual Manual Revision 0 2 Revision Date 07 08 2014 Part No 50 1Z156 1000 ...

Страница 2: ...t indirect special incidental or consequential damages arising out of the use or inability to use the product or documentation even if advised of the possibility of such damages This document contains proprietary information protected by copyright All rights are reserved No part of this manual may be reproduced by any mechanical electronic or other means in any form without prior written permissio...

Страница 3: ...attery 9 Getting Start 10 1 Android Wizard in first start 10 2 Key Definition 11 3 Status Indicator 11 3 1 Indicator LED 11 3 2 Indicate icons 11 Connection 12 2 Connecting to Wi Fi Network 12 3 Connecting to Bluetooth Network 13 4 Using GPS AGPS 14 5 WCDMA GSM 16 6 NFC 18 Using Camera 19 1 Picture mode 19 2 Video mode 22 System Setting 23 1 About Phone 23 2 Display 23 Utilities 25 1 Button utilit...

Страница 4: ...charge three or more batteries at the same time may damage the cradle or result in other safety risks Only connect one device to the DC adapter when charging the batteries as this may damage the cradle or result in other safety risks Do not power on the IMX 3000 if it is forbidden to use wireless equipment or if using such equipment will cause noise interference or other dangers Wireless devices m...

Страница 5: ...equipment from humidity Do not use this equipment near water or a heat source Never pour any liquid into opening this could cause fire or electrical shock Openings in the case are provided for ventilation Do not block or cover these openings Make sure you provide adequate space around the system for ventilation when you set up your work area Never insert objects of any kind into the ventilation op...

Страница 6: ...h NFC 2G 3G This transmitter must not be co located or operating in conjunction with any other antenna or transmitter 2 This equipment complies with FCC RF radiation exposure limits set forth for an uncontrolled environment This equipment should be installed and operated with a minimum distance of 20 centimeters between the radiator and your body RF exposure for cellular phone Cautions In August 1...

Страница 7: ...ertified power level in all tested frequency bands Although the SAR is determined at the highest certified power level the actual SAR level of the GPS Controller while operating can be well below the maximum value This is because the GPS Controller is designed to operate at multiple power levels so as to use only the poser required to reach the network In general the closer you are to a wireless b...

Страница 8: ...ensor 12 USB port 18 NFC antenna 2 Package of Contents The IMX 3000 is packaged with the components listed below If any of the items in the contents list are missing or damaged retain the shipping carton and packing material and contact the dealer for inspection Please obtain authorization before returning any product to ADLINK IMX 3000 Handheld Computer x1 pcs Li ion Battery x 1pcs AC Adapter and...

Страница 9: ...8 3 Installing SIM card and Micro SD card Insert the SIM card or Micro SD card in the correct direction Lock the SIM card or Micro SD card cover after inserting the SIM card ...

Страница 10: ...ug for your region into the DC adapter and plug it into the wall socket to begin charging 4 2 Charging Cradle Connect the DC adapter to the charging cradle to charge the IMX 3000 and secondary battery simultaneously 4 3 Secondary Battery Charging The LED on the charging cradle will change from red to green when charging is complete The IMX 3000 cannot be charged while using the USB connection ...

Страница 11: ...oid APP in to Home screen 1 2 Release the page by pressing OK button 1 3 Press Applications icon another wizard will shows up 1 4 Release the page by pressing OK button 1 5 Unlock screening The screen will lock in first start or resume by stand by mode unlock the screen by press and hold the lock icon and then drag it to unlock icon ...

Страница 12: ...nning 3 Status Indicator 3 1 Indicator LED The indicator LED is located at the top left of the IMX 3000 Description Red LED Battery is charging Green LED Battery is full charged 3 2 Indicate icons Icon Battery capacity Battery capacity remind indicator Battery charging Battery is charging Battery low Battery capacity is less than 15 Battery very low Battery capacity is less than 5 USB connected US...

Страница 13: ... to connect to it You will be prompted to enter a password or other credentials if the network is secured If the connection is successful the notification icon will display on status bar with the number of bars indicating the signal strength If the network is Open the IMX 3000 will connect to the network automatically If the network is Secure You will be prompted to enter a password or other crede...

Страница 14: ...th clients and displays their names 3 4 Touch a Bluetooth client to pair When Bluetooth is turning on the notification icon will display on the status bar You can start exchanging data with the Bluetooth device Touch Menu to see more functions While Bluetooth is on the IMX 3000 will search and display available devices and the notification will display on the status bar ...

Страница 15: ...ocation Service 2 Enable GPS satellite 4 2 Get GPS location by Wi Fi or mobile connection 1 Touch on the Home screen Settings Location Service 2 Enable Google s location service 4 3 Get GPS location in Google map 1 Touch on the Home screen Maps 2 Get location in Google map ...

Страница 16: ...15 It may take several minutes for GPS to determine your location for the first time GPS will be more time efficient after satellite locations have been saved ...

Страница 17: ...check 1 Network 2 Signal strength 3 Mobile network type 4 Service state 5 Roaming 6 Mobile network state 7 IMEI 5 2 Set Airplane mode 1 Touch on the Home screen Settings More 2 Enable Airplane mode by touching the check box All wireless function will lose connection if airplane mode The icon of airplane mode will display in the status bar ...

Страница 18: ...ch on the Home screen Settings More Mobile network settings 2 Enable 2G networks by touching the check box 2G icon will replace 3G icon in stats bar 5 4 Set VPN 1 Touch on the Home screen Settings More 2 Set VPN by touching radio box ...

Страница 19: ...18 6 NFC 6 1 Enable disable NFC 1 Touch on the Home screen Settings More 2 Enable Disable NFC The NFC application require to additional installation ...

Страница 20: ...e mode 1 1 Taking a picture 1 Drag the control to the Photo position 2 Frame your subject on screen 3 Touch the onscreen Shutter icon to take a picture 1 2 Zoom in and zoom out Drag the scroll to zoom in or zoom out 1 3 Setting Flash mode 1 Press on the screen 2 Press to set flash mode ...

Страница 21: ...ernal storage means Micro SD card 1 5 Setting picture size 1 Press on the screen 2 Press Picture size 3 Press or to select picture size 4 Picture size Items Size W H Full HD 1944 2595 1944 2592 HD 1536 204 1536 2048 High 1200 1600 1200 1600 Medium 480 640 480 640 Low 144 176 144 176 1 6 Setting picture quality 1 Press on the screen 2 Press Picture quality ...

Страница 22: ...pg 100 Jepg 95 Jepg 85 Jepg 75 Jepg 65 1 7 Setting ZSL ZSL means zero shutter lag 1 Press on the screen 2 Press ZSL to set ZSL on or off 1 8 Resetting camera setting Reset camera settings to factory default 1 Press on the screen 2 Press Reset to defaults ...

Страница 23: ...to start shooting a video 4 Touch the onscreen Stop icon to stop shooting video 2 2 Setting Flash mode 1 Press on the screen 2 Press to set flash mode 3 The flash mode can be set to on or off 4 Press on the screen 2 3 Setting Video quality 1 Press on the screen 2 Press Video quality Remove the protective film on lens before using the camera ...

Страница 24: ...5 Service state 6 Roaming 7 IMEI 8 Wi Fi MAC address View Wi Fi MAC address 9 Bluetooth address View Bluetooth MAC address 1 2 Baseband version 1 Baseband version refers Arm9 1 3 Software version 1 Software version refers Arm11 2 Display 2 1 Brightness setting 1 Setting brightness by scroll bar 2 Setting brightness to Automatic brightness Press the check box Automatic brightness to enable it The b...

Страница 25: ...5 seconds 30 seconds 1 minute default setting minutes minutes 10 minutes 30 minutes Never 2 4 Touch key light duration Set key light duration for keypad 1 5 seconds 6 seconds Always off Always on The IMX 3000 goes into standby mode after screen timeout in order to save battery power ...

Страница 26: ...on utility by press then press Button Utility 1 1 Re define key as key value 1 Press the Key radio box and then press to launch the menu to re define key value 2 You may assign one of the following key to the key Tab Enter Volume_up Volume_down Search Scan 1 2 Application assignment 1 Press the apk radio box and then press to set the shortcut of application in the menu 2 You may re assign the key ...

Страница 27: ...code type and data will display on the page 2 Background Scan Hide Reader Utility by launch another application or press BACK Home key Get barcode data by press Scan key The barcode data can sent to any text area that you focus on 2 2 Setting 1 Notification LED notification Menu sheet Scan engine type will be auto detected Barcode type display area Barcode content display area Soft scan key ...

Страница 28: ...efix output code Add the prefix code in previous of barcode content Suffix output code Add the suffix code in end of barcode content Delimiter Add a delimiter in end of barcode content Auto Enter Add an ENTER character in the end of one scan 2 Auto enable background scan when system boot Reader utility will enable in background when system boot 3 Reset to default Reset all columns to default volum...

Страница 29: ... engine will be trigger continuous in each interval of 2 seconds In this mode the same barcode data will be ignoring Stop when success Press Scan key then release it align the scan line to barcode sheet to get barcode content The scan engine will be trigger continuous in each interval of 2 seconds The scan engine will stop to trigger until get the barcode data successful Press and hold scan key al...

Страница 30: ... China Co Ltd Address 上海市浦东新区张江高科技园区芳春路 300 号 201203 300 Fang Chun Rd Zhangjiang Hi Tech Park Pudong New Area Shanghai 201203 China Tel 86 21 5132 8988 Fax 86 21 5132 3588 Email market adlinktech com ADLINK Technology Beijing Address 北京市海淀区上地东路 1 号盈创动力大厦 E 座 801 室 100085 Rm 801 Power Creative E No 1 B D Shang Di East Rd Beijing 100085 China Tel 86 10 5885 8666 Fax 86 10 5885 8625 Email market adli...

Страница 31: ...echnology Inc Korean Liaison Office Address 서울시 서초구 서초동 1675 12 모인터빌딩 8 층 8F Mointer B D 1675 12 Seocho Dong Seocho Gu Seoul 137 070 Korea Tel 82 2 2057 0565 Fax 82 2 2057 0563 Email korea adlinktech com ADLINK Technology Singapore Pte Ltd Address 84 Genting Lane 07 02A Cityneon Design Centre Singapore 349584 Tel 65 6844 2261 Fax 65 6844 2263 Email singapore adlinktech com ADLINK Technology Singap...

Страница 32: ...31 Email israel adlinktech com ...

Отзывы: