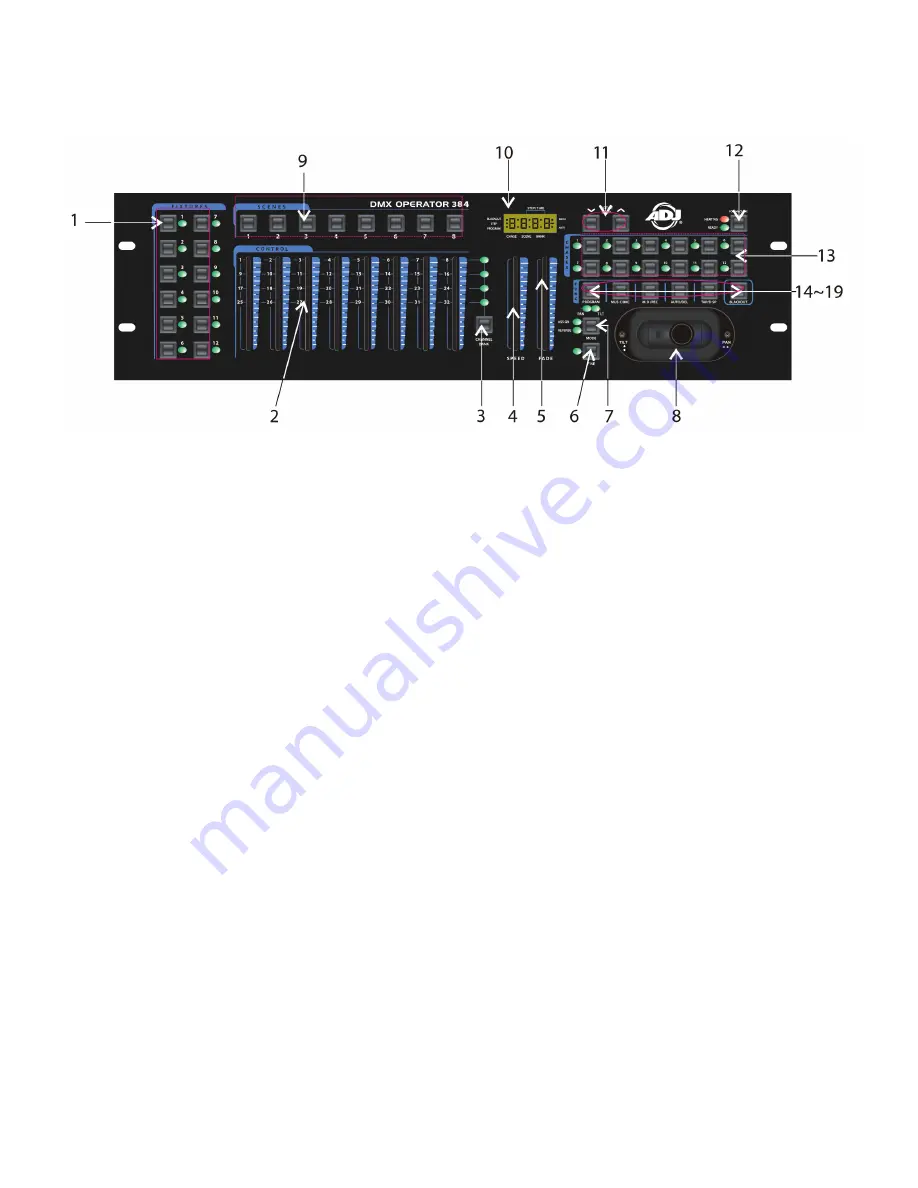
OVERVIEW
6
1. Fixture buttons (1~12): Used to select relevant fixtures for control.
2. Channel faders (1~8): Used to control the output of each corresponding fixture channel.
3. Channel Bank button: Used to switch between channels 1-8, 9-16, 17~24 and 25~32.
4. Speed fader: Used to adjust chase speed (range is 0.1 second to 10 minutes per step).
5. Fade Time fader: Used to adjust chase fade time (range is 0 to 30 seconds).
6. FINE button: Used in conjunction with the joystick. When the FINE button is engaged, adjusting
the joystick will be more precise when needing to hit a specific area with a scanner or moving head.
7. MODE button: This is a multi-function button that is used when assigning the joystick & Fade set-
ting.
8. Joystick: Traditionally used to adjust the X/Y channels of a moving light.
9. Scene buttons (1-8): Used when storing or playing back programmed scenes. Also used when
backing up data to a USB Stick or through a ULink Cable.
10. LED display: The LED display shows you relevant information depending on current operation.
11. Bank Up/Down button: Used to select a scene bank or chase step.Also used to view files in
memory stick.
12. Fog-machine button: Used to trigger fog machine which should be connected to rear of console.
13. Chase buttons (1-12): Used when storing or playing back relevant chases.
14. Program button: Used to enter and exit Record mode when programming.
15. Music/Bkc button: Used to engage audio mode for chase synchronization and to copy a bank of
scenes to another.
16. MIDI/Rec button: Used to record scenes and chase steps. Also used to setup MIDI operation.
17. Auto/Del button: Used to enter AUTO mode for automatic scene bank sequence or to delete a
scene or chase.
18. Tap/Disp button: Used to tap sync chase playback and to change display view operation.
19. Black-out button: Used to bring all current output down to zero.
FRONT PANEL


