background image

www.adeept.com

25

Install as shown below.

Assemble the following components

Effect diagram after assembling

15. Fix the rocker arm on the A26 to the servo on the A23.

Fixing screw packaged

with servo x1

Содержание RaspTank

Страница 1: ...www adeept com 1...

Страница 2: ...ome part which is just normal But misoperation may cause overheat Misoperation may cause damage to the product Please take care Do not connect the positive and negative poles of the power inversely or...

Страница 3: ...g DIY refitting etc except for commercial purpose The Adeept Company owns all rights of contents in the manual including but not limited to texts images data etc Any distribution or printing should be...

Страница 4: ...1 5 Tools 6 1 6 Self prepared Parts 6 2 Assembly 7 2 1 Preparations before Assembly 7 2 2 Servo debugging 9 2 3 Rocker arm assembly 16 2 4 Body part assembly 28 2 5 Track assembly 49 3 Software Hardw...

Страница 5: ...adeept com 1 1 Components List 1 1 Acrylic Plates A02 1pcs A01 1pcs A04 1pcs A03 1pcs A08 1pcs A09 1pcs A07 2pcs A06 1pcs A05 1pcs A10 1pcs A11 1pcs A12 1pcs A13 6pcs A16 1pcs A15 4pcs A17 1pcs A14 2...

Страница 6: ...n case of breaking The acrylic plate is covered with a layer of protective film You need to remove it first Some holes in the acrylic may have residues so you need to clean them before the use A19 1pc...

Страница 7: ...com M3 12 Screw X12 www adeept com M3 18 Screw X1 www adeept com M3 30 Screw X2 www adeept com M4 6 Screw X2 www adeept com M3 10 Countersunk Head Screw X2 www adeept com M1 4 6 Self tapping Screw X16...

Страница 8: ...x2 Motor Seat Set x2 M2 Nut B X 2 M2 10 Screw B X 2 N20 Motor Seat X 1 1 3 Transmission Parts 1 4 Electronic Parts Servo x5 S12D3 Coupling Set x2 M4 4 Locking Screw x2 S12D3 Coupling x1 Track x2 Adeep...

Страница 9: ...com 5 Adeept Ultrasonic Module X1 18650 Battery Holder Set X1 3 Tracking Module X1 Car Light X4 Raspberry P1 Camera Ribbon X1 3 Pin Wire A X3 3 Pin Wire B X1 4 Pin Wire X1 5 Pin Wire X1 Servo Extensio...

Страница 10: ...ing 18650 lithium battery with overcurrent protection function 18650 battery whose capacity is less than 1700mAh 18650 battery specially for strong light flashlight 18650 battery with power shortage o...

Страница 11: ...following components Effect diagram after assembling 2 Assembly 2 1 Preparations before Assembly 1 Connect the Raspberry Pi Camera and the ribbon 2 Connect the Adeept Ultrasonic Module with 4 Pin wire...

Страница 12: ...as a small plug at one end and a large plug at the other end To prevent confusion between the following two components when reading the manual we define the following two components as Car Light A and...

Страница 13: ...pt com 9 Effect diagram after assembling 2 2 Servo debugging 1 Fix four M2 5x4 6 Copper Standoffs on Raspberry Pi Assemble the following components M2 5x4 6 Copper Standoff x4 Raspberry Pi x1 M2 5x4 S...

Страница 14: ...berry Pi Assemble the following components For continence to read the acrylic sheets in the document are available in a variety of colors The color of them is subject to actual conditions and their nu...

Страница 15: ...www adeept com 11 Effect diagram after assembling 3 Insert the Adeept Motor HAT into Raspberry Pi Assemble the following components Adeept Motor HAT x1...

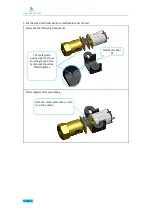
Страница 16: ...www adeept com 12 4 Connect the 18650 Battery Holder Set to the Adeept Motor HAT Note that the switch is OFF...

Страница 17: ...tteries into the rings ribbon closer to the anode Install the batteries into the holder based on the pole To remove the batteries just pull the ribbon and take them out 5 Put two 18650 batteries in 18...

Страница 18: ...com 14 6 Connect five servos to Adeept Motor HAT The color of the servo wire corresponds to the color of the port Only the servo terminals are shown here Connect the 5 servos to port 11 12 13 14 15 re...

Страница 19: ...Pi Otherwise the servo will not rotate to the middle position after booting If SD card is not inserted the servo needs to be rotated to the middle position manually After debugging remove the servo an...

Страница 20: ...ssembling Assemble the following components A18 x1 Rocker arm x2 At this time the rocker arm hasn t been fixed When fixing the mounting hole of the rocker arm should be aligned with the round hole on...

Страница 21: ...ith the round hole on the A18 Install it at the angle shown below Assemble the following components 3 Then fix one end of A18 to the servo on A17 4 Fix a debugged servo to A20 M2 5 8 Screw x1 A18 x1 E...

Страница 22: ...nstalling the mounting hole of the rocker arm should be aligned with the round hole on the A18 Install it at the angle shown below Effect diagram after assembling 5 Then fix the other end of the A18 t...

Страница 23: ...www adeept com 19 6 Then fix A17 to A02 Effect diagram after assembling Assemble the following components A17 A02 x1 M3 Nut x1 M3 12 Screw x1...

Страница 24: ...th A19 and A21 Assemble the following components M3 Lock Nut x2 A19 x1 A16 x1 A21 x1 M3 12 Screw x2 Do not tighten between M3 Lock Nut and M3 12 Screw Allow rotation between A16 and A19 also A19 and A...

Страница 25: ...www adeept com 21 8 Fix A16 to A02 Assemble the following components A16 A02 M3 Nut x1 M3 12 Screw x1 Effect diagram after assembling...

Страница 26: ...ble the following components 9 Fix one M3 8 Copper Standoff to A24 10 Fix a debugged servo to A24 M3 8 Copper Standoff x1 A15 x1 Install it in strict accordance with the position shown in the figure D...

Страница 27: ...nts Install A27 and A28 as shown below Effect diagram after assembling Assemble the following components 11 Fix one rocker arm of the servo to A27 12 Assemble A27 and A28 Rocker arm x1 A27 x1 Self tap...

Страница 28: ...ct diagram after assembling Effect diagram after assembling Assemble the following components 13 Fix a debugged servo to A23 14 Fix a rocker arm to A26 Rocker arm x1 A26 x1 Self tapping screw packaged...

Страница 29: ...www adeept com 25 Install as shown below Assemble the following components Effect diagram after assembling 15 Fix the rocker arm on the A26 to the servo on the A23 Fixing screw packaged with servo x1...

Страница 30: ...semble the following components Assemble the following components Effect diagram after assembling 16 Fix one A25 with two M3 40 Nylon Standoffs 17 Complete assembly of the clamp section M3 8 Screw x2...

Страница 31: ...www adeept com 27 Assemble the following components Effect diagram after assembling 18 Install the clamp section on the robotic arm M3 30 Nylon Standoff x1 M3 8 Screw x2...

Страница 32: ...efined as Car Light B x1 The end already connected with wire of the Car Light faces to the left Pay attention to the relative position of each part do not install in a wrong way A07 x1 Effect diagram...

Страница 33: ...as shown below 4 Fix S12D3 Coupling on GA12 N20 Gear Motor 2 sets GA12 N20 Gear Motor x1 Effect diagram after assembling M4x4 Locking Screw x2 S12D3 Coupling x1 The distance here should not be too sho...

Страница 34: ...20 Motor Seat 2 sets Here the metal plate with a notch is on the outside The metal plate pointed by the arrow and the groove of the motor seat should be fitted together Assemble the following componen...

Страница 35: ...x N20 Motor Seat on A11 Fix the other N20 Motor Seat on A11 Assemble the following components A11 x1 M2 10 Screw x2 Here the side with URL faces up M2 Nut x2 Effect diagram after assembling Effect dia...

Страница 36: ...ollowing components Effect diagram after assembling M3 6 Copper Standoff x1 A04 x1 Do not reverse the A04 M3 8 Screw x1 Assemble the following components M3 10 Countersunk Head Screw a 18650 Battery H...

Страница 37: ...Standoff x1 M3 8 Screw x1 Do not reverse the A03 M3 10 Countersunk Head Screw Assemble the following components Effect diagram after assembling A04 x1 Assemble the following components a 18650 Batter...

Страница 38: ...the convenience to read only one end of the wiring is shown here Same as bellow M3 Nut x1 3 Tracking Module x1 A01 x1 M3 12 Screw x1 Effect diagram after assembling Effect diagram after assembling Whe...

Страница 39: ...ot be screwed in turn over the plate and screw in the other side Assemble the following components M2 Nut x2 Assemble the following components M1 4 6 Self tapping Screw x4 Adeept Ultrasonic Module x1...

Страница 40: ...opper Standoffs on A09 Effect diagram after assembling Assemble the following components Buckle the rocker arm into the servo at the angle shown in the figure below Assemble the following components M...

Страница 41: ...www adeept com 37 18 Fix A10 and A12 between A08 and A09 Assemble the following components A08 x1 M3 8 Screw x2 Effect diagram after assembling...

Страница 42: ...www adeept com 38 19 Fix A05 on A01 Assemble the following components A05 A01 M3 Nut x1 M3 12 Screw x1 Effect diagram after assembling...

Страница 43: ...pberry Pi Camera Ribbon with Raspberry Pi Effect diagram after assembling Assemble the following components Raspberry Pi Camera Ribbon M2 5 Nut x4 The Raspberry Pi Camera Ribbon is connected to the po...

Страница 44: ...www adeept com 40 21 Insert A06 to A01 Assemble the following components Effect diagram after assembling A06 A01...

Страница 45: ...the circuit Motor B Connect the servo with GA12 N20 Gear Motor Number the previously installed servos and GA12 N20 Gear Motor according to the port number on the Adeept Motor HAT for the convenience t...

Страница 46: ...www adeept com 42 Connect the servo and the GA12 N20 Gear Motor to the corresponding port numbers of Adeept Motor HAT 15 13 14 12 11...

Страница 47: ...www adeept com 43 Connect the Adeept Ultrasonic Module Car Light 3 Tracking Module and 18650 Battery Holder Set as shown below...

Страница 48: ...www adeept com 44 23 Insert A07 to A01 Effect diagram after assembling Assemble the following components A07 A01 A07...

Страница 49: ...03 A04 and A11 on A01 The wiring of the battery holder can be passed through the gap on A03 A04 Assemble the following components A04 A03 A11 First clamp A11 with A03 A04 and then insert it on A01 Eff...

Страница 50: ...www adeept com 46 25 Fix A04 with M3 12Screw Fix A03 with M3 12Screw Assemble the following components M3 Nut x2 M3 12 Screw x2 Effect diagram after assembling...

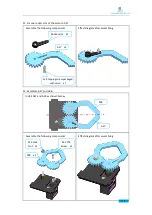
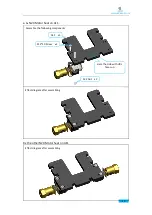
Страница 51: ...www adeept com 47 26 Fix A02 to A03 and A04 Assemble the following components M3 Nut x2 M3 12 Screw x2...

Страница 52: ...www adeept com 48 Effect diagram after assembling...

Страница 53: ...en wheel 2 sets A13 X1 Effect diagram after assembling Assemble the following components M3 18 Copper Standoff X2 A15 X1 A13 X1 M3 8 Screw X2 Effect diagram after assembling Assemble the following com...

Страница 54: ...www adeept com 50 4 Install the driving wheel on the S12D4 Coupling Assemble the following components M4 6 Screw X1 Effect diagram after assembling...

Страница 55: ...e following components First put the track on the driving wheel and the driven wheel then pass the M3 30 Screw through the driven wheel and fix it with the M3 6 Copper Standoff track x1 Effect diagram...

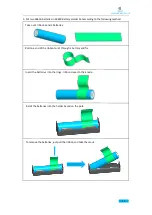
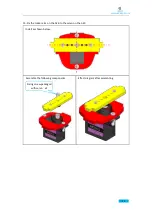
Страница 56: ...www adeept com 52 6 Install the track of the other side as described above Effect diagram after assembling...

Страница 57: ...recommended If you ve finished the installation and the system works well you may skip this step You need to download the Win32 Disk Imager and burn the operating system to the SD card Download the Wi...

Страница 58: ...tems they are hidden by default and you need to make the setting You may search on the Internet by yourself for how to display the filename extension suffix in your own system For example in Windows 7...

Страница 59: ...mt is the common encryption method for most routers If the network connection fails you may log in and check on the router management page For more about the network connection for Raspberry Pi please...

Страница 60: ...work Scanner App to check the address The address of the Raspberry Pi is the one with Raspberry The name of the router that the computer or mobile connects should be consistent with the one of the WiF...

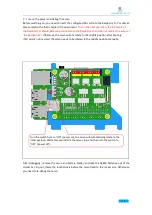
Страница 61: ...www adeept com 57 If a warning window prompts click Yes...

Страница 62: ...nds are all lowercase Input the code below to download git clone https github com adeept adeept_rasptank git Then setup sudo python3 adeept_rasptank setup py It may take some time to finish It may tak...

Страница 63: ...multiple platforms Here we ll focus on the installation of Python 3 7 under Windows Download Python 3 7 https www python org Click through Downloads Download Python 3 7 0 Install it after download is...

Страница 64: ...f arbitrary records without sacrificing too much speed for small multi dimensional arrays Download OpenCV_python whl https www lfd uci edu gohlke pythonlibs opencv In our case we download opencv_pytho...

Страница 65: ...with the LEDs turn blue it means the car has set up an AP Hotspot you can use your PC to search it the RPi Car s AP Hotspot s SSID name is AdeeptCar and password is 12345678 Then implement operations...

Страница 66: ...close enough it would stop and if it gets too close to the yellow object it would go back OpenCV Watch Dog Function If the camera on the robot detects an object moving or changing the LEDs on the rob...

Страница 67: ...torials Please subscribe our Youtube channel for more Change LED Color You can control the colors of the LEDs on the robot in real time by dragging these three sliders These three sliders correspond t...

Страница 68: ...all projects in the guide you should have some knowledge of the Raspberry Pi and Robot thus you can try to change the robot into other projects by adding more Adeept modules or changing the code for e...

Страница 69: ...www adeept com 65...

Отзывы: