background image

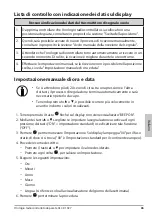
Ricezione del segnale orario

66

Orologio radiocontrollato da parete XL CK 1927

Avvio manuale della ricezione radio del segnale orario

Se il simbolo del segnale radio non appare nella parte sinistra dello schermo, 

vuol dire che il dispositivo non è più in grado di ricevere segnali radio dal 

trasmettitore del segnale orario. Anche in tal caso, l'indicazione dell'orario 

continua ad apparire con precisione.


Premere il tasto  . In tal modo la ricezione di segnale è stata avviata manualmente. 

Note: 


‚

Se la ricezione non è andata a buon fine, il simbolo della ricezione radio scompare 

dopo alcuni minuti, ma l'orario continua ad essere correttamente indicato sullo 

schermo.


‚

Se la ricezione del segnale va a buon fine, l'orologio radiocontrollato si 

regola sull'ora ricevuta dal trasmettitore del segnale orario. Se sono già state 

effettuate impostazioni manuali della data e dell'ora, queste vengono regolate 

automaticamente.

Scelta della posizione

ATTENZIONE a eventuali danni al prodotto


‚

Proteggere l'orologio radiocontrollato da polvere, urti, temperature 

estreme e non esporre i dispositivi direttamente alla luce solare. Porlo 

solo in un ambiente chiuso e asciutto. 


‚

Tenerlo lontano da televisori, computer e monitor. Inoltre, anche le stazioni base 

dei telefoni cordless non dovrebbero essere collocate nelle immediate vicinanze 

dell'orologio radiocontrollato.


‚

A seconda della posizione è possibile che in casi individuali l'orologio 

radiocontrollato riceva i segnali da un altro trasmettitore del segnare orario o 

anche alternativamente da due trasmettitori del segnale orario. Questo non è un 

difetto. In questo caso modificare la posizione dell'orologio radiocontrollato.


‚

Anche condizioni meteo avverse possono produrre interferenze alla ricezione, ad 

esempio in caso di temporali.


‚

Occasionalmente, ad esempio in caso di lavori di manutenzione, possono 

verificarsi delle interruzione del segnale.

Installazione/sospensione orologio radiocontrollato

L’orologio radiocontrollato è dotato di un occhiello di sospensione sul retro e di un 

supporto ripiegabile in due parti. 


Appendere o porre l'orologio radiocontrollato quanto più vicino possibile a una 

finestra. Qui di solito la ricezione è migliore.

Содержание CK 1927

Страница 1: ...backlight Reloj radio XL con retroiluminación Horloge murale XL radiopilotée à rétroéclairage Orologio radiocontrollato da parete XL con retroilluminazione Ścienny zegar radiowy XL z podświetleniem Bedienungsanleitung CK 1927 Operating instructions Instrucciones de operación Mode d emploi Istruzioni per l uso Instrukcja obsługi ...

Страница 2: ...ngsanleitung beschreibt den sicheren Umgang und die Pflege des Artikels Bewahren Sie diese Bedienungsanleitung auf falls Sie später etwas nachlesen möchten Wenn Sie den Artikel an jemand anderen weitergeben geben Sie auch diese Anleitung mit Die Nichtbeachtung dieser Bedienungsanleitung kann zu Verletzungen oder Schäden am Artikel führen Zeichenerklärung Dieses Symbol in Verbindung mit dem Wort GE...

Страница 3: ...im Display 9 Uhrzeit und Datum manuell einstellen 9 Funkempfang des Zeitsignals manuell starten 10 Standort wählen 10 Funkuhr aufstellen aufhängen 10 Über den Zeitzeichensender DCF77 10 Wecken 11 Weckzeit einstellen 11 Weckfunktion ein und ausschalten 12 Geweckt werden 12 Sonstige Funktionen 13 Batterien wechseln 13 Reinigen 14 Störung Abhilfe 14 Konformitätserklärung 15 Entsorgen 15 Lieferumfang ...

Страница 4: ...on Kindern vor genommen werden es sei denn sie sind 8 Jahre oder älter und werden beaufsichtigt Batterien können bei Verschlucken lebensgefährlich sein Bewahren Sie Uhr und Batterien deshalb für Kleinkinder uner reichbar auf Wurde eine Batterie verschluckt muss sofort medi zinische Hilfe in Anspruch genommen werden GEFAHR für Kinder Halten Sie Kinder von Verpackungsmaterial fern Bei Verschlucken b...

Страница 5: ...e bei Bedarf vor dem Einlegen Nehmen Sie keine Veränderungen an dem Artikel vor Lassen Sie Reparaturen nur von einer Fachwerkstatt durchführen Unsachgemäß durchgeführte Reparaturen können erhebliche Gefährdungen für den Benutzer verursachen Technische Daten Modell DCF Funkuhr CK 1927 Batterie 2x LR6 AA 1 5 V Bemessungsstrom 120 mA Messbereich Temperatur ca 10 C 50 C 14 F 122 F Messbereich Luftfeuc...

Страница 6: ...Auf einen Blick 6 XL Funkwanduhr CK 1927 Auf einen Blick 3 10 11 12 13 4 1 2 5 7 9 8 6 18 17 16 15 14 ...

Страница 7: ...msanzeige 7 Innenraumtemperatur in C oder F 8 Snooze Funktion ist aktiv 9 Uhrzeit 10 Aufhänge Öse 11 Lautsprecher 12 Batteriefach für 2x LR6 AA 13 Ausklappbarer Standfuß Bedientasten 14 Taste Funkübertragung manuell starten und abbrechen 15 Taste Maßeinheit der Temperatur wechseln 16 Taste Werte erhöhen Werte verringern Weckfunktion ein und ausschalten im Einstellmodus Zwischen 12 und 12 Stunden F...

Страница 8: ... ertönen Kurz darauf wird im Display die gemessene Raum Temperatur und die Luftfeuchtigkeit angezeigt Danach schaltet das Gerät auf Empfang wobei die Funkwellen Anzahl die Qualität des Empfangs anzeigt Je mehr Funkwellen im Display angezeigt werden desto besser ist der Empfang Sobald das Signal in ausreichender Stärke empfangen wurde wird im Display außerdem die Uhrzeit und das aktuelle Datum mit ...

Страница 9: ...g automatisch beendet und Sie müssen ihn wiederholen Wenn Sie die Taste oder gedrückt halten erfolgt der Vor bzw Rücklauf der angezeigten Werte schneller 1 Halten Sie die Taste gedrückt bis im Display BEEP ON angezeigt wird 2 Stellen Sie mit der Tasten oder ein ob bei jedem Tastendruck ein Piepton ertö nen soll ON Standardeinstellung oder schalten Sie diese Funktion aus OFF 3 Drücken Sie um die Ei...

Страница 10: ...en geschlossenen Raum auf Halten Sie Abstand zu Fernsehgeräten Computern und Monitoren Auch Basis stationen von schnurlosen Telefonen sollten sich nicht in unmittelbarer Nähe der Funkuhr befinden Abhängig von Ihrem Standort kann es im seltenen Einzelfall vorkommen dass die Funkuhr Signale von einem anderen Zeitzeichen Sender empfängt oder sogar abwechselnd von zwei Zeitzeichen Sendern Das ist kein...

Страница 11: ...sie aktiv sein soll Montag bis Freitag Display Anzeige M F oder Samstag bis Sonntag Display Anzeige S S oder Montag bis Sonntag Display Anzeige M S Weckzeit einstellen Wenn zwischen zwei Tastendrücken mehr als ca 20 Sekunden liegen wird der Einstellvorgang automatisch beendet und Sie müssen ihn wiederholen Wenn Sie die Taste oder gedrückt halten erfolgt der Vor bzw Rücklauf der angezeigten Werte s...

Страница 12: ...erden Zur eingestellten Zeit werden Sie von einem Wecksignal geweckt wobei das Signal mit zunehmender Weckdauer immer intensiver wird Weckalarm für 24 Stunden unterbrechen Drücken Sie einige Sekunden lang auf das Sensorfeld oder drücken Sie eine beliebige Taste um den Alarm zu unterbrechen Nach 24 Stunden wird der Alarm erneut ausgelöst Autostopp Funktion Wenn Sie keine Taste drücken schaltet sich...

Страница 13: ... automatisch Ist die Sommerzeit aktiv wird im Display DST Daylight Saving Time angezeigt Funkwanduhr auf Auslieferzustand zurücksetzen Setzen Sie die Uhr auf ihren Auslieferzustand zurück wenn im Display ungewöhnliche bzw offensichtlich falsche Werte angezeigt werden 1 Nehmen Sie die Batterien aus dem Batteriefach und warten Sie einen Moment 2 Legen Sie die Batterien wieder ein Beachten Sie die ri...

Страница 14: ...ie die Uhrzeit manuell ein Die Temperaturangabe erscheint zu hoch Prüfen Sie ob die Uhr direkter Sonnen strahlung ausgesetzt ist Die Anzeige ist unleserlich die Funktion ist unklar oder die Werte sind offensichtlich falsch Setzen Sie die Uhr auf den ursprünglichen Lieferzustand zurück Die Uhrzeit weicht genau um eine oder zwei etc Stunden ab Wahrscheinlich haben Sie eine falsche Zeit zone eingeste...

Страница 15: ...f Sammlung Artikel entsorgen Entsorgen Sie den Artikel entsprechend der Vorschriften die in Ihrem Land gelten Geräte dürfen nicht im normalen Hausmüll entsorgt werden Am Ende seiner Lebensdauer ist der Artikel einer geordneten Entsor gung zuzuführen Dabei werden im Gerät enthaltene Wertstoffe der Wiederverwertung zugeführt und die Belastung der Umwelt vermie den Geben Sie das Altgerät an einer Sam...

Страница 16: ...bout this operating manual This operating manual describes how to operate and maintain your product safely Keep this operating manual in a safe place for future reference If you pass this product on to someone else pass on this operating manual as well Failure to observe this operating manual may result in injuries or damage to your product Explanation of symbols This symbol combined with the word...

Страница 17: ... 20 Start up 22 Receiving the time signal 22 Checklist when data is missing on the display 23 Setting the time and date manually 23 Starting signal reception of the time signal manually 24 Choosing a location 24 Setting up hanging the radio controlled clock 24 About the time signal transmitter DCF77 24 Alarm 25 Setting the alarm time 25 Switching the alarm function on off 26 Waking up 26 Other fun...

Страница 18: ...ren unless they are 8 years of age or older and are being supervised Batteries when swallowed can be life threatening Therefore keep the clock and battery out of the reach of small children If a battery has been swallowed medical assistance must be sought immediately DANGER for children Keep packaging material away from children There is a risk of choking if swallowed Also pay attention that child...

Страница 19: ...ed before inserting the battery Do not make any modifications to the product Only allow repairs to be carried out by a specialist workshop Repairs carried out improperly can considerably endanger the user Technical data Model CK 1927 DCF radio controlled clock Battery 2x LR6 AA 1 5 V Rated current 120 mA Temperature range approx 10 C 50 C 14 F 122 F Humidity measurement range 20 95 relative Dimens...

Страница 20: ...Overview 20 CK 1927 XL radio controlled wall clock Overview 3 10 11 12 13 4 1 2 5 7 9 8 6 18 17 16 15 14 ...

Страница 21: ...day 5 Humidity in percentage 6 Date display 7 Indoor temperature in C or F 8 Snooze function is active 9 Time 10 Hanging loop 11 Speaker 12 Battery compartment for two LR6 AA batteries 13 Fold out support foot Operating buttons 14 Button Start and cancel radio transmission manually 15 Button Change temperature unit 16 Button Increase decrease values Switch alarm function on and off in setting mode...

Страница 22: ...ppear on the display shortly thereafter The device then switches to receiving mode during which the number of radio waves indicates the quality of the reception The more radio waves shown on the display the better is the reception As soon as the signal has been received in sufficient strength the display also shows the time and the current date and the day of the week The radio controlled clock au...

Страница 23: ...re is more than approx 20 seconds between two pushes of a button the setting process automatically ends and you will have to repeat it If you press and hold the or buttons the displayed values will be increased or decreased more quickly 1 Press and hold down the button until BEEP ON appears on the display 2 Use the or button to set whether a beep should follow each press of a button ON default set...

Страница 24: ...dry closed room Maintain distance from TV sets computers and monitors Base stations of cordless telephones should also not be in the immediate vicinity of the radio controlled clock Depending on your location it may occur in rare individual cases that the radio controlled clock receives signals from another time signal transmitter or even alternately from two time signal transmitters This is not a...

Страница 25: ...g two alarm times independently of each other For each alarm time you can specify the days on which it should be active Monday to Friday M F display or Saturday to Sunday S S display or Monday to Sunday M S display Setting the alarm time If there is more than approx 20 seconds between two pushes of a button the setting process automatically ends and you will have to repeat it If you press and hold...

Страница 26: ...up At the set time you will be woken by an alarm signal which will become more intense as the waking time increases Interrupting the alarm for 24 hours Keep the sensor field pressed for a few seconds or press any button to interrupt the alarm After 24 hours the alarm will be triggered again Auto stop function If you do not press a button the alarm switches off automatically after 2 minutes After 2...

Страница 27: ...e signal reception When daylight saving time is active the display shows DST Daylight Saving Time Resetting the radio controlled wall clock to defaults Reset the clock to defaults if the display shows unusual and or obviously incorrect values 1 Remove the batteries from the battery compartment and wait a moment 2 Reinsert the batteries Pay attention to the correct polarity of the batteries 3 Proce...

Страница 28: ...ception manually if necessary Adjust the time manually Temperature indication appears too high Check if the clock is exposed to direct sunlight The indicator is illegible the function is unclear or the values are obviously false Reset the clock to defaults The time differs exactly by one or two etc hours You have probably set an incorrect time zone The display shows HH or LL instead of measured te...

Страница 29: ...able materials Disposing of the product Dispose of the product in accordance with the regulations that apply in your country Devices must not be disposed of in normal household waste At the end of its life the product must be disposed of in an appropriate way In this way valuable materials contained in the device will be recycled and the burden on the environment avoided Bring the old device to a ...

Страница 30: ...trucciones Este manual de instrucciones describe el manejo seguro y el cuidado del artículo Conserve este manual de instrucciones por si necesita volver a consultarlo Si le entrega el artículo a otra persona acompáñelo también de estas instrucciones Si no se tienen en cuenta las recomendaciones de este manual de instrucciones pueden producirse lesiones o daños en el artículo Explicación de símbolo...

Страница 31: ...ria 36 Lista de comprobación en caso de fallo en la indicación de datos en la pantalla 37 Ajuste manual de hora y fecha 37 Inicio manual de la recepción de radio de la señal horaria 38 Seleccionar ubicación 38 Colocar colgar el reloj radio controlado 38 Acerca del emisor de señal horaria DCF77 38 Despertador 39 Ajustar hora de alarma 39 Conectar y desconectar la función despertador 40 Despertarse ...

Страница 32: ... pilas pueden suponer un peligro de muerte si se ingieren Mantenga el reloj y la pila fuera del alcance de los niños Si se ingiere una pila debe acudir inmediatamente en busca de asistencia médica RIESGOS para los niños Mantenga a los niños alejados del material de embalaje Existe riesgo de asfixia por ingestión Tenga cuidado de que no introduzcan la cabeza en la bolsa del embalaje RIESGO de incen...

Страница 33: ...ada pueden suponer un riesgo elevado para el usuario Datos técnicos Modelo Reloj DCF CK 1927 Pilas 2x LR6 AA 1 5 V Intensidad de corriente 120 mA Rango de medida de temperatura aprox 10 C 50 C 14 F 122 F Rango de medida de la humedad del aire 20 95 relativa Dimensiones 225 x 33 x 145 mm Distribuidor no hay dirección de servicio técnico Waagen Schmitt GmbH Hammer Steindamm 27 29 22089 Hamburgo Alem...

Страница 34: ...De un vistazo 34 Reloj radio XL CK 1927 De un vistazo 3 10 11 12 13 4 1 2 5 7 9 8 6 18 17 16 15 14 ...

Страница 35: ...tanto por ciento 6 Indicación de fecha 7 Temperatura interior en ºC o en ºF 8 La función de repetición está activada 9 Hora 10 Anilla para colgar 11 Altavoz 12 Compartimento para 2 pilas LR6 AA 13 Soporte plegable Botones de control 14 Botón Activar o cancelar la transmisión de radio de forma manual 15 Botón Cambiar las unidades de temperatura 16 Botón Aumentar reducir los valores Activar y desact...

Страница 36: ...Poco después la pantalla mostrará la temperatura ambiente medida y la humedad del aire A continuación el aparato se conecta mostrando el número de ondas la calidad de la recepción Cuantas más ondas se muestren en la pantalla mejor es la recepción Una vez que la señal haya sido recibida con la potencia suficiente se mostrará también en la pantalla la hora y la fecha actuales aparecerán junto con el...

Страница 37: ... manual de hora y fecha Cuando pasan más de 20 segundos entre una pulsación de botón y otra el proceso de ajuste finaliza automáticamente y hay que volver a repetirlo Si mantiene pulsado o el valor avanzará o retrocederá más rápido 1 Mantenga pulsado el botón hasta que en la pantalla aparezca BEEP ON 2 Ajuste los valores con los botones o para establecer si debe sonar un pitido con cada pulsación ...

Страница 38: ...o coloque cerca de televisores ordenadores o monitores Tampoco deben colocarse bases de teléfonos inalámbricos en las proximidades del reloj Dependiendo de su ubicación alguna vez puede ocurrir que el radio reloj reciba señales de otro emisor de señales horarias o incluso alternativamente de dos transmisores de señal horaria No es un fallo del aparato En ese caso se debe cambiar la ubicación del r...

Страница 39: ...larma independientes la una de la otra En ambas se puede establecer en qué días de la semana estarán activas lunes a viernes M F sábado a domingo S S o lunes a domingo M S Ajustar hora de alarma Cuando pasan más de 20 segundos entre una pulsación de botón y otra el proceso de ajuste finaliza automáticamente y hay que volver a repetirlo Si mantiene pulsado o el valor avanzará o retrocederá más rápi...

Страница 40: ...F con la la función de alarma activada Despertarse A la hora establecida le despertará la alarma del despertador que irá aumentando en volumen gradualmente Interrumpir el despertador 24 horas Pulse durante unos segundos el sensor o presione cualquier botón para interrumpir la alarma Pasadas 24 horas la alarma sonará nuevamente Función Autostop Si no presiona ningún botón la alarma se detendrá auto...

Страница 41: ...de la señal horaria Si está activada la hora de verano en la pantalla aparecerá DST Daylight Saving Time Restablecer la configuración de fábrica del reloj Restablezca la configuración de fábrica del reloj si en la pantalla aparecen valores extraños o claramente erróneos 1 Saque las pilas de su compartimento y espere un momento 2 Vuelva a colocar las pilas Preste atención a la polaridad correcta de...

Страница 42: ...ora La indicación de la temperatura es demasiado alta Compruebe si el reloj está expuesto directamente a la luz del sol La indicación es ilegible la función no está clara o los valores son claramente erróneos Restablezca la configuración de fábrica del reloj La hora difiere exactamente en una o más horas de la hora real Probablemente ha seleccionado una zona horaria equivocada En la pantalla apare...

Страница 43: ...nedor de cartón y las láminas al de plásticos Eliminación del artículo Elimine el artículo conforme a la normativa correspondiente aplicable en su país Los aparatos no deben eliminarse con la basura doméstica normal El artículo debe ser eliminado de forma adecuada al final de su vida útil Para ello se deben reciclar las piezas del aparato y así evitar un daño al medio ambiente Deposite el aparato ...

Страница 44: ...lités À propos de ce mode d emploi Ce mode d emploi décrit l utilisation conforme ainsi que les procédures d entretien de l article Conservez ce manuel pour toute référence ultérieure Si vous cédez l article à une tierce personne transmettez lui également ce mode d emploi Le non respect de ce mode d emploi peut entraîner des blessures ou endommager l article Légende Ce symbole associé au mot DANGE...

Страница 45: ...arche initiale 50 Réception du signal horaire 50 Liste de contrôle en cas de données erronées affichées à l écran 51 Régler l heure et la date manuellement 51 Lancer manuellement la réception radio du signal horaire 52 Choisir l emplacement 52 Installer l horloge 52 À propos de l émetteur de signal horaire DCF77 52 Réveil 53 Régler l heure de réveil 53 Allumer éteindre la fonction réveil 54 Au mom...

Страница 46: ... être dangereuses pour la santé en cas d ingestion Gardez l horloge et les piles hors de portée des enfants en bas âge En cas d ingestion d une pile sollicitez immédiatement une aide médicale DANGER pour les enfants Ne pas laisser les enfants jouer avec les matériaux d emballage Il existe un risque d étouffement en cas d ingestion Veillez également à ce que le sac d emballage ne soit pas glissé su...

Страница 47: ...correcte peut entraîner de graves dangers pour l utilisateur Caractéristiques techniques Modèle Horloge radiopilotée à signal DCF CK 1927 Piles 2x LR6 AA 1 5 V Intensité nominale 120 mA Plage de températures environ 10 C à 50 C 14 F à 122 F Plage de mesure de l humidité de l air 20 95 humidité relative Dimensions 225 x 33 x 145 mm Distributeur n effectuant pas les réparations Waagen Schmitt GmbH H...

Страница 48: ...Vue d ensemble 48 Horloge murale XL radiopilotée CK 1927 Vue d ensemble 3 10 11 12 13 4 1 2 5 7 9 8 6 18 17 16 15 14 ...

Страница 49: ...chage de la date 7 Température intérieure en C ou F 8 La fonction Snooze est active 9 Heure 10 Œillet de suspension 11 Haut parleur 12 Compartiment à piles pour 2x LR6 AA 13 Pied repliable Commandes 14 Touche Pour démarrer et arrêter la transmission radio manuellement 15 Touche Changer l unité de mesure de la température 16 Touche Pour augmenter diminuer les valeurs Pour activer et désactiver la f...

Страница 50: ...pendant un court instant et plusieurs bips retentissent Peu de temps après l écran affiche la température ambiante mesurée et l humidité de l air L appareil se règle ensuite sur réception le nombre d ondes radio indiquant la qualité de la réception plus il y a d ondes radio affichées à l écran plus la réception est bonne Lorsque le signal horaire est assez puissant s affichent également l heure et...

Страница 51: ...oule plus de 20 secondes entre l actionnement de deux touches ou boutons le réglage prend automatiquement fin et devra être entrepris de nouveau Si vous maintenez enfoncée la touche ou l avance ou le recul des valeurs affichées s effectue plus rapidement 1 Maintenez la touche enfoncée jusqu à ce que l écran affiche BEEP ON 2 À l aide des touches et indiquez si vous souhaitez qu un bip soit émis à ...

Страница 52: ...ment dans un espace clos et sec Installez la à distance des ordinateurs des moniteurs et des téléviseurs Les stations de base des téléphones sans fil devraient également être tenues à distance de l horloge Selon votre situation géographique il peut arriver que votre horloge radio capte le signal d un autre émetteur horaire voire qu il capte alternativement les signaux de deux émetteurs Il ne s agi...

Страница 53: ...medi et le dimanche affichage de l indication S S ou du lundi au dimanche affichage de l indication M S Régler l heure de réveil Si pendant le réglage il s écoule plus de 20 secondes entre l actionnement de deux touches ou boutons le réglage prend automatiquement fin et devra être entrepris de nouveau Si vous maintenez enfoncée la touche ou l avance ou le recul des valeurs affichées s effectue plu...

Страница 54: ...rammée vous êtes réveillé par une sonnerie le signal s amplifiant progressivement Désactiver l alarme pendant 24 heures Appuyez sur le bouton tactile pendant quelques secondes ou appuyez sur n importe quelle touche pour interrompre l alarme La sonnerie se déclenchera de nouveau au bout de 24 heures Fonction d arrêt automatique Si vous n appuyez sur aucune touche la sonnerie s éteint automatiquemen...

Страница 55: ...ctue automatiquement si la réception est bonne Si l heure d été est activée DST Daylight Saving Time s affiche à l écran Réinitialiser l horloge murale radiopilotée à l état de livraison Remettez l horloge dans son état de livraison si l écran affiche des valeurs inhabituelles ou manifestement erronées 1 Retirez les piles du compartiment à piles et attendez un instant 2 Réinsérez les piles Veillez...

Страница 56: ... radio manuellement Réglez l heure manuellement La température indiquée semble trop élevée Vérifiez si l horloge est exposée à la lumière directe du soleil L affichage est illisible le fonctionnement est défectueux ou les valeurs sont manifestement fausses Remettez l horloge à l état de livraison d origine L heure affichée diffère exactement d une ou deux heures etc Vous avez apparemment défini un...

Страница 57: ... article Veuillez éliminer l article selon les prescriptions en vigueur dans votre pays en matière de traitement des déchets Les appareils électriques ne doivent pas être éliminés avec les déchets ménagers classiques À la fin de sa durée de vie l article doit être soumis à une élimination contrôlée Ainsi les matières utiles contenues dans l appareil pourront être recyclées avec un moindre impact s...

Страница 58: ...er l uso Queste istruzioni per l uso descrivono l utilizzo sicuro e la cura del prodotto Conservarle per eventuali consultazioni future In caso di cessione del prodotto a terzi consegnare anche le presenti istruzioni per l uso La mancata osservanza delle istruzioni per l uso può causare lesioni alle persone o danni al prodotto Descrizione dei simboli Questo simbolo accompagnato dalla parola PERICO...

Страница 59: ...nzione 64 Ricezione del segnale orario 64 Lista di controllo con indicazione dei dati sul display 65 Impostazione manuale di ora e data 65 Avvio manuale della ricezione radio del segnale orario 66 Scelta della posizione 66 Installazione sospensione orologio radiocontrollato 66 Informazioni sul trasmettitore di segnale orario DCF77 67 Sveglia 67 Impostazione della sveglia 67 Attivazione e disattiva...

Страница 60: ...enzione solo se di età superiore agli 8 anni e sotto la supervisione di una persona adulta L ingestione delle batterie può costituire un pericolo mortale Pertanto tenere l orologio e la batteria fuori dalla portata dei bambini piccoli In caso di ingestione di una batteria consultare immediatamente un medico PERICOLO per i bambini Tenere lontano dalla portata dei bambini il materiale di imballaggio...

Страница 61: ...nserirle Non apportare nessuna modifica al dispositivo Rivolgersi esclusivamente ad un tecnico specializzato per la riparazione del prodotto Riparazioni non eseguite correttamente possono essere causa di seri pericoli per l utente Dati tecnici Modello Orologio radiocontrollato DCF CK 1927 Batterie 2 di tipo LR6 AA da 1 5 V Corrente nominale 120 mA Intervallo di misurazione della temperatura appros...

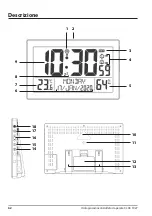
Страница 62: ...Descrizione 62 Orologio radiocontrollato da parete XL CK 1927 Descrizione 3 10 11 12 13 4 1 2 5 7 9 8 6 18 17 16 15 14 ...

Страница 63: ...Temperatura interna in C o F 8 La funzione Snooze è attiva 9 Orario 10 Occhiello di sospensione 11 Altoparlante 12 Vano batterie per 2 batterie LR6 AA 13 Base pieghevole Tasti funzione 14 Pulsante Avvio o interruzione manuale della trasmissione radio 15 Pulsante Selettore unità di misura della temperatura 16 Pulsante Aumento Diminuzione dei valori Attivazione Disattivazione della sveglia in modali...

Страница 64: ...ssi diversi segnali acustici Subito dopo sul display viene visualizzata la temperatura ambiente misurata e l umidità Poi il dispositivo entrerà in modalità di ricezione il numero di onde radio indica la qualità del segnale ricevuto quante più onde radio appaiono sul display tanto più forte sarà il segnale radio Quando la ricezione del segnale è sufficientemente forte sullo schermo compariranno l o...

Страница 65: ...a e data Impostazione manuale di ora e data Se si attendono più di 20 secondi circa tra una pressione e l altra dei tasti il processo di regolazione termina automaticamente e sarà necessario ripeterlo da capo Tenendo premuto o è possibile scorrere più velocemente in avanti o indietro i valori visualizzati 1 Tenere premuto il tasto finché sul display non viene visualizzato BEEP ON 2 Mediante i tast...

Страница 66: ... orologio radiocontrollato da polvere urti temperature estreme e non esporre i dispositivi direttamente alla luce solare Porlo solo in un ambiente chiuso e asciutto Tenerlo lontano da televisori computer e monitor Inoltre anche le stazioni base dei telefoni cordless non dovrebbero essere collocate nelle immediate vicinanze dell orologio radiocontrollato A seconda della posizione è possibile che in...

Страница 67: ...icezione ad esempio durante un forte temporale il dispositivo continuerà a funzionare normalmente ed accederò alla modalità di ricezione alla prossima ora impostata Sveglia Il dispositivo offre la possibilità di impostare due sveglie indipendenti l una dall altra Per ogni sveglia è possibile scegliere i giorni in cui deve attivarsi Da lunedì a venerdì indicazione sul display M F o Da sabato a dome...

Страница 68: ...onare la sveglia corrispondente AL1 o AL2 2 Tramite impostare l indicazione sul display su ON Sul display viene mostrato ad es a seconda dell impostazione selezionata La funzione della sveglia è attivata Per disattivare la sveglia procedere come descritto e con la funzione della sveglia attiva impostare tramite l indicazione sul display su OFF Risveglio All ora impostata l unità emetterà un segnal...

Страница 69: ...PM Selettore unità di misura della temperatura Premere il tasto per commutare la temperatura tra le unità di misura Celsius o Fahrenheit Impostazione dell ora legale e dell ora solare In caso di ricezione del segnale orario il passaggio dall ora solare all ora legale e viceversa avviene automaticamente Se l orario estivo è attivo sul display appare DST Daylight Saving Time Ripristino dell orologio...

Страница 70: ...ui è situato il dispositivo Se necessario avviare la procedura manuale di ricezione del segnale Impostare manualmente l orario La temperatura sembra troppo alta Assicurarsi che l orologio radiocontrollato non sia esposto alla luce solare diretta Il display è illeggibile la funzione non è chiara oppure i valori sono chiaramente errati Ripristinare l orologio radioconrollato alle impostazioni di fab...

Страница 71: ...uella del materiale riciclabile Smaltimento del prodotto Smaltire il prodotto secondo le norme vigenti nel proprio paese Non smaltire il dispositivo con i normali rifiuti domestici Al termine della sua vita utile l apparecchio deve essere smaltito in modo appropriato In tal modo si rende possibile il riutilizzo del materiale riciclabile contenuto nell apparecchio limitando l impatto sull ambiente ...

Страница 72: ...sługi zawiera opis bezpiecznej obsługi i pielęgnacji artykułu Instrukcję obsługi należy przechowywać w celu jej późniejszego wykorzystania Jeżeli produkt będzie przekazywany innej osobie należy przekazać również tę instrukcję Nieprzestrzeganie instrukcji obsługi może spowodować obrażenia ciała lub uszkodzenie produktu Objaśnienie znaków Ten symbol w połączeniu ze słowem NIEBEZPIECZEŃSTWO ostrzega ...

Страница 73: ...mienie 78 Odbiór sygnału czasowego 78 Lista kontrolna w przypadku braku wskazań danych na wyświetlaczu 79 Ręczne ustawianie godziny i daty 79 Ręczne włączanie odbioru sygnału czasu 80 Wybór miejsca ustawienia 80 Stawianie zawieszanie zegara 80 Informacje o nadajniku sygnału czasu DCF77 80 Budzenie 81 Ustawianie czasu budzenia 81 Włączanie i wyłączanie funkcji budzenia 82 Budzenie 82 Pozostałe funk...

Страница 74: ...ą czyścić ani serwisować urządzenia chyba że mają co najmniej 8 lat i są nadzorowane Połknięcie baterii stanowi zagrożenie dla życia Zegar i baterię należy więc przechowywać w miejscu niedostępnym dla małych dzieci W przypadku połknięcia baterii należy natychmiast zwrócić się o pomoc medyczną NIEBEZPIECZEŃSTWO dla dzieci Materiały opakowaniowe należy przechowywać z dala od dzieci Połknięcie grozi ...

Страница 75: ... włożeniem należy wyczyścić styki baterii i urządzenia Nie modyfikować produktu Naprawy zlecać tylko specjalistom Nieprawidłowo wykonane naprawy mogą spowodować poważne zagrożenia dla użytkownika Dane techniczne Model Ścienny zegar radiowy DCF CK 1927 Bateria 2x LR6 AA 1 5 V Prąd znamionowy 120 mA Zakres pomiarowy temperatury od ok 10 C do 50 C od 14 F do 122 F Zakres pomiarowy wilgotności powietr...

Страница 76: ...W skrócie 76 Ścienny zegar radiowy XL CK 1927 W skrócie 3 10 11 12 13 4 1 2 5 7 9 8 6 18 17 16 15 14 ...

Страница 77: ... daty 7 Temperatura wewnętrzna w C lub F 8 Funkcja drzemki aktywna 9 Godzina 10 Ucho zaczepowe 11 Głośnik 12 Komora na baterie 2x LR6 AA 13 Rozkładana nóżka Przyciski obsługi 14 Przycisk Ręczne włączanie i wyłączanie transmisji radiowej 15 Przycisk Zmiana jednostki miary temperatury 16 Przycisk Zwiększanie zmniejszanie wartości Włączanie i wyłączanie funkcji budzenia w trybie ustawień Przełączanie...

Страница 78: ...zlegnie się kilka krótkich sygnałów dźwiękowych Następnie na wyświetlaczu pojawi się zmierzona temperatura pomieszczenia i wilgotność powietrza Następnie urządzenie przełącza się na pobieranie sygnału przy czym liczba fal radiowych wskazuje jakość sygnału Czym więcej fali radiowych na wyświetlaczu tym lepsza siła sygnału Po odebraniu sygnału o dostatecznej sile na wyświetlaczu ponadto pojawi się g...

Страница 79: ...ie ok 20 sekund proces ustawiania zostanie automatycznie zakończony i trzeba będzie go powtórzyć Przez trzymanie wciśniętych przycisków lub można przyspieszyć zmianę wyświetlanych wartości rosnąco lub malejąco 1 Nacisnąć i przytrzymać przycisk aż na wyświetlaczu pojawi się BEEP ON 2 Przyciskami lub dokonać ustawienia czy krótki sygnał dźwiękowy ma się rozlegać przy każdym naciśnięciu przycisku ON ...

Страница 80: ...stawiać wyłączenie w suchym i zamkniętym pomieszczeniu Zachować odstęp od telewizorów komputerów i monitorów Również stacje bazowe telefonów bezprzewodowych nie powinny znajdować się w bezpośredniej bliskości od zegara radiowego W zależności od miejsca ustawienia w rzadkich przypadkach może się zdarzyć że sygnały zegara radiowego będą odbierane przez inny nadajnik sygnału czasu lub nawet na zmianę...

Страница 81: ...u wskazanie na wyświetlaczu M F lub od soboty do niedzieli wskazanie na wyświetlaczu S S lub od poniedziałku do niedzieli wskazanie na wyświetlaczu M S Ustawianie czasu budzenia Jeżeli między dwoma naciśnięciami przycisku minie ok 20 sekund proces ustawiania zostanie automatycznie zakończony i trzeba będzie go powtórzyć Przez trzymanie wciśniętych przycisków lub można przyspieszyć zmianę wyświetla...

Страница 82: ...udzenie W ustalonym czasie rozlegnie się sygnał budzenia zyskując na intensywności wraz z upływem czasu budzenia Wstrzymanie alarmu budzenia na 24 godziny Nacisnąć i przytrzymać kilka sekund przycisk lub nacisnąć dowolny przycisk aby przerwać alarm Alarm rozlegnie się ponownie po 24 godzinach Funkcja automatycznego wyłączania Alarm wyłączy się automatycznie po 2 minutach jeśli nie zostanie naciśni...

Страница 83: ...czasu automatycznie Jeżeli czas letni jest aktywny na wyświetlaczu pojawi się DST Daylight Saving Time Resetowanie ściennego zegara radiowego do ustawień fabrycznych Zegar należy zresetować do ustawień fabrycznych jeżeli na wyświetlaczu pojawią się nietypowe lub niewątpliwie błędne wartości 1 Wyjąć baterie z komory baterii i chwilę poczekać 2 Ponownie włożyć baterie Zwrócić przy tym uwagę na prawi...

Страница 84: ...ór radiowy Ustawić ręcznie godzinę Informacja o temperaturze jest za wysoka Sprawdzić czy zegar nie jest narażony na bezpośrednie działanie promieni słonecznych Wskazanie jest nieczytelne funkcja jest niejasna lub wartości są nieprawidłowe Zresetować zegar do ustawień fabrycznych Godzina jest błędna dokładnie o jedną dwie itd godziny Prawdopodobnie ustawiono nieprawidłową strefę czasową Zamiast zm...

Страница 85: ...urowce wtórne Utylizacja produktu Produkt należy utylizować zgodnie z przepisami obowiązującymi w danym kraju Urządzeń nie wolno wyrzucać razem ze zwykłymi odpadami domowymi Po zakończeniu okresu użytkowania produkt należy przekazać do odpowiedniej utylizacji Surowce wtórne znajdujące się w urządzeniu zostaną przekazane do recyklingu co zmniejszy zanieczyszczenie środowiska Zużyte urządzenie należ...

Страница 86: ......
Отзывы: