background image



























9

Computer systems

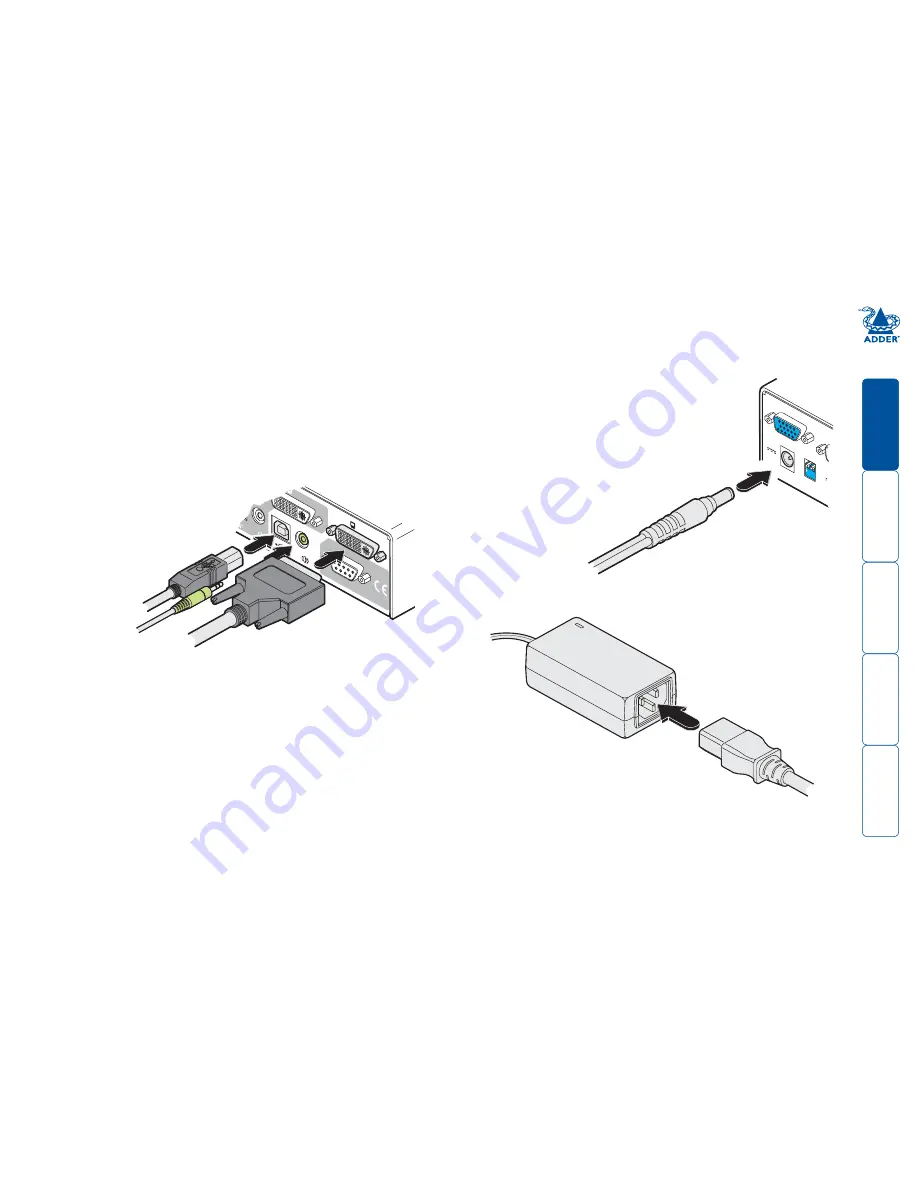
Each computer system is connected to the AdderView PRO unit using up to 
three cables.

To connect a computer system

1  Ensure that power is disconnected from the AdderView PRO unit and the 

system to be connected. 

2  Use a DVI cable or a VGA to DVI-I conversion cable (if using analogue 

signals) to link the video output of the computer’s graphic port to the DVI-I 
port of the required channel on the rear of the unit.

  Note: A combined DVI-I and USB (type A to B) cable is also available for 

linking computers to the AdderView PRO (Part numbers: VSCD3 for a 2m 
cable and VSCD4 for a 5m cable).

3  Use a USB cable (type-A to type-B) to link a USB port on the computer 

system to the USB port of the required channel on the rear of the unit.

4  If required, use a stereo audio link cable (3.5mm jacks at either end) to link 

the speaker port on the computer system to the audio port of the required 
channel on the rear of the unit. 

US

U

VGA

5V

4A

INDOOR

USE

ONL

Y

1

2

ON

OPTIONS

DVI-I

DVI-I

1

2

From the USB port 
on the computer

From the video port 
on the computer

From the speaker port 
on the computer

Power in connection

The AdderView PRO unit is supplied with a standard 20W power adapter. There 
is no on/off switch on the unit, so operation begins as soon as a power adapter 
is connected.


2  Connect the IEC connector of the supplied country-specific power lead to 

the socket of the power adapter.

To connect the power supply

1  Attach the output lead from the power 

adapter to the 

5V

 socket on the rear panel 

of the unit.

3  Connect the power lead to a nearby main supply socket.

Note: Both the unit and its power supply generate heat when in operation and 
will become warm to the touch. Do not enclose them or place them locations 
where air cannot circulate to cool the equipment. Do not operate the equipment 
in ambient temperatures exceeding 40 degrees Centigrade. Do not place the 
products in contact with equipment whose surface temperature exceeds 40 
degrees Centigrade. 

Содержание AdderView Pro AV8PRO-DVI

Страница 1: ...AdderView PRO User Guide KB MS OSD UPG LCK COMPUTER KVM SPK USB1 USB2 PWR MODE www adder com AV8PRO DVI...

Страница 2: ...uter list 13 The reminder banner 13 Autoscanning 14 Performing upgrades 15 Operation Selecting a computer 17 To select a computer using the on screen menu 17 To select a computer using the front panel...

Страница 3: ...presenting default identities to the systems which did not allow for specialised features present on either the keyboard or mouse With True Emulation you will find that subject to the correct drivers...

Страница 4: ...ecessary signals states and processes Therefore manufacturers have previously relied upon a fixed keyboard and mouse profile that is declared to each computer regardless of the actual connected device...

Страница 5: ...r console Connect DVI D and or VGA video leads USB keyboard and mouse up to two other USB devices plus optional speakers to these connectors Computer channels Each computer connects to one of these ei...

Страница 6: ...you may additionally need AdderView PRO AV8PRO DVI Flash upgrade serial cable 9 way D male to female Two 19 rack mount brackets and four screws Combined dual link DVI D and USB USB type A to B cable...

Страница 7: ...th the AdderView PRO and its power supply generate heat when in operation and will become warm to the touch Do not enclose them or place them in locations where air cannot circulate to cool the equipm...

Страница 8: ...ls If a connected system provides only analogue video then no signal will be seen on the digital DVI D output port and vice versa Attach the lead s from the video monitor to the appropriate port conne...

Страница 9: ...5 USB devices Where required attach the leads from your USB peripherals to the USB sockets labelled USB1 and USB2 USB 1 USB 2 DVI I DVI D USER CONSOLE VGA 5V 4A INDOOR USE ONLY 1 2 ON From USB devices...

Страница 10: ...e required channel on the rear of the unit US U VGA 5V 4A INDOOR USE ONLY 1 2 ON OPTIONS DVI I DVI I 1 2 From the USB port on the computer From the video port on the computer From the speaker port on...

Страница 11: ...is fitted with multiple video cards or video cards with multiple video heads Whenever an AdderView PRO channel is switched it sends an RS232 command out on the serial interface marked OPTIONS on the r...

Страница 12: ...ration menus layout The menu options are arranged as shown here For a description of each option within the Configuration menus see Appendix 1 for more details Configuration Menu Functions EDID Option...

Страница 13: ...sword 1 Display the Configuration menu 2 Highlight Setup Options and press 3 Highlight Security and press 4 Enter a new password The password is not case sensitive and can be any combination of key st...

Страница 14: ...ou exit from the on screen menu NEVER will disable the banner 4 Press to save the settings Press twice more to return to the computer channel and view your changes Please see Appendix 1 for more confi...

Страница 15: ...is step is only required when the Scan List option is selected and allows you to select which computers will be scanned To select an autoscan mode 1 Display the Configuration menu 2 Highlight the Glob...

Страница 16: ...the unit 3 Connect the upgrade computer to the AdderView PRO Connect the serial port of the upgrade computer to the OPTIONS port on the rear panel of the unit using a straight through serial upgrade...

Страница 17: ...e firmware version The upgrade file details will be displayed within the dialog IMPORTANT Check that the Intended Target Units field matches the Unit Connected field If these fields do not match then...

Страница 18: ...video mouse and speakers Will switch only the keyboard video and mouse Will switch only the speakers Will switch only USB peripheral 1 Will switch only USB peripheral 2 3 Use the and keys or the scro...

Страница 19: ...g mode that is currently set using either the on screen menu or the front panel buttons see left 1 Optional If you need to selectively switch some of your peripherals press the MODE button repeatedly...

Страница 20: ...ather than the computer However if these particular hotkeys clash with another device or program you can change them to a different combination within the Setup Options menu Additional hotkey press co...

Страница 21: ...energy statements Getting assistance If you are still experiencing problems after checking the list of solutions in the Troubleshooting section then we provide a number of other solutions Adder Techn...

Страница 22: ...select an option to change option values to quit and save the changes The following items and menus are available in the Configuration menu Functions Global Preferences Setup Options Edit Computer Li...

Страница 23: ...s Returns all key settings within the AdderView PRO to their original states WARNING This function will clear all stored computer names When this option is selected you must press the F7 key to confir...

Страница 24: ...hree button mouse or IntelliMouse Pressing the central button or wheel button together with the left hand mouse button will cause the unit to switch to the next available computer When mouse switching...

Страница 25: ...y reselecting your original language ADDERVIEW PRO Setup Options Security ENABLED Language Default Channel Hotkeys Baud Rate ENGLISH OSD CTRL ALT 1200 Space Toggle Up Down Esc Quit To get here 1 Press...

Страница 26: ...format that allows computer systems to be informed of the capabilities of the video monitor connected to them EDID Source Settings AUTO DVI VGA Determines which monitor connected to the user console s...

Страница 27: ...4 7 7 5 5 8 8 9 9 Appendix 2 Cable specifications RS232 serial flash upgrade straight through cable 9pin D type male 9pin D type female Multi head synchronisation cable MASTER end 9pin D type male SLA...

Страница 28: ...w PRO make sure the total ampere rating of the devices plugged into the extension cord does not exceed the cord s ampere rating Also make sure that the total ampere rating of all the devices plugged i...

Страница 29: ...is connected d Consult the supplier or an experienced radio TV technician for help FCC Compliance Statement United States This equipment generates uses and can radiate radio frequency energy and if n...

Страница 30: ...Way Bar Hill Cambridge CB23 8SQ United Kingdom Tel 44 0 1954 780044 Fax 44 0 1954 780081 Adder Corporation 350R Merrimac Street Newburyport MA 01950 United States of America Tel 1 888 932 3337 Fax 1 8...

Страница 31: ...ators 4 K Keyboard connection 7 KVM 2 L Lock the unit 12 M Mounting 6 Mouse connection 7 Multiple video head connections 10 synchronisation cable 26 O Operation 17 Options port 4 P Parts supplied and...

Отзывы: