background image

SCP-FPR806-010-01H

March 24, 2003

22

ADC Telecommunications, Inc.

3

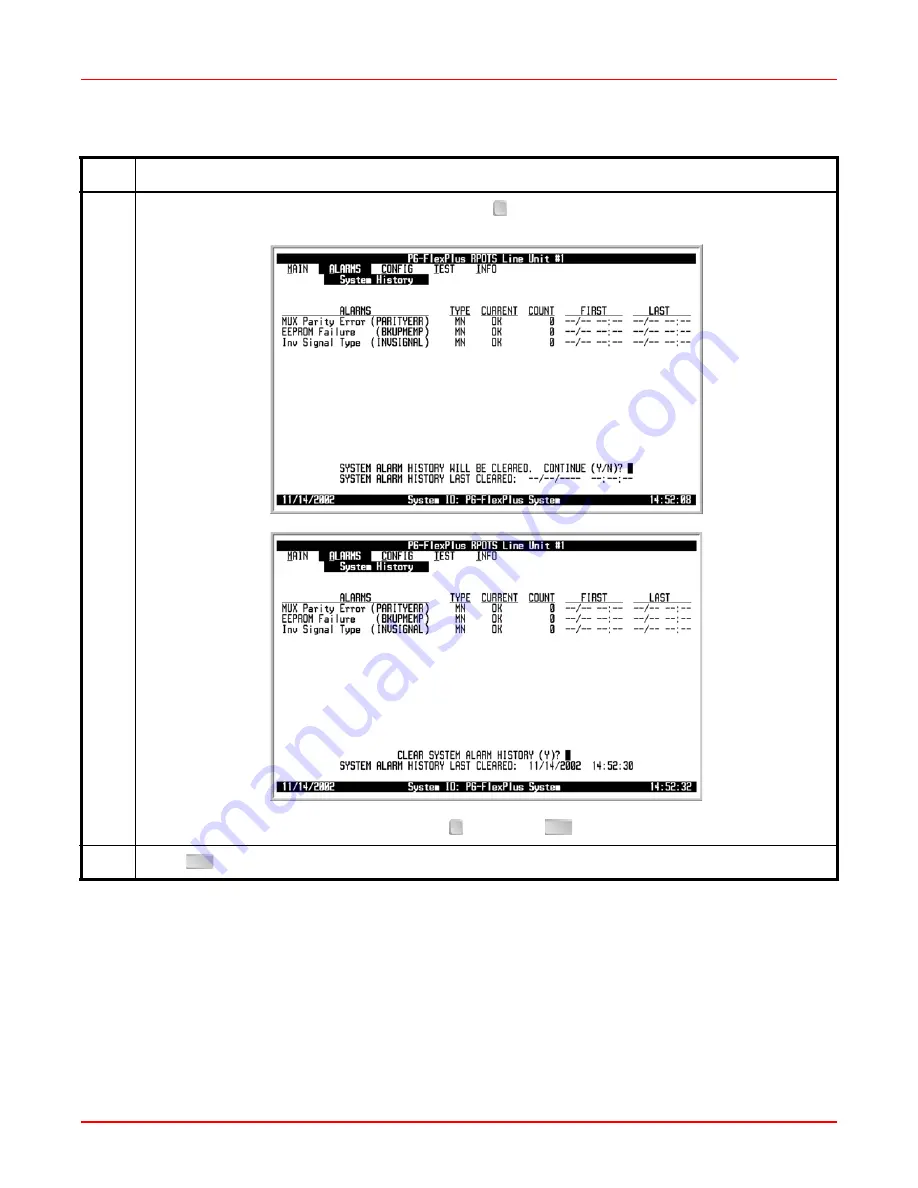
To verify you want to clear the system history, press 


at the 

SYSTEM ALARM HISTORY WILL BE 

CLEARED. CONTINUE (Y/N)?

 prompt.

If you want to retain the system history, press  , then press 

. The Main Menu screen reappears.

4

Press 

. The Main Menu screen reappears.

ALARMS — System History (Continued)

Step

Action

Y

N

ESC

ESC

Содержание PG-FlexPlus FPR-806

Страница 1: ...Section SCP FPR806 010 01H PG FlexPlus RPOTS 6 Channel Remote Terminal Channel Unit Technical Practice Model List CLEI Code FPR 806 1 S9C2BB0B...

Страница 2: ......

Страница 3: ...ined in this document is company private to ADC DSL Systems Inc and shall not be modified used copied reproduced or disclosed in whole or in part without the written consent of ADC Contents herein are...

Страница 4: ...original container Element Meaning Bold font Text that you must input exactly as shown e g type 1 for card 1 menu buttons e g ACCEPT SHELF OPTIONS or menu screen options e g ALARMS screen that you mu...

Страница 5: ...Installation and Test 9 Required Tools and Test Equipment 9 Installation 9 Install an FPR 806 9 Initialize and Power Up the FPR 806 9 Administration 9 Navigational Methods 10 Provisioning Testing and...

Страница 6: ...24 2003 iv ADC Telecommunications Inc INFO Event Log 37 INFO Help 39 Subscriber Reported Faults 41 Acronyms 43 Product Support 45 Technical Support 45 Limited Warranty 45 Returns 45 FCC Class A Compli...

Страница 7: ...FPR806 010 01H ADC Telecommunications Inc v Figure 1 Integrated Distributed DLC 1 Figure 2 Universal Distributed DLC 2 Figure 3 System Support for DID 3 Figure 4 FPR 806 Front Panel 7 Figure 5 Termin...

Страница 8: ...SCP FPR806 010 01H March 24 2003 vi ADC Telecommunications Inc...

Страница 9: ...PR 806 Front Panel LEDs 8 Table 5 FPR 806 Diagnostic Indicators 8 Table 6 Navigational Keystrokes 10 Table 7 Alarm Menu Options 19 Table 8 Configuration Menu Options 23 Table 9 Shelf Options 26 Table...

Страница 10: ...SCP FPR806 010 01H March 24 2003 viii ADC Telecommunications Inc...

Страница 11: ...System Support for DID Integrated Distributed DLC As a distributed Integrated DLC Figure 1 the remote system shelf can be placed in a CO CEV or outdoor cabinet anywhere that the DS1 facility can be de...

Страница 12: ...rop testing results through overhead communications to the CO shelf where the MLT reads the TR 909 signatures from the CO shelf The 96 channels delivered to the system Remote shelf can be directly dro...

Страница 13: ...mote system shelf through the FPC 806 cards Figure 3 System Support for DID Class 5 Switch 4 DS1s TR 08 Mode 1 Optional TR 08 Facility protect DS1 MLT pair Line powered 24 ch PG Flex RTs Line powered...

Страница 14: ...th DS3 UNI Support 1 PCS 718 L1 19 Shelf 2 PCS 718 L2 19 Shelf Wire Wrap 2 PCS 822 L1B Cabinetized Field Shelf 3 Management Options AMU 912 L1 Management Unit T1 Multiplexer Options PMX 744 L1B 8 Port...

Страница 15: ...ive Signatures The tests outlined in Table 2 can be initiated through MLT craft screens or integrated TR 08 channel test depending upon application Test Failure Condition TR k TG RG k Foreign Voltage...

Страница 16: ...48 V minimum Loop Current 23 mA minimum Ring Generation Unbalanced Trapezoidal 40 Vrms minimum 20 3 Hz up to 5 REN per line 10 REN total Ring Trip 200 ms after Loop Closure POTS Interface Supports Loo...

Страница 17: ...elecommunications Inc 7 FRONT PANEL Figure 4 shows the FPR 806 front panel and Table 4 on page 8 lists the LEDs and LED status for the FPR 806 Refer to Table 5 on page 8 for diagnostic indications Fig...

Страница 18: ...806 Flashing PMX 744 is removed Off No fault is detected POTS 1 6 Green On Off Hook Ring Cadence Flash Channel is ringing Slow Flash Channel is in test Off Channel is idle LED State Description Action...

Страница 19: ...that remains On ADMINISTRATION Refer to the proper Management Unit Technical Practice for detailed Administration instructions For example 1 Provision your PC Laptop running Windows HyperTerminal or...

Страница 20: ...ffect Moves to the next field No effect Cycle through the field options Moves up a menu level From the Main Menu the Logout screen is displayed Returns to Main Menu without accepting changes The banne...

Страница 21: ...tions are set to factory defaults to minimize field provisioning Use the Craft terminal to verify system performance and to customize the units to your requirements MENUS AND DISPLAY STRUCTURE Figure...

Страница 22: ...d is not known contact ADC Technical Support while at the terminal Technical Support will provide a temporary password based on the Access Key number displayed on the Logon screen Log On the FPR 806 T...

Страница 23: ...1H ADC Telecommunications Inc 13 3 After a successful login the welcome banner screen appears for a few seconds Then the AMU 912 Main Menu screen appears Log On the FPR 806 Through the Management Unit...

Страница 24: ...24 2003 14 ADC Telecommunications Inc 4 At the Main Menu choose SELECT Press to choose the appropriate COLU e g COLU 1 The FPR 806 Main Menu appears Log On the FPR 806 Through the Management Unit AMU...

Страница 25: ...rminal unattended for any length of time log off until you are ready to resume work This prevents unauthorized persons from inadvertently changing any of your operating parameters and or experiencing...

Страница 26: ...SCP FPR806 010 01H March 24 2003 16 ADC Telecommunications Inc 3 Press The following screen appears 4 Press The PG FlexPlus Login screen reappears Logout Continued Step Action ENTER Y...

Страница 27: ...March 24 2003 SCP FPR806 010 01H ADC Telecommunications Inc 17 MAIN MENU OPTIONS The Main Menu provides access to the status of the system...

Страница 28: ...24 2003 18 ADC Telecommunications Inc MAIN The screen provides access to the status of the system MAIN Step Action 1 At the Main Menu screen select MAIN The following screen appears 2 Press The Main M...

Страница 29: ...events Refer to Table 7 for the sub menu option and description parameter and valid value Table 7 Alarm Menu Options Sub Menu Options Sub Menu Descriptions Selectable Parameter Options Valid Values Sy...

Страница 30: ...mmunications Inc ALARMS System History This screen displays the system s active critical major and minor alarms ALARMS System History Step Action 1 At the Main Menu screen select ALARMS Press to choos...

Страница 31: ...ry press The Main Menu screen reappears The alarm information displayed indicates Alarm Types CRITICAL Critical alarm is present MAJOR Major alarm is present MINOR Minor alarm is present NOT ALARMED C...

Страница 32: ...to clear the system history press at the SYSTEM ALARM HISTORY WILL BE CLEARED CONTINUE Y N prompt If you want to retain the system history press then press The Main Menu screen reappears 4 Press The...

Страница 33: ...iptions Parameters Valid Values System Options Table 9 on page 26 for Shelf Options Set system options System Options will be changed Continue Y N Y or N System Alarm Types See Table 11 on page 29 Pro...

Страница 34: ...Options CONFIG System Options Step Action 1 At the Main Menu screen select CONFIG Press to choose System Options The following screen appears 2 Press The following screen appears To change a field va...

Страница 35: ...PTIONS WILL BE CHANGED CONTINUE Y N prompt the following actions can be taken To save the system options press All current values are set to desired values To retain the existing values press 4 Press...

Страница 36: ...efault POTS Ringing Frequency 20 25 30 50 HZ Changes frequency of ringing at the RT 20 HZ POTS DID Mode ENABLE DISABLE Enables Disables POTS Direct Inward Dialing Mode DISABLE PG FlexPlus System ID Up...

Страница 37: ...alarm types Table 11 on page 29 shows the alarm fields values descriptions and default settings Table 10 on page 29 provides a description of the Alarm types reported CONFIG System Alarm Types Step A...

Страница 38: ...he alarm type changes select the ACCEPT SYSTEM ALARM TYPE CHANGES button then press From the SYSTEM ALARM TYPES WILL BE CHANGED CONTINUE Y N prompt the following actions can be taken To save the alarm...

Страница 39: ...y Updated CR Critical Yes Yes Yes MJ Major Yes Yes Yes MN Minor Yes Yes Yes NA Not Alarmed No No Yes NR Not Reported No No No Alarm Value Description Default MUX Parity Error CR MJ MN NA NR Parity err...

Страница 40: ...onfiguration data back to the original factory default setting CONFIG Set Factory Defaults Step Action 1 At the Main Menu screen select CONFIG Press to choose Set Factory Defaults The following screen...

Страница 41: ...N DATA WILL BE SET TO FACTORY DEFAULTS THIS MAY BE SERVICE AFFECTING CONTINUE Y N prompt the following actions can be taken To save the Factory Default changes press The following events occur all cur...

Страница 42: ...u Options If you attempting to run a second test when one test is already in progress a flashing warning message appears Wait a few minutes then try to run the test again Sub Menu Options Sub Menu Des...

Страница 43: ...articular channel CAUTION Performing a subscriber drop test on any channel interrupts service on the line under test The remaining lines on the system remain in service TEST Subscriber Drop Test Step...

Страница 44: ...can be taken To start the test press To abort the test press Then press and the Main Menu reappears 4 Upon completion of all tests the Subscriber Drop Test Results screen with the Subscriber Test Fail...

Страница 45: ...Sub Menu Descriptions Parameters Valid Values Inventory Displays product identification information manufacturing data software versions and the hardware revisions for the FPR 806 Event Log Displays...

Страница 46: ...duct identification information manufacturing data software versions and the hardware revisions for the FPR 806 Step Action 1 At the Main Menu screen select INFO Press to choose Inventory The followin...

Страница 47: ...hysical or logical device change etc about the FPR 806 INFO Event Log Step Action 1 At the Main Menu screen select INFO Press to choose Event Log The following screen appears 2 Press The following scr...

Страница 48: ...n press and at the EVENT LOG HISTORY WILL BE CLEARED CONTINUE Y N prompt The following events occur 1 All Event Log History is cleared 2 Time and date that the registers were last cleared are updated...

Страница 49: ...FO Help This screen provides information on using the system screens and menus Step Action 1 At the Main Menu screen select INFO Press to choose Help The following screen appears 2 Press The following...

Страница 50: ...n and Troubleshooting LED State Probable Cause Solution PWR On OK Off No input power Shelf power fuse blown FPR 806 processor stopped Verify fuses on bay fuse panel Check input power on the COT Shelf...

Страница 51: ...ubmenu and press d Select the fields for the DS1 and the Channel and type of numbers of the RT in fault e Select the Enable Test Access button and press f Check for dialtone at the VF Interface If dia...

Страница 52: ...6 card If audible level is too low at protector drop lifted drop the channel to the MU interface and check for voice quality a At the Craft Terminal from the MU Menu select the MAIN option and press b...

Страница 53: ...Level 1 DSL Digital Subscriber Line E ES Errored Seconds ESD Electrostatic Discharge F FCC Federal Communications Commission G GND Ground I ICB Integrated Channel Bank L LCF Loop Current Feed LCFO Lo...

Страница 54: ...Inc R RLCF Reverse Loop Current Feed RMA Return Material Authorization RPOTS Remote Plain Old Telephone Service Remote Terminal Channel Unit RT RemoteTerminal S SES Severely Errored Seconds SYNC Sync...

Страница 55: ...ted below Telephone 800 366 3891 Email Address rma ADC com 3 Include the following information in writing along with the equipment you are returning Company name and address Contact name and telephone...

Страница 56: ...environment This equipment generates uses and can radiate radio frequency energy and if not installed and used in accordance with the instruction manual may cause harmful interference to radio commun...

Страница 57: ......

Страница 58: ...World Headquarters ADC Telecommunications Inc 12501 Whitewater Drive Minnetonka Minnesota USA 55343 For Technical Assistance 800 366 3891 Sq 5H 1251815...

Отзывы: