


150-204-100-03, Issue 3
Installation
HRE-204 List 1 and List 2
May 7, 1999
5
M
OUNTING
O
PTIONS
The HRE-204 List 1 and List 2 is suitable for mounting on a desktop or on a wall. Before setting up the equipment,
select a location that will provide appropriate security.
Desktop Mounting
The remote enclosure includes four inverted dimples in the bottom plate for desktop mounting. The dimples create
an air gap between the bottom of the enclosure and the surface of the desk. This prevents overheating by providing
air flow through the enclosure. Do not block the air flow from the bottom of the unit.
Wall Mounting
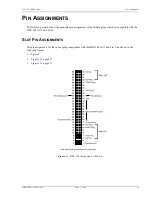
To mount the enclosure on a wall, loosen the backplate and use it as a template for the two mounting holes as
follows:
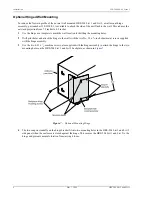
1
Loosen the 216 HEX security nut on the side panel (
) with a
7
/
16
-inch CAN wrench.
Figure 4.
Side Panel Assembly
2
Remove the side panel.
3
Remove the top retaining screw that holds the backplate to the chassis.
Regardless of where the HRE-204 List 1 and List 2 is mounted, ADC recommends that the frame
ground lug be connected to earth ground according to the grounding recommendations found
in Section 9 of Bellcore’s GR-1089-DEC, 1996. See
“Power and Grounding” on page 9
for more
information.
HRE-
204
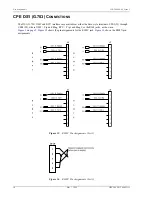
1234
CPE
1
CPE
2
CPE
3
CPE
4
R J48 jacks
Cable entry
sl ot 0.44
square inches
Friction latching clasp
Front
panel
Attachment
lip
216 HEX ( 7/16")
security nut
5.8"
7.5"
4.8"