background image

Select Your Time Zone

U.S. - Central Standard

next

4

5

For more details on outdoor device setup and 

placement, see the outdoor device instruction manual.

Follow the on-screen prompts to set the 

time, date, and units of measurement.

Mount Outdoor Device

Set Up Display

1.  

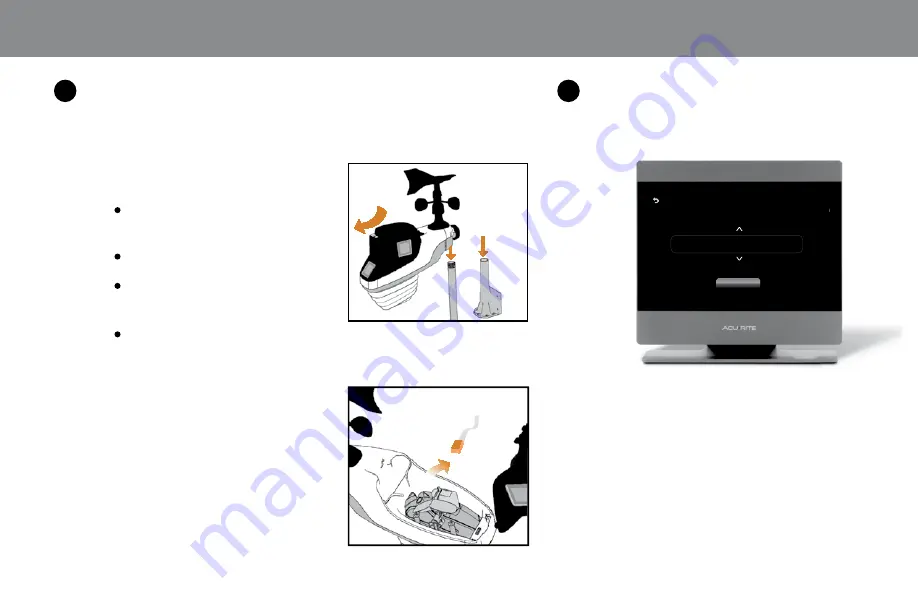
Find a suitable place to mount 
the outdoor device:

    At least 5 feet (1.5 meters) 

  off the ground

    Rear solar panel facing south
      Away from heat and humidity 

  sources

    Level for accurate rain    

  reporting


2.  

Remove rain gauge stabilizer 
from outdoor device.


SOUTH

OR

REMOVE

To view your AcuRite outdoor device readings from an indoor display, the device must be added to the display.
Note: This procedure is also required to be completed if you are replacing an outdoor device. 

How To Add An Outdoor Device

1.  

Verify the outdoor device is powered on

2.  

From the top-left section of the indoor display, select the Menu icon (   )

3.  

Select Sensors

Note: If you’re replacing an outdoor device, select Remove A Sensor and 

remove the batteries and power from the outdoor device that is being 

replaced.

4.  

Select Add A New Sensor. The indoor display searches for any outdoor 

devices in wireless range. This may take a couple minutes.

5.  

Once the outdoor device has been located, select Add A Sensor. If more 

than one outdoor device has been detected, you may need to scroll up and 

down to select the appropriate device.

4

5

Содержание Atlas 06061

Страница 1: ...AcuRite Atlas Indoor Display model 06061 Instruction Manual...

Страница 2: ...ontains sensors that read temperature humidity wind speed and direction rainfall UV light intensity and optionally lightning requires optional Lightning Detection Sensor may be purchased separately Th...

Страница 3: ...N 3 Install Batteries In the battery compartment of the AcuRite AtlasTM outdoor device install four AA alkaline or lithium batteries Lithium batteries are recommended in low temperature conditions esp...

Страница 4: ...n screen prompts to set the time date and units of measurement Mount Outdoor Device Set Up Display 1 Find a suitable place to mount the outdoor device At least 5 feet 1 5 meters off the ground Rear so...

Страница 5: ...door display select the Menu icon 3 Select Sensors Note If you re replacing an outdoor device select Remove A Sensor and remove the batteries and power from the outdoor device that is being replaced 4...

Страница 6: ...ainfall for current week and month and year to date Display settings volume brightness sleep mode Indoor temperature humidity Current date time Menu Select to view monthly records configure alarms or...

Страница 7: ...n Backlight set the backlight auto dim and sleep mode settings You can set the indoor display s time and date settings including the time zone Daylight Saving Time and the time and date format How To...

Страница 8: ...ading Records Shows high low and accumulation reading records by month You can delete the current day s readings this feature is commonly accessed when inaccurate readings occur during the setup proce...

Страница 9: ...4 Using the left and right arrows select an alarm type select Next 5 Set the condition that activates the alarm When the condition is reached 6 Verify the alarm icon is set to ON 7 Select Save and Ex...

Страница 10: ...e left and right arrows select the reading type of the alarm to be disabled select Next 5 Select the alarm icon until it displays OFF How To Disable All Alarms 1 Select Alarms 2 Select Indoor alarms o...

Страница 11: ...ent to My AcuRite or Weather Underground READING CALIBRATIONS How To Set A Reading Calibration 1 From the top left section select the Menu icon 2 Select Calibrate 3 Select Indoor to adjust readings ta...

Страница 12: ...oduct WARRANTY CLAIMS T 1 Contact AcuRite Support at support chaney inst com and provide opportunity for Customer Support to resolve any issue 2 In the event that an issue cannot be resolved over the...

Страница 13: ...AcuRite Atlas Outdoor Device model 06059 Instruction Manual...

Страница 14: ...ns at its installation location The outdoor device contains sensors that read temperature humidity wind speed and direction rainfall UV light intensity and optionally lightning requires optional Light...

Страница 15: ...le level 6 UV and light sensor 7 Rainfall collector 8 Wind direction vane 1 2 3 4 5 7 6 8 Open the battery compartment and insert four 4 AA alkaline or lithium batteries Lithium batteries are recommen...

Страница 16: ...later Visit www Acurite com for more information Outdoor Device Placement AcuRite Atlas is designed to remain outdoors all year long Mount the outdoor device in a location that meets all the requirem...

Страница 17: ...pas or other bodies of water Maximize Wind Accuracy It s recommended to mount the outdoor device at least 5 feet 1 5 meters off the ground higher is better for wind measurement The National Weather Se...

Страница 18: ...2 Point the wind vane to north You may need a north orientation 3 While holding the vane facing north press the calibration button in the battery compartment again rapidly Wind direction information...

Страница 19: ...ice paid for the product WARRANTY CLAIMS T 1 Contact AcuRite Support at support chaney inst com and provide opportunity for Customer Support to resolve any issue 2 In the event that an issue cannot be...

Страница 20: ...gistered trademark of the Chaney Instrument Co Lake Geneva WI 53147 All other trademarks and copyrights are the property of their respective owners AcuRite uses patented technology Visit www AcuRite c...

Отзывы: