background image

PLEASE DISPOSE OF OLD OR DEFECTIVE BATTERIES IN AN ENVIRONMENTALLY SAFE 

WAY AND IN ACCORDANCE WITH YOUR LOCAL LAWS AND REGULATIONS.

BATTERY SAFETY: Clean the battery contacts and also those of the device prior to battery installation. Remove batteries from equipment that will not 

be used for an extended period of time. Follow the polarity (+/-) diagram in the battery compartment. Promptly remove dead batteries from the device. Dispose of 

used batteries properly. Only batteries of the same or equivalent type as recommended are to be used. DO NOT incinerate used batteries. DO NOT dispose of batteries 

recharge non-rechargeable batteries. DO NOT short-circuit the supply terminals.

IMPORTANT: Batteries are 

a backup power source to 

preserve records in the event of 

a power outage. 

Power adapter 

is recommended as the primary 

power source to enjoy the full 

functionality of this product.
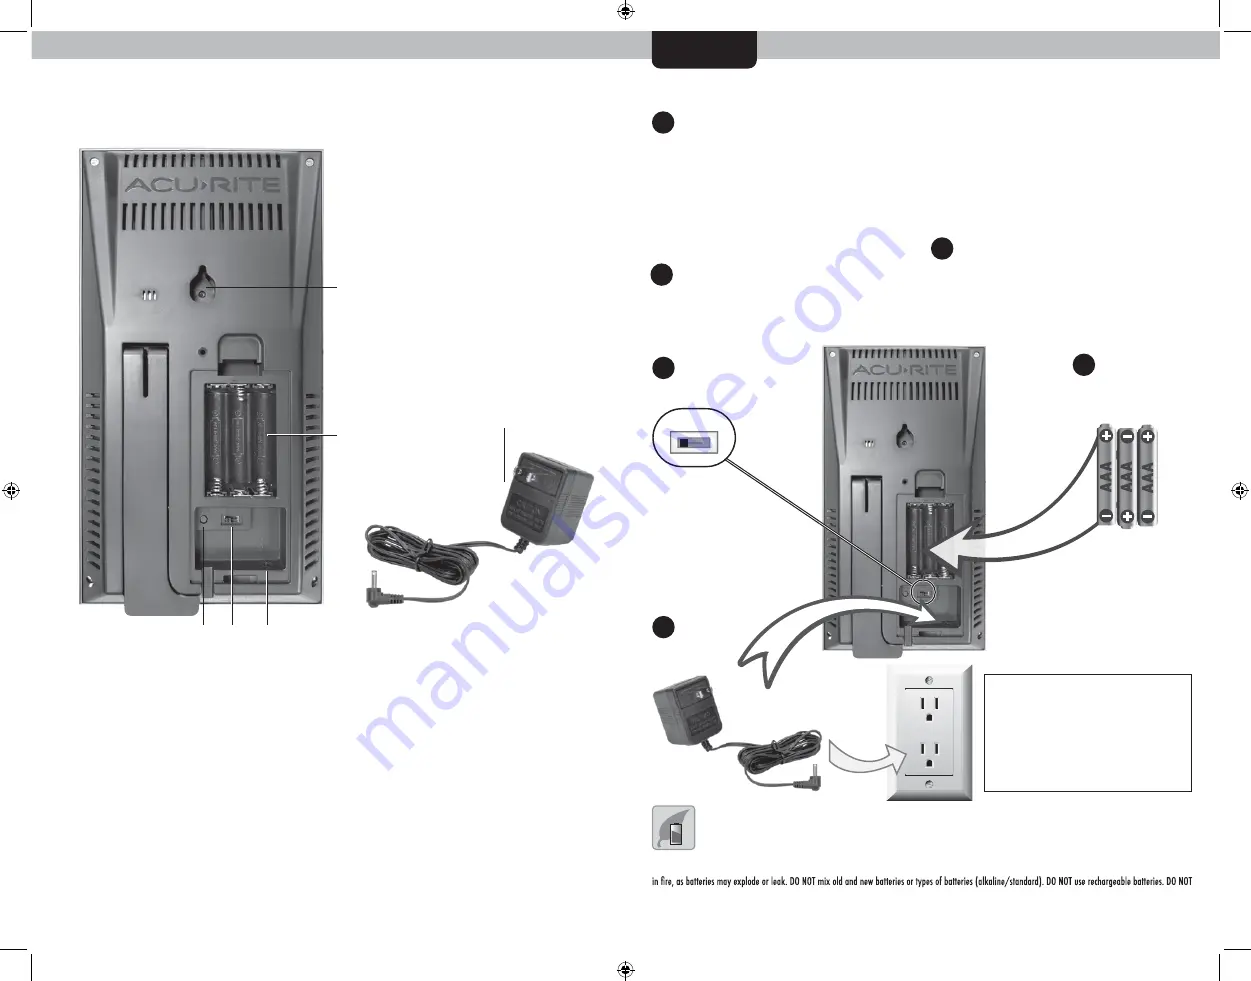
Display Setup

1

 Set the A-B-C Switch

 Locate the A-B-C switch inside 

the battery compartment. Set 

the A-B-C switch to A, B or C. 

You must select the same letter 

choices for both the display and 

the sensor in order for the units to 

synchronize. 

Install or Replace Backup 

Batteries 

(optional)

1.  Remove the battery  

compartment cover.

2.  Insert 3 x AAA alkaline 

batteries into the battery 

compartment, as shown. Follow 

the polarity (+/–) diagram in 

the battery compartment. 

3. Replace the battery cover.

Plug in Power Adapter

For the best performance, plug 

in the power adapter as the main 

power source for this product.

3

Plug in  

Power  

Adapter

1

A-B-C Switch 

Set to match 

sensor

2

3


A B C

4

5

SETUP

Back of Display


3

6

4

5

2

1

BACK OF DISPLAY

4. 


1. 


Integrated Hang Hole 

For easy wall mounting.

2. 


5.  RESET BUTTON

Press and release to clear data.

Press and HOLD for full reset to 

factory defaults.  

6.  Power Adapter
7. Battery Compartment Cover

(not shown)

Plug-in for Power Adapter 

3.

Backup Battery Compartment 

A-B-C Switch

ID code that must match 5-in-1 

sensorʼs A-B-C switch to ensure

units synchronize. 

Install Backup 

Batteries

3 AAA Batteries

(optional)

2

Содержание 06096

Страница 1: ...VE THIS MANUAL FOR FUTURE REFERENCE Package Contents 1 Display with Tabletop Stand 2 Power Adapter 3 Instruction Manual PRODUCT REGISTRATION Register online to receive 1 year warranty protection www AcuRite com IMPORTANT PRODUCT MUST BE REGISTERED TO RECEIVE WARRANTY SERVICE This product requires an AcuRite 5 in 1 Weather Sensor sold separately to be operational ...

Страница 2: ...nding 14 Button For momentary backlight and dimmer settings 17 Button For alarm setup preferences 18 Indicates display is in auto dimming brightness mode see page 6 Icon 20 Barometric Pressure Arrow icon indicates direction pressure is trending 21 28 Current Outdoor Temperature Arrow icon indicates direction temperature is trending 23 Current Wind Speed 24 Current Wind Direction 25 Seasonal Displa...

Страница 3: ... A B C Switch Locate the A B C switch inside the battery compartment Set the A B C switch to A B or C You must select the same letter choices for both the display and the sensor in order for the units to synchronize Install or Replace Backup Batteries optional 1 Remove the battery compartment cover 2 Insert 3 x AAA alkaline batteries into the battery compartment as shown Follow the polarity diagra...

Страница 4: ...ht remains on at 100 brightness Press the button once to dim to 60 brightness Press again to dim to 15 Press a 3rd time to enter AUTO DIM mode The icon appears to the left of the time to indicate that auto dim mode is ON NOTE Pressing and holding the button for 5 seconds will disable the backlight Once any button is pressed the backlight will return to your selected setting AUTO DIM MODE Automatic...

Страница 5: ...acking This weather station features enhanced tracking of historical rainfall data Rain accumulation data is displayed for the current day week or month most recent rainfall total Press the button to review historical rainfall records Records are shown in the following order TODAY RAIN TOTAL THIS WEEK RAIN TOTAL THIS MONTH RAIN TOTAL PREVIOUS MONTHLY TOTALS WITH RAIN up to 12 months prior CURRENT ...

Страница 6: ...will be accurate Allow unit to run continuously for 33 days Battery removal or resetting the display will restart Learning Mode After 14 days forecast should be fairly accurate however Learning Mode calibrates for a total of 33 days Troubleshooting Programmable Alarms This display features programmable alarms that sound an alert to notify you when a value for outdoor temperature humidity wind spee...

Страница 7: ...isplay and an electrical outlet Check that the batteries are installed correctly Batteries may need to be replaced Reset the display by pressing and holding the RESET button for 10 seconds located in the battery compartment of the display Date and time will need to be entered after a reset Troubleshooting If your AcuRite product does not operate properly after trying the troubleshooting steps visi...

Страница 8: ... the original purchase price paid for the product Applicability of Policy This Return Refund and Warranty Policy applies only to purchases made in the United States and Canada For purchases made in a country other than the United States or Canada please consult the policies applicable to the country in which you made your purchase Additionally this Policy applies only to the original purchaser of ...

Страница 9: ...rs AcuRite uses patented technology Visit www AcuRite com patents for details Printed in China 06096 INST 111919 It s more than accurate it s AcuRite offers an extensive assortment of precision instruments designed to provide you with information you can depend on to www AcuRite com Weather Stations Temperature Humidity Weather Alert Radio Kitchen Thermometers Timers Clocks Plan your day with conf...

Отзывы: