


2 of 18
BII12560-03 (1907)
© 2019 American Honda Motor Co., Inc. – All Rights Reserved.
Illustration of the Illuminated Door Sill Trims in the
Vehicle
INSTALLATION
1.
Turn the ignition to ON.
2.
If the vehicle has a shift lever, move the shift lever to
the neutral (N) position.
3.
Turn the ignition to OFF.
4.
Disconnect the negative cable from the battery.
Client Information: The information in this installation
instruction is intended for use only by skilled
technicians who have the proper tools, equipment, and
training to correctly and safely add equipment to your
vehicle. These procedures should not be attempted by
“do-it-yourselfers.”
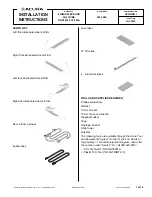
DOOR SILL
TRIM
HARNESS
SUBHARNESS
2A
FUSE
RIGHT FRONT
ILLUMINATED
DOOR SILL TRIM
RIGHT REAR
ILLUMINATED
DOOR SILL TRIM
LEFT FRONT
ILLUMINATED
DOOR SILL TRIM
LEFT REAR
ILLUMINATED
DOOR SILL TRIM
5.
Apply tape to the center console panel and the
driver’s and passenger’s console side trims as
shown. If the vehicle has a shift lever, wrap a shop
towel around the shift lever.
SHOP TOWEL
CENTER CONSOLE
PANEL
PASSENGER’S
CONSOLE
SIDE TRIM
TAPE
With shift lever models
TAPE
PASSENGER’S
CONSOLE
SIDE TRIM
CENTER
CONSOLE
PANEL
Without shift lever models


