background image

© 2019 American Honda Motor Co., Inc. – All Rights Reserved.

BII12560-03 (1907)

1 of 18

08E12-TY2-2000-9A

VERSION 1

Publications No.

Issue Date

INSTALLATION
INSTRUCTIONS

Accessory

Application

ILLUMINATED DOOR 

SILL TRIMS

P/N 08E12-TY2-200A

2020 RLX

JUL 2019

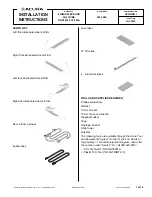
PARTS LIST

Left front illuminated door sill trim

Right front illuminated door sill trim

Left rear illuminated door sill trim

Right rear illuminated door sill trim

Door sill trim harness

Subharness

Fuse label

27 Wire ties

2

Aluminum tapes

TOOLS AND SUPPLIES REQUIRED

Phillips screwdriver

Ratchet

10 mm Socket

10 mm Open end wrench

Diagonal cutters

Tape

Isopropyl alcohol

Shop towel

Scissors

The following tools are available through the Acura Tool 
and Equipment Program. On the iN, click on: Service > 
Service Bay > Tool and Equipment Program, then enter 
the number under “Search.” Or, call 888-424-6857.

•   Trim Tool Set (T/N SOJATP2014)

•   Plastic Trim Tool (T/N SILTRIMTL10)

Содержание 08E12-TY2-200A

Страница 1: ...minated door sill trim Right rear illuminated door sill trim Door sill trim harness Subharness Fuse label 27 Wire ties 2 Aluminum tapes TOOLS AND SUPPLIES REQUIRED Phillips screwdriver Ratchet 10 mm Socket 10 mm Open end wrench Diagonal cutters Tape Isopropyl alcohol Shop towel Scissors The following tools are available through the Acura Tool and Equipment Program On the iN click on Service Servic...

Страница 2: ...equipment and training to correctly and safely add equipment to your vehicle These procedures should not be attempted by do it yourselfers DOOR SILL TRIM HARNESS SUBHARNESS 2A FUSE RIGHT FRONT ILLUMINATED DOOR SILL TRIM RIGHT REAR ILLUMINATED DOOR SILL TRIM LEFT FRONT ILLUMINATED DOOR SILL TRIM LEFT REAR ILLUMINATED DOOR SILL TRIM 5 Apply tape to the center console panel and the driver s and passe...

Страница 3: ...CTORS CENTER LOWER TRIM VEHICLE CONNECTORS CENTER LOWER PANEL 6 CLIPS 2 HOOKS 2 HOOKS 8 Open the glove box Pull away the door opening seal and remove the passenger s dashboard side lid 9 Remove the passenger s dashboard upper cover and unplug the vehicle connector 4 CLIPS 2 RETAINING TABS FRONT DOOR OPENING SEAL Pull away 3 HOOKS PASSENGER S DASHBOARD SIDE LID PASSENGER S DASHBOARD UPPER COVER VEH...

Страница 4: ...ights Reserved 10 Close the glove box 11 Remove the passenger s dashboard lower cover and unplug the vehicle connector 4 CLIPS VEHICLE CONNECTOR PASSENGER S DASHBOARD LOWER COVER FRONT 12 Remove the two bolts from the bottom of the glove box FRONT 2 BOLTS GLOVE BOX ...

Страница 5: ...4 SELF TAPPING SCREWS GLOVE BOX 2 CLIPS 4 CLIPS 5 RETAINING TABS FRONT PASSENGER S FRONT DOOR SILL TRIM 15 Pull away the door opening seal and remove the passenger s kick panel 16 Pull away the door opening seal and remove the driver s dashboard side lid 2 CLIPS DOOR OPENING SEAL Pull away PASSENGER S KICK PANEL 2 RETAINING 4 CLIPS 3 HOOKS DOOR OPENING SEAL Pull away FRONT DRIVER S DASHBOAR D SIDE...

Страница 6: ...he plate VEHICLE CONNECTORS 2 CLIPS PLATE LOWER COLUMN COVER 9 CLIPS ASPIRATO R HOSE DRIVER S DASHBOARD LOWER COVER 18 Turn the knob and remove the driver s dashboard under cover and unplug the vehicle connector 19 Remove the driver s front door sill trim CLIP FRONT VEHICLE CONNECTOR DRIVER S DASHBOARD UNDER COVER KNOB Turn 4 CLIPS 5 RETAINING TABS FRONT DRIVER S FRONT DOOR SILL TRIM ...

Страница 7: ...elease the rear seat cushion DOOR OPENING SEAL Pull away DRIVER S KICK PANEL 2 CLIPS 2 HOOKS REAR SEAT CUSHION 22 Remove the right rear door sill trim 23 Remove the right center pillar lower trim 24 Repeat steps 22 and 23 on left side of the vehicle 4 CLIPS 5 RETAINING RIGHT REAR DOOR SILL TRIM FRONT CLIP 2 RETAINING RIGHT CENTER PILLAR LOWER TRIM FRONT ...

Страница 8: ...LUMINATED DOOR SILL TRIM 27 Using isopropyl alcohol on a shop towel thoroughly clean the left front illuminated door sill trim where the aluminum tape will attach 28 Using scissors cut one aluminum tape into four equal pieces Secure the insulator to the left front illuminated door sill trim with two pieces of aluminum tape 29 Carefully remove the insulator from the left rear door sill trim Do not ...

Страница 9: ... INSULATOR SECTION VIEW LEFT REAR ILLUMINATED DOOR SILL TRIM Align with the rib LEFT REAR ILLUMINATED DOOR SILL TRIM ALUMINUM TAPE Cut in step 28 1 4 ALUMINUM TAPE 1 4 ALUMINUM TAPE Clean with isopropyl alcohol 34 Using isopropyl alcohol on a shop towel thoroughly clean the door sill trim harness fuse case where the fuse label will attach 35 Attach the fuse label to the door sill trim harness fuse...

Страница 10: ...onnector DOOR SILL TRIM HARNESS 12 PIN CONNECTOR FUSE BOX DUMMY CONNECTOR Do not reuse FRONT VIEW OTHER ACCESSORY HARNESS 12 PIN CONNECTOR OTHER ACCESSORY HARNESS 12 PIN CONNECTOR 38 Secure the door sill trim harness to the vehicle harness with two wire ties 39 Route the door sill trim harness as shown Line up the green tape on the door sill trim harness with the vehicle harness as shown and secur...

Страница 11: ...ure the door sill trim harness to the vehicle harness with one wire tie DOOR SILL TRIM HARNESS FRONT ASPIRATOR HOSE VEHICLE HARNESS WIRE TIE DOOR SILL TRIM HARNESS VEHICLE CLIP GREEN TAPE 42 Route the door sill trim harness as shown 43 Secure the door sill trim harness to the vehicle harness with one wire tie FRONT DOOR SILL TRIM HARNESS FRONT GLOVE BOX OPENING DOOR SILL TRIM HARNESS VEHICLE HARNE...

Страница 12: ...cle harness with two wire ties FRONT WIRE TIE VEHICLE CLIP GREEN TAPE DOOR SILL TRIM HARNESS VEHICLE BRACKET VEHICLE HARNESS GLOVE BOX OPENING GLOVE BOX OPENING 2 WIRE TIES DOOR SILL TRIM HARNESS VEHICLE HARNESS 46 Plug the two door sill trim harness 2 pin connectors into the right front illuminated door sill trim 2 pin connector and subharness 2 pin connector RIGHT FRONT ILLUMINATED DOOR SILL TRI...

Страница 13: ...TRIM HARNESS AND SUBHARNESS WIRE TIE 48 Position the right front illuminated door sill trim to the vehicle panel as shown 49 Secure the right front illuminated door sill trim harness and subharness to the vehicle harness with one wire tie 50 Remove the right front illuminated door sill trim Align with the hole 4 CLIPS Do not secure VEHICLE PANEL WIRE TIE RIGHT FRONT ILLUMINATED DOOR SILL TRIM RIGH...

Страница 14: ...OR RIGHT REAR ILLUMINATED DOOR SILL TRIM 2 PIN CONNECTOR FRONT 53 Secure the subharness and 2 pin connectors to the vehicle harness with two wire ties 54 Position the right rear illuminated door sill trim to the vehicle panel as shown 55 Secure the right rear illuminated door sill trim harness to the vehicle harness with two wire ties 2 PIN CONNECTORS SUBHARNESS 2 WIRE TIES VEHICLE HARNESS 4 CLIPS...

Страница 15: ...LL TRIM QD22742AH 4 CLIPS RIGHT CENTER PILLAR LOWER TRIM RIGHT REAR ILLUMINATED DOOR SILL TRIM 58 Install the passenger s kick panel and install the right front illuminated door sill trim 59 Plug the door sill trim harness 2 pin connector into the left front illuminated door sill trim 2 pin connector RIGHT FRONT ILLUMINATED DOOR SILL TRIM PASSENGER S KICK PANEL 4 CLIPS DOOR SILL TRIM HARNESS 2 PIN...

Страница 16: ...ith one wire tie 4 CLIPS Do not secure Line up with the hole VEHICLE PANEL WIRE TIE VEHICLE HARNESS LEFT FRONT ILLUMINATED DOOR SILL TRIM HARNESS Do not slack DOOR SILL TRIM HARNESS WIRE TIE Line up with the branch of the vehicle harness LEFT FRONT ILLUMINATED DOOR SILL TRIM HARNESS Bundle up the excess 63 Remove the left front illuminated door sill trim 64 Secure the door sill trim harness to the...

Страница 17: ...TRIM 2 PIN CONNECTOR FRONT QD22728AH LEFT REAR ILLUMINATED DOOR SILL TRIM HARNESS 2 PIN CONNECTORS DOOR SILL TRIM HARNESS 2 WIRE TIES VEHICLE HARNESS 67 Position the left rear illuminated door sill trim to the vehicle panel as shown 68 Secure the left rear illuminated door sill trim harness to the vehicle harness with two wire ties 69 Remove the left rear illuminated door sill trim VEHICLE PANEL A...

Страница 18: ...4 CLIPS LEFT FRONT ILLUMINATED DOOR SILL TRIM DRIVER S KICK PANEL 72 Check that all wire harnesses are routed properly and all connectors are plugged in 73 Install all removed parts 74 Connect the negative cable to the battery 75 Press and hold the audio unit power button for 2 seconds to restore the audio and navi if equipped system functions 76 Set the clock on vehicles without navigation 77 Mak...

Отзывы: