background image

ENGLISH

18

9)


MOWING TIPS

Best results are achieved when no more than 1/3 of the height of the grass is cut off. The cutting deck
shoulde be level under all conditions; if long grass must be cut, use highest cutting height for first
mowing. If you want the grass shorter, then recut to the lower height. If cut too short, the grass will
expend more energy for development of new leaves and less for root strengthening and will be more
subjected to burning. On the other hand, if allowed to grow too long, the lower part will be shaded and
will discolor. Dispersed clippings mat to form thatch which prevents proper growth; to prevent grass
disease from thatch, bagging is always recommended,

except in the case of mulching. 

All 

ACTIVE

mower are designed to allow immediate change of function: cutting and bagging at the same time or
cutting only (this is recommended only when grass is high) or mulching.

10)


MAINTENANCE

1)

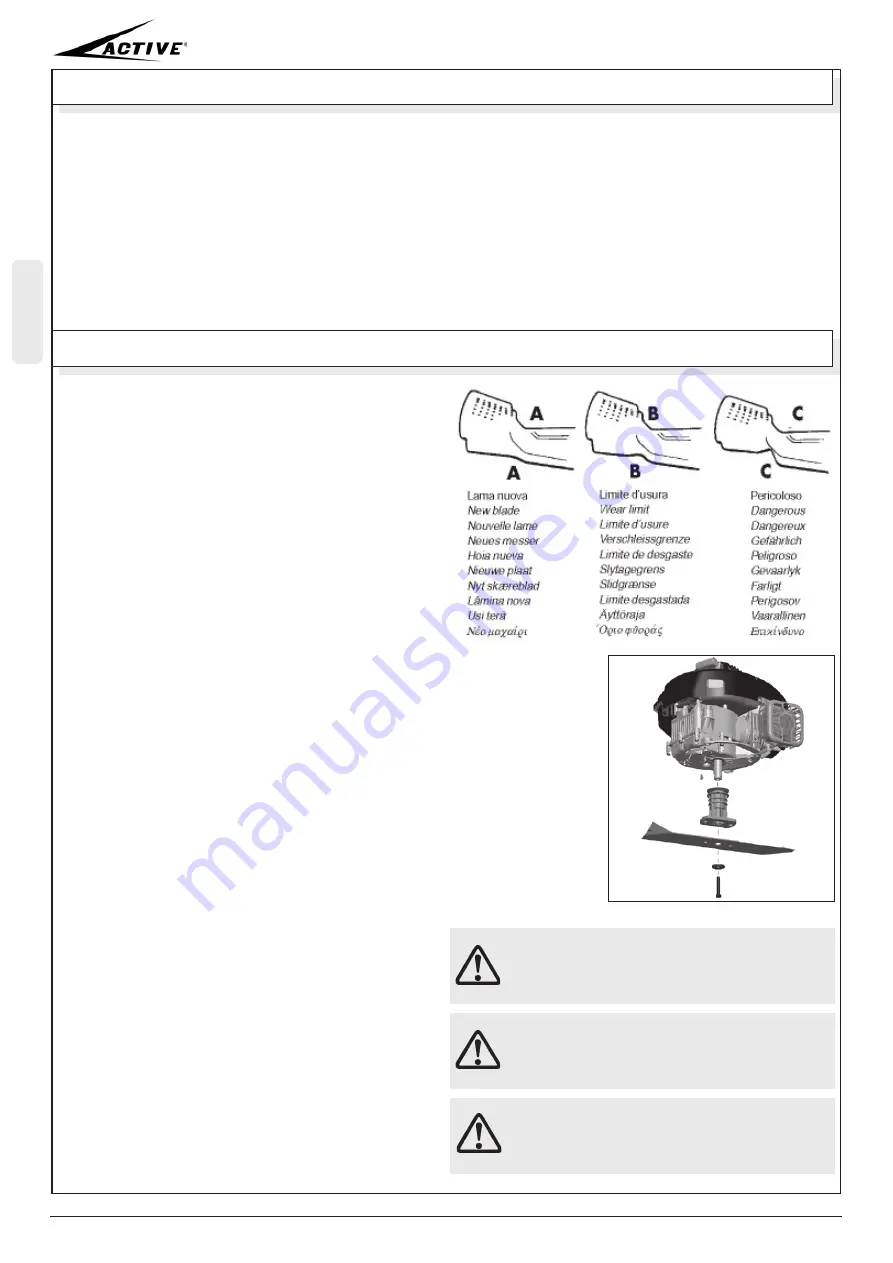
 Check the blade and the engine mounting bolts at frequent

intervals for proper tighness, as showned in the picture. Stop
the engine and disconnect the spark plug wire before reparing.
Tip mower on its left side or opposite side from spark plug, so
plug will not be fouled (which causes starting problems).

Inspecting : 

carefully examine blade for sharpness and wear,

especially where flat and curved parts meet. Since sand and
abrasive material can wear away the metal that connects the
flat surface to the upturned lift, check blade before using the
mower. If a slot or wear is noticed replace blade. Replace blade
if badly chipped, bent or out of balance.

Disassembly:


Firmly grip an edge of the blade, to avoid the

risk of cuts it advisable to wear gloves; unscrew the bolt, remove
the washer and then the blade.

Sharpening : 

Sharpen blade when the cutting edges become dull if the blade is in

otherwise good condition. For best results, remove the blade and sharpen it on grinding
wheel. Check blade after sharpening to determine that it is still balanced. It will cause
excessive vibration if unbalanced. Be careful to avoid cutting yuorself on sharp blade!
Assemble the blade centering it on the support and tighten the bolt at 55 Nm.

2)

 Keep all nuts, bolts and screws tight to be sure the equipment is in safe working

conditions.

3) 

When the grasscatcher is used on your mower, check the catcher often for damage.

Used only recommended catcher. Replace with new bag if loose seams or tears are
evident. To extend the life of the basket it is necessary to empty it each time the cut
is terminated and before the winter storage.

4)

 Never store the equipment with gasoline in the tank inside a building where fumes

may reach an open flame or spark. Allow the engine to cool before storing in any
enclosure.

5)


Frequently check the condition of the belt. If it’s damaged, replace it immediately.

6)


After an accidental collision with foreign objects such as

rocks or roots, carefully examine the blade and the hub blade
holder. If you notice cracks or faults, immediately replace
the component.

7) 

Have your mower inspected and serviced each year by an

authorized ACTIVE dealer. Determine if any additional devices
are available which might upgrade the safety of your mower.

8)

 Factory specified ACTIVE replacement parts must be used

to assure adequate protection against injury.

9) 

For the maintenance of the engine, check the

manufacturer’s manual.

ATTENTION!

Srop the engine and disconnect the spark plug wire
before reparing.

ATTENTION! 


If blade is allowed to wear, a slot may

form near the sail. Eventually a piece of blade may
break off resulting in serious injury to yourself or a
bystander.

ATTENTION!

The collision with a foreign body causes the
breakage of the blade-bearing hub to safeguard
the integrity of the motor shaft.

Содержание 5000 B

Страница 1: ...istruzioni per l uso e la manutenzione Safety and operation instruction Manuel d instructions et de mise en route Bedienungsanleitung Manual de instrucci nes y de mantenimiento Gebruiks en onderhoudsh...

Страница 2: ...2...

Страница 3: ...es d utilisation de votre tondeuse Lisez attentivement les conseils de s curit conformes aux normes Europ enes avant d utiliser la tondeuse Les symboles mentionn s dans ce manuel indiquent un ventuel...

Страница 4: ...utilizzo 7 Scollegare la candela prima di ogni intervento di riparazione o manutenzione 8 Fermare la rotazione della lama prima di svuotare il cestello 2 ETICHETTA DI CONFORMITA L etichetta di confor...

Страница 5: ...eva regolazione altezza taglio 17 Comando cambio 4 MONTAGGIO DEI COMPONENTI Dopo aver sballato il rasaerba aprire il manubrio e avvitare a fondo le manopole per bloccarlo Per i modelli 5800 con manu b...

Страница 6: ...avo la trazione pu trascinare a fatica il rasaerba Portare la fune di avviamento del motore sul manubrio fissandola nell apposito occhiello in una posizione pi comoda per l utilizzo 6 AVVIAMENTO E UTI...

Страница 7: ...a procedendo nella modalit Mulching necessario accertarsi che l erba sia asciut ta e la lama ben affilata per evitare che l erba tagliata si accumuli sotto la chiocciola della scocca 3 Posizionare la...

Страница 8: ...controllate che dopo questa operazione la lama sia ancora bilanciata Se non fosse bilanciata si avranno delle vibrazioni ecces sive Montate la lama centrandola sul supporto e stringete il bullone Cop...

Страница 9: ...rotezioni di sicurezza siano montate Non utilizzare il rasaerba senza che il raccoglierba o il deflettore siano montati Non aggiungete carburante quando vi trovate in un locale chiuso quando il motore...

Страница 10: ...A questo punto azionare la leva avanzamento D e spostare la manopola variatore B per ottenere la velocit desiderata 6 Nel caso in cui ci si volesse fermare per qualsiasi motivo es svuotare il cesto be...

Страница 11: ...scalmente obbligatorio comprovante la data di acquisto 4 La garanzia decade in caso di Assenza palese di manutenzione Utilizzo non corretto del prodotto o manomissione Utilizzo dei lubrificanti o comb...

Страница 12: ...ITALIANO 12 15 CARATTERISTICHE TECNICHE...

Страница 13: ...ITALIANO 13 16 CERTIFICATO DI CONFORMITA...

Страница 14: ...away from the mower 7 Stop the engine and disconnect the spark plug wire before reparing 8 Stop the engine and the blade before emptying the grass catcher 2 CONFORMITY LABEL The conformity label show...

Страница 15: ...s for cutting height 17 Variable speed 4 ASSEMBLY After unpacking the lawn mower open the handlebar and tighten the knobs to lock down For 5800 models with fixed handlebars using the screws Assemble t...

Страница 16: ...not enough the drive may drag badly the mower Bring the starter rope of the motor on the handlebar using the special clip in a more comfortable position for the user 6 STARTING AND USE Check that the...

Страница 17: ...g 2 If it is moving in the mulching mode you must make sure that the grass is dry and sharp blade to prevent the cut grass from collecting under the spiral of the shell 3 Position the mulching closure...

Страница 18: ...ng edges become dull if the blade is in otherwise good condition For best results remove the blade and sharpen it on grinding wheel Check blade after sharpening to determine that it is still balanced...

Страница 19: ...ng Do not operate mower when barefoot or wearing open sandals Wear sensible clothing long pants boots or heavy shoes that will grip even in wet weather and gloves like golfers for a sure grip Also don...

Страница 20: ...tion 2 4 Operate the handle release BBC E and put down the BBC clutch lever C until it engages the clutch The blade start to rotate 5 Operate the handle pull plug D and adjust the speed by the control...

Страница 21: ...document stating the date of purchase 4 Warranty fails in case of evident lack of maintenance incorrect use of the machine or tampering use of incorrect fuel and or lubricants use of non genuine parts...

Страница 22: ...ENGLISH 22 15 TECHNICAL SPECIFICATIONS...

Страница 23: ...ENGLISH 23 16 DECLARATION OF CONFORMITY...

Страница 24: ...onnes et animaux 7 D brancher la bougie d allumage avant tout entretien ou r paration 8 Arr ter la rotation de la lame avant de vider le panier 2 ETIQUETTE DE CONFORMIT L tiquette de conformit indique...

Страница 25: ...e hauteur de coupe 17 Variateur de vitesse 4 MONTAGE DE COMPOSANTS Apr s avoir d ball la tondeuse gazon soulevez le guidon et serrez fond les vis de fixation Pour les mod les 5800 guidon fixe utiliser...

Страница 26: ...clench e si le c ble n est pas assez tendu la traction sera al atoire Accrocher la poign e de d marrage du moteur sur le crochet pr vu cet effet pour une position plus commode d utilisation 6 DEMARRAG...

Страница 27: ...ement il faut enlever l arr t Mulching et d monter le sac de ramassage 2 En proc dant selon le mode Mulching il faut s assurer que le gazon l herbe n est pas sec s che et que la lame est correctement...

Страница 28: ...s remarquez des fissures ou d fauts remplacez imm diatement le composant 7 Faites r viser votre tondeuse la fin de chaque saison par un revendeur ACTIVE Votre tondeuse restera ainsi en parfait tat pou...

Страница 29: ...parez ou remplacez imm diatement la pi ce concern e Ne jamais ajouter d essence dans le r servoir lorsque la tondeuse est en marche ou lorsque le moteur est encore chaud Ne fumez pas pendant que vous...

Страница 30: ...nt D et d placer le bouton d entra nement B pour obtenir la vitesse souhait e 6 Dans le cas o vous souhaitez arr ter pour une raison quelconque par exemple vider le sac pause boisson monter sur un tro...

Страница 31: ...te ou faute de manutention des utilisations de lubrifiants ou combustibles de mauvaise qualit de pi ces ou accessoires n tant pas d origine des interventions effectu es par du personnel non agr 5 Les...

Страница 32: ...32 FRAN AIS 15 CARACT RISTIQUES TECHNIQUES...

Страница 33: ...33 FRAN AIS 16 CERTIFICAT DE CONFORMITE...

Страница 34: ...Gefahrenbereich fernhalten 7 F r jede Wartung achten Sie darauf den Motor auszuschalten und entfernen Sie den Z ndkerzenstecker 8 Stoppen Sie den Motor raus bevor Sie den Korb entleeren 2 TYPENSCHILD...

Страница 35: ...ebel Schnitth henverstellung 17 Variomatikhebel 4 MONTAGE Er ffnet der M her sichern Sie den Lenker mit den Kn pfen F r 5800 Modelle mit festen Lenker die Schrauben Montieren Sie den Fangsack indem Si...

Страница 36: ...h Befestigen Sie den Griff des Starterseils in der daf r vorgesehenen se am Holm 6 INBETRIEBNAHME UND EINSATZ Pr fen Sie ob der Motor Benzinhahn ge ffnet ist Bringen Sie den Gashebel in die Position M...

Страница 37: ...e vermijden dat het gemaaide gras zich onder de worm van het frame ophoopt 3 Plaats de Mulching sluiting in de ruimte waar het gras terecht komt F rAluminium Modelle passen auch in die Mulchmesser 4 P...

Страница 38: ...und Schraubenbolzen festziehen 55 Nm 6 Nach einem Zusammensto mit Fremdk rpern wie Steinen oder Wurzeln pr fen Sie sofort das Messer und die Nabe Klingenhalter Wenn Sie Risse oder Fehler bemerken erse...

Страница 39: ...n gutes Profil haben damit Sie auch bei nassem Gras einen festen Stand haben Kontrollieren Sie den festen Sitz der Messerschrauben alle anderen Befestigungen wie Schrauben Bolzen und Muttern Beachten...

Страница 40: ...elle bet tigen Sie den vorderen Hebel D und den Variatorhebel B um die gew nschte Geschwindigkeit zu erreichen 6 Im Fall dass Sie aus irgendeinem Grund z B Entleerung der Tasche Trinken ber einen B rg...

Страница 41: ...vorgeschriebenes Dokument mit dem Kaufdatum vorgelegt werden 4 Die Garantie verf llt bei offensichtlichem Wartungsmangel nicht korrekter Verwendung des Produkts bzw bei Besch digung Verwendung von un...

Страница 42: ...42 DEUTSCH 15 TECHNISCHE MERKMALE...

Страница 43: ...43 DEUTSCH 16 KONFORMIT T SERKL RUNG...

Страница 44: ...s 7 Pare el motor y desconecte la bujia antes de reparar 8 Fermare la rotazione della lama prima di svuotare il cestello 2 ETIQUETA DE CUMPLIMIENTO La etiqueta de cumplimiento muestra las principales...

Страница 45: ...de corte 17 Variator de velocidad 4 MONTAJE Despu s de la apertura la cortadora de c sped abra el manillar y apriete las perillas de bloqueo hacia abajo Para 5800 los modelos con manillares fijos util...

Страница 46: ...la unidad puede ser accionado tensar el cable simplemente la unidad puede arrastrar la fatiga del cortac sped Llevar el cable del motor de arranque en el manillar fij ndolo en el ojal en una posici n...

Страница 47: ...es necesario asegurarse de que la hierba est seca y la cuchilla bien afilada para evitar que la hierba cortada no se acumule debajo del tornillo patr n de la carrocer a 3 Colocar el cierre Mulching en...

Страница 48: ...ente 7 Haga una revisi n anual del aparato en su distribuidor autorizado de ACTIVE Determine si hay disponible alg n dispositivo de seguridad adicional que pueda aumentar la seguridad de su cortac spe...

Страница 49: ...e gasolina en sitios cerrados cuando el motor est funcionando o mientras el motor est caliente No fume mientras llena el deposito de gasolina No arranque el motor en lugares cerrados Los gases pueden...

Страница 50: ...r la palanca hacia adelante D y mover el pomo de accionamiento B para obtener la velocidad deseada 6 En caso de que quiera parar por cualquier motivo por ejemplo el vaciado de la bolsa la bebida sobre...

Страница 51: ...igatorio para comprobar la fecha de compra 4 La garant a pierde eficacia en caso de evidente falta de mantenimiento Utilizaci n no correcta del producto o forzamiento Utilizaci n de los lubrificantes...

Страница 52: ...ESPA OL 52 15 DATOS T CNICOS...

Страница 53: ...ESPA OL 53 16 CERTIFICADO CONFORMIDAD...

Страница 54: ...t te schakelen en de kabel van de bougie te verwijderen voor u met het onderhoud begint 8 Stoppen van de rotatie van het blad voor het legen van de mand 2 NALEVING LABEL De compliance label toont de b...

Страница 55: ...vangzak 15 Transmissie 16 Afstelhendels snijhoogte 17 Command snelheidsvariator 4 MONTAGE Na het uitpakken van de grasmaaier opent u het stuur en draai de knoppen om het te vergrendelen Voor 5800 mode...

Страница 56: ...andrijving worden ingeschakeld lichtjes trekken van de kabel de tractie niet drag Breng de motor starter kabel op het stuur de vaststelling van het in het oog in een meer comfortabele positie voor geb...

Страница 57: ...ze bezig bent moet u controleren of het gras droog is en of het mes goed scherp is om te vermijden dat het gemaaide gras zich onder de worm van het frame ophoopt 3 Plaats de Mulching sluiting in de ru...

Страница 58: ...een slijpschijf de twee uiteinden van het mes slijjpen Na het slijpen is het noodzakelijk om de balans van de messen te controleren om trillingen van de machine tijdens het werken tegen te gaan Montee...

Страница 59: ...n betere greep De staat van de messen controleren en uzelf ervan verzekeren dat u alle veiligheidsmaatregelen in acht neemt De machine nooit zonder vangzak of deflector gebruiken In geva Van gebreken...

Страница 60: ...t punt Bedien de hendel naar voren D en verplaats de rij knop B om de gewenste snelheid te verkrijgen 6 In het geval dat u wilt stoppen om welke reden bijvoorbeeld het legen van de zak drinken meer da...

Страница 61: ...oldoende onderhoud is geweest aan de machine de machine op onjuiste wijze is gebruikt of als eraan is geknoeid het gebruik van verkeerde olie of smering heeft plaatsgevonden er niet originele onderdel...

Страница 62: ...62 NEDERLANDS 15 TECHNISCHE GEGEVENS...

Страница 63: ...63 NEDERLANDS 16 VERKLARING VAN OVEREENSTEMMING...

Страница 64: ...2 972151 Fax 0522 971929 www eluitipografia it ACTIVE s r l Via Delmoncello 12 26037 S Giovanni in Croce CR Tel 0375 91742 Fax 0375 91684 email ITALY vendite active srl com email EXPORT mail active sr...

Отзывы: