background image


10 


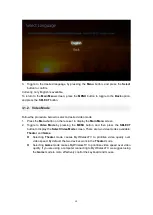
3.  Toggle to the desired  language by pressing the 

Menu

  button, and press the 

Select


button to confirm.   

Currently, only English is available. 
To return to the 

Main Menu

 screen, press the

 MENU

 button to toggle to the 

Back

 option, 

and press the 

SELECT

 button. 

3.1.2.    Video Mode 

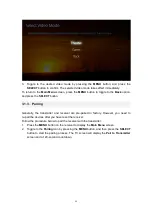
Follow the procedure below to select a desired video mode: 
1.  Press the 

Menu

 button on the receiver to display the 

Main Menu

 screen.   

2.  Toggle to 

Video Mode

  by pressing the 

MENU

  button, and then press the 

SELECT


button to display the 

Select Video Mode

 screen. There are two video modes available: 

Theater

 and 

Game

.   

  Selecting 

Theater

  mode causes  MyWirelessTV to prioritize video quality over 

video speed. By default, the two devices work in the 

Theater

 mode. 

  Selecting 

Game

 mode causes MyWirelessTV to prioritize video speed over video 

quality. If you are using a computer connecting to MyWirelessTV, we suggest using 
the 

Game

 mode to more effectively control the keyboard and mouse. 

Содержание MWTV2RX

Страница 1: ...MyWirelessTV 2 Multi Room Wireless HD Video Kit Model MWTV2TX MWTV2RX User Manual V1 0 ...

Страница 2: ... 2 1 2 Receiver 6 2 2 Connecting the MyWirelessTV Transmitter 6 2 3 Connecting the MyWirelessTV Receiver 7 2 4 Setting up IR Control 7 2 4 1 Connecting the IR Blaster Cable 7 2 4 2 Connecting the IR Receiver Extension Cable 8 Part III Configuring MyWirelessTV 2 9 3 1 Graphical User Interface 9 3 1 1 Language 9 3 1 2 Video Mode 10 3 1 3 Pairing 11 3 1 4 Exit 12 3 1 5 System Information 13 3 2 Reset...

Страница 3: ... Game modes Theater mode delivers better quality and Game mode supports lower latency A V quality auto adjustment based on wireless operating environment Supports controlling of device s IR e g Cable Sat STB with existing remote control over IR Blaster cable Supports one HDMI source input and one HDMI pass through HDMI pass through port maintains original audio and video quality for local TV Compa...

Страница 4: ...er and Receiver 1 4 1 MyWirelessTV 2 Transmitter The MyWirelessTV 2 Transmitter features six ports Power HDMI Input HDMI Out to TV IR Transmit USB and OTG one button SELECT and two LEDs LINK and POWER Transmitter Front Panel LINK LED The LINK LED is used to display the state of pairing between the Transmitter and Receiver If it is blinking or off the Transmitter is not paired with any Receiver If ...

Страница 5: ... use of the source device remote control in tandem with MyWirelessTV 1 4 2 MyWirelessTV 2 Receiver The MyWirelessTV 2 Receiver features four ports Power HDMI Out to TV IR Ext and USB two buttons MENU and SELECT and three LEDs MODE LINK and POWER Receiver Front Panel MODE LED Reserved LINK LED The LINK LED is used to display the state of pairing between the Transmitter and Receiver If it is blinkin...

Страница 6: ...2A HDMI Out to TV IR Ext Power Port The 5V DC 2A power port is used to connect the Receiver to a power source HDMI Out to TV Port The HDMI Out to TV port is used via an HDMI cable to connect the Receiver to an HDMI ready display such as a high definition TV IR Ext Port The IR Ext port is used to connect the IR Receiver cable used to extend the range of the source device s remote control in conjunc...

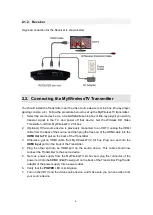
Страница 7: ...nitor This chapter will take you through both procedures as well as setting up the IR Blaster and IR Receiver to allow you to use the remote control of the source device in the location you are watching or playing your content 2 1 Typical MyWirelessTV Connection Configuration 2 1 1 Transmitter A typical connection for the Transmitter is shown below Note Connecting a TV to the HDMI Out to TV port i...

Страница 8: ...V unplug the HDMI cable from the back of the source and then plug the free end of the HDMI cable into the HDMI Out to TV port on the back of the Transmitter 3 Otherwise get an HDMI cable from MyWirelessTV 2 Kit box Plug one end into the HDMI Input port on the back of the Transmitter 4 Plug the other end into an HDMI port on the source device This cable should now connect the Transmitter to the sou...

Страница 9: ...er MyWirelessTV network and emits the IR signal to control the source device Thus you can control the source device from wherever the TV and Wireless HD Video Receiver are located The IR Receiver Extension Cable extends the IR receiver of the Wireless HD Video Receiver Thus it allows the Receiver to receive IR signal from the remote control if the device is placed in an area where IR signal is not...

Страница 10: ...r into the green IR Ext port on the back of the Receiver 3 Remove the protective covering of the double stick tape and attach the flat end of the IR Receiver Extension Cable to the front corner of the HDTV monitor s bezel or frame You should now be able to use the remote control of the source device from the location of the HDTV monitor to which you are streaming content Note The use of the IR Rec...

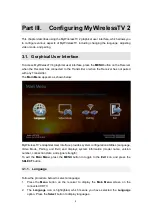
Страница 11: ...ny Transmitter The Main Menu appears as shown below MyWirelessTV s Graphical User Interface provides system configuration abilities Language Video Mode Pairing and Exit and displays system information model name version number connection state and signal strength To exit the Main Menu press the MENU button to toggle to the Exit icon and press the SELECT button 3 1 1 Language Follow the procedure b...

Страница 12: ...o display the Main Menu screen 2 Toggle to Video Mode by pressing the MENU button and then press the SELECT button to display the Select Video Mode screen There are two video modes available Theater and Game Selecting Theater mode causes MyWirelessTV to prioritize video quality over video speed By default the two devices work in the Theater mode Selecting Game mode causes MyWirelessTV to prioritiz...

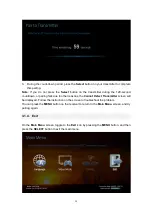
Страница 13: ...Generally the transmitter and receiver are pre paired in factory However you need to re pair the devices after you have reset the receiver Follow the procedure below to pair the receiver with the transmitter 1 Press the MENU button on the receiver to display the Main Menu screen 2 Toggle to the Pairing icon by pressing the MENU button and then press the SELECT button to start the pairing process T...

Страница 14: ...r pairing fails due to other reasons the Cannot Detect Transmitter screen will be displayed Follow the instruction on the screen to troubleshoot the problem You can press the MENU button on the receiver to return to the Main Menu screen and try pairing again 3 1 4 Exit On the Main Menu screen toggle to the Exit icon by pressing the MENU button and then press the SELECT button to exit the main menu...

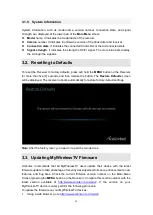
Страница 15: ... seconds and then release the button The Restore Defaults screen will be displayed The receiver reboots automatically to restore factory default settings Note After the factory reset you need to re pair the two devices 3 3 Updating MyWirelessTV Firmware Actiontec recommends that all MyWirelessTV users update their device with the latest firmware update to take advantage of recently developed perfo...

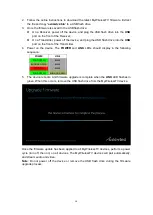
Страница 16: ...n the device The POWER and LINK LEDs should display in the following sequence POWER LINK SOLID GREEN BLACK BLINKING GREEN BLACK SOLID RED BLACK SOLID GREEN BLINKING GREEN 5 The device reboots And firmware upgrade is complete when the LINK LED flashes in green When this occurs remove the USB flash drive from the MyWirelessTV device Once the firmware update has been applied to all MyWirelessTV devic...

Страница 17: ...is in line of sight of the remote control Why don t I see any video when I connect my HDMI PC or laptop computer to MyWirelessTV Make sure the HDMI output display is selected from your PC or laptop If needed refer to your PC or laptop s user manual for more information Why is the video quality so poor To improve video quality try adjusting the orientation of the Transmitter and or Receiver Use the...

Страница 18: ...e box might be an older generation and is not fully HDCP compliant Please check support site for further details Nothing is displaying on the TV connected to the Receiver after it s turned on and both the LINK and POWER lights are on Make sure the HDMI cable is connected from Receiver to TV power on the TV with the correct input selected and then power cycle the Receiver ...

Страница 19: ...reless Operates on 5GHz frequency AES 128 bit WPS pairing Range up to 100 ft Content Protection HDCP 2 x for HDMI Power Input 5V 2A Consumption 5W LED Indicators Transmitter Link Power Receiver Link Power Mode Mechanical Weight per unit 0 30 lb 136 g Dimensions W x D x H per unit 4 13 x 4 72 x 1 18 in 105 x 120 x 30 mm Color Glossy black Environmental Operating temperature 0 ºC to 40 ºC 32 ºF to 1...

Страница 20: ...18 Regulatory and compliance FCC IC and UL Warranty One 1 year limited ...

Отзывы: