background image

www.acti.com


Hardware Manual 


26 

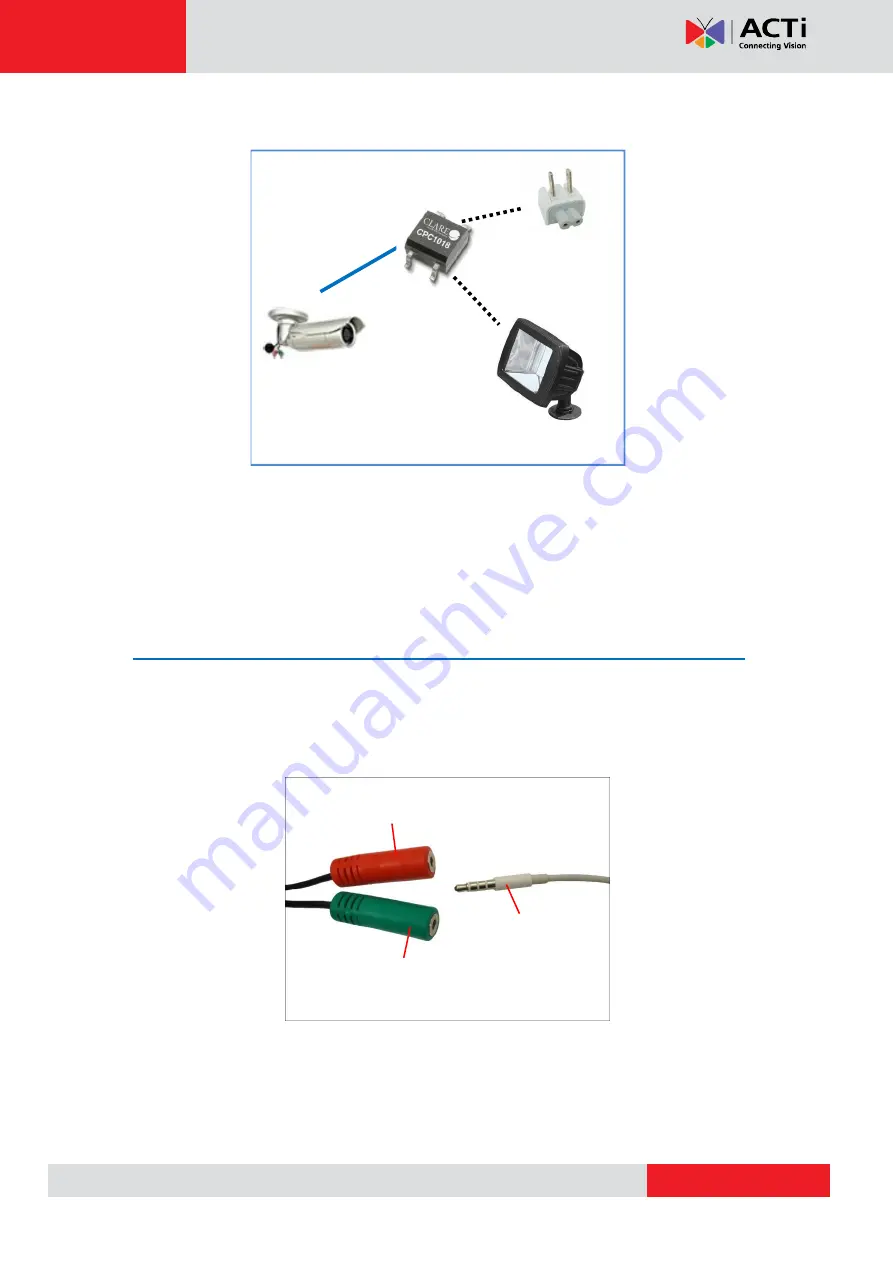
The illustration below is a graphic example of connecting a relay to a high voltage DO device. 


Relay 

(DO1 Device) 

Camera 

Illuminator 

110V-220V AC 

External Power 

Source 


NOTE:

 For more information on DI/DO connections, please refer to the Knowledge Base 

article 

All about Digital Input and Digital Output

 downloadable from the link below


(

http://www.acti.com/kb/detail.asp?KB_ID=KB20091230001

). 


How to Connect Audio Input / Output Devices 
(Optional) 

If using an audio input device, such as a microphone with a built-in amplifier, connect the 

device to the 

Audio Input

 jack (RED) of the camera. If using an audio output device, such as a 

speaker, connect the device to the 

Audio Output

 jack (GREEN) jack of the camera. 


NOTE 1:


Make sure that the connected audio input device has a built-in amplifier. Connecting 

an ordinary microphone will dwarf sounds and will result in inaudible recording. 

NOTE 2:

 If the audio connectors will not be used, leave the rubber caps on to ensure cables 

remain waterproof and eliminate short-circuit hazards. 

Audio Input 
Jack 

Audio Output Jack 

Audio Device 

Содержание E44A

Страница 1: ...Bullet Camera Hardware Manual E44A E45A E46A Ver 2014 10 20 ...

Страница 2: ...t the Camera 13 Step 3 Waterproof and Connect the Cable s 14 How to Use the Cable Gland 15 How to Use the Conduit Gland 18 Step 4 Connect to Network 22 Step 5 Access the Camera Live View 22 Other Connections 23 How to Connect DI DO Devices Optional 23 How to Connect Audio Input Output Devices Optional 26 Other Adjustments and Accessories 27 Adjust the Viewing Angle 27 Attach the Sunshield 28 Reset...

Страница 3: ...www acti com Hardware Manual 3 Accessing the Camera 33 Configure the IP Addresses 33 Using DHCP Server to Assign IP Addresses 33 Using the Default Camera IP Address 40 Access the Camera 42 ...

Страница 4: ... attempt to service this video device yourself as opening or removing covers may expose you to dangerous voltage or other hazards Refer all servicing to qualified service personnel Trademarks All names used in this manual are probably registered trademarks of respective companies Liability Every reasonable care has been taken during the writing of this manual Please inform your local office if you...

Страница 5: ...turning the equipment off and on the user is encouraged to try to correct the interference by one or more of the following measures Reorient or relocate the receiving antenna Increase the separation between the equipment and receiver Connect the equipment into an outlet on a circuit different from that to which the receiver is connected Consult the dealer or an experienced radio TV technician for ...

Страница 6: ...ice personnel Damage Requiring service Disconnect this video product from the power supply immediately and refer servicing to qualified service personnel under the following conditions 1 When the power supply cord or plug is damaged 2 If liquid has been spilled or objects have fallen into the video product 3 If the video product has been directly exposed to rain or water 4 If the video product doe...

Страница 7: ...dels This hardware manual contains the following models E44A 2MP Bullet with D N Adaptive IR Basic WDR SLLS Vari focal lens E45A 1MP Bullet with D N Adaptive IR Superior WDR Vari focal lens E46A 3MP Bullet with D N Adaptive IR Superior WDR Vari focal lens ...

Страница 8: ...ww acti com Hardware Manual 8 Package Contents Camera Bracket Plate Sunshield Drill Template Mounting Screw Kit Sunshield Screw Kit Conduit Gland Cable Gland Washer Warranty Card Quick Installation Guide ...

Страница 9: ...s on to ensure cables remain waterproof and eliminate short circuit hazards 3 Audio Output Connects to audio output devices such as a speaker etc NOTE If the audio connectors will not be used leave the rubber caps on to ensure cables remain waterproof and eliminate short circuit hazards 4 Digital Input Output Connects to digital input or output devices such as an alarm trigger panic button etc Dig...

Страница 10: ...ry card to the camera first before mounting the camera Follow the procedures below 1 Remove the three 3 screws securing the integrated bracket 2 Detach the integrated body from the camera back cover 3 Remove the clamping nut and rubber insert to loosen the cable within the gland NOTE Connectors are connected inside the camera be careful when pulling the rubber insert from the gland ...

Страница 11: ...nected inside the camera do not abruptly lift the cover 5 Insert the memory card with the metallic contacts facing down into the slot until it clicks into place 6 Before closing the back cover make sure the Ethernet cable connector is connected to the main board If the cable is disconnected connect as shown below ...

Страница 12: ... the back cover 8 Push the rubber insert into the gland and attach the clamping nut NOTE Make sure the clamping nut is tightly attached to ensure that the connection is waterproof 9 Attach the integrated bracket and secure the three 3 screws ...

Страница 13: ... template included in the package NOTE Depending on the surface where you will install the camera it may be necessary to drill three 3 holes and use the supplied screw tox 3 Attach the camera to the surface using the three 3 supplied screws 4 Adjust the camera installation angle and orientation and then tighten the two 2 screws to fix its position ...

Страница 14: ...and Use this solution when connecting an Exterior grade Ethernet cable between the camera and a Power over Ethernet PoE switch or injector See How to Use the Cable Gland on page 15 Conduit Gland Use this solution when connecting a standard indoor Ethernet cable between the camera and a Power over Ethernet PoE switch injector A flexible conduit trade size 1 2 is required to house the Ethernet cable...

Страница 15: ...able connections see related installation procedures for details Before connection prepare the following materials Cable Gland included in the camera package Exterior Grade Ethernet Cable not included in the package NOTE Exterior grade cables are already waterproof Not included in the package Washer included in the camera package Perform the following to waterproof the pigtail using the cable glan...

Страница 16: ...m Hardware Manual 16 2 Insert the clamping nut into the Ethernet cable 3 Insert the sealing insert with claw 4 Insert the gland body into the Ethernet cable 5 On the pigtail side insert the washer into the pigtail ...

Страница 17: ...TE Make sure the gland body is tightly attached to the pigtail and the washer is secured between them 8 Insert the sealing insert into the cable gland body and then attach the clamping nut to complete the cable solution NOTE Make sure the clamping nut is tightly attached to the cable gland body and the sealing insert is squeezed tightly ...

Страница 18: ...ble is not available Before connection prepare the following materials Conduit Gland included in the camera package Flexible Conduit 1 2 Trade size not included in the package NOTE Not included in the package Washer included in the camera package Ethernet Cable CAT 5 or CAT 6 not included in the package Perform the following to waterproof the pigtail using the conduit gland 1 Disassemble the condu...

Страница 19: ...cable through the flex conduit Leave enough length of the cable outside the flex conduit 3 Insert the clamping nut through the flex conduit 4 Insert the sealing nut and fix it at the end of the flex conduit 5 Insert the gland body into the Ethernet cable ...

Страница 20: ...l side insert the washer into the pigtail 7 Connect the Ethernet cable connector to the pigtail connector 8 Attach the gland body to the pigtail NOTE Make sure the gland body is tightly attached to the pigtail and the washer is secured between them ...

Страница 21: ...the flex conduit and insert the sealing nut into the gland body NOTE Make sure the clamping nut is tightly attached to the cable gland body and the sealing insert is squeezed tightly 10 Attach the clamping nut to complete the cable solution ...

Страница 22: ...r injector to a network PC and a power source See Power over Ethernet PoE connection example below Network AC Power Source PoE Injector Power Cable Ethernet Cable Ethernet Cable Data Power Ethernet Cable Data Camera Step 5 Access the Camera Live View See Accessing the Camera on page 33 for more information on how to access the Live View of the camera ...

Страница 23: ...in the camera site DI can be triggers of events For example you can connect a panic button to the camera as such when the panic button is pressed the alarm signal will be sent through the camera Other common DI device applications are emergency button smoke detector passive infrared sensor etc Digital Output DO devices are external devices that are activated by the camera upon an event inside the ...

Страница 24: ...Digital Input DI Red Digital Output Cables Cable Color Wiring Connection 12V 12V Yellow To connect digital output devices map the digital output device wires to 12V yellow and DO brown wires Digital Output DO Brown The table below shows the DI DO connection specifications Device DI Connection design TTL compatible logic levels Voltage To trigger low Logic level 0 0V 0 4V Normal high Logic level 1 ...

Страница 25: ...and DO pins to connect a DO device See wiring scheme below High Voltage DO Device Connection Even though the camera provides 12V power this may not be enough for some high voltage DO devices such as a ceiling light or a motor that opens or closes a gate In this case there is a need to connect an external relay See wiring scheme below Note that when choosing an appropriate relay please refer to its...

Страница 26: ...Output Devices Optional If using an audio input device such as a microphone with a built in amplifier connect the device to the Audio Input jack RED of the camera If using an audio output device such as a speaker connect the device to the Audio Output jack GREEN jack of the camera NOTE 1 Make sure that the connected audio input device has a built in amplifier Connecting an ordinary microphone will...

Страница 27: ...ing Angle 1 Open the front cover 2 Based on the live view from the camera adjust the focal length and focus of the target area 3 When done close the front cover CAUTION The front cover must be tightly closed to ensure water or dust does not go through any opening Focal Length Focus ...

Страница 28: ...ed outdoors attach the sunshield to protect the lens from all types of weather and lighting conditions 1 Loosely secure the supplied screws and washers to attach the sunshield 2 Slide to adjust the sunshield to cover the lens as far as possible but out of the camera s live view 3 Tighten the screws to fix the position of the sunshield See final installation below ...

Страница 29: ... and therefore the camera cannot be accessed In case of IP address mask or allow deny filter related issues resulting with the inability to modify these settings In case of connectivity issues or abnormal video quality How to Reset the Camera Do the following procedures to access the Reset button and restore the camera its default factory settings 1 Remove the three 3 screws securing the integrate...

Страница 30: ...e cable within the gland NOTE Connectors are connected inside the camera be careful when pulling the rubber insert from the gland 4 Twist to open the back cover and slowly lift the cover 5 To reset the camera press and hold the Reset button for at least 5 seconds or until the LED lights up ...

Страница 31: ... cable connector is connected to the main board If the cable is disconnected connect as shown below 7 Attach the back cover 8 Push the rubber insert into the gland and attach the clamping nut NOTE Make sure the clamping nut is tightly attached to ensure that the connection is waterproof ...

Страница 32: ...www acti com Hardware Manual 32 9 Attach the integrated bracket and secure the three 3 screws ...

Страница 33: ... server running then you do not need to configure the IP addresses at all both the camera and the PC would request a unique IP address from DHCP server automatically In such case the camera will immediately be ready for the access from the PC The user however might not know the IP address of the camera yet It is necessary to know the IP address of the camera in other to be able to access it by usi...

Страница 34: ...re tool that can not only discover the cameras but also list lots of valuable information such as IP and MAC addresses serial numbers firmware versions etc and allows quick configuration of multiple devices at the same time The IP Utility can be downloaded for free from http www acti com IP_Utility With just one click you can launch the IP Utility and there will be an instant report as follows You...

Страница 35: ...twork and it does not detect any DHCP services it will automatically assign itself a default IP 192 168 0 100 Whereas the default port number would be 80 In order to access that camera the IP address of the PC has to be configured to match the network segment of the camera Manually adjust the IP address of the PC In the following example based on Windows 7 we will configure the IP address to 192 1...

Страница 36: ...IP Utility With the procedure shown above all the cameras will have unique IP addresses starting from 192 168 0 101 In case there are 20 cameras selected the last one of the cameras would have the IP 192 168 0 120 Later by pressing the Refresh button of the IP Utility you will be able to see the list of cameras with their new IP addresses Please note that it is also possible to change the IP addre...

Страница 37: ... Explorer browsers free third party software plug ins must be installed to the PC first to be able to get the live video feed from the camera Browser Required Plug In Safari QuickTime http www apple com quicktime download Other non Internet Explorer browsers Basic VLC Media Player http www videolan org Disclaimer Notice The camera manufacturer does not guarantee the compatibility of its cameras wi...

Страница 38: ...following address into Web browser s address bar http 192 168 0 100 Upon successful connection to the camera the user interface called Web Configurator would appear together with the login page The HTTP port number was not added behind the IP address since the default HTTP port of the camera is 80 which can be omitted from the address for convenience Before logging in you need to know the factory ...

Страница 39: ...Copyright 2014 ACTi Corporation All Rights Reserved 7F No 1 Alley 20 Lane 407 Sec 2 Ti Ding Blvd Neihu District Taipei Taiwan 114 R O C TEL 886 2 2656 2588 FAX 886 2 2656 2599 Email sales acti com ...

Отзывы: