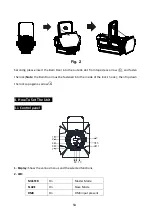
ACME TS-300M CW Скачать руководство пользователя страница 7


3. Button: 

  MENU 

  To select the programming functions 

  DOWN 

  To go backward in the selected functions 

  UP 

  To go forward in the selected functions 

  ENTER 

  To confirm the selected functions 

4. Dimmer: 

Manual adjust the dimmer value.


5 Zoom: 

Manual adjust the zoom value. 
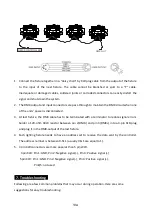
6. DMX input: 

For DMX512 link, use 5-pin XLR cable to link the unit together.


7. POWER IN:

 Connects to mains supply power.


8. POWER OUT: 

Connects to the next unit. 

9. DMX output: 

For DMX512 link, use 5-pin XLR cable to link the unit together.


10. Fuse(

T10A

): 

Used to protect the unit from damage of the over current. 

11.ETHERNET: 

Connect with the multimedia and use software to control the units via ArtNet;. 
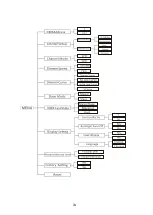


4.2 Main Functions   

To select any functions, press the 

MENU

 button until the required one is shown on the display. 

Select the function by 

ENTER

 button and the display will blink. Use the 

DOWN

 and 

UP

 button to 

change the mode. Once the required mode has been selected, press the 

ENTER

 button to setup or 

it will automatically return to the main functions without any change after idling one minute. Back 

to the functions without any change press the 

MENU

 button.   

The main functions are shown below: 


6A 

Содержание TS-300M CW

Страница 1: ...TS 300M CW TS 300M WW User Manual Please read the instruction carefully before use ...

Страница 2: ...Barn Door Installation 4 4 How To Set The Unit 5 4 1 Control panel 5 4 2 Main Functions 6 5 How to Control the Unit 11 5 1 Master Slave Built In Preprogrammed Function 11 5 2 DMX Controller 11 5 3 DMX 512 Configurations 12 6 DMX 512 Connections 12 7 Troubleshooting 13 8 Fixture Cleaning 14 1A ...

Страница 3: ...azard Use safety cable when fixes this unit DO NOT handle the unit by taking its head only but always by taking its base Maximum ambient temperature is Ta 40 DO NOT operate it where the temperature is higher than this Unit surface temperature may reach up to 85 DO NOT touch the housing bare hand during its operation Turn off the power and allow about 15 minutes for the unit to cool down before rep...

Страница 4: ...le operating And make sure that the structure to which you are attaching the unit is secure and is able to support a weight of 10 times of the unit s weight Also always use a safety cable that can hold 12 times of the weight of the unit when installing the fixture The equipment must be fixed by professionals And it must be fixed at a place where is out of the touch of people and has no one pass by...

Страница 5: ...Kgs Dimension 340 583 284mm 583 340 284 3 The Plate for Color Filter Barn Door Installation Fig 1 At first please push the Lock Cap button by hand as the arrow 1E A and move away the Lock as the arrow A 2E A Then insert the Plate for Color Filter into the inside slot from topsideA 3E A 4A ...

Страница 6: ...ote the Barn Door must be fastened into the inside of the lock s hook then flip down the lock cap again as arrowA 5E A 4 How To Set The Unit 4 1 Control panel 1 3 2 4 5 6 89 10 7 11 1 Display Show the various menus and the selected functions 2 LED MASTER On Master Mode SLAVE On Slave Mode DMX On DMX input present 5A ...

Страница 7: ...the unit together 10 Fuse T10A Used to protect the unit from damage of the over current 11 ETHERNET Connect with the multimedia and use software to control the units via ArtNet 4 2 Main Functions To select any functions press the MENU button until the required one is shown on the display Select the function by ENTER button and the display will blink Use the DOWN and UP button to change the mode On...

Страница 8: ...7A ...

Страница 9: ...t the unit idle one minute to exit menu mode Channel Mode To select Channel Mode press the ENTER button to confirm Use the UP DOWN button to select 1CH or 2CH channels mode press the ENTER button to store Press the MENU button back to the last menu or let the unit idle one minute to exit menu mode Dimmer Speed Select Dimmer Speed press the ENTER button to confirm present mode will blink on the dis...

Страница 10: ...n to select the Master or Slave mode Once the mode has been selected press the ENTER button to save Hold and press the MENU button about one second or wait for one minute to exit the menu mode DMX State Select DMX State press the ENTER button to confirm present mode will blink on the display Use the DOWN and UP button to select the Master Slave Blackout or Hold mode Once the mode has been selected...

Страница 11: ... ENTER button to confirm present mode will blink on the display use the UP DOWN button to select the No normal display or Yes inverse display press the ENTER button to save Press the MENU button back to the last menu or let the unit idle one minute to exit menu mode Language Select Language press the ENTER button to confirm present mode will blink on the display use the UP DOWN button to select th...

Страница 12: ...e unit in two ways 1 Master slave built in preprogram functions 2 Universal DMX controller 5 1 Master Slave Built In Preprogrammed Function By linking the units in master slave connection the first unit will control the other units to give an automatic synchronized light show This function is good when you want an instant show 5 2 DMX Controller Use universal DMX controller to control the units yo...

Страница 13: ... Address Unit 2 Address Unit 3 Address Unit 4 Address 1 channels 1 2 3 4 2 channels 1 3 5 7 5 3 DMX 512 Configurations 1 Channels Mode CHANNEL VALUE FUNCTION 1 0 255 DIMMER 0 100 2 Channels Mode CHANNEL VALUE FUNCTION 1 0 255 DIMMER 0 100 2 0 255 DIMMER FINE 0 100 6 DMX 512 Connections The DMX512 is widely used in intelligent lighting control with a maximum of 512 channels 12A ...

Страница 14: ...o be terminated with a terminator to reduce signal errors Solder a 120 ohm 1 4W resistor between pin 2 DMX and pin 3 DMX into a 3 pin XLR plug and plug it in the DMX output of the last fixture 4 Each lighting fixture needs to have an address set to receive the data sent by the controller The address number is between 0 511 usually 0 1 are equal to 1 5 3 pin XLR connectors are more popular than 5 p...

Страница 15: ...longside to high voltage cables that may cause damage or interference to DMX interface circuit C One of the channels is not working well 1 The stepper motor might be damaged or the cable connected to the PCB is broken 2 The motor s drive IC on the PCB might be out of condition 8 Fixture Cleaning The cleaning of internal and external optical lenses and or mirrors must be carried out periodically to...

Страница 16: ...of the Electromagnetic Compatibility EMC Directive 89 336 EEC EN55103 1 2009 EN55103 2 2009 EN62471 2008 EN61000 3 2 2006 A1 2009 A2 2009 EN61000 3 3 2008 1BHarmonized Standard EN 60598 1 2008 All 2009 EN 60598 2 17 1989 A2 1991 EN 62471 2008 EN 62493 2010 Safety of household and similar electrical appliances Part 1 General requirements Innovation Quality Performance ...

Отзывы: