
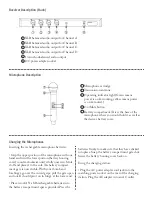

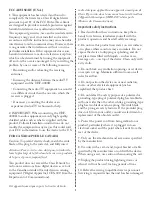
Receiver Description (Back)
Charging the Microphones
Inserting the rechargeable microphone batteries:
• Grip the upper portion of the microphone with one
hand and twist the lower portion (battery housing
cover) counter-clockwise until it fully unscrews. Slide
it off and place it to the side. Th
e battery compart-
ment gate is now visible. With your thumb and
forefi nger, go over the curved grips, pull the gate open
and out. It should pivot on its hinge at the lower end.
• Place two AA Ni-Mh rechargeable batteries into
the battery compartment spaces provided. Press the
batteries fi rmly to make sure that they have clicked
into place. Snap the battery compartment gate shut.
Screw the battery housing cover back on.
Using the charging station:
• Plug the AC power adapter cord jack into the
matching power socket on the rear of the charging
station. Plug the AC adapter into an AC outlet.
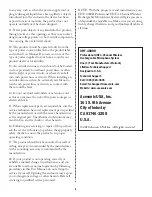
Microphone Description
1 Microphone cartridge
2 Transmission antenna
3 Operating indicator light (Green means
power is on & working, yellow means power
is on & muted.)
4 On/Mute button
5 Battery compartment: Th
is is the base of the
microphone where you would hold it, as well as
the device’s battery cover.
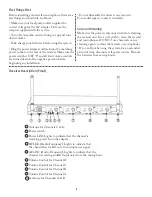
1 XLR balanced audio output for Channel A
2 XLR balanced audio output for Channel B
3 XLR balanced audio output for Channel C
4 XLR balanced audio output for Channel D
5 1/4-inch unbalanced audio output
6 DC power adapter socket
3


