background image

1

Eng

lis

h

Acer LCD Monitor Quick Start Guide (QSG)

Important safety instructions

Please read the following instructions carefully. 
1

To clean the LCD monitor screen: 

Turn off the LCD monitor and unplug the power cord.

Spray a non-solvent cleaning solution onto a rag and clean the screen gently.

2

Do not place the LCD monitor near a window. Exposing the monitor to rain, moisture or sunlight 

can severely damage it. 

3

Do not apply pressure to the LCD screen. Excessive pressure may cause permanent damage to the 

display. 

4

Do not remove the cover or attempt to service this unit yourself. An authorized technician should 

perform servicing of any nature. 

5

Store the LCD monitor in a room with a temperature of -20° to 60° C (-4° to140° F). Storing the LCD 

monitor outside this range may result in permanent damage.

6

Immediately unplug your monitor and call an authorized technician if any of the following 

circumstances occur:

Monitor-to-PC signal cable is frayed or damaged. 

Liquid spills onto the LCD monitor or the monitor is exposed to rain. 

The LCD monitor or case is damaged. 

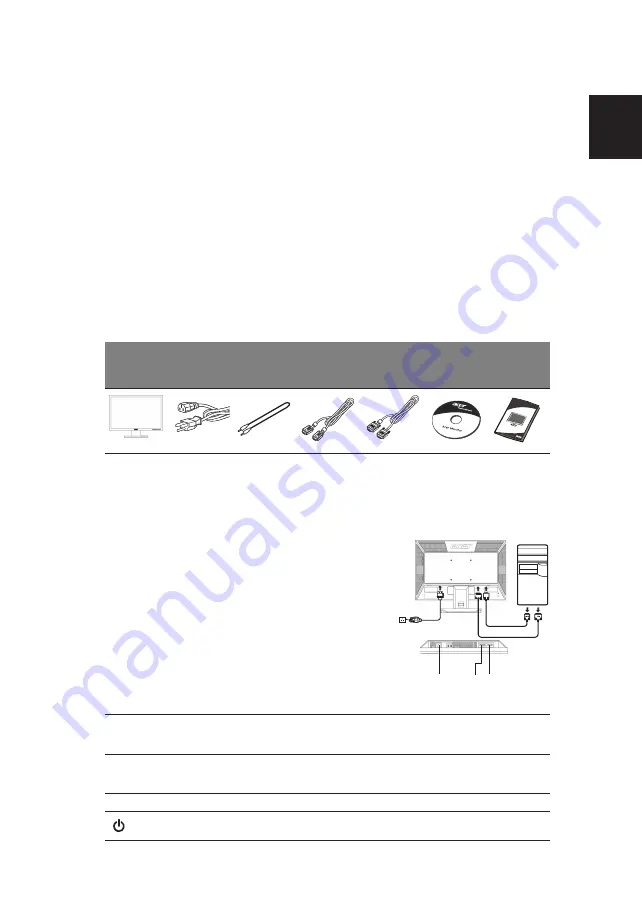
Package contents 

Attaching the monitor to the base 

1

Remove the monitor base from the packaging and place it on a stable and level workspace. 

2

Remove the monitor from the packaging. 

3

Align the release button at the buttom of the monitor with the corresponding slot at the bottom of 

the base. A clicking sound signifies that the monitor has been securely attached to the base.

Connecting your monitor to a computer  

1

Turn off your computer and unplug your computer's power 

cord. 

2

Connect the signal cable to the VGA and/or DVI-D (optional) 

input socket of the monitor, and the VGA and/or DVI-D 

(optional) output socket of the graphics card on the 

computer. Then tighten the thumbscrews on the signal cable 

connector.

3

Optional: Connect the audio input socket (AUDIO IN) of the 

LCD monitor and the line-out port on the computer with the 

audio cable. 

4

Insert the monitor power cable into the power port at the 

back of the monitor. 

5

Plug the power cords of your computer and your monitor into 

a nearby electrical outlet. 

External controls

LCD monitor   Power cord 

Audio cable 

(optional) 

VGA cable

DVI cable  

(only dual-

input 

models)

User’s guide

Quick start 

guide 

Auto

Auto

If the OSD is active, press Auto


to exit the OSD. Once the OSD is inactive, press 

Auto and the monitor will automatically optimize the display position, focus, 

and clock of your display. 

</>

Minus / Plus 

If the OSD is active, press the Minus or Plus buttons to toggle between the OSD 

options. If the OSD is inactive, press the Minus or Plus buttons to adjust the 

volume. (Optional)

Menu

OSD functions

Press to view the OSD. Press again to enter a selection in the OSD.

Power button

Turns the monitor on/off. Blue indicates power on. Amber indicates standby/

power saving mode. 


2

1-1

1-1

1-2

1-2

2

Содержание V193WEJB

Страница 1: ...tor with the corresponding slot at the bottom of the base A clicking sound signifies that the monitor has been securely attached to the base Connecting your monitor to a computer 1 Turn off your compu...

Страница 2: ...tion Changes or modifications not expressly approved by the manufacturer could void the user authority which is granted by the Federal Communications Commission to operate this product Operation condi...

Страница 3: ...age OSD position timeout Auto configuration only Analog input model Input signal Selection only Dual input model DDCCI On Off Display information Reset Exit All specifications are subject to change wi...

Страница 4: ...base Un clic signifie que la fixation du moniteur sur la base est correcte Connexion du moniteur l ordinateur 1 teignez votre ordinateur et d branchez le cordon d alimentation 2 Branchez le c ble sig...

Страница 5: ...ress ment approuv s par le constructeur peuvent annuler le droit de l utilisateur qui est accord par la Commission de Communications F d rale utiliser ce produit Conditions de Fonctionnement Cet appar...

Страница 6: ...emp rature de stockage 20 C 60 C Humidit en fonctionnement 10 85 MTBF 50000 heures Dimensions Poids poids net Sp cifications de M canisme Pente 5 15 Faire pivoter Non minence r glage Non Pivot Non D t...

Страница 7: ...di bagian bawah monitor dengan slot yang sesuai di bagian bawah dudukan Bunyi klik akan terdengar jika monitor telah terpasang dengan kencang pada dudukan Menyambungkan monitor ke komputer 1 Matikan k...

Страница 8: ...bantu melestarikan sumber daya alam serta memastikan bahwa peralatan tersebut didaur ulang dengan cara yang akan melindungi kesehatan manusia dan lingkungan Untuk informasi lebih lanjut tentang tempat...

Страница 9: ...ga 35 C Suhu Penyimpanan 20 C hingga 60 C Kelembaban Pengoperasian 10 hingga 85 MTBF Dimensi 440 24 P x 358 18 T x 161 44 L mm Berat N W Unit 4 17 kg bersih Spesifikasi mekanisme Miring 5 hingga 15 Pu...

Страница 10: ...1 Acer LCD QSG 1 LCD LCD 2 LCD 3 LCD 4 5 LCD 20 C 60 C 6 PC LCD LCD 1 2 3 1 2 VGA DVI D VGA DVI D 3 LCD AUDIO IN 4 5 s LCD VGA DVI OSD OSD OSD OSD OSD OSD OSD OSD OSD 2 1 1 1 1 1 2 1 2 2...

Страница 11: ...2 Class B ICES 003 Remarque a I intention des utilisateurs canadiens Cet appareil numerique de la classe B est conforme a la norme NMB 003 du Canada a OSD OSD b OSD www eiae org www lamprecycle org...

Страница 12: ...H 30KHz 80KHz V 5 75Hz 136MHz 1440 x 900 75Hz VESA DDCCI DDC2B D Sub 0 7Vp p 75 OHM 4 100 240VAC 50 60Hz 5 C 35 C 20 C 60 C 10 85 MTBF N W kg 5 ACM RGB OSD DDCCI 160 160 CR 10 5 3 mm 3 mm 15 50 250cd...

Страница 13: ...e o bot o de liberta o no fundo do monitor com as ranhuras correspondentes no fundo da base Um estalido significa que o monitor foi devidamente acoplado base Ligar o seu monitor a um computador 1 Desl...

Страница 14: ...do seu equipamento no momento da elimina o contribuir para a conserva o dos recursos naturais e assegurar que o mesmo reciclado de forma a proteger a sa de humana e o ambiente Para mais informa es re...

Страница 15: ...namento 5 C a 35 C Temperatura de Armazenamento 20 C a 60 C Humidade de Funcionamento 10 a 85 MTBF 5 Dimens es Peso N W Especifica es do Mecanismo Inclina o Vertical 5 a 15 Inclina o Horizontal N o Aj...

Страница 16: ...monitor con las ranuras correspondientes situadas en la parte inferior de la base Si escucha un clic significa que el monitor ha quedado colocado firmemente sobre la base Conecte su monitor a un orden...

Страница 17: ...V Precauci n Los cambios o modificaciones no aprobados expl citamente por el fabricante podr an invalidar la autoridad del usuario otorgada por la Comisi n Federal de Comunicaciones FCC para utilizar...

Страница 18: ...C Temperatura de almacenamiento 20 C a 60 C Humedad operativa 10 a 85 MTBF 50000 h Dimensiones Peso P N Especificaci n del mecanismo Inclinaci n 5 a 15 Balanceo No Ajuste de altura No Pivote No Sopor...

Страница 19: ...LCD QSG 1 LCD LCD 2 LCD 3 LCD 4 5 LCD 20 60 C 4 140 F LCD 6 PC LCD LCD 1 2 3 1 2 VGA DVI D VGA DVI D 3 LCD AUDIO IN 4 5 s LCD VGA DVI OSD OSD OSD OSD OSD OSD OSD OSD OSD a OSD OSD b OSD 2 1 1 1 1 1 2...

Страница 20: ...006 95 EC RoHS 2002 95 EC EMC B FCC 15 1 2 B ICES 003 Remarque a I intention des utilisateurs canadiens Cet appareil numerique de la classe B est conforme a la norme NMB 003 du Canada Electronic Indus...

Страница 21: ...75Hz 136MHz 1440 x 900 75Hz VESA DDCCI DDC2B DVI D 24 0 7Vp p 75 100 240VAC 50 60Hz 5 C 35 C 10 85 MTBF 5 E Empowering ACM RGB OSD DDCCI 5 3mm H x 0 2 3mm V 0000 25 C 15 16 7 408 mm D Sub 255 mm 440...

Страница 22: ...4...

Страница 23: ...er LCD QSG 1 LCD LCD 2 LCD 3 LCD 4 5 LCD 20 60 C 4 140 F LCD 6 LCD LCD 1 2 3 1 2 VGA DVI D VGA DVI D 3 LCD AUDIO IN 4 5 LCD VGA DVI OSD OSD OSD OSD OSD OSD OSD OSD OSD a OSD OSD b OSD 2 1 1 1 1 1 2 1...

Страница 24: ...C 2006 95 EC 2002 95 EC EMC B FCC FCC 15 1 2 B ICE 003 Remarque a I intention des utilisateurs canadiens Cet appareil numerique de la classe B est conforme a la norme NMB 003 du Canada Electronic Indu...

Страница 25: ...55 75Hz 16 7 136MHz 1440 x 900 75Hz VESA DDCCI DDC2B D Sub DVI D 24 0 7Vp p 75 OHM 408 255 mm 100 240VAC 50 60Hz 5 C 35 C 20 C 60 C 10 85 MTBF C 440 24 x 358 18 x 161 44 mm 5 15 E ACM RGB OSD DDCCI 1...

Страница 26: ...Acer QSG 1 2 3 4 5 20 60 4 140 6 VGA DVI 1 2 3 1 2 VGA DVI D VGA DVI D 3 AUDIO IN 4 5 AUTO OSD OSD OSD OSD OSD OSD MENU OSD OSD OSD 1 2 1 1 1 1 1 2 1 2 2...

Страница 27: ...RoHS 2002 95 EC EMC 15 FCC 1 2 ICES 003 Remarque a I intention des utilisateurs canadiens Cet appareil numerique de la classe B est conforme a la norme NMB 003 du Canada 4 LD 0 Q 9 b 7 4 K K 7 0 64 4...

Страница 28: ...play_Management ADM CD Windows 98SE ME NT 98SE ME NT 4 0 2000 XP Vista 16 7M 55 75Hz 0 283 x 0 283 Max ACM 176 H 176 V CR 5 160 160 CR 10 136MHz 30KHz 80KHz 1440 x 900 75Hz DVI D 24 0 55W VESA DDCCI D...

Отзывы: