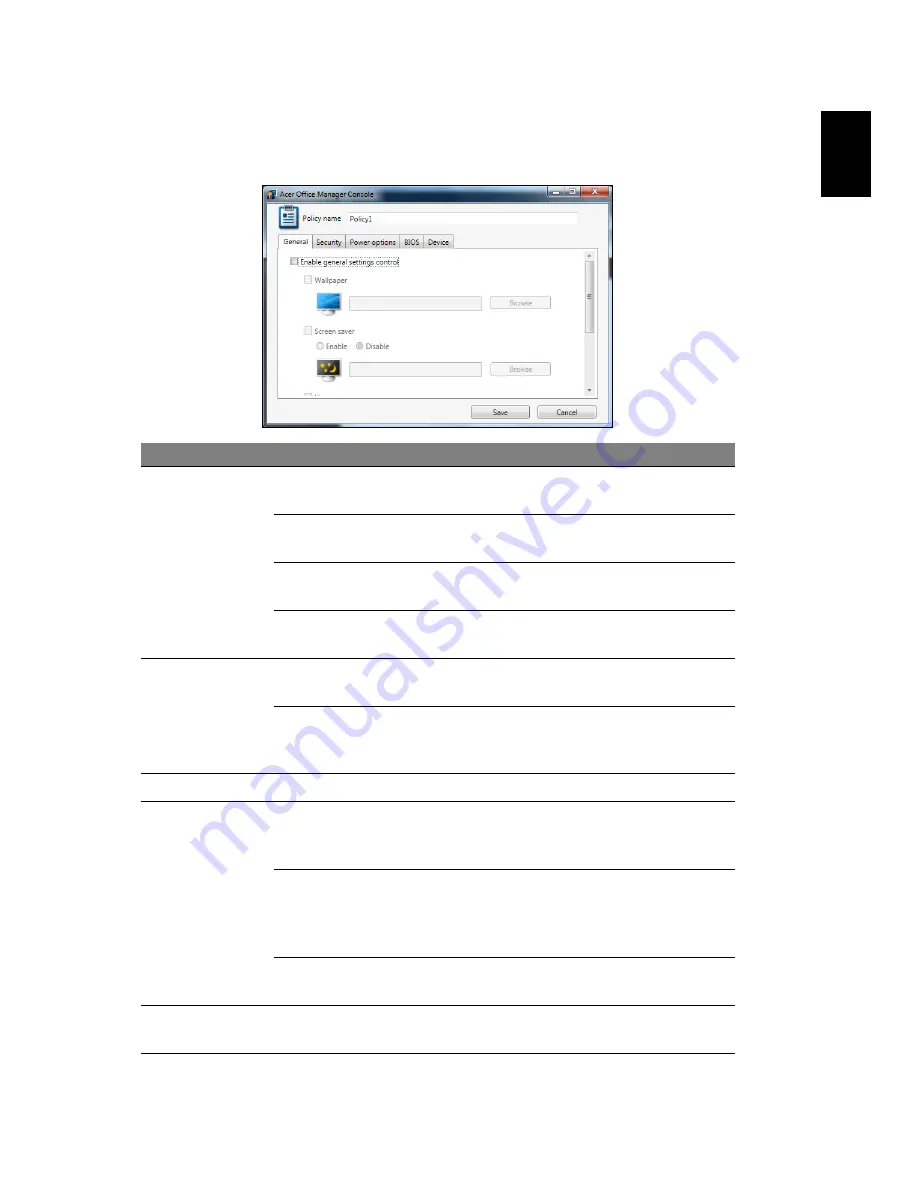
Acer TravelMate P645-M Скачать руководство пользователя страница 32

20

Engl

ish

Policies

You can set policies to apply to selected clients or groups of clients. Click the 

+

symbol to add a new policy.

Tab

Item

Function

General

Wallpaper

Set a wallpaper that will be applied to all 
clients.

Screen saver

Set a screen saver that will be applied to 
all clients.

Homepage

Set which home page Internet Explorer will 
open when launched.

Enable AutoPlay

Enable or disable AutoPlay for external 
devices or CD- / DVD-ROMs

Security

Enable IE security 
settings

Define Internet Explorer security settings.

Enable user 
account policy

Set policies for user passwords, such as 
minimum password strength, password 
validity, and lockout parameters.

Power options

Define power settings.

BIOS

BIOS Supervisor 
password

Set a BIOS Supervisor password. If a 
password already exists, you will need to 
enter it before you can change it.

BIOS User 
password

Set a BIOS User password. If a password 
already exists, you will need to enter it or 
the Supervisor password before you can 
change the User password.

Change boot 
sequence settings

Change the order of devices used to boot 
the system.

Device

Enable or disable devices on notebook 
computers.

Содержание TravelMate P645-M

Страница 1: ...TravelMate Series User s Manual...

Страница 2: ..._ Serial number ___________________________________ Date of purchase ________________________________ Place of purchase ________________________________ Wednesday July 31 2013 All Rights Reserved Trav...

Страница 3: ...sconnecting power to the power supply unit Install the power supply unit before connecting the power cord to the AC power outlet Unplug the power cord before removing the power supply unit from the co...

Страница 4: ...V AC The power cord included with the system meets the requirements for use in the country region where the system was purchased Power cords for use in other countries regions must meet the requiremen...

Страница 5: ...e temperature of the base will rise during normal operation particularly when plugged in to AC power Allowing sustained contact with exposed skin can cause discomfort or burns Product servicing Do not...

Страница 6: ...ended purpose Never use any charger or battery that is damaged Do not short circuit the battery Accidental short circuiting can occur when a metallic object such as a coin clip or pen causes direct co...

Страница 7: ...RADIATION DU FAISCEAU LASER INVISIBLE EN CAS D OUVERTURE EVITTER TOUTE EXPOSITION AUX RAYONS LUOKAN 1 LASERLAITE LASER KLASSE 1 VORSICHT UNSICHTBARE LASERSTRAHLUNG WENN ABDECKUNG GE FFNET NICHT DEM S...

Страница 8: ...may be attracted to the device and persons with hearing aids should not hold the device to the ear with the hearing aid Do not place credit cards or other magnetic storage media near the device becau...

Страница 9: ...r the air bag or in the air bag deployment area If in vehicle wireless equipment is improperly installed and the air bag inflates serious injury could result Using your device while flying in aircraft...

Страница 10: ...h the ENERGY STAR mark What is ENERGY STAR Products that are ENERGY STAR qualified use less energy and prevent greenhouse gas emissions by meeting strict energy efficiency guidelines set by the U S En...

Страница 11: ...your company s health and safety department The following section provides tips for more comfortable computer use Finding your comfort zone Find your comfort zone by adjusting the viewing angle of the...

Страница 12: ...g drapes shades or blinds using a task light changing the display s viewing angle using a glare reduction filter using a display visor such as a piece of cardboard extended from the display s top fron...

Страница 13: ...help you to be more productive please refer to the TravelMate Series User s Manual This guide contains detailed information on such subjects as system utilities data recovery expansion options and tr...

Страница 14: ...the computer display when you close it Never place the computer on uneven surfaces Taking care of your AC adapter Here are some ways to take care of your AC adapter Do not connect the adapter to any o...

Страница 15: ...nd remove the battery pack 2 Disconnect the AC adapter 3 Use a soft moist cloth Do not use liquid or aerosol cleaners If either of the following occurs The computer has been dropped or the body has be...

Страница 16: ...8 Touchpad basics 8 Touchpad gestures 8 Using the keyboard 10 Lock keys and embedded numeric keypad 10 Hotkeys 10 Windows keys 12 Acer ProShield 13 Overview 13 Setting up ProShield 13 Personal Secure...

Страница 17: ...ery low warning 44 Installing and removing the battery pack 44 Traveling with your computer 45 Disconnecting from the desktop 45 Moving around 45 Preparing the computer 45 What to bring to meetings 46...

Страница 18: ...eshooting 65 Troubleshooting tips 65 Error messages 65 Tips and hints for using Windows 8 66 Three concepts you might want to keep in mind 66 How do I access the charms 66 How do I get to Start 66 How...

Страница 19: ...7 English Regulations and safety notices 70...

Страница 20: ...ith your finger to perform a click which will select or start an item Quickly repeat the tap to perform a double tap or double click Drag Press and hold the left side of the selection button or tap tw...

Страница 21: ...Touchpad 9 English Two finger pinch Zoom in and out of photos maps and documents with a simple finger and thumb gesture...

Страница 22: ...output Lock key Description Caps Lock When Caps Lock is on all alphabetic characters typed are in uppercase Num Lock Fn F11 When Num Lock is on the embedded keypad is in numeric mode The keys function...

Страница 23: ...ay off Turns the display screen backlight off to save power Press any key to return Fn F7 Touchpad toggle Turns the built in touchpad on and off Fn F8 Speaker toggle Turns the speakers on and off Fn F...

Страница 24: ...ctions Key Description Windows key Pressed alone it returns to the Start screen It can also be used with other keys for special functions please check Windows Help Application key This key has the sam...

Страница 25: ...orized access and intrusion Credential Manager Password Fingerprint registration if your PC has a fingerprint scanner Online accounts configuration Pre Boot Authentication Boot sequence and device sec...

Страница 26: ...combination of letters and numbers Once you have set a password you can click Next to proceed to setting up a Personal Secure Drive or click Finish to exit the wizard Personal Secure Drive The Persona...

Страница 27: ...es to the settings Use the menu in the left hand pane to make changes Credential Manager Here you can set and manage your credentials including Pre boot authentication You can change your ProShield an...

Страница 28: ...secure your PC from unauthorized access Register two or more fingerprints that can then be used to access your PC during start up instead of your password Click Registration Tutorial for more informa...

Страница 29: ...to be completely removed from the hard disk The File Shredder overwrites the data to make recovering the data impossible Warning Make sure you select only the information you want to shred Once you ha...

Страница 30: ...le The first time you run the Console you will be asked to set up a password and an email address for notifications Note The password should be from 8 to 31 characters long and must include at least o...

Страница 31: ...ients being managed from the Console Double click an icon to view the system information for that client You can also group clients together for easier management For example you can create a group fo...

Страница 32: ...ttings Define Internet Explorer security settings Enable user account policy Set policies for user passwords such as minimum password strength password validity and lockout parameters Power options De...

Страница 33: ...tem You can also see which Hotfixes have been applied to each system Select the system model from the Model drop down menu You can then further refine the search by operating system via the OS drop do...

Страница 34: ...account to receive email notifications Preference settings Set up your program launch and lock preferences Notification settings Set up what time related notifications should show on the Dashboard Dat...

Страница 35: ...ecovery Management is only available with a pre installed Windows operating system Important We recommend that you create a Recovery Backup and Drivers and Applications Backup and as soon as possible...

Страница 36: ...B or larger 1 From Start type Recovery and then click Acer Recovery Management in the list of apps 2 Click Create Factory Default Backup The Recovery Drive window opens Make sure Copy contents from th...

Страница 37: ...puter If you delete this information you can only use the USB recovery backup to restore your computer if you lose or erase the USB drive you cannot restore your computer 7 Unplug the USB drive and la...

Страница 38: ...rom Start type Recovery and then click Acer Recovery Management in the list of apps 2 Click Create Drivers and Applications Backup Plug in the USB drive or insert a blank DVD into the optical drive th...

Страница 39: ...Important Write a unique descriptive label on each backup such as Drivers and Applications Backup Make sure you keep the backup in a safe place that you will remember Recovering your system To recove...

Страница 40: ...step you may need to reinstall the applications and device drivers that came pre installed on your computer from the factory You can reinstall using either your hard drive or the backup you have creat...

Страница 41: ...c drive or connect it to a free USB port If you inserted a DVD wait for Acer Resource Center to start If Acer Resource Center does not start automatically press the Windows key E then double click on...

Страница 42: ...Open System Restore then Next 4 Click the latest restore point at a time when your system worked correctly click Next then Finish 5 A confirmation window appears click Yes Your system is restored usi...

Страница 43: ...ctory Settings with Acer Recovery Management on page 31 Customized Restore will attempt to retain your files user data but will reinstall all software and drivers Software installed since you purchase...

Страница 44: ...then continues by copying files to your hard drive 6 After the recovery has finished you can start using your computer by repeating the first start process Recovering from the hard drive during startu...

Страница 45: ...ackup 2 If your computer does not have a built in keyboard make sure a keyboard is attached to your computer 3 Plug in the USB drive and turn on your computer 4 If it is not already enabled you must e...

Страница 46: ...et your PC to start the reset process Reset your PC deletes everything on your hard drive then reinstalls Windows and all software and drivers that were pre installed on your system If you can access...

Страница 47: ...each file is erased so no files can be viewed after the recovery Cleaning the drive takes much longer up to 5 hours but is much more secure as old files are completely removed 6 Click Reset 7 After t...

Страница 48: ...nging the OS will erase all data on your computer Perform a backup before changing Changing to Windows 8 To change to Windows 8 open Acer eRecovery Management Start All programs Acer 1 Select Restore...

Страница 49: ...To change back to Windows 7 you must change Boot Mode back to Legacy BIOS Windows 7 will not start if the BIOS Mode is set to UEFI Please refer to Changing BIOS settings on page 38 Start Windows 8 fro...

Страница 50: ...ur BIOS settings press F2 when you see the Acer logo during boot up Use the arrow keys to select Boot Boot Mode Press Enter then use the arrow keys to select UEFI or Legacy BIOS Press Enter again Fina...

Страница 51: ...boot up to launch Acer Recovery Management 2 Select Restore Operating System to Factory Deafults 3 Select which operating system to restore Windows 7 or Windows 8 4 Click OK and follow the instructio...

Страница 52: ...uses Fast startup to start quickly but also uses a small amount of power to check for signals to start These checks will slowly drain your computer s battery If you prefer to reduce your computer s po...

Страница 53: ...Power management 41 English 5 To access Shutdown Settings select Change settings that are currently unavailable 6 Scroll down and disable Turn on fast startup 7 Select Save changes...

Страница 54: ...correctly installed in the battery bay Plug the AC adapter into the computer and connect to a mains power outlet You can continue to operate your computer on AC power while your battery is charging Ho...

Страница 55: ...fully charged Not discharging and recharging the battery to its extremes as described above Frequent use the more you use the battery the faster it will reach the end of its effective life A standard...

Страница 56: ...er first and that the top surface of the battery is facing up 2 Slide the battery into the battery bay and gently push until the battery locks in place To remove a battery pack 1 Slide the battery rel...

Страница 57: ...ng within short distances for example from your office desk to a meeting room Preparing the computer Before moving the computer close and latch the display cover to place it in Sleep mode You can now...

Страница 58: ...can damage the drive head Pack the computer in a protective case that can prevent the computer from sliding around and cushion it if it should fall Caution Avoid packing items next to the top cover of...

Страница 59: ...computer Prepare the computer as if you were taking it home Make sure that the battery in the computer is charged Airport security may require you to turn on your computer when carrying it into the ga...

Страница 60: ...al considerations Follow the same special considerations as when traveling with the computer In addition these tips are useful when traveling internationally When traveling in another country check th...

Страница 61: ...Traveling with your computer 49 English...

Страница 62: ...on your computer Note We don t recommend sending more than 1 MB of data at a time via NFC Enabling NFC on your computer To enable NFC on your computer do the following 1 press the Windows key C 2 cli...

Страница 63: ...lets and other devices can send information to your computer via NFC Depending upon the device sending the data you may be able to receive a variety of content Much of the content NFC is able to send...

Страница 64: ...a complete mobile computing experience Connectivity options Ports allow you to connect peripheral devices to your computer as you would with a desktop PC For instructions on how to connect different...

Страница 65: ...n network feature The built in network feature allows you to connect your computer to an Ethernet based network To use the network feature connect an Ethernet cable from the Ethernet RJ 45 port on the...

Страница 66: ...s to files and devices connected to the network for example a printer or scanner Also you can share an internet connection with other computers in your home Installation speed and simplicity Installin...

Страница 67: ...ons Not all ExpressCard slots will support both types Please refer to your card s manual for details on how to install and use the card and its functions Inserting an ExpressCard Insert the card into...

Страница 68: ...glish IEEE 1394 port The computer s IEEE 1394 port allows you to connect to an IEEE 1394 compatible device like a video camera or digital camera See your video or digital camera s documentation for de...

Страница 69: ...ce between any compatible digital audio video source such as a set top box DVD player and A V receiver and a compatible digital audio and or video monitor such as a digital television DTV over a singl...

Страница 70: ...58 English Universal Serial Bus USB The USB port is a high speed serial bus which allows you to connect USB peripherals without taking up system resources...

Страница 71: ...ode insert a DVD movie of a different region into the DVD drive Once your DVD drive is set to a region code it will only play DVDs for that region You can set the region code a maximum of five times i...

Страница 72: ...2 Remove the screws from the memory cover then lift and remove the memory cover 3 a Insert the memory module diagonally into the slot then b gently press it down until it clicks into place 4 Replace t...

Страница 73: ...ed to run it To activate the BIOS utility press F2 during the POST while the computer logo is being displayed Boot sequence To set the boot sequence in the BIOS utility activate the BIOS utility then...

Страница 74: ...utomatically blanks the screen to save power Press any key to turn the display back on If pressing a key does not turn the display back on three things might be the cause The brightness level might be...

Страница 75: ...you need to know about the ITW program A list of available authorized service centers is in this handy booklet Read this passport thoroughly Always have your ITW passport on hand especially when you t...

Страница 76: ...64 English Machine and model type Serial number Date of purchase...

Страница 77: ...of action If you still encounter problems after going through the corrective measures please contact your dealer or an authorized service center for assistance Error messages Corrective action CMOS b...

Страница 78: ...dows key on the keyboard press the Windows key C and click Start or move the cursor to the lower left hand corner of the screen and click Start How do I jump between apps Move the cursor to the left h...

Страница 79: ...image How do I move tiles Click and hold a tile to select it then drag it to the place on Start that you want it to appear Other tiles will be moved to accommodate the tile in its new location Can I...

Страница 80: ...and you want to make an app appear on Start you can select the app and right click on it Select Pin to Start from the menu that appears at the bottom of the screen How do I remove a tile from Start R...

Страница 81: ...ve already installed Windows 8 and didn t sign in with a Microsoft account or you don t have a Microsoft account and want to get one press the Windows key C and click Settings Change PC settings User...

Страница 82: ...s may be attached to this equipment Operation with non certified peripherals is likely to result in interference to radio and TV reception Caution Changes or modifications not expressly approved by th...

Страница 83: ...rs is 100 mW Maximum authorized power outdoors is 10 mW Departments in which the use of the 2400 2483 5 MHz band is permitted with an EIRP of less than 100 mW indoors and less than 10 mW outdoors This...

Страница 84: ...es afin de fournir un cran de blindage maximal Si le mat riel ou son antenne d mission est install l ext rieur il doit faire l objet d une licence Caution When using IEEE 802 11a wireless LAN this pro...

Страница 85: ...EMPT RADIO COMMUNICATION DEVICES RSS 210 Exposure of humans to RF fields RSS 102 The computer employs low gain integral antennas that do not emit RF field in excess of Health Canada limits for the gen...

Отзывы: