background image

TravelMate 340

Service Guide

  PART NO.: 49.40F02.001
  DOC. NO.:   SG322-9910A                                                                                      PRINTED IN TAIWAN

Service guide files and updates are available

on the AIPG/CSD web; for more information, 

please refer to 

http://csd.acer.com.tw

340SG.book  Page I  Thursday, October 28, 1999  10:51 AM

Содержание TravelMate 340

Страница 1: ...ART NO 49 40F02 001 DOC NO SG322 9910A PRINTED IN TAIWAN Service guide files and updates are available on the AIPG CSD web for more information please refer to http csd acer com tw 340SG book Page I Thursday October 28 1999 10 51 AM ...

Страница 2: ... and specifically disclaims any warranties of merchantability or fitness for any particular purpose Any Acer Incorporated software described in this manual is sold or licensed as is Should the programs prove defective following their purchase the buyer and not Acer Incorporated its distributor or its dealer assumes the entire cost of all necessary servicing repair and any incidental or consequenti...

Страница 3: ...onal information related to the current topic WARNING Alerts you to any damage that might result from doing or not doing specific actions CAUTION Gives precautionary measures to avoid possible hardware or software problems IMPORTANT Reminds you to do specific actions relevant to the accomplishment of procedures 340SG book Page III Thursday October 28 1999 10 51 AM ...

Страница 4: ...neric service guide In such cases please contact your regional offices or the responsible personnel channel to provide you with further technical details 2 Please note WHEN ORDERING FRU PARTS that you should check the most up to date information available on your regional web or channel If for whatever reason a part number change is made it will not be noted in the printed Service Guide For ACER A...

Страница 5: ... and Fan Utility 35 Main Board Data Utility 35 System Diagnostic Diskette 36 Running PQA Diagnostics Program 37 Chapter 3 Machine Disassembly and Replacement 39 General Information 40 Before You Begin 40 Disassembly Procedure Flowchart 41 Removing the Battery Pack 43 Removing the Hard Disk Drive Module 44 Disassembling the Hard Disk Drive Module 44 Removing the External DIMM Module 45 Removing the...

Страница 6: ...ent Problems 63 Undetermined Problems 63 Index of AFlash BIOS Error Message 64 Index of PQA Diagnostic Error Code Message 64 Chapter 5 Jumper and Connector Information 65 Top View 65 Bottom View 66 Chapter 6 FRU Field Replaceable Unit List 67 Appendix A Model Number and Configurations 77 Appendix B Test Compatible Components 79 Windows 95 Environment Test 80 Windows 98 Environment Test 81 Windows ...

Страница 7: ... high fidelity PCI stereo audio with 3D sound and wavetable synthesizer T Built in speaker T EasyLink Combo Drive CD ROM or DVD ROM T Dual view capability T DVD playback capability with DVD equipped EasyLink DVD Combo Drive option T USB video capture kit Connectivity T High speed fax data PCI modem T Built in network feature for Ethernet 10 1000 LAN optional T Fast infrared FIR wireless communicat...

Страница 8: ...es an automatic LCD dim feature that automatically decides the best settings for your display and at the same time conserves power See on page 24 for more information on power management features Dualview The computer s video chip takes advantage of Windows 98 multi display capability allowing you to extend your desktop to an external display device such as an external monitor or projector With th...

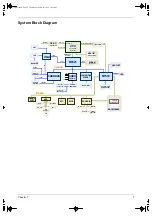
Страница 9: ...AL EXTERNAL HEADPHONE HEADPHONE LAN MODEM LAN MODEM SOCKET SOCKET RJ45 RJ11 RJ45 RJ11 M1533 LEVEL SHIFT LEVEL SHIFT USBPORT USBPORT HDD HDD GPI GPO GPIO GPI GPO GPIO EXTERNAL SMI EXTERNAL SMI DEBUG DEBUG PORT PORT KBC KBC INT K B INT K B EXT K B EXT K B FAN FAN CONTROL CONTROL FAN FAN TOUCH PAD TOUCH PAD PS2 PS2 RTC RTC BIOS BIOS SUPER I O SUPER I O INT K B INT K B PRINTER PRINTER SERIAL SERIAL PO...

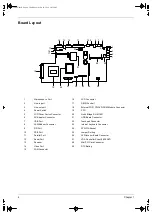
Страница 10: ...d Connector 7 USB Port 22 Touchpad Connector 8 LAN Modem Connector 23 Internal Keyboard Connector 9 FIR Port 24 PCMCIA Socket 10 PS 2 Port 25 Jumper Setting 11 Parallel Port 26 LED Inverter Board Connector 12 Serial Port 27 VGA Controller Cyber 9525 DVD 13 Speaker 28 Mini PCI Card Connector 14 Video Port 29 RTC Battery 15 FAN Connector 3 28 5 15 18 21 14 16 17 13 12 11 9 8 7 6 22 23 24 25 2 1 4 26...

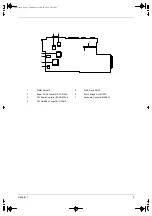
Страница 11: ...IOS Flash ROM 2 Super I O Controller NS PC97338 6 South Bridge ALI M1533 3 PCI Audio Controller ESS ES1946 7 Keyboard Controller M38867 4 PCI CardBus Controller OZ6812 1 2 3 4 5 6 7 340SG book Page 5 Thursday October 28 1999 10 51 AM ...

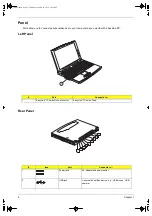
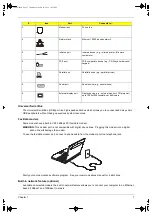
Страница 12: ...ld with a desktop PC Left Panel Rear Panel Port Connects to 1 EasyLink Combo Drive connector EasyLink Combo Drive Icon Port Connects to 1 Power jack AC adapter and power outlet 2 USB jack Universal Serial Bus device e g USB mouse USB camera 340SG book Page 6 Thursday October 28 1999 10 51 AM ...

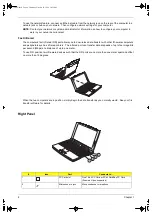
Страница 13: ...ware program See your communications manual for instructions Built in network feature optional Available on selected models the built in network feature allows you to connect your computer to an Ethernet based 10BaseT and 100BaseT network 3 Modem jack Phone line 4 Network jack Ethernet 10 100 based network 5 Infrared port Infrared device e g infrared printer IR aware computers 6 PS 2 port PS 2 com...

Страница 14: ...computers and peripherals such as infrared printers The infrared port can transfer data at speeds of up to four megabits per second Mbps at a distance of up to one meter To use FIR position two IR aware devices such that their IR ports are no more than one meter apart and offset no more than 15 degrees When the two computers are in position simply begin the data transfer as you normally would See ...

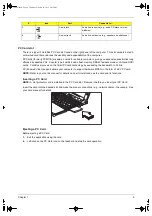
Страница 15: ...port hardware MPEG in the form of a ZV PC card NOTE Refer to your card s manual for details on how to install and use the card and its functions Inserting a PC Card NOTE A slot protector card is installed in the PC Card slot Remove it before you insert your PC Card Insert the card into the desired slot and make the proper connections e g network cable if necessary See your card manual for details ...

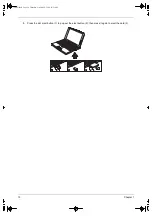
Страница 16: ...10 Chapter 1 3 Press the slot eject button 1 to pop out the eject button 2 then press it again to eject the card 3 340SG book Page 10 Thursday October 28 1999 10 51 AM ...

Страница 17: ...while the cover is closed Icon Function Description 1 Power Lights when the computer is on 2 Sleep Lights when the computer enters Sleep mode 3 Media Activity Lights when the floppy drive hard disk or EasyLink Combo Drive is active 4 Battery Charge Lights when the battery is being charged 5 Caps Lock Lights when Caps Lock is activated 6 Num Lock Lights when Num Lock is activated 340SG book Page 11...

Страница 18: ...wer Management Scheme Toggle Switches the power management scheme used by the computer function available if supported by operating system Fn F4 Sleep ACPI or Standby APM Puts the computer in Sleep mode or Standby mode Fn F5 Display Toggle Switches display output between the display screen external monitor if connected and both the display screen and external monitor Fn F6 Screen Blank Turns the d...

Страница 19: ...k on the Language tab 4 Verify that the keyboard layout used for English United States is set to United States International If not select and click on Properties then select United States International and click on OK 5 Click on OK To type the Euro symbol 1 Locate the Euro symbol on your keyboard 2 Open a text editor or word processor 3 Hold Alt Gr and press the Euro symbol NOTE Some fonts and so...

Страница 20: ...ls ACPI 1 0a APM 1 2 PC Card 95 SM BIOS 2 1 EPP IEEE 1284 ECP IEEE 1284 1 7 1 9 IrDA PCI 2 1 PnP 1 0a PS 2 keyboard and mouse USB VESA VGA BIOS DDC 2B CD ROM bootable Windows keyboard Microsoft Simple Boot Flag BIOS password control Set by switch see SW3 switch 6 settings Second Level Cache Item Specification Cache controller Build in ALI 1621 Cache size 256 KB 1st level cache control Always enabl...

Страница 21: ...4MB 64MB 32MB 96MB 32MB 64MB 96MB 128MB 0 128MB 0 128MB 128MB 64MB 64MB 128MB 128MB 32MB 160MB 32MB 128MB 160MB 128MB 64MB 192MB 64MB 128MB 192MB 128MB 128MB 256MB LAN Modem Combo Interface Item Specification Chipset Ambit T60 082 C 00 Fax modem data baud rate bps 14 4K Data modem data baud rate bps 56K Supports modem protocol V 90 data modem 56K V 90 fax modem 14 4K and digital line protection op...

Страница 22: ...er Mbytes s 10 69 20 2 10 69 20 2 Data transfer rate host buffer Mbytes s 16 6 PIO mode 4 66 6 Ultra DMA mode 4 DC Power Requirements Voltage tolerance 5 5 5 5 CD ROM Floppy Diskette Combo Drive Interface Item Specification Vendor model name TEAC CF240500 CD ROM Performance Specification Transfer rate KB sec 1 545KB sec 3 600KB sec FULL CAV Access time typ 130 ms Rotation speed 5136 rpm typ Buffer...

Страница 23: ...2 KB Interface ATAPI Applicable disc format DVD ROM DVD Video CD DA CD ROM Mode 1 Mode 2 CD ROM XA MODE 2 FORM 1 FORM 2 Multi Session Photo CD CD I Video CD Enhanced CD CD PLUS Compatible CD R W Loading mechanism Drawer with soft eject and emergency eject hole Power Requirement Input Voltage 5 V Diskette Drive Floppy Disk Specifications Media recognition 2DD 720KB 2HD 1 2MB 3 mode 2HD 1 44MB Secto...

Страница 24: ...Graph interface AGP 1X or 2X Accelerated Graphics Port bus Maximum resolution LCD 1024x768 16 bit colors Maximum resolution CRT 1600x1280 256 colors Video Memory Item Specification Fixed or upgradeable Fixed built in video controller Video memory size 2 5MB Video Resolutions Mode Resolution Refresh Rate CRT Only LCD CRT Simultaneous 640x480x256 85 60 640x480x64K 85 60 640x480x16M 85 60 800x600x256...

Страница 25: ...t Item Specification OHCI USB 1 0 Number of USB port 1 Location Rear side Serial port function control Enable Disable by BIOS Setup IrDA Port Item Specification IrDA FIR port controller NS PC97338VJG Number of IrDA FIR port 1 Location Rear side IrDA FIR port function control Enable disable by BIOS Setup Optional IrDA FIR port in BIOS Setup 2F8h 3F8h 3E8h 2E8h Optional IrDA FIR port IRQ in BIOS Set...

Страница 26: ... external keyboard work simultaneously Yes Battery Item Specification Vendor model name Panasonic CGP E 618AE Battery Type Li ion Pack capacity 2800 mAH Cell voltage 3 6V cell Number of battery cell 6 Package configuration 3 cells in series 2 series in parallel Package voltage 10 8 V DC AC LCD Inverter Item Specification Vendor model name Ambit T62 123 C 01 Sumida IV12149 Input voltage V 7 3 min 2...

Страница 27: ...at maximum load under 115V 60Hz Output Ratings CV mode DC output voltage 19 0V 20 0V Noise Ripple 300mvp pmax 20MHz bandwidth Load 0 A min 2 4 A max Output Ratings CC mode DC output voltage 12V 19V Constant output 2 75 0 2 A Dynamic Output Characteristics Turn on delay time 2 sec 115Vac Hold up time 4 ms min 115 Vac input full load Over Voltage Protection OVP 24 V Short circuit protection Output c...

Страница 28: ...sk is idle within a specified period of time T Hard disk drive is in standby mode spindle turned off Environmental Requirements Item Specification Temperature Operating 5 35 Degree C Non Operating 20 60 Degree C Humidity Operating 20 80 RH Non condensing Non Operating 20 90 RH Non condensing Vibration Operating Unpacked 5 25 6 Hz 0 38 mm peak to peak 25 6 250Hz 0 5G Non Operating Unpacked 5 27 1 H...

Страница 29: ... for PnP BIOS I O Address Map I O Address Function 000 00F DMA controller 1 020 021 Interrupt controller 1 040 043 Timer 1 060 064 Keyboard controller 8742 chip select 061 System speaker out 040B DMA controller 1 061 System speaker 070 071 Real time clock and NMI mask 080 08F DMA page register 0A0 0A1 Interrupt controller 2 0C0 0DF DMA controller 2 0F0 0FF Numeric data processor 120 13F 180 18F Po...

Страница 30: ...RQ5 Audio or LPT1 optional IRQ6 Floppy IRQ7 LPT1 or Audio optional IRQ8 Real time clock IRQ9 Card bus ACPI Modem IRQ10 USB IRQ11 FIR IRQ12 PS2 pointing device IRQ13 Numeric data processor IRQ14 1st EIDE device hard disk IRQ15 2nd EIDE device CD ROM drive DMA Channel Assignment DMA Channel Function DRQ0 Audio or FIR optional DRQ1 ECP or Audio or FIR optional DRQ2 Floppy DRQ3 ECP or FIR optional DRQ...

Страница 31: ...ult Settings Use the cursor up down keys to select a menu item then press Enter Within a menu navigate through the BIOS Utility by following these instructions T Press the cursor up down keys to move between parameters T Press the cursor left right keys to change the value of a parameter T Press Esc while you are in any of the menu options to return to the main menu NOTE You can change the value o...

Страница 32: ...System BIOS Version Shows the version number of the BIOS Vx Rx version and release numbers VGA BIOS Version Shows the version number of the VGA display BIOS Vx Rx version and release numbers Serial Number Shows the serial number of the system It is the number identical to the system serial number labelled at the bottom of the system unit The default serial number is scanned while manufacturing and...

Страница 33: ... values that define how your computer behaves on system startup UUID Shows the universally unique identifier number of the computer also known as GUID Globally Unique Identifier It is the requirement specification of SMBIOS 2 1 System Management BIOS UUID are fixed size 128 bit value and are unique across both space and time as well as stored in LCD inverter UUID number can identify a person and e...

Страница 34: ...the computer automatically determines the display device when the computer starts up If an external display device e g monitor is connected it becomes the boot display otherwise the computer LCD is the boot display When set to Both the computer outputs to both the computer LCD and an external display device if one is connected Auto or Both Screen Expansion Enables or disables the screen expansion ...

Страница 35: ...he base I O address and interrupt request IRQ of the serial port Enabled or Disabled 3F8h 3E8h 2F8h or 2E8h 4 or 11 IrDA Port Enables or disables the infrared port When enabled you can set the base I O address interrupt request IRQ and direct memory access DMA channel of the infrared port Enabled or Disabled 2F8h 3E8h 3F8h or 2E8h 3 or 10 Parallel Port Enables or disables the parallel port When en...

Страница 36: ...ent Three password types protect your computer from unauthorized access Setting these passwords creates several different levels of protection for your computer and data Parameter Description Options Setup Password When set this password protects the computer and this BIOS Utility from unauthorized entry See the following section for instructions on how to set a password Disabled or Enabled Power ...

Страница 37: ...ress Enter 3 When the Hard Disk Password is set the following prompt appears at boot up Type the Hard Disk Password a symbol appears for each character you type and press Enter to use the computer If you enter the password incorrectly an x symbol appears Try again and press Enter IMPORTANT You have three chances to enter a password If you successfully entered the password the following symbol appe...

Страница 38: ...fferent levels of protection for your computer and data on page 30 Power Management The Power Management screen contains parameters that are related to power saving and power management The following table describes the parameters in this screen Settings in boldface are the default and suggested parameter settings NOTE If your system has ACPI all power management functions are taken care of by Win...

Страница 39: ...ir default values select this menu item and press Enter The following dialog box displays If you would like to load default settings for all parameters use the cursor left right keys to select Yes then press Enter Choose No if otherwise 340SG book Page 33 Thursday October 28 1999 10 51 AM ...

Страница 40: ...lity Executing Flash Program IMPORTANT If this diskette is not bootable do the following actions before you use it 1 Create a bootable disk 2 Copy all AFlash files into this bootable diskette 3 Put the bootable disk into TravelMate 340 series mobile then re boot IMPORTANT Never turn off the system power while Flash BIOS is programming This will damage your system 4 After Flash BIOS is done reboot ...

Страница 41: ...OTE When you set a new LCD Panel ID and the new LCD is not yet enabled to function so connect an external CRT to see the program execution process NOTE Make sure the new ID code you choose corresponds with the LCD brand and type If you write a wrong ID into inverter just reboot and re execute the program and input the correct ID code 2 Restart computer the new LCD should work normally NOTE If LCD ...

Страница 42: ...r this test fails 4 Exit To use this diskette first boot from this diskette then a Microsoft Windows 98 Startup Menu prompts you to choose the testing item Follow the instructions on screen to proceed IMPORTANT If this diskette is not bootable do the following actions before you use it 1 Do system transfers 2 Copy the following files to A HIMEM SYS MSCDEX EXE LASTDRV COM RAMDRIVE SYS Disk 2 1 Infr...

Страница 43: ...of the selected items and check the select test items in sequence Full Test performs all test items detail for your system Quick Test performs all test items quickly for your system The screen below appears if you select Multi Test PQA Vx_x xx xx xx Diag Result SysInfo Option Exit PQA Vx_x xx xx xx Diag Result SysInfo Option Exit Diag ONE TEST MULTI TEST FULL TEST QUICK TEST PQA Vx_x xx xx xx Diag...

Страница 44: ...Tests the selected item s T Enter Opens the available options T Test Times Indicates the number of tests to perform NOTE The F1 and F2 keys function only after you finish configuring the Test option NOTE When any errors are detected by diagnostic program refer to Index of PQA Diagnostic Error Code Message on page 64 for troubleshooting PQA Vx_x xx xx xx Diag Result SysInfo Option Exit Diag MANUAL ...

Страница 45: ... mat for preventing electrostatic discharge T Flat bladed screwdriver T Phillips screwdriver T Tweezers T Flat bladed screwdriver or plastic stick NOTE The screws for the different components vary in size During the disassembly process group the screws with the corresponding components to avoid mismatch when putting back the components Chapter 3 Machine Disassembly and Replacement 340SG book Page ...

Страница 46: ...ith the disassembly procedure make sure that you do the following 1 Turn off the power to the system and all peripherals 2 Unplug the AC adapter and all power and signal cables from the system 3 Remove the battery pack 340SG book Page 40 Thursday October 28 1999 10 51 AM ...

Страница 47: ... you want to remove the system board you must first remove the keyboard then disassemble the inside assembly frame in that order START HDD M odule Extended DIM M Cover M iddle Cover Battery LCD FPC Cable M ain Unit see next page Keyboard Inverter Cable LCD M odule LCD Bezel LCD and Inverter Board LCD FPC Cable Inverter LED Board Inverter LED C able A x 1 B x 2 A x 2 A x 2 C x 2 D x 4 E x 6 340SG b...

Страница 48: ...9A323 6R0 Screw M2 5X6 Black M ain Unit M odem Heat Plate M odem Board M ain Board DIMM Cover DIMM M odule RTC Battery HDD Board M odem Connector Upper Case PCMCIA Slot Touchpad Bracket Touchpad Cable Touchpad Board CPU Heatsink Upper Case Touchpad Bracket Touchpad Cable Touchpad Board CPU Heatsink Option 1 Option 2 A x 1 C x 11 F x 2 B x 2 G x 1 B x 2 B x 2 CPU Lower Holder E x 4 340SG book Page ...

Страница 49: ...se button inward 2 Slide the battery pack out from the main unit NOTE To replace the battery pack into the main unit be sure that the triangular point in the battery pack matches with the point in the lower case 340SG book Page 43 Thursday October 28 1999 10 51 AM ...

Страница 50: ...fficult to completely remove the screw Disassembling the Hard Disk Drive Module 1 Gently detach the connector from the hard disk module 2 Remove the two screws on both sides of the hard disk module 3 Remove the hard disk plate from the hard disk module 4 Slide the hard disk out from the hard disk drive bezel 5 This completes the disassembly procedure of the hard disk drive 1 New added description ...

Страница 51: ...Chapter 3 45 Removing the External DIMM Module 1 Remove the two screws holding the external DIMM cover 2 Lift the cover out to remove the DIMM module 340SG book Page 45 Thursday October 28 1999 10 51 AM ...

Страница 52: ...from the main board and lift the middle cover away Removing the Speaker 1 First remove the screw 2 Remove the speaker plate with the speaker from the middle cover 3 Separate the speaker plate from the speaker Disassembling the LCD module 1 Disconnect the inverter cable from the main board 2 Remove the two screws from the LCD FPC cable 3 Disconnect the LCD FPC cable from the main board 340SG book P...

Страница 53: ...9 Remove the four screws from the LCD bezel 10 Snap off the LCD bezel carefully and gently remove the LCD bezel from the LCD module 11 Remove the two screws from the hinges 12 Remove the hinges from the LCD module 13 Detach the hinge caps from the hinges 14 Remove the six screws from the LCD and the inverter 15 Remove the LCD and the inverter from the LCD Panel 340SG book Page 47 Thursday October ...

Страница 54: ...n the LCD over and disconnect the LCD power connector from the inverter 17 Disconnect the inverter cable from the inverter 18 Disconnect the LCD FPC cable from the LCD 340SG book Page 48 Thursday October 28 1999 10 51 AM ...

Страница 55: ...rom the DIMM cover 2 Remove the DIMM cover from the main unit 3 Use two flat bladed screw drivers to push out the latches on both sides of the DIMM socket 4 Remove the DIMM module from the main unit Removing the Modem Combo Board 1 Remove the screw from the modem heat sink and remove it from the main unit 2 Use two flat bladed screw drivers to push out the latches on both sides of the modem socket...

Страница 56: ... Use a plastic flat bladed screw driver to remove the RTC battery from its socket NOTE To replace the RTC battery press the RTC battery into the socket Removing the Lower Case 1 Remove the three screws and the 11 screws on the base of the unit 2 Remove the lower case from the main unit 340SG book Page 50 Thursday October 28 1999 10 51 AM ...

Страница 57: ...the Main Board 1 Remove the 4 screws on the mother board as shown below 2 Turn the main board over and put it on the side of the upper case 3 Remove then fan cable from the main board 4 Remove the main board from the upper case 5 Remove the harddisk drive board from the main board 6 Gently remove the PCMCIA slot from the main board by hand 340SG book Page 51 Thursday October 28 1999 10 51 AM ...

Страница 58: ...e the two screws from the touchpad bracket 2 Remove the touchpad bracket from the upper case 3 Disconnect the touchpad cable from the touchpad board 4 Remove the touchpad board from the upper case 340SG book Page 52 Thursday October 28 1999 10 51 AM ...

Страница 59: ...oes not go on or stay on Power System Check on page 55 POST does not complete No beep or error codes are indicated Power On Self Test POST Error Message on page 57 Undetermined Problems on page 63 POST detects an error and displayed messages on screen Error Message List on page 58 The diagnostic test detected an error and displayed a FRU code Running PQA Diagnostics Program on page 37 Other sympto...

Страница 60: ...e any label attached to it The label can cause damage to the drive or can cause the drive to fail Do the following to select the test device 1 Boot from the diagnostics diskette and start the PQA program refer to Running PQA Diagnostics Program on page 37 2 Go to the diagnostic CD ROM in the test items 3 Press F2 in the test items 4 Follow the instructions in the message window If an error occurs ...

Страница 61: ...charged battery pack then check that power is supplied by the battery pack If you suspect a power problem see the appropriate power supply check in the following list T Check the Power Adapter on page 55 T Check the Battery Pack on page 55 Check the Power Adapter Unplug the power adapter cable from the computer and measure the output voltage at the plug of the power adapter cable See the following...

Страница 62: ...ge indicator still does not light up replace the battery pack If the charge indicator still does not light up replace the DC DC charger board Touchpad Check If the touchpad doesn t work do the following actions one at a time to correct the problem Do not replace a non defective FRU 1 Reconnect the touchpad cables 2 Replace the touchpad 3 Replace the system board After you use the touchpad the poin...

Страница 63: ...aced when servicing a computer If the symptom is not listed see Undetermined Problems on page 63 The following lists the error messages that the BIOS displays on the screen and the error symptoms classified by function NOTE Most of the error messages occur during POST Some of them display information about a hardware device e g the amount of memory installed Others may indicate a problem with a de...

Страница 64: ... Default configuration used RTC battery Run BIOS Setup Utility to reconfigure system time then reboot system System timer error RTC battery Run BIOS Setup Utility to reconfigure system time then reboot system System board Real time clock error RTC battery Run BIOS Setup Utility to reconfigure system time then reboot system System board Previous boot incomplete Default configuration used Run Load D...

Страница 65: ...attery pack and power adapter See Power System Check on page 55 Ensure every connector is connected tightly and correctly Reconnect the DIMM LED board System board No beep power on indicator turns on and LCD is blank Power source battery pack and power adapter See Power System Check on page 55 Reconnect the LCD connector Hard disk drive LCD inverter ID LCD cable LCD Inverter LCD System board No be...

Страница 66: ...icator Related Symptoms Symptom Error Action in Sequence Indicator incorrectly remains off or on but system runs correctly Reconnect the inverter board Inverter board System board Power Related Symptoms Symptom Error Action in Sequence Power shuts down during operation Power source battery pack and power adapter See Power System Check on page 55 Battery pack Power adapter Hard drive battery connec...

Страница 67: ...if control is from the keyboard Hard disk drive System board The system doesn t enter hibernation mode and four short beeps every minute See Hibernation Mode on page 22 Press Fn F4 and see if the computer enters hibernation mode Touchpad Keyboard Hard disk connection board Hard disk drive System board The system doesn t enter standby mode after closing the LCD See Standby Mode on page 22 LCD cover...

Страница 68: ...oard Print problems Ensure the Parallel Port in the Onboard Devices Configuration of BIOS Setup Utility is set to Enabled Onboard Devices Configuration Run printer self test Printer driver Printer cable Printer System Board Serial or parallel port device problems Ensure the Serial Port in the Devices Configuration of BIOS Setup Utility is set to Enabled Device driver Device cable Device System boa...

Страница 69: ...er the system is inoperative Follow these procedures to isolate the failing FRU do not isolate non defective FRU NOTE Verify that all attached devices are supported by the computer NOTE Verify that the power supply being used at the time of the failure is operating correctly See Power System Check on page 55 1 Power off the computer 2 Visually check them for damage If any problems are found replac...

Страница 70: ... Action in Sequence 16XXX Backup battery error Backup battery 01XXX CPU or main board error Reload BIOS default setting System board 02XXX Memory error DIMM System board 03XXX Keyboard error Reset Keyboard Keyboard System board 04XXX Video error System board 05XXX Parallel Port error System board 06XXX Serial port or main board error System board 07XXX Diskette drive error Diskette drive System bo...

Страница 71: ...10 LED Inverter Board Connector U1 FIR Port CN11 Mini PCI Card Connector U20 PCMCIA Socket CN12 External FDD CD DVD ROM Module Connector GF1 Golden Finger for Debug Board CN13 Internal Keyboard Connector BT1 RTC Battery CN14 Touchpad Connector SW3 Settings SW3 Setting Switch 1 Switch 2 Switch 3 OFF OFF OFF English keyboard ON OFF OFF Japanese keyboard OFF ON OFF European keyboard Switch 4 Switch 5...

Страница 72: ...66 Chapter 5 Bottom View DM2 DIMM Socket 2 340SG book Page 66 Thursday October 28 1999 10 51 AM ...

Страница 73: ...RVICE PROVIDERS your Acer office may have a DIFFERENT part number code to those given in the FRU list of this printed Service Guide You MUST use the local FRU list provided by your regional Acer office to order FRU parts for repair and service of customer machines NOTE To scrap or to return the defective parts you should follow the local government ordinance or regulations on how to dispose it pro...

Страница 74: ...68 Chapter 6 340SG book Page 68 Wednesday November 3 1999 11 46 AM ...

Страница 75: ... SUMITA INVERTER IV12149 T TM340 19 21042 001 NS INVERTER CABLE Hua Chen C A INV 20 15P 175MM TM330 50 40C02 002 NS LCD FPC CABLE Hua Chen C A LCD COAXIAL SANYO TM340 50 40F02 001 NS LCD FPC CABLE C A LCD COAXIAL SANYO FAV TM340 50 40F02 011 NS HINGE PACK ASSY HINGE PACK TM340 6K 40C01 001 NS HINGE HINGE LCD L STEEL 330 34 40C06 002 NS HINGE HINGE LCD R STEEL 330 34 40C05 002 NS LCD PANEL TFT ASSY...

Страница 76: ...64AW 10WA MITSUBISHI 72 00864 00N NS DIMM 64MB SDRAM Siemens SDIMM 64M HYS64V8220GCDL 8 SIEMENS 72 64820 B0N NS DIMM 128MB SDRAM Winbond SODIMM 128M W9812CASB 75 WINBOND 72 W9812 00N NS DIMM 128MB SDRAM Mitsubishi SODIMM 128M MH16S64VS 8TA MITSUBISHI 72 16S64 A0N NS DIMM 128MB SDRAM NEC SODIMM 128M W17128IHNC86220 NEC 72 17128 00N Storage Device NS HDD ASSEMBLY 6G IBM ASSY HDD MODULE 6G TM340 6M 4...

Страница 77: ...330 34 40C12 001 NS HDD BEZEL BZL HDD PC M010 330 41 40C01 002 PCB 13 PCI MODEM LAN BOARD AMBIT MDM LAN 56K AMBIT T60 082 C 00 54 09051 001 NS PCI MODEM BOARD AMBIT MODEM INT 56K AMB J07M039 00 54 09011 261 16 TOUCH PAD BOARD SYNAPTICS TOUCHPAD MULTI SWITCH SYNAPTIC 56 1740C 001 Picture No Part Name Description Part No 340SG book Page 71 Wednesday November 3 1999 11 46 AM ...

Страница 78: ...OARD US VERSION Darfon KB US NSK 85N11 340 90 40F07 031 29 KEYBOARD US VERSION JME KB US JME K9811 TM340 90 40F07 001 Power NS ADAPTER 60W DELTA ADT 60W ADP 60XB D 3P 730 340 25 10064 041 18 BATTERY PACK LI ON PANASONIC ASSY BTY PACK CGP E 618AE 330 60 40C07 001 NS POWER CORD CORD 125V UL 3P K01081B1183WP 27 01618 051 Picture No Part Name Description Part No 340SG book Page 72 Wednesday November 3...

Страница 79: ...1 NS UPPER DIMM COVER PLT L DIMM METAL TM330 34 40C18 002 NS LOWER DIMM COVER ASSY DIMM CVR 60 40C09 001 NS MIDDLE COVER SPEAKER ASSY ASSY MIDDLE CVR TM330 60 40C08 003 NS LCD PANEL COAT ASSY PNL COAT TM340 60 40F10 001 NS PCMCIA SOCKET SKT PCMCIA 68P WZ2131 G2 SMD 62 10024 061 NS CPU HEATSINK TM340 ASSY CPU HEAT SINK TM340 60 40F05 001 NS CPU HOLDER TM340 ASSY CPU HOLDER TM340 60 40F03 001 Pictur...

Страница 80: ...crews 25 SCREWS SCRW KAM MS SBZ M2 L9 BLACK 86 9A322 9R0 26 SCREWS SCRW WH MS CBZ M2 5 L6 BLACK 86 9A323 6R0 27 SCREWS SCRW WAFER NYLO M2 5 6L B ZN 86 9A353 6R0 NS SCREWS SCRW WH MS CBZ M2 5 L4 BLACK 86 9A323 4R0 24 SCREWS SCRW WCH FLT M2 L4 B ZN 86 9A322 4R0 28 SCREWS SCRW KAH MS CN M2 L6 NI 86 9A522 6R0 Miscellaneous 5 340 LOGO PLT LOGO TOOLING PMMA TM330 40 40C01 001 NS LCD RUBBER TM330 CSN LCD...

Страница 81: ... LCD LATCH TM330 LATCH LCD NYLON 050 330 42 40C06 003 NS LCD SPRING CATCH TM330 SPRING CATCH STEEL TM330 34 40C13 001 Others NS RTC BATTERY IC RTC BQ3285LD SSOP 24P 71 03285 B0I Picture No Part Name Description Part No 340SG book Page 75 Wednesday November 3 1999 11 46 AM ...

Страница 82: ...76 Chapter 6 340SG book Page 76 Wednesday November 3 1999 11 46 AM ...
Страница 83: ...Mark Acer T Brand Name Acer T Product Name TravelMate 340 T Description Notebook Personal Computer Model Number Definitions Model No LCD CPU Memory HDD Ext Module BTY 340T 12 1 TFT Pentium III 450 BGA on board 64MB 6 4GB FDD 24X CD ROM Li Ion 341T 12 1 TFT Pentium III 500 BGA on board 64 MB 10GB FDD 24X CD ROM Li Ion 342T 12 1 TFT Pentium III 550 BGA on board 64MB 10GB FDD 24X CD ROM Li Ion Model ...

Страница 84: ...78 Appendix A 340SG book Page 78 Wednesday November 3 1999 11 46 AM ...
Страница 85: ...ent Refer to the following lists for components adapter cards and peripherals which have passed these tests Regarding configuration combination and test procedures please refer to the TravelMate 340 Compatibility Test Report released by the Acer Mobile System Testing Department Test Compatible Components Appendix B 340SG book Page 79 Wednesday November 3 1999 11 46 AM ...
Страница 86: ...nk Ethernet Xircom CreditCard Ethernet Adapter Xircom CreditCard Ethernet Adapter IIps Xircom CreditCard Ethernet Adapter 10 100 IBM EtherJet PC Card LAN Token Ring 3Com TokenLink III 16 4 IBM Turbo 16 4 TokenRing PC Card Multi Function Card 3Com Ethernet III LAN 33 6 Modem Global PC Card Combo 3Com 10 100 Fast EtherLink LAN 56K Dlink Winconnect 33 6 LAN Fax Modem Combo Megahertz PC Card 33 6 Ethe...

Страница 87: ...36 V34 Fax for PCMCIA W EZjack PCMCIA Data Fax Modem International 33 6 14 4 Modem up to 56K ActionTec DataLink 56Kbps Fax Modem TDK K56Kflex Data Fax Modem USR Megahertz 56K Modem IBM 56K Double Jack Modem Item Specifications 340SG book Page 81 Wednesday November 3 1999 11 46 AM ...

Страница 88: ...k Ethernet Xircom CreditCard Ethernet Adapter Xircom CreditCard Ethernet Adapter IIps Xircom CreditCard Ethernet Adapter 10 100 IBM EtherJet PC Card LAN Token Ring 3Com TokenLink III 16 4 IBM Turbo 16 4 TokenRing PC Card Multi Function Card 3Com Ethernet III LAN 33 6 Modem Global PC Card Combo 3Com 10 100 Fast EtherLink LAN 56K Dlink Winconnect 33 6 LAN Fax Modem Combo Megahertz PC Card 33 6 Ether...

Страница 89: ...x for PCMCIA W EZjack PCMCIA Data Fax Modem International 33 6 14 4 Modem up to 56K Pretec Modem 56K ActionTec DataLink 56Kbps Fax Modem TDK K56Kflex Data Fax Modem USR Megahertz 56K Modem IBM 56K Double Jack Modem Item Specifications 340SG book Page 83 Wednesday November 3 1999 11 46 AM ...
Страница 90: ...0 100 IBM EtherJet PC Card TokenRing IBM Turbo 16 4 TokenRing PC card Modem Adapters Modem up to 28 8K TDK V34 28 8 14 4 Data Fax PCMCIA Xicom PCMCIA Fax Modem 28 8m Modem up to 33 6K Megahertz 33 6 PC Card Modem Hayes Optima 336 V34 Fax for PCMCIA W EZjack IBM PCMCIA Data Fax Modem International 33 6 14 4 Modem up to 56K IBM 56K Double Jack Modem I O Adapters PCMCIA SCSI Adaptec SlimSCSI APA 1480...

Страница 91: ...s PRO 100 Mobile Adapter TDK Cardbus Ethernet 10 100 Base TX IBM 10 100 EtherJet Cardbus Adapter 32 bit Xircom CardBus Ethernet II 10 100 Xircom CardBus Ethernet 10 100 Intel Built in LAN Network Adapters Ethernet 10baseT 100baseT 3Com EtherLink III 3Com 10 100 16bits Fast EtherLink D Link Ethernet Xircom CreditCard Ethernet adapter Xircom CreditCard Ethernet Adapter IIps Xircom CreditCard Etherne...

Страница 92: ...V70 NEC 20 color Monitor NANAO Flex Scan E35F PCMCIA SCSI Adaptec SlimSCSI APA 1480AB PCMCIA CD ROM IBM Portable 20x Speed CD ROM Drive w SOUND JP Panasonic 4x Portable CD ROM Sound Player Panasonic 20x Portable CD ROM Player PCMCIA ATA SunDisk ATA 15MB Item Specifications 340SG book Page 86 Wednesday November 3 1999 11 46 AM ...

Страница 93: ...ematics T Spare parts lists T Chips T TABs Technical Announcement Bulletin The service repair section provides you with downloadable information on T Troubleshooting guides T Tooling box information T Repair instructions for specific models T Basic repair guidelines T Debug cards for Acer s latest models For these purposes we have included an Acrobat File to facilitate the problem free downloading...

Страница 94: ...88 Appendix C 340SG book Page 88 Wednesday November 3 1999 11 46 AM ...
Страница 95: ... navigating 25 Navigating the 25 Onboard Devices Configuration 29 Power Management 32 Startup Configuration 27 System Information 26 System Security 30 Board Layout 4 BQ3285LD 14 brightness hot keys 12 C Cache controller 14 size 14 caps lock on indicator 11 CardBus 1 19 85 Check Procedures 54 Battery 55 Diskette Drive 54 External CD ROM Drive 54 Keyboard 54 Memory 55 Power Adapter 55 Power System ...

Страница 96: ...Spare Part Index 57 ESS ES1946 5 Ethernet 10baseT 100baseT 1 84 85 Euro 13 External Diskette Drive Check 54 F Fan Utility 35 FIR 1 7 8 19 Flash ROM 5 Flash Utility 34 FRU Field Replaceable Unit List 67 External Module 74 Keyboard 73 Mechanical Parts 74 Power 73 Screws 75 Storage Device 71 H Hard disk 1 14 16 85 80 disassembling the 44 removing the 44 Hard Disk Standby Mode 22 Hardware Configuratio...

Страница 97: ... Adapter Ethernet 10baseT 100baseT 80 Token Ring 80 NS PC97338 5 NS PC97338VJG 14 num lock on indicator 11 O Onboard Devices Configuration 29 Online Support Information 81 OZ6812 5 P Panel 6 left 6 rear 6 right 8 Panel ID Utility 35 Parallel Port 7 18 Parallel port setting in BIOS Utility 29 Password Changing a 32 removing a 31 Setting a 30 PC Card 8 9 14 19 PC Card PCMCIA 1 PCB 99203 65 PCMCIA 4 ...

Страница 98: ...es 54 System Information 26 System Memory 14 System Security 30 T Temperature 22 TokenRing 84 85 Test Compatible Components 79 TFT SVGA 1 Thermal Utility 35 TIME setting in Setup Utility 27 Touchpad removing 52 touchpad hot key 12 Touchpad Check 56 Troubleshooting 53 U Undetermined Problems 63 USB 1 6 7 19 Utilities 25 W Windows 2000 Environment Test 82 Windows 95 Environment Test 80 Windows 98 En...

Отзывы: