background image

17

Eng

lis

h

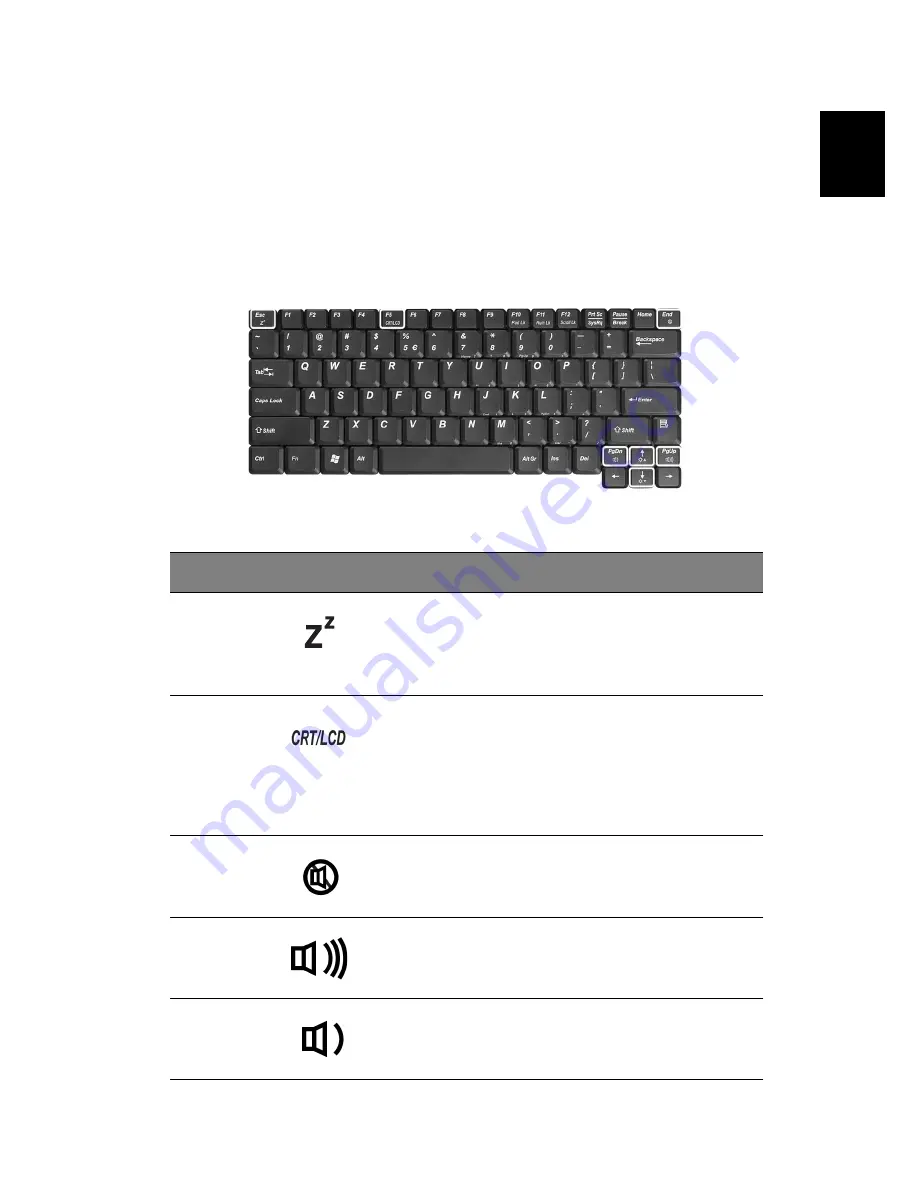
Hot keys

The computer employs hot keys or key combinations to access most of 
the computer’s controls like screen brightness, volume output and the 
BIOS Utility.

To activate hot keys, press and hold the 

Fn

 key before pressing the 

other key in the hot key combination.   

Hot key

Icon

Function

Description

Fn

-

Esc

Sleep

Puts the computer in Sleep 
mode.

See “Power management” on 
page 27.

Fn-F5

Display toggle

Switches display output 
between the display screen, 
external monitor (if 
connected) and both the 
display screen and external 
monitor.

Fn-End

Speaker toggle

Turns the speakers on and off.

Fn-PgUp

Volume up

Increases the speaker volume.

Fn-PgDn

Volume down

Decreases the speaker 
volume.

Содержание TravelMate 290

Страница 1: ...TravelMate 290 series User s guide...

Страница 2: ...dence concerning your unit should include the serial number model number and purchase information No part of this publication may be reproduced stored in a retrieval system or transmitted in any form...

Страница 3: ...ww acer com First off the Just for Starters poster helps you get started with setting up your computer This User s guide introduces you to the many ways your computer can help you be more productive T...

Страница 4: ...nagement functions See Windows help for more information Use the customized functions for power management You can also shut down the computer by closing the display cover or by pressing the sleep hot...

Страница 5: ...on top of it Carefully route the power cord and any cables away from personal traffic When unplugging the power cord do not pull on the cord itself but pull on the plug The total ampere ratings of the...

Страница 6: ...r Use a soft cloth moistened with water Do not use liquid or aerosol cleaners To clean the display screen use an LCD cleaning kit If any of the following occurs The computer has been dropped or the bo...

Страница 7: ...Hard disk 23 AcerMedia bay 23 Using software 24 Audio 26 Adjusting the volume 26 Power management 27 Moving around with your TravelMate 28 Disconnecting from the desktop 28 Moving around 28 Taking the...

Страница 8: ...mputer 47 Frequently asked questions 49 Troubleshooting tips 52 Error messages 53 Requesting service 54 International Traveler s Warranty ITW 54 Before you call 54 Appendix A Specifications 57 Appendi...

Страница 9: ...1 Getting to know your TravelMate...

Страница 10: ...er combines high performance versatility power management features and multimedia capabilities with a unique style and ergonomic design Work with unmatched productivity and reliability with your new p...

Страница 11: ...uter as illustrated in the Just for Starters poster let us show you around your new TravelMate computer Front open view Item Description 1 Display screen Also called LCD liquid crystal display display...

Страница 12: ...hands when you use the computer 6 Keyboard Inputs data into your computer 7 Status indicators LEDs light emitting diode that turn on and off to show the status of the computer its functions and compon...

Страница 13: ...cation switch Enables and disables Wireless communication devices 4 Stereo speaker Outputs sound 5 Headphone Speaker Line out jack Connects to headphones or other line out audio devices speakers 6 Mic...

Страница 14: ...lMate 6 English Right view Item Description 1 Stereo speaker Outputs sound 2 HDD Houses the computer s hard disk 3 Ventilation slot Enables the computer to stay cool even after prolonged use 4 DC in j...

Страница 15: ...t port Connects to an Ethernet 10 100 based network 4 Modem port Connects to a phone line 5 Two USB 2 0 ports Connects to Universal Serial Bus devices e g USB mouse USB camera 6 External display port...

Страница 16: ...etting to know your TravelMate 8 English 7 Parallel port Connects to a parallel device e g parallel printer 8 Security keylock Connects to a Kensington compatible computer security lock Item Descripti...

Страница 17: ...r removing the optical drive 3 AcerMedia bay Houses an AcerMedia drive module 4 Battery bay Houses the computer s battery pack 5 Battery release latch Unlatches the battery to remove the battery pack...

Страница 18: ...i ion main battery pack Power management system with ACPI Advanced Configuration Power Interface Display Thin Film Transistor TFT liquid crystal display LCD displaying 32 bit high color up to 1024 x 7...

Страница 19: ...et port Fast infrared wireless communication Three USB 2 0 ports Two in rear and one on left IEEE 1394 port InviLink 802 11b or 802 11 a b wireless LAN manufacturing optional Bluetooth ready manufactu...

Страница 20: ...w the display screen and three on the front of the computer The Power and Battery status indicators are visible even when the display is closed Icon Function Description HDD Lights when Hard Disk Driv...

Страница 21: ...ccurs for 2 sec if the speakers are on Using the original adapter is strongly recommended Caps Lock Lights when Caps Lock is activated Pad Lock cursor Lights when Pad Lock is activated Num Lock Lights...

Страница 22: ...rcase Pad Lock Fn F10 When Pad Lock is on the embedded keypad is enabled In this mode the keypad is cursor function Num Lock Fn F11 When Num Lock is on the embedded keypad is in numeric mode The keys...

Страница 23: ...keypad It is indicated by small characters located on the right hand side of the keycaps Desired access Num lock on Num lock off Number keys on embedded keypad Type numbers in a normal manner Main ke...

Страница 24: ...Description Windows logo key Start button Combinations with this key perform shortcut functions Below are a few examples Tab Activates next taskbar button E Explores My Computer F Finds Document M Min...

Страница 25: ...key in the hot key combination Hot key Icon Function Description Fn Esc Sleep Puts the computer in Sleep mode See Power management on page 27 Fn F5 Display toggle Switches display output between the...

Страница 26: ...s to be set to United States International To verify the keyboard type in Windows Millennium Edition and Windows 2000 follow the steps below 1 Click on Start Settings Control Panel 2 Double click on K...

Страница 27: ...d for En English United States is set to United States International If not select and click on ADD then select United States International and click on OK 5 Click on OK To type the Euro symbol 1 Loca...

Страница 28: ...above the keyboard are three buttons The left most button is the power button To the right of the power button are the two launch keys They are designated as the programmable buttons P1 and P2 Launch...

Страница 29: ...n the palmrest provides optimum comfort and support Touchpad basics The following items teach you how to use the touchpad Move your finger across the touchpad to move the cursor Press the left and rig...

Страница 30: ...g harder will not increase the touchpad s responsiveness Function Left button Right button Tap Execute Click twice quickly Tap twice at the same speed as double clicking a mouse button Select Click on...

Страница 31: ...is the answer to your storage needs This is where your programs and data are stored AcerMedia bay The hot swappable AcerMedia bay accepts a wide variety of optional media drive modules for use with y...

Страница 32: ...computer 1 Eject the DVD tray and insert a DVD movie disc then close the DVD tray Important When you launch the DVD player for the first time the program asks you to input the region code DVD discs a...

Страница 33: ...a different region into the DVD ROM drive Please refer to the online help for more information Region code Country or region 1 U S A Canada 2 Europe Middle East South Africa Japan 3 Southeast Asia Ta...

Страница 34: ...omputer comes with 16 bit high fidelity AC 97 stereo audio and dual stereo speakers Adjusting the volume Adjusting the volume on the computer is as easy as pressing some buttons See Hot keys on page 1...

Страница 35: ...to the serial and parallel ports and video memory If no activity is detected for a period of time called an inactivity timeout the computer stops some or all of these devices in order to conserve ener...

Страница 36: ...other external devices 7 Disconnect the Kensington lock if you are using one to secure the computer Moving around when you are just moving within short distances for example from your office desk to...

Страница 37: ...g is shorter than that you probably do not need to bring anything with you other than the computer What to bring to long meetings If your meeting will last longer than 2 5 hours with 4 cell battery pa...

Страница 38: ...temperature changes by keeping the computer with you If you need to stop for an extended period of time and cannot bring the computer with you leave the computer in the trunk of the car to avoid expo...

Страница 39: ...ou Bring the following items with you AC adapter Spare fully charged battery pack s AcerMedia drive module s Additional printer driver files if you plan to use another printer Special considerations I...

Страница 40: ...eler s Warranty passport Special considerations Follow the same special considerations as when traveling with the computer In addition these tips are useful when traveling internationally When traveli...

Страница 41: ...und an immovable object such as a table or locked drawer handle Insert the lock into the notch and turn the key to secure the lock Some keyless models are also available Using passwords Passwords prot...

Страница 42: ...n you press F2 to enter the BIOS Utility at boot up Type the Supervisor Password and press Enter to access the BIOS Utility If you enter the password incorrectly a warning message appears Try again an...

Страница 43: ...2 Customizing my computer...

Страница 44: ...basics of your TravelMate computer let s get acquainted with the advanced features of your computer In this chapter you will learn how to add options upgrade components for better performance and cust...

Страница 45: ...connect different external devices to the computer see your online guide for more details Fax data modem Your computer has a built in V 90 92 56Kbps AC 97 Link fax data modem Warning This modem port i...

Страница 46: ...rom the network jack on the rear of the computer to a network jack or hub on your network Fast infrared The computer s fast infrared FIR port allows you to do wireless data transfer with other IR awar...

Страница 47: ...e Universal Serial Bus USB 2 0 port is a high speed serial bus which allows you to connect and daisy chain USB peripherals without taking up precious system resources Your computer has three ports ava...

Страница 48: ...ts credit card sized cards that enhance the usability and expandability of the computer These cards should have a PC Card logo on them PC Cards formerly PCMCIA are add on cards for portable computers...

Страница 49: ...le if necessary See your card manual for details Ejecting a PC Card Before ejecting a PC Card 1 Exit the application using the card 2 Left click on the PC Card icon on the taskbar and stop the card op...

Страница 50: ...d dealer if you decide to perform a key component upgrade Memory upgrade Memory is expandable to 2 GB employing 128 256 512 1024 MB industry standard soDIMMs Small Outline Dual Inline Memory Modules T...

Страница 51: ...emove the screws from the memory cover a then lift up and remove the memory cover b 3 Insert the memory module diagonally into the slot a then gently press it down b until it clicks into place 4 Repla...

Страница 52: ...off your computer before you can swap the module You can swap the AcerMedia drive with any optional AcerMedia modules First slide the AcerMedia release latch as shown in the illustration a Then remov...

Страница 53: ...nd then Launch Manager to start the application BIOS Utility The BIOS Utility is a hardware configuration program built into your computer s BIOS basic input output system Your computer is already pro...

Страница 54: ...2 Customizing my computer 46 English...

Страница 55: ...3 Troubleshooting my computer...

Страница 56: ...s Read it before calling a technician if a problem occurs Solutions to more serious problems require opening up the computer Do not attempt to open the computer by yourself Contact your dealer or an a...

Страница 57: ...n system diskette in the external USB floppy drive Remove or replace it with a system diskette and press Ctrl Alt Del to restart the system Nothing appears on the screen The computer s power managemen...

Страница 58: ...volume level may be too low In Windows look at the volume control icon on the taskbar You can also use the volume control buttons to adjust the volume See Hot keys on page 17 for more detail If headph...

Страница 59: ...ort is enabled Make sure both devices are IrDA compliant The printer does not work Check the following Make sure that the printer is connected to a power outlet and that it is turned on Make sure that...

Страница 60: ...ncorporates an advanced design that delivers onscreen error message reports to help you solve problems If the system reports an error message or an error symptom occurs see Error messages on page 53 I...

Страница 61: ...or an authorized service center Disk Boot Failure Insert a system bootable diskette into the floppy drive A then press Enter to reboot Equipment Configuration Error Press F2 during POST to enter the B...

Страница 62: ...pecially when you travel to receive the benefits from our support centers Place your proof of purchase in the flap located inside the front cover of the ITW passport If the country you are traveling i...

Страница 63: ..._____________ Address ______________________________________ ______________________________________________ Telephone number ____________________________ Machine and model type _______________________...

Страница 64: ...3 Troubleshooting my computer 56 English...

Страница 65: ...Appendix A Specifications...

Страница 66: ...This appendix lists the general specifications of your computer...

Страница 67: ...Display and video Thin Film Transistor TFT liquid crystal display LCD displaying 32 bit true color up to 1024 x 768 eXtended Graphics Array XGA resolution Simultaneous LCD and CRT display support Dua...

Страница 68: ...ker headphone out jack 3 5mm mini jack One microphone in jack One IEEE 1394 port One S video TV out port Three USB 2 0 ports Two in rear and one on left One FIR port IrDA Weight and dimensions 2 61 kg...

Страница 69: ...attery pack 63 Wh Li ion battery pack 2 5 hour rapid charge 3 5 hour charge in use AC adapter 65 Watt Auto sensing 90 264Vac 47 63Hz Options 128 MB 256 MB 512 MB 1GB memory upgrade modules Additional...

Страница 70: ...Appendix A Specifications 62 English...

Страница 71: ...Appendix B Notices...

Страница 72: ...This appendix lists the general notices of your computer...

Страница 73: ...nd receiver Connect the device into an outlet on a circuit different from that to which the receiver is connected Consult the dealer or an experienced radio television technician for help Notice Shiel...

Страница 74: ...will be notified as soon as possible You will also be informed of your right to file a complaint with the FCC Your telephone company may make changes in its facilities equipment operations or procedur...

Страница 75: ...company 7 Do not allow anything to rest on the power cord Do not locate this product where persons will walk on the cord 8 If an extension cord is used with this product make sure that the total ampe...

Страница 76: ...VDE approved or its equivalent Maximum length is 15 feet 4 6 meters Laser compliance statement The CD or DVD drive used with this computer is a laser product The CD or DVD drive s classification labe...

Страница 77: ...aktig skifte av batteri Benytt samme batteritype eller en tilsvarende type anbefalt av apparatfabrikanten Brukte batterier kasseres i henhold til fabrikantens instruksjoner VARNING Explosionsfara vid...

Страница 78: ...ss otherwise authorized by Macrovision Corporation Reverse engineering or disassembly is prohibited Apparatus Claims of U S Patent Nos 4 631 603 4 577 216 4 819 098 and 4 907 093 licensed for limited...

Страница 79: ...ency Radiation The radiated output power of the Wireless module is far below the FCC radio frequency exposure limits Nevertheless the Wireless module shall be used in such a manner that the potential...

Страница 80: ...lowing measures Reorient or relocate the receiving antenna Increase the separation between the equipment and receiver Connect the equipment into an outlet on a circuit different from that to which the...

Страница 81: ...performance 10 security 33 setting up a home office 30 taking home 29 traveling internationally 31 traveling on local trips 31 troubleshooting 48 turning off iv connections network 38 D display hotkey...

Страница 82: ...estions setting location for modem use 51 S safety CD ROM 68 FCC notice 65 general instructions 67 modem notices 66 scroll lock 14 on indicator 12 security keylock 33 passwords 33 service when to call...

Отзывы: