background image

XV273K  User Guide English

12

Using the Shortcut Menu

The following content is for general reference only. Actual product specifications may vary.

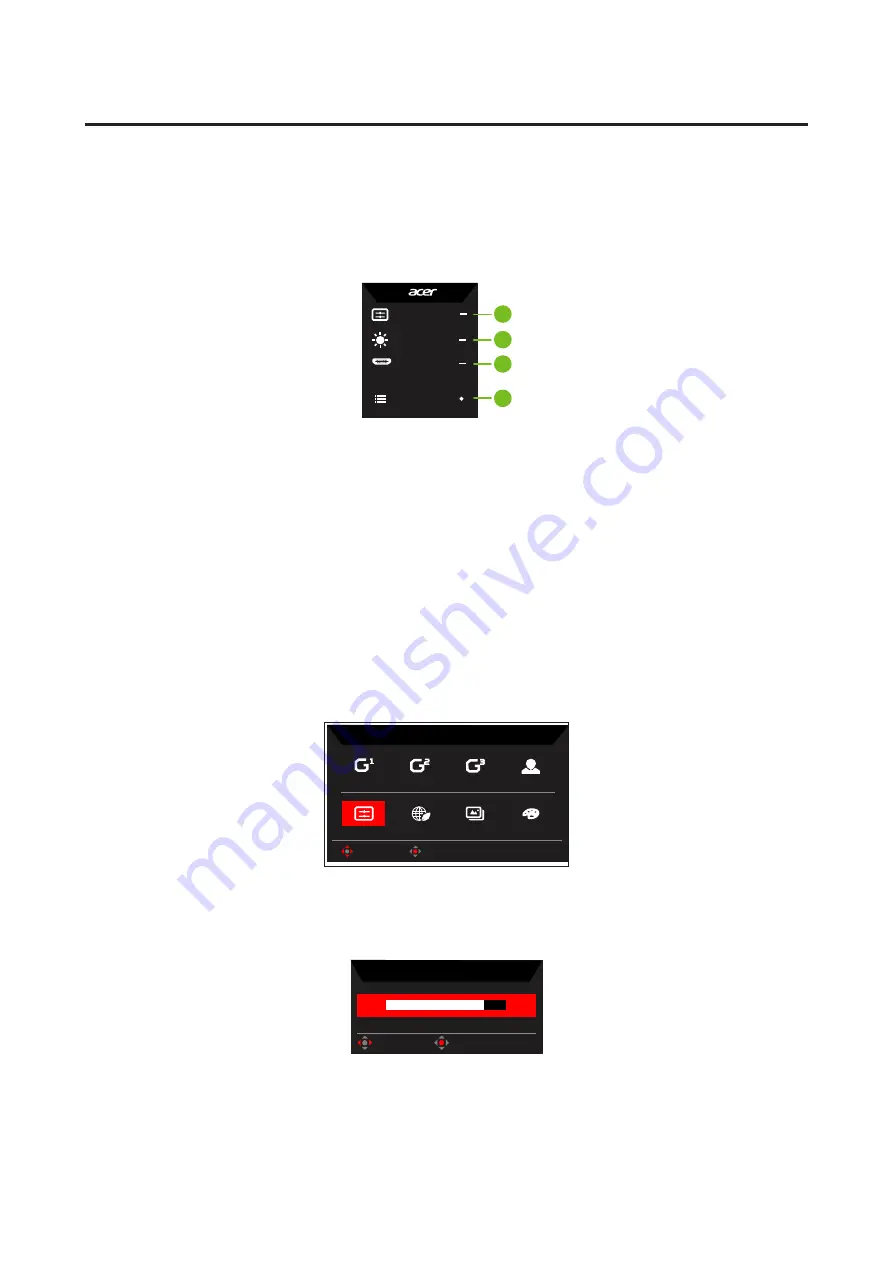
The OSD (On Screen Display) can be used to adjust the settings of your LCD monitor. 

Press the key to open the OSD. You can use the OSD to adjust the picture quality, OSD 

position and general settings. For advanced settings, please refer to following page:

Main page

Mode

Standard

Brightness

80

Input

HDMI

Menu

1
2
3

4

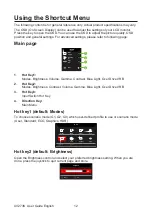
1.  Hot Key1: 


Modes, Brightness, Volume, Gamma, Contrast, Blue Light, Over Drive,VRB

2.  Hot Key2: 


Modes, Brightness, Contrast, Volume, Gamma, Blue Light, Over Drive,VRB

3.  Hot Key3:


Input Switch Hot Key

4.  Direction Key:


Main Menu

Hot key1 (default: Modes)

To choose scenario mode (G1, G2, G3) which user-defined profile to use or scenario mode 

(User, Standard, ECO, Graphics, HDR)

Action

Racing

Sports

User

HDR

Graphics

ECO

Standard

Modes

OK

Move


Hot key2 (default: Brightness)

Open the Brightness control and select your preferred brightness setting. When you are 

done, press the joystick to quit current page and store.

Brightness

80

OK

Adjust


Содержание NITRO XV Series

Страница 1: ...Acer LCD Monitor User Guide ...

Страница 2: ...ided below The serial number and model number are recorded on the label affixed to your computer All correspondence concerning your unit should include the serial number model number and purchase information No part of this publication may be reproduced stored in a retrieval system or transmitted in any form or by any means electronically mechanically by photocopy recording or otherwise without th...

Страница 3: ...tch for a few hours Cleaning your monitor Please carefully follow these guidelines when cleaning the monitor Always unplug the monitor before cleaning Use a soft cloth to wipe the screen and cabinet front and sides Accessibility Be sure that the power outlet you plug the power cord into is easily accessible and located as close to the equipment operator as possible When you need to disconnect powe...

Страница 4: ...otal ampere rating of the equipment plugged into the extension cord does not exceed the extension cord ampere rating Also make sure that the total rating of all products plugged into the wall outlet does not exceed the fuse rating Do not overload a power outlet strip or receptacle by plugging in too many devices The overall system load must not exceed 80 of the branch circuit rating If power strip...

Страница 5: ...al plants or where blasting operations are in progress Areas with a potentially explosive atmosphere are often but not always marked They include below deck on boats chemical transfer or storage facilities vehicles using liquefied petroleum gas such as propane or butane and areas where the air contains chemicals or particles such as grain dust or metal powders Additional safety information Your de...

Страница 6: ...y lead to carpal tunnel syndrome tendonitis tenosynovitis or other musculoskeletal disorders The following symptoms may appear in the hands wrists arms shoulders neck or back numbness or a burning or tingling sensation aching soreness or tenderness pain swelling or throbbing stiffness or tightness coldness or weakness If you have these symptoms or any other recurring or persistent discomfort and o...

Страница 7: ...splay in such a way that the side faces the window or any light source minimizing room light by using drapes shades or blinds using a task light changing the display s viewing angle using a glare reduction filter using a display visor such as a piece of cardboard extended from the display s top front edge Avoid adjusting your display to an awkward viewing angle Avoid looking at bright light source...

Страница 8: ...ed above is in conformity with the relevant Union harmonization legislations as below Directive and following harmonized standards and or other relevant standards have been applied EMC Directive 2014 30 EU EN 55032 2012 AC 2013 Class B EN 61000 3 2 2014 3 Class D EN 55024 2010 EN 61000 3 3 2013 LVD Directive 2014 35 EU EN 60950 1 2006 A11 2009 A1 2010 A12 2011 A2 2013 RoHS Directive 2011 65 EU EN ...

Страница 9: ...ay not cause harmful interference and 2 this device must accept any interference received including interference that may cause undesired operation The following local Manufacturer Importer is responsible for this declaration Product LCD Monitor Model Number XV273K SKU Number XV273K xxxxxx x 0 9 a z or A Z Name of Responsible Party Acer America Corporation Address of Responsible Party 333 West San...

Страница 10: ...tructions iv LCD pixel statement v Tips and information for comfortable use v Finding your comfort zone v Taking care of your vision v Developing good work habits vi Unpacking 1 Adjusting the monitor 2 Height Adjustment 2 Tilt 2 Swivel 3 Monitor shading hood installation 4 Monitor introduction 6 Connecting the cables 7 Connecting the adapter and AC Power cord 8 Power saving 8 Display Data Channel ...

Страница 11: ...Main Menu 13 Troubleshooting 23 HDMI DP Mode Optional 23 ...

Страница 12: ...t when you unpack the box and save the packing materials in case you need to ship or transport the monitor in the future LCD monitor Quick start guide DP Cable Optional USERGUIDE LCD Monitor NITRO XV3 series XV273K USB cable Optional HDMI cable Optional AC Power cord Shading Hood Packet ...

Страница 13: ...comfortable for you Hold the stand to prevent the monitor from falling when you change its angle You can adjust the monitor s angle from 25 to 5 and it allows 20 swivel adjustment from either left or right You can also adjust the monitor s height within 100 mm Height Adjustment 2 100mm 1 Note Please adjust the height of the monitor afer pressing the top of the monitor Tilt 25 5 ...

Страница 14: ...XV273K User Guide English 3 Swivel 20 20 ...

Страница 15: ...de English 4 Monitor shading hood installation 1 Align the screw holes on the side of monitor 2 Use screwdriver or coin to fasten screw and fix door on the head 3 Repeat the same process to fix door on the other side ...

Страница 16: ...ead 5 Shading hood installation complete How to open top small door 1 Use fingers to push up under cover 2 Slide small door to the end as shown in the direction of the picture How to close top small door 1 Slide small door back to the end 2 Push down to lock the door ...

Страница 17: ...Function key a Press to view Main page Press again to enter hotkey2 function b When the Function Menu is active press this button to select select scenario mode or game mode 4 Function key X a Press to view Main page Press again to enter Input select function b When the Function Menu is active this button will quit the OSD 5 Function key a Press to view Main page Press again to enter next function...

Страница 18: ...utput socket of the graphics card on the computer Then tighten the thumbscrews on the signal cable connector 3 Connect the USB Cable Optional Connect the USB 3 0 cable to port for fast charge Connect the USB 3 0 cable to port 4 Insert the monitor power cable into the power port at the back of the monitor 5 Connect the power adapter and power cord to the monitor then to a properly grounded AC outle...

Страница 19: ...et type SVT wire and plug rated 10 A 125 V For units using 220 240 V AC Use a cord set consisting of H05VV F cord and plug rated 10 A 250 V The cord set should have the appropriate safety approvals for the country in which the equipment will be installed Power saving The monitor will be driven into Power Saving mode by the control signal from the display controller as indicated by the amber color ...

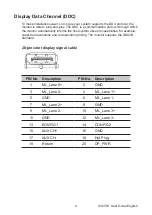
Страница 20: ...tomatically informs the host system about its capabilities for example supported resolutions and corresponding timing The monitor supports the DDC2B standard 20 pin color display signal cable PIN No Description PIN No Description 1 ML_Lane 0 2 GND 3 ML_Lane 0 4 ML_Lane 1 5 GND 6 ML_Lane 1 7 ML_Lane 2 8 GND 9 ML_Lane 2 10 ML_Lane 3 11 GND 12 ML_Lane 3 13 KONFIG1 14 CONFIG2 15 AUX CH 16 GND 17 AUX C...

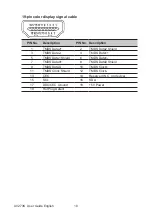
Страница 21: ...scription 1 TMDS Data2 2 TMDS Data2 Shield 3 TMDS Data2 4 TMDS Data1 5 TMDS Data1 Shield 6 TMDS Data1 7 TMDS Data0 8 TMDS Data0 Shield 9 TMDS Data0 10 TMDS Clock 11 TMDS Clock Shield 12 TMDS Clock 13 CEC 14 Reserved N C on device 15 SCL 16 SDA 17 DDC CEC Ground 18 5V Power 19 Hot Plug Detect ...

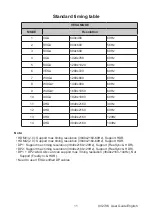
Страница 22: ...840x2160 30Hz 12 UHD 3840x2160 60Hz 13 UHD 3840x2160 120Hz 14 UHD 3840x2160 144Hz Note HDMI1 2 0 Support max timing resolution 3840x2160 60Hz Support HDR HDMI2 2 0 Support max timing resolution 3840x2160 60Hz Support HDR DP1 Support max timing resolution 3840x2160 120Hz Support FreeSync HDR DP2 Support max timing resolution 3840x2160 120Hz Support FreeSync HDR DP1 DP2 AMD Gfx card can support max ...

Страница 23: ... Input HDMI Menu 1 2 3 4 1 Hot Key1 Modes Brightness Volume Gamma Contrast Blue Light Over Drive VRB 2 Hot Key2 Modes Brightness Contrast Volume Gamma Blue Light Over Drive VRB 3 Hot Key3 Input Switch Hot Key 4 Direction Key Main Menu Hot key1 default Modes To choose scenario mode G1 G2 G3 which user defined profile to use or scenario mode User Standard ECO Graphics HDR Action Racing Sports User H...

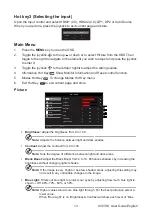
Страница 24: ...cture Mode Standard 80 50 Off Off Off Color Audio OSD System Brightness Contrast Blue Light ACM HDR Off Light Sensor Picture Enter Move 5 Black Boost X Off Super Sharpness Gaming Brightness Adjust the brightness from 0 to 100 Note Adjusts the balance between light and dark shades Contrast Adjust the contrast from 0 to 100 Note Sets the degree of difference between light and dark areas Black Boost Adjus...

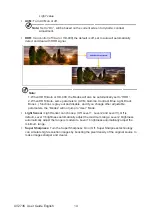
Страница 25: ...ight Black Boost functions is gray out and disable and if you change other adjustable parameters the Modes will not jump to User Mode Light Sensor Light Sensor can choose Off Level 1 Level 2 and Level 3 Off is default Level 3 brightness automatically adjust the maximum range Level 2 brightness automatically adjust the range is moderate Level 1 brightness automatically adjust the minimum range Supe...

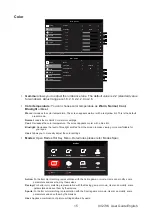
Страница 26: ...tor s normal color settings Cool Decreases the color temperature The screenappears cooler with a blue tint Bluelight Decreases the level of blue light emitted from the screen to make viewing more comfortable for your eyes User Allows you to manually adjust the color settings Modes Open Modes Hot Key Menu Detail rules please refer Modes Spec Action Racing Sports User HDR Graphics ECO Standard Modes...

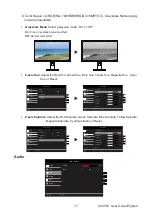
Страница 27: ...Hue Saturate are gray out and can t adjustment Color Space You can choose sRGB Rec 709 EBU DCI SMPTE C and Standard Note Color Space HDR to correspond Modes is HDR Other Color Space the Modes Standard 1 CIE 1931 positive and negative error of 0 05 HDR according to current Panel to fine tune 2 Color Space HDR the Modes HDR Picture page HDR Auto 3 The signal content is SDR the brightness can to adju...

Страница 28: ...axis Hue Red Hue X Enter Move Back 50 50 50 50 50 50 Green Hue Blue Hue Yellow Hue Magenta Hue Cyan Hue Reset Performance Performance 6 axis Saturate Adjust the Red Saturate Green Saturate Blue Saturate Yellow Saturate Magenta Saturate Cyan Saturation or Reset Mode Standard Standard Audio OSD System Picture Color Mode Color Space Off Grayscale Mode 6 axis Saturate X Enter Move 6 axis Hue Mode Stand...

Страница 29: ...splay the panel s current refresh rate on the screen VRB To choose whether to support dynamic picture more clean control default is Off Note 1 HDR setting Auto or HDR 400 is not support VRB 2 VRB function does not affect the Logo Aim Point Message and Input Icon brightness 3 VRB set Normal or Extreme when to turn on FreeSync will auto set VRB is Off 4 VRB set Normal or Extreme when to adjustment B...

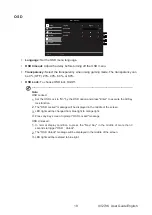
Страница 30: ...Lock To choose OSD lock On Off Note OSD Locked 1 Set the OSD Lock to On by the OSD option and press Enter to execute the All Key lock function 2 The OSD Locked message will be displayed in the middle of the screen 3 LED lights will be changed from blue light to orange light 4 Press any Key screen to prompt OSD Locked message OSD Unlocked 1 In normal display condition to press the Navi Key in the m...

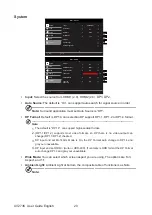
Страница 31: ...n order Note Surround application must set Auto Source is Off DP Format Default is DP1 4 can selection DP support DP1 1 DP1 2 or DP1 4 format Note 1 The default is DP1 4 can support high bandwidth video 2 DP1 1 DP1 2 supports most video formats so DP there is no video output can change DP1 1 DP1 2 checked 3 DP input and set 4K 144Hz Mode is On the DP Format auto change to DP1 4 and gray out unavai...

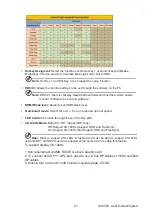
Страница 32: ...MI black level Quick start mode Select Off or On Turn on to speed up boot speed LED Control Controls the brightness of the Key LED 4K 144Hz Mode Default is Off Support DP Only Off Support 4K 120Hz Support HDR and FreeSync On Support 4K 144Hz Not Support HDR and FreeSync Note Want to support 4K 144Hz Graphic Card must be able to support 4K 144Hz and both DP1 and DP2 must be connected at the same ti...

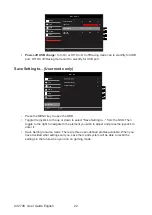
Страница 33: ...e only Mode User System Picture Color Audio OSD Enter Move X Save setting to Gaming Game Mode Sports Press the MENU key to open the OSD Toggle the joystick to the up or down to select Save Setting to from the OSD Then toggle to the right to navigate to the element you wish to adjust and press the joystick to enter it Save Setting to Game mode There are three user defined profiles available When yo...

Страница 34: ...rightness and contrast to maximum or reset to their default setting Off Check the power switch Check if the AC power cord is properly connected to the monitor Amber Check if the video signal cable is properly connected at the back of monitor Check if the computer system is switched on and in power saving standby mode OSD Locked If OSD Lock is on the LED status set Amber Note Acer monitor is purpos...

Отзывы: