background image

49

Chapter 3

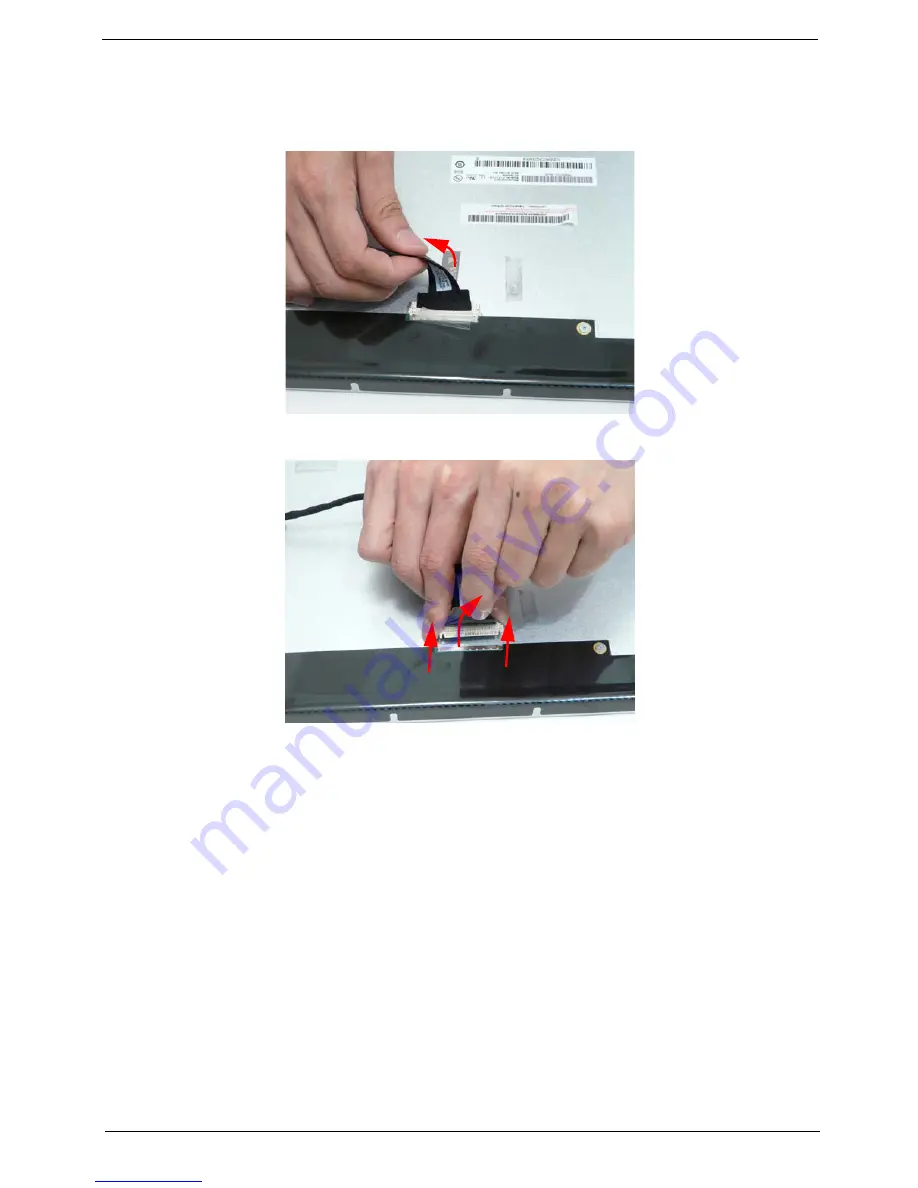
Removing the LVDS cable and LCD Brackets

1.

See “Removing the Inverter Board” on page 47.

2.

Peel the LVDS cable away from the LCD module, taking care to grasp from the cloth adhesive strip

3.

Peel the clear protective tape away from the connector and pull the connector out of the LCD module.


Содержание eMachines EZ1600

Страница 1: ...eMachines EZ1600 EZ1601 Service Guide PRINTED IN TAIWAN Service guide files and updates are available on the ACER CSD web for more information please refer to http csd acer com tw ...

Страница 2: ...II Revision History Please refer to the table below for the updates made on this service guide Date Chapter Updates ...

Страница 3: ...pect to the contents hereof and specifically disclaims any warranties of merchantability or fitness for any particular purpose Any Acer Incorporated software described in this manual is sold or licensed as is Should the programs prove defective following their purchase the buyer and not Acer Incorporated its distributor or its dealer assumes the entire cost of all necessary servicing repair and an...

Страница 4: ... bits and pieces of additional information related to the current topic WARNING Alerts you to any damage that might result from doing or not doing specific actions CAUTION Gives precautionary measures to avoid possible hardware or software problems IMPORTANT Reminds you to do specific actions relevant to the accomplishment of procedures ...

Страница 5: ... NOT be covered in this generic service guide In such cases please contact your regional offices or the responsible personnel channel to provide you with further technical details 2 Please note WHEN ORDERING FRU PARTS that you should check the most up to date information available on your regional web or channel If for whatever reason a part number change is made it will not be noted in the printe...

Страница 6: ...VI ...

Страница 7: ...quirements 34 General Information 34 Pre disassembly Instructions 34 Disassembly Process 35 Disassembly Flowchart 35 Removing the Stand Assembly 37 Removing the LCD Bezel 40 Removing the Switch Board 42 Removing the Support Legs 43 Removing the LCD Module 45 Removing the Inverter Board 47 Removing the LVDS cable and LCD Brackets 49 Removing the ODD Module 51 Removing the ODD Board and Cable 54 Rem...

Страница 8: ... the Stand Assembly 93 Troubleshooting 96 Common Problems 96 Component Failure 97 Wireless Failure 101 LCD Failure 103 General Troubleshooting Issues 105 Intermittent Problems 108 Undetermined Problems 108 Jumper and Connector Locations 109 Top View 109 Bottom View 110 Clearing Password Check and BIOS Recovery 111 Clearing Password Check 111 BIOS Recovery by Crisis Disk 112 FRU Field Replaceable U...

Страница 9: ...E Express Chipset Memory Up to 2 GB of DDR2 533 MHz SDRAM single channel support on one DIMM Display 18 5 widescreen with 16 9 aspect ratio 1366 x 768 native resolution 5 ms response time 250 nits cd m2 brightness 1000 1 ACM contrast ratio Hard drive Serial ATA hard disk up to 250 GB SSD NAND flash module up to 16 GB Optical drive SuperMulti Card reader Multi in 1 card reader supporting MultiMedia...

Страница 10: ... headphone and microphone jacks Brightness control button Rear Three USB 2 0 ports PS 2 keyboard and mouse ports Ethernet RJ 45 port Audio jack Software eMachines Recovery Management Microsoft Office Home and Student 2007 Trial Microsoft Works Norton Internet Security 2009 60 day trial 4 Adobe Reader Adobe Flash Player CyberLink Power2Go Google Toolbar and Desktop Search Dimensions 484 W x 380 9 H...

Страница 11: ...tional accessories eMachines PS 2 keyboard and mouse NOTE Items marked with denote only selected models NOTE The specifications listed above are for reference only The exact configuration of your PC depends on the model purchased ...

Страница 12: ...4 Chapter 1 System Block Diagram ...

Страница 13: ... computer IMPORTANT Your computer s hardware options port locations and indicators may vary from this illustration Front View Component Description Power button Press this button to turn the power on or off You can also configure the power button to operate in Standby Resume mode or Hibernate mode Power button ...

Страница 14: ...ay vary from this illustration Component Icon Description Optical disc drive Use this drive to listen to audio CDs install games and programs watch DVDs and store large files onto recordable discs depending on drive type This drive may be a CD recordable CD DVD or recordable DVD Optical disc drive ...

Страница 15: ...eases the brightness of the LCD Screen Memory card reader Insert a memory card from a digital camera MP3 player PDA cellular telephone or other device into the memory card reader USB 2 0 port Plug USB Universal Serial Bus devices such as a USB external drive printer scanner camera keyboard or mouse into this port Headphone jack Plug powered analog front speakers an external amplifier or headphones...

Страница 16: ...ts Plug USB Universal Serial Bus devices such as a USB printer scanner camera keyboard or mouse into these ports PS 2 mouse port Plug a PS 2 mouse into this port PS 2 keyboard port Plug a PS 2 keyboard into this port Audio line output jack Plug an line output to an amplifier or entertainment system into this jack for sound output Speakers Provide audio output when headphones or amplified speakers ...

Страница 17: ...iles and to adjust the volume Windows key Press this key to open the Windows Start menu This key can also be used in combination with other keys to open utilities See Windows Keys on page 10 Fn key Press this key in combination with keys that have alternate functions defined such as the F9 F12 keys Press Fn to increase the brightness of the display Press Fn to decrease the brightness of the displa...

Страница 18: ...rk domain M Minimizes all windows R Open the Run dialog box T Cycle through programs on the taskbar U Open Ease of Access Center X Open Windows Mobility Center BREAK Display the System Properties dialog box SHIFT M Restore minimized windows to the desktop TAB Cycle through programs on the taskbar by using Windows Flip 3 D SPACEBAR Bring all gadgets to the front and select Windows Sidebar CTRL F Se...

Страница 19: ...ler Core logic Intel Atom N270 Processor North Bridge Navy Pier 945GSE South Bridge ICH7 M LAN RTL8111DL 10 100 1000M Onboard Audio Codec HDA Codec ALC269 Keyboard Item Specification Chipset ATI RS690MC Features AGTL interface Front side bus Support Intel Atom Processor 533MHz transfer rate processor bus speed Integrated DRAM controller Dual channel DDR2 SDRAM interface Unified Memory Architecture...

Страница 20: ...gement Timer SMI generation Low Pin Count LPC host interface PCI Express Interface Support PCI Express 1 1 6 PCI Express root ports Support for full 2 5 Gb s bandwidth in each direction per x1 lane Item Specification BIOS vendor Phoenix BIOS BIOS Version D0 12 Item Specification Memory controller Built in Memory size Non onboard DIMM socket number 1 Supports memory size per socket 2 GB Supports ma...

Страница 21: ...ignaled Interrupt and MSI X Supports quad core Receive Side Scaling RSS Embeds an adaptive equalizer in PCI express PHY PCB traces to reach 40 inches Supports Deep Slumber Mode DSM power saving feature Customized LEDs 64 pin QFN package RTL8111D and 48 pin LQFP RTL8111DL Green package Item Specification Model and Type Foxconn T77H053 00 Atheros XB91 mini card Conformity 802 11 b g n Modulation Tec...

Страница 22: ...s Buffer size 8 MB 8 MB Interface SATA SATA Internal transfer rate Mbits sec max 830 1175 I O data transfer rate Mbytes sec max 875 Mbits s maximum DC Power Requirements Voltage 5 0V 5 Item Specifications Vendor Model Name Western Digital WD1600BEVT 22ZCTO Western Digital WD2500BEVT 22ZCT0 Capacity MB 160 250 Bytes per sector 512 Data heads 2 4 Drive Format Disks 1 2 Spindle speed RPM 5400 Perform...

Страница 23: ...ROM Mode 1 data disc CD ROM Mode 2 data disc CD ROM XA CD I Photo CD Multi Session Video CD CD Audio Disc Mixed mode CD ROM disc data and audio CD Extra CD Text CD R Conforming to Orange Book Part 2 read write CD RW Conforming to Orange Book Part 3 read write Read 24X CD ROM 24X CD R 24X CD RW 8X DVD ROM 8X DVD R 8X DVD R 6X DVD ROM DL double layer 6X DVD R DL double layer 6X DVD R DL double layer...

Страница 24: ... 0 300 Display Mode TN normally white Typical White Luminance cd m2 also called Brightness 300 Supported Colors 16 7M Contrast Ratio 1000 1 Response Time Optical Rise Time Fall Time msec 5 Nominal Input Voltage VDD 5V Interface 1 ch LVDS Viewing Angle degree Horizontal Vertical 170 typical 160 typical Temperature Range C Operating Storage shipping 0 to 50 40 to 60 ...

Страница 25: ... menu options Information Main Advanced Security Boot and Exit Follow these instructions To choose a menu use the left and right arrow keys To choose an item use the up and down arrow keys To change the value of a parameter press F5 or F6 A plus sign indicates the item has sub items Press Enter to expand this item Press Esc while you are in any of the menu options to go to the Exit menu In any men...

Страница 26: ...ield shows product name of the system System Serial Number This field displays the serial number of this unit System BIOS Version Displays system BIOS version BIOS Release Date This field displays the release date of the system BIOS PhoenixBIOS Setup Utility Item Specific Help F1 Esc Help Exit Select Item Select Menu Change Values Press Enter Press Enter F9 F10 Setup Defaults Save and Exit Intel R...

Страница 27: ...t HH MM SS hour minute second Bootup Num Lock Set Num Lock to on or off automatically during boot Option Off or On PhoenixBIOS Setup Utility Item Specific Help Tab Shift Tab or Enter selects field F1 Esc Help Exit Select Item Select Menu Change Values Press Enter Press Enter F9 F10 Setup Defaults Save and Exit 05 27 2009 17 21 24 Hitachi HTS54501 HL DT ST DVDRAM Enabled Enabled On Disable All but ...

Страница 28: ...er Size Graphics Memory Integrated Peripherals Enter the Integrated Peripherals submenu Onboard IDE Controller Onboard SATA Controller Onboard SATA Mode Onboard USB Controller Legacy USB Support Onboard Audio Controller Onboard LAN Controller Onboard LAN Option ROM Onboard LAN Option ROM PhoenixBIOS Setup Utility Item Specific Help F1 Esc Help Exit Select Item Select Menu Change Values Press Enter...

Страница 29: ...tility from unauthorized access The user can not either enter the Setup menu nor change the value of parameters N A Change User Password Press Enter to set the user password When set this password prompts the user to enter a password during the boot sequence The user must enter the correct password to be able to continue booting the system This option is only available if a supervisor password has...

Страница 30: ...ter to Set 4 If desired you can opt to enable the Password on boot parameter 5 When you are done press F10 to save the changes and exit the BIOS Setup Utility Removing a Password Follow these steps 1 Use the and keys to highlight the Set Supervisor Password parameter and press the Enter key The Set Password box appears 2 Type the current password in the Enter Current Password field and press Enter...

Страница 31: ...hen you are done press F10 to save the changes and exit the BIOS Setup Utility If the verification is OK the screen will display as following The password setting is complete after the user presses Enter If the current password entered does not match the actual current password the screen will show you the Setup Warning If the new password and confirm new password strings do not match the screen w...

Страница 32: ...e up when the system is in standby and a PS 2 device is activated Enabled or Disabled Wake Up by USB KB Mouse Disable or Enable wake up when the system is in standby and a USB device is activated Enabled or Disabled Restore On AC Power Loss Set the state the device returns to in the event of AC power loss Off causes the device to remain off in the event of power loss and On restarts the device whe...

Страница 33: ...V Displays the power supply voltage for the nominal 5V bus This field is read only N A Memory 1 80V Displays the memory voltage This field is read only N A Chipset 1 50V Displays the chipset voltage This field is read only N A Shutdown Temperature If enabled the computer shuts itself down automatically when the temperature rises above a setpoint Disabled Enabled PhoenixBIOS Setup Utility Item Spec...

Страница 34: ...e or include the device to boot Shift 1 enables or disables a device 1 4 Loads default boot sequence F1 Esc Help Exit Select Item Select Menu Change Values Press Enter Press Enter F9 F10 Setup Defaults Save and Exit Boot priority order 1 Internal HDD Hitachi HTS545016B9A300 S 2 SATA ODD HL DT ST DVDRAM GT20N S3 3 USB HDD 4 USB KEY 5 6 7 8 Excluded from boot order 1 USB FDC 1 USB CDROM Boot priorit...

Страница 35: ...or all SETUP item Discard Changes Load previous values from CMOS for all SETUP items Save Changes Save Setup Data to CMOS PhoenixBIOS Setup Utility Item Specific Help Exit System Setup and save your changes to CMOS F1 Esc Help Exit Select Item Select Menu Change Values Press Enter Press Enter F9 F10 Setup Defaults Save and Exit Exit Saving Changes Exit Discarding Changes Load Setup Defaults Discar...

Страница 36: ...pdate is required for the following conditions New versions of system programs New features or options Restore a BIOS when it becomes corrupted This section contains instructions for the following BIOS utilities DOS flashit utility WinPhlash utility DMI Tools ...

Страница 37: ...ype flashit 3101a fd dc mc all at the DOS prompt to update the BIOS The flash process begins Flash is complete when the message Flash programming complete displays PhoenixBIOS Setup Utility Item Specific Help Keys used to view or configure devices Up and Down arrows select a device F6 and F5 moves the device up or down F1 Esc Help Exit Select Item Select Menu Change Values Select Sub Menu Enter F9...

Страница 38: ...Phlash executable to run the program NOTE You must run the program with administrator privileges for it to function properly 2 In the Specify New BIOS file field enter the BIOS ROM file name and path IMPORTANT Be sure the AC power is plugged in If not the following error message displays 3 Click OK to begin the update A progress screen displays 4 When the process is complete the system will reboot...

Страница 39: ...3 Select Boot Menu to modify the boot priority order for example if using a USB HDD to run DMI Tools move USB HDD to position 1 4 Boot into DOS 5 Key in qdmi30a then click Enter The following screen appears Select one of the functions to modify To modify the asset tag key in 1 and then key in a string for the new asset tag as shown below To modify the product number key in 2 then key in a new stri...

Страница 40: ...ter 2 To modify the serial number key in 3 then key in a new string for the serial number as shown below To modify the 1394 GUID number key in 4 then key in a new string for the 1394 GUID number as shown below ...

Страница 41: ...Chapter 2 33 ...

Страница 42: ...rews with the corresponding components to avoid mismatch when putting back the components General Information Pre disassembly Instructions Before proceeding with the disassembly procedure make sure that you do the following 1 Turn off the power to the system and all peripherals 2 Unplug the AC adapter and all power and signal cables from the system 3 Place the system on a flat stable surface The f...

Страница 43: ...D Module M3 0 8 0 Self Tapping 1 Remove Support Legs Turn off power and disconnect all cables before proceeding Remove LCD Module Remove LCD Bezel Remove Inverter Board Remove LCD Brackets and Cable Remove Speakers Remove WLAN Antennas Remove ODD Module Remove ODD Board and Cable Remove DIMM Module Remove Mainboard Remove Thermal Module Remove WLAN Board Remove HDD Module Remove Switch Board Remov...

Страница 44: ...0 Self tapping 2 Speakers M2 0 4 0 Self Tapping 4 WLAN Antennas M2 0 4 0 plated 2 Power Board Cable M2 0 6 0 1 HDD Module M3 0 8 0 Self Tapping 1 M3 3 4 WLAN Board M2 5 4 1 Mainboard M3 0 5 6 M3 0 12 0 Self Tapping 2 Thermal Module M2 5 4 4 Step Screw Quantity Part No ...

Страница 45: ... disassembly Instructions on page 34 2 Lift the stand assembly up as shown below 3 Pry up the edges of the hinge cover using a plastic tool as shown below 4 Push in and lift up on the top edge of the hinge cover until the securing tabs clear the slots ...

Страница 46: ...ge cover as shown until the securing tabs clear the slots 6 Grasp the hinge cover with both hands to pull the top edge out and remove from the assembly 7 Remove the three screws securing the hinge to the back cover Step Size Quantity Screw Type Switch Boards M4 8 3 ...

Страница 47: ...39 Chapter 3 8 Remove the hinge from the back cover pull down so the metal tabs on the hinge clear the slots in the back cover ...

Страница 48: ... the bezel away from the LCD screen starting from the top center 3 Work your way from the center of the bezel to the right and left sides 4 Pry the bezel apart from one of the top corners working your way down the edge and towards the center bottom until the bezel is completely separated from the back cover ...

Страница 49: ...er 3 5 Lift the bezel away from the assembly as shown IMPORTANT The bezel is still attached to the assembly by a cable Do not lift the bezel away completely 6 Unplug the switch board cable from the switch board ...

Страница 50: ... Switch Board 1 See Removing the LCD Bezel on page 40 2 Remove the two screws securing the Switch Board to the LCD Bezel 3 Lift the Switch Board away from the LCD Bezel Step Size Quantity Screw Type Switch Boards M2 6 plated 2 ...

Страница 51: ...pport Legs 1 See Removing the LCD Bezel on page 40 2 Remove the eight securing screws from the front of the computer as shown 3 Remove the left leg from the assembly Step Size Quantity Screw Type Support legs M3 0 8 self tapping 8 ...

Страница 52: ...Chapter 3 44 4 Remove the right leg from the assembly ...

Страница 53: ...rews from the LCD Module 3 Lift the module up high enough so that you are able to access the cables underneath IMPORTANT Do not lift the module completely away from the assembly doing so may result in permanent damage to the cables and connectors Step Size Quantity Screw Type LCD Module M3 0 8 self tapping 2 ...

Страница 54: ...Chapter 3 46 4 Unplug the inverter cable 5 Unplug the LVDS cable 6 Lift the LCD module away from the assembly and carefully place face down on a clean lint free cloth ...

Страница 55: ...ving the Inverter Board 1 See Removing the LCD Module on page 45 2 Unplug the Mainboard connector cable from the Inverter Board 3 Unplug the lower connector to the LCD Panel 4 Unplug the upper connector to the LCD Panel ...

Страница 56: ...Chapter 3 48 5 Unscrew the two securing screws holding the Inverter Board to the LCD Bracket 6 Lift the Inverter Board clear of the LCD assembly Step Size Quantity Screw Type Inverter Board M3 0 5 2 ...

Страница 57: ...ckets 1 See Removing the Inverter Board on page 47 2 Peel the LVDS cable away from the LCD module taking care to grasp from the cloth adhesive strip 3 Peel the clear protective tape away from the connector and pull the connector out of the LCD module ...

Страница 58: ... the LCD module and lift the bracket away from the module 5 Un screw the two screws securing the right LCD bracket to the LCD module and lift the bracket away from the module Step Size Quantity Screw Type LCD Bracket M3 5 2 Step Size Quantity Screw Type LCD Bracket M3 5 2 ...

Страница 59: ...ODD Module 1 See Removing the LCD Module on page 45 2 Remove the ESD spacer from the top of the drive 3 Remove the single screw securing the ODD to the Back Cover Step Size Quantity Screw Type ODD Module M3 0 8 0 Self Tapping 1 ...

Страница 60: ...inboard by pushing the ODD out of the lower cover Remove the ODD from the lower cover 5 Insert an appropriate tool into the hole in the ODD bezel to eject the ODD tray 6 Remove the ODD bezel by turning the bezel downward and pulling the bezel out ...

Страница 61: ...53 Chapter 3 7 Remove the two screws from the ODD bracket and pull the bracket away from the ODD module Step Size Quantity Screw Type ODD Bracket M2 3 Plated 2 ...

Страница 62: ...the ODD cable from the ODD Board IMPORTANT Do not remove the cable completely the grounding cable is still attached to one of the screws 3 Remove the two securing screws from the ODD Board and remove the board and cable from the assembly Step Size Quantity Screw Type ODD Board M3 0 8 0 Self tapping 2 ...

Страница 63: ...5 2 Remove the four screws securing the speakers to the back cover 3 Pull the speakers off the posts in the back panel 4 Unplug the speaker cable from the mainboard 5 Remove the speaker cable from all cable clips Step Size Quantity Screw Type Speakers M2 0 4 0 Self Tapping 4 ...

Страница 64: ...nnect the antenna cables from the WLAN Board as shown NOTE Take note of the correct cable positioning Grey to the Main connector and Black to the Aux connector 3 Remove the two screws securing the WLAN Antennas to the Back Cover Step Size Quantity Screw Type WLAN Antennas M2 0 4 0 plated 2 ...

Страница 65: ...57 Chapter 3 4 Remove the adhesive tape securing the cables to the back cover 5 Lift the antennas off of the mounting pins 6 Remove the cables from the cable channels ...

Страница 66: ...TC Battery 1 See Removing the LCD Module on page 45 2 Locate the RTC Battery 3 Push the RTC battery in the direction indicated The spring underneath will cause the RTC battery to pop up 4 Lift the RTC Battery out of the Mainboard ...

Страница 67: ...ard Cable 1 See Removing the LCD Module on page 45 2 Disconnect the Power Board Cable from the Mainboard 3 Remove the single screw securing the grounding cable to the Back Cover Step Size Quantity Screw Type Power Board Cable M2 0 6 0 1 ...

Страница 68: ...he LCD Module on page 45 2 Remove the single screw securing the HDD assembly to the Back Cover 3 Slide the HDD assembly in the direction indicated to separate the HDD from the SATA interface Step Size Quantity Screw Type HDD Module M3 0 8 0 Self Tapping 1 ...

Страница 69: ...ter 3 4 Lift the HDD assembly out of the Back Cover 5 Remove the four screws securing the HDD to the HDD Carriage 6 Lift the HDD Carriage clear of the HDD Module Step Size Quantity Screw Type HDD Module M3 3 4 ...

Страница 70: ...Disconnect the antenna cables from the WLAN Board as shown NOTE Take note of the correct cable positioning Grey to the Main connector and Black to the Aux connector 3 Remove the single screw securing the WLAN Board to the Mainboard Step Size Quantity Screw Type WLAN Board M2 5 4 1 ...

Страница 71: ...63 Chapter 3 4 Remove the WLAN Board from the Mainboard ...

Страница 72: ...rd 1 See Removing the RTC Battery on page 58 2 See Removing the WLAN Board on page 62 3 Disconnect the Speaker Cable from the Mainboard 4 Disconnect the Power Board cable from the Mainboard 5 Disconnect the ODD Cable from the Mainboard ...

Страница 73: ...ecuring the thermal module to the back cover 7 Remove the screw securing the ODD grounding cable to the mainboard and back cover Step Size Quantity Screw Type Mainboard M3 0 12 Self Tapping 2 Step Size Quantity Screw Type Mainboard M3 0 5 1 ...

Страница 74: ... 66 8 Remove the remaining five screws securing the mainboard to the back cover 9 Using both hands Tilt the Mainboard up and pull clear of the Back Cover as shown Step Size Quantity Screw Type Mainboard M3 0 5 5 ...

Страница 75: ... surface 3 Remove the four screws securing the Thermal Module to the Mainboard 4 Using both hands gently twist the Thermal Module left and right to break the thermal paste seal between the Thermal Module and CPU 5 Lift the Thermal Module clear of the Mainboard Step Size Quantity Screw Type Thermal Module M2 5 4 4 ...

Страница 76: ... 3 68 Removing the Memory Module 1 See Removing the ODD Module on page 51 2 Push out the release latches on both sides of the DIMM socket to release the DIMM Module 3 Remove the DIMM Module from the Mainboard ...

Страница 77: ...nto place Replacing the Thermal Module IMPORTANT Ensure all heat pads are in place before replacing the Thermal Module The following thermal pads are approved for use Eapus XR PE 1 Remove all traces of thermal grease or pad adhesive from the CPU and thermal module using a lint free cloth or cotton swab and Isopropyl Alcohol Acetone or other approved cleaning agent ...

Страница 78: ...ace the Thermal Module onto the Mainboard taking care to align the screw holes before allowing the thermal pad to contact the CPU 3 Replace the four securing screws Step Size Quantity Screw Type Thermal Module M2 5 4 4 ...

Страница 79: ...the left edge of the mainboard into the Back Cover and lower into place aligning the mainboard with the screw holes 2 Replace the five screws in the positions indicated below to secure the mainboard to the back cover Step Size Quantity Screw Type Mainboard M3 0 5 5 ...

Страница 80: ...re the ODD grounding cable to the mainboard and back cover 4 Replace the two screws to secure the thermal module to the back cover Step Size Quantity Screw Type Mainboard M3 0 5 1 Step Size Quantity Screw Type Mainboard M3 0 12 Self Tapping 2 ...

Страница 81: ...73 Chapter 3 5 Connect the ODD Cable to the Mainboard 6 Connect the Power Board cable to the Mainboard 7 Connect the Speaker Cable to the Mainboard ...

Страница 82: ...pter 3 74 Replacing the WLAN Board 1 Insert the WLAN Board in to the Mainboard connector in the direction of the arrow 2 Replace the single securing screw Step Size Quantity Screw Type WLAN Board M2 5 4 1 ...

Страница 83: ... to the WLAN Board terminals as shown NOTE Take note of the correct cable positioning Black to the red callout and gray to the blue callout Replacing the HDD Modules 1 Place HDD Carriage onto the HDD Module taking care to align the screw holes ...

Страница 84: ...four securing screws 3 Place the HDD assembly into the Back Cover between the HDD guides 4 Slide the HDD assembly in the direction indicated to connect the HDD to the SATA interface Step Size Quantity Screw Type HDD Module M3 3 4 ...

Страница 85: ...D assembly to the Back Cover Replacing the Power Board Cable 1 Insert the single screw securing the grounding cable to the Back Cover Step Size Quantity Screw Type HDD Module M3 0 8 0 Self Tapping 1 Step Size Quantity Screw Type Power Board Cable M2 0 6 0 1 ...

Страница 86: ... the Power Board Cable to the Mainboard Replacing the RTC Battery 1 Push the RTC battery in the direction indicated until the battery clicks into place Replacing the WLAN Antennas 1 Insert the cables into the cable channels ...

Страница 87: ...ntennas onto the mounting pins 3 Replace the adhesive tape securing the cables to the back cover 4 Insert the two screws securing the WLAN Antennas to the Back Cover Step Size Quantity Screw Type WLAN Antennas M2 0 4 0 plated 2 ...

Страница 88: ...he correct cable positioning Grey to the Main connector and Black to the Aux connector Replacing the Speakers 1 Plug the speaker cable into the mainboard 2 Insert the speakers onto the mounting posts in the back panel Take care to wrap the speaker cables around the aligning posts as shown ...

Страница 89: ...81 Chapter 3 3 Insert the speaker cable into the cable clips 4 Insert the four screws to secure the speakers to the back cover Step Size Quantity Screw Type Speakers M2 0 4 0 Self Tapping 4 ...

Страница 90: ...nto the mounting pins on the back cover and insert the two securing screws as shown IMPORTANT Be sure the grounding cable is attached to one of the screws as indicated 2 Connect the ODD cable to the ODD Board Step Size Quantity Screw Type ODD Board M3 0 8 0 Self tapping 2 ...

Страница 91: ...hapter 3 Replacing the ODD 1 Insert the two screws to secure the ODD bracket to the ODD module 2 Insert the ODD bezel into the front of the ODD module Step Size Quantity Screw Type ODD Bracket M2 3 Plated 2 ...

Страница 92: ...t the ODD to the mainboard by pushing the ODD into the SATA interface on the ODD board 4 Replace the single screw to secure the ODD to the Back Cover 5 Adhere the ESD spacer to the top of the drive Step Size Quantity Screw Type ODD Module M3 0 8 0 Self Tapping 1 ...

Страница 93: ...the two screws to secure it in place 2 Place the left bracket onto the LCD module and insert the two screws to secure it in place IMPORTANT be sure to thread the LCD backlight cables through the bracket as shown Step Size Quantity Screw Type LCD Bracket M3 5 2 Step Size Quantity Screw Type LCD Bracket M3 5 2 ...

Страница 94: ...module and apply the clear protective tape to secure the connector in place 4 Adhere the LVDS Cable to the back of the LCD panel Replacing the Inverter Board 1 Place the Inverter Board onto the LCD assembly taking care to mount it to the pins on the LCD bracket ...

Страница 95: ... 2 Insert the two screws to secure the Inverter Board to the LCD Bracket 3 Plug the upper connector into the LCD Panel 4 Plug the lower connector into the LCD Panel Step Size Quantity Screw Type LCD Bezel M3 0 5 2 ...

Страница 96: ...Chapter 3 88 5 Plug the Mainboard connector cable into the Inverter Board Replacing the LCD Module 1 Hold the LCD module above the main assembly as shown 2 Plug in the LVDS cable ...

Страница 97: ... cable 4 Place the module down onto the assembly taking care to align the brackets with the screw holes in the back cover 5 Insert the two securing screws into the LCD Module Step Size Quantity Screw Type LCD Module M3 0 8 self tapping 2 ...

Страница 98: ...o the assembly as shown The legs center tabs should cover the LCD module bracket tabs and the bottom tabs should be covered by the LCD bracket tabs 2 Insert the eight securing screws on the front of the computer as shown Step Size Quantity Screw Type Support legs M3 0 8 self tapping 8 ...

Страница 99: ...hapter 3 Replacing the Switch Board 3 Place the Switch Board onto the LCD Bezel 4 Insert the two screws to secure the Switch Board to the LCD Bezel Step Size Quantity Screw Type Switch Boards M2 6 plated 2 ...

Страница 100: ... Bezel 1 Plug the switch board cable into the switch board 2 Place the bezel onto assembly as shown 3 Starting at the bottom edge press the bezel into the back cover so that the securing tabs along the outside edges snap into place ...

Страница 101: ...nge to the back cover pull down so the metal tabs on the hinge clear the slots in the back cover 2 Replace the three screws securing the hinge to the back cover 3 Slide the hinge cover over the hinge as shown Step Size Quantity Screw Type Switch Boards M4 8 3 ...

Страница 102: ...the stand slightly and check that the bottom edge of the hinge cover is fully inserted If not push it into place pushing in as indicated with your fingers and down on the top of the hinge cover with your thumbs 6 To verify that the hinge cover is fully inserted open the stand The hinge cover should not contact the stand when fully opened if it is properly installed ...

Страница 103: ...95 Chapter 3 ...

Страница 104: ...s possible 2 Verify the symptoms by attempting to re create the failure by running the diagnostic test or by repeating the same operation 3 Use the troubleshooting sections to try and resolve the issue 4 If the Issue is still not resolved see Online Support Information on page 142 Start Hardware or Software Failure Hardware Failure Determine HW failure type Component Failure LCD Failure Mainboard ...

Страница 105: ...ccess failure screen displays The ODD is noisy Perform the following general solutions one at a time to correct the problem 1 Reboot the computer and retry the operation 2 Try an alternate disc 3 Navigate to Start Computer Check that the ODD device is displayed in the Devices with Removable Storage panel 4 Navigate to Start Control Panel System and Maintenance System Device Manager Component Failu...

Страница 106: ...Movie fields select the desired player from the drop down menu 5 Check that the Regional Code is correct for the selected media IMPORTANT Region can only be changed a limited number of times After Changes remaining reaches zero the region cannot be changed even Windows is reinstalled or the drive is moved to another computer a Navigate to Start Control Panel System and Maintenance System Device Ma...

Страница 107: ...onnected correctly 5 Replace the ODD See Removing the ODD Module on page 51 Drive Read Failure If discs cannot be read when inserted in the drive perform the following actions one at a time to correct the problem 1 Remove and clean the failed disc 2 Retry reading the CD or DVD d Test the drive using other discs e Play a DVD movie f Listen to a music CD If the ODD works properly with alternate disc...

Страница 108: ...ound Sound Ensure that Speakers are selected as the default audio device green check mark NOTE If Speakers does not show right click on the Playback tab and select Show Disabled Devices clear by default 7 Select Speakers and click Configure to start Speaker Setup Follow the onscreen prompts to configure the speakers 8 Remove and recently installed hardware or software 9 Restore system and file set...

Страница 109: ...o driver 5 Ensure that all volume controls are set mid range a Click the volume icon on the taskbar and drag the slider to 50 Ensure that the volume is not muted b Click Mixer to verify that other audio applications are set to 50 and not muted 6 Navigate to Start Control Panel Hardware and Sound Sound Ensure that Speakers are selected as the default audio device green check mark NOTE If Speakers d...

Страница 110: ...s from a known good date using System Restore If the issue is not fixed repeat the preceding steps and select an earlier time and date 10 Reinstall the Operating System 11 If the Issue is still not resolved see Online Support Information on page 142 ...

Страница 111: ...olding down the power button for 10 seconds Reconnect the power and reboot the computer 3 Disconnect power and all external devices including port replicators or docking stations Remove any memory cards and CD DVD discs Restart the computer LCD Failure Is the LVDS cable properly connected Test the LVDS Cable Is the inverter properly connected Test the inverter Test the inverter cables Re insert th...

Страница 112: ...alone as this may reduce display brightness If the display is too dim at the highest brightness setting the LCD is faulty and should be replaced See Removing the LCD Module on page 45 5 Check the display resolution is correctly configured a Minimize or close all Windows b If display size is only abnormal in an application check the view settings and control mouse wheel zoom feature in the applicat...

Страница 113: ... using up to date software to ensure the computer is virus free 3 If the computer is experiencing HDD or ODD BIOS information loss disconnect and reconnect the power and data cables between devices If the BIOS settings are still lost replace the cables 4 If HDD information is missing from the BIOS the drive may be defective and should be replaced 5 Replace the Motherboard 6 If the Issue is still n...

Страница 114: ... ODD are set correctly 7 Remove any recently added hardware and associated software 8 Run the Windows Disk Defragmenter For more information see Windows Help and Support 9 Run Windows Check Disk by entering chkdsk r from a command prompt For more information see Windows Help and Support 10 Restore system and file settings from a known good date using System Restore If the issue is not fixed repeat...

Страница 115: ...e Device Manager to determine that The device is properly installed There are no red Xs or yellow exclamation marks There are no device conflicts No hardware is listed under Other Devices 13 If the Issue is still not resolved see Online Support Information on page 142 ...

Страница 116: ...ce failed which installed devices are incorrect whether a short circuit is suspected or whether the system is inoperative Follow these procedures to isolate the failing FRU do not isolate non defective FRU NOTE Verify that all attached devices are supported by the computer NOTE Verify that the power supply being used at the time of the failure is operating correctly 1 Power off the computer 2 Visu...

Страница 117: ...ector Media Card Media card reader connector Line in Jack Level Line In Connector USB USB connectors PS2 Keyboard PS2 Connector for Keyboard PS2 Mouse PS2 Connector for Mouse RJ45 LAN connection RJ45 HDD connector 2 USB connector USB connector PS2 mouse connector PS2 keyboard connector Line in Jack USB connector USB connector Head Phone connector MIC Media Card Reader connector DDR SODIMM Chapter ...

Страница 118: ...N card slot Speaker Internal speaker connector LCD Connector for LVDS cable Inverter Connector for inverter Switch Cable Power Board cable connector RTC Battery RTC Battery connector Inverter connector LCD connector WLAN Card connector Switch Cable connector ODD Cable connector Speaker connector RTC Battery ...

Страница 119: ...essary to bypass the password check users need to short the HW Gap to clear the password by the following steps Power Off a system and remove HDD AC and Battery from the machine Open the back cover of the machine and find out the HW Gap on M B as picture Use an electric conductivity tool to short the two points of the HW Gap Plug in AC keep the short condition on the HW Gap and press Power Button ...

Страница 120: ...ey The Crisis USB key could be made by executing the Crisis Disk program in another system with Windows XP OS Follow the steps below 1 Save ROM file file name JAL90x64 fd to the root directory of USB storage 2 Plug USB storage into USB port 3 Press Brightness up Brightness down Power button to initiate system CRISIS mode When CRISIS is complete the system auto restarts with a workable BIOS 4 Updat...

Страница 121: ...irmation screen displays 6 Click the OK button on the left to continue 7 Click the N button when prompted to complete the process 8 Insert the Crisis Disk in to the USB floppy drive attached to the BIOS flash failed system ...

Страница 122: ...em powers on and the Crisis BIOS Recovery process begins BIOS Boot Block begins restoring the BIOS code from the Crisis floppy disk to BIOS ROM on the failed systems When the Crisis flash process is finished the system restarts with a workable BIOS Update to the latest version BIOS for the system using the regular BIOS flashing process ...

Страница 123: ...N Card 2 Right LCD Bracket 3 soDIMM Memory 4 Heat Sink 5 Hard Disk Drive 6 Hard Disk Drive Bracket 7 ODD Bezel 8 Front Bezel Assembly 9 LCD Panel 10 Left LCD Bracket 11 Power Switch Board 12 Mainboard 13 Inverter Board 14 Left Support Leg 15 Optical Disk Drive Interface Board 8 9 10 12 13 14 15 16 17 18 1 2 3 4 7 5 6 11 Chapter 6 ...

Страница 124: ...116 Chapter 6 16 Right Support Leg 17 Rear Cover Sub Assembly 18 Optical Disk Drive No Description Acer P N ...

Страница 125: ...7 22V VO 1700V TWS 449 349 MB NAS06 001 EL7 MB 945GSE CPU 1 6G N A PCB EL7 ODD B 2L 37 17 REVB N A PCB EL7 SW B 2L 55 15 REVD NI 10200 012 WLAN 802 11 B G 9WEM106QCF00Q CE NI 10200 024 WLAN 802 11 B G 9WEM106QCF00Q US Cable N A CABLE ASSY EL7 INVER 299MM 10P 30V 1A N A TAPE INVERTER CABLE EL7 JXEL7004 REV3A N A CABLE ASSY EL7 W LCD 200MM 30P 30V 1A N A CABLE ASSY EL7 ODD 215MM 12P 30V 1A ...

Страница 126: ...LACK N A BRACKET HDD EL7 FBEL7005 REV3A N A Kick Stand Kick Stand Black N A BRACKET LCD L EL7 FBEL7003 REV3A N A BRACKET LCD R EL7 FBEL7004 REV3A N A EL7 SUPPORT LEG L SUB ASSY N A EL7 SUPPORT LEG R SUB ASSY N A EL7 ODD BEZEL SUB ASSY N A EL7 ODD BEZEL SUB ASSY BLACK N A ODD BRACKET QU1 FBQU1007 REV3C N A HINGE COVER EL7 EBEL7001 REV3A BLACK N A HINGE COVER EL7 EBEL7001 REV3A CPU KC ANB01 270 CPU ...

Страница 127: ...85XW01 V2 0B LF 250nit 5ms 1000 1 250nits HF LK 18005 015 CCFL LCD AUO 18 5 W WXGA None Glare M185XW01 V2 0C LF 250nit 5ms 1000 1 250nits HF LK 1800D 003 CCFL LCD CMO 18 5 W WXGA None Glare M185B1 L02 C1 LF 250nit 5ms 1000 1 2CCFL 250nits HF LK 18006 002 CCFL LCD SAMSUNG 18 5 W HD None Glare LTM185AT01 A01 LF 250nit 5ms 1000 1 250nits HF LK 18006 003 CCFL LCD SAMSUNG 18 5 W HD None Glare LTM185AT0...

Страница 128: ... Super Multi DRIVE 12 7mm Tray DL 8X DS 8A3S LF W O bezel SATA Speaker N A SPEAKER 4 OHM 2W FG QT180 Sponge N A ODD SPONG EMI Part Number Description SCREW M2 5 4 0 I NI NYLOK IRON SCREW2 5 3I HEAD4 5 0 5 BNI NYLOK IRON SCREW M2 0 5 0 I NI NYLOK IRON SCREW M2 0 5 0 I BNI NYLOK IRON SCREW M3 0 4 0 I NI NYLOK IRON SCREW T2 0 4 0 I NI IRON SCREW T2 0 6 0 I BZN IRON SCREW M4 0 8 0 F MC NYLOK IRON SCRE...

Страница 129: ...Chapter 6 121 ...

Страница 130: ...004 EZ1600 AAP ACS Singapore AAP002 PW NAS05 001 EZ1600 TWN GCTW N Taiwan 244H Z1600 485 TWN002 PW NAS05 003 EZ1600 AAP AJC Japan EZ1600 E5 AAP002 S1 NAS05 003 EZ1600 EMEA AAF South Africa 0003 EMEA002 S1 NAS05 002 EZ1600 EMEA AAF South Africa 0001 EMEA002 S1 NAS05 001 EZ1600 EMEA AAF South Africa EMEA002 PW NAT05 025 EZ1601 EMEA ACH Luxembourg 99 FXDTZ QI4 EMEA002 PW NAT05 024 EZ1601 EMEA ACH Bel...

Страница 131: ... 1 NSM8XS D18 5W mCard PS2 eCooper2 PS2Opt PB PW NAS05 014 EZ1600 EMEA002 XPHR05e ATMN270B SO1GBII6 1 N160GB5 4KS 1 NSM8XS D18 5W mCard PS2 eCooper2 PS2Opt PB PW NAS05 013 EZ1600 EMEA002 XPHRA4e ATMN270B SO1GBII6 1 N160GB5 4KS 1 NSM8XS D18 5W mCard PS2 eCooper2 PS2Opt PB PW NAS05 012 EZ1600 EMEA002 XPHR15e ATMN270B SO1GBII6 1 N160GB5 4KS 1 NSM8XS D18 5W mCard PS2 eCooper2 PS2Opt PB PW NAS05 011 EZ...

Страница 132: ...S 1 NSM8XS D18 5W mCard PS2 eCooper PS2Opt PB PW NAT05 022 EZ1601 EMEA002 XPHR03e ATMN270B SO1GBII6 1 N160GB5 4KS 1 NSM8XS D18 5W mCard PS2 eCooper PS2Opt PB PW NAT05 021 EZ1601 CHINA002 XPHCNE1 ATMN270B SO1GBII6 1 N160GB5 4KS 1 NSM8XS D18 5W 802 11bgn PS2 eCooper PS2Opt PB PW NAT05 020 EZ1601 EMEA002 XPHR26e01 ATMN270B SO1GBII6 1 N160GB5 4KS 1 NSM8XS D18 5W mCard PS2 eCooper PS2Opt PB PW NAT05 01...

Страница 133: ...S2 eCooper PS2Opt PB S1 NAT05 002 EZ1601 Sample EMEA002 XPHZAe1 ATMN270B SO1GBII6 1 N160GB5 4KS 1 NSM8XS D18 5W PS2 eCooper2 PS2 eCooper S1 NAT05 001 EZ1601 Sample EMEA002 XPHZAe1 ATMN270B SO1GBII6 1 N160GB5 4KS 1 D18 5W mCard PS2 eCooper2 PS2 eCooper S1 VA606 001 VZ280 Sample EMEA001 XPPZA1 ATMN270B SO1GBII6 1 N160GB5 4KS 1 NSM8XS D18 5W PS2 0810 PS2Opt PB S1 VA706 001 VZ280G Sample EMEA001 XPPZA...

Страница 134: ...ack eClapton Q945GSE_1394 N _Logo N PW NAT0C 003 eClapton AIO 18 5 Black 18 5 AIO eClapton Black eClapton Q945GSE_1394 N _Logo N PW NAT05 004 eClapton AIO 18 5 Black 18 5 AIO eClapton Black eClapton Q945GSE_1394 N _Logo N PW NAT0C 002 eClapton AIO 18 5 Black 18 5 AIO eClapton Black eClapton Q945GSE_1394 N _Logo N PW NAT05 003 eClapton AIO 18 5 Black 18 5 AIO eClapton Black eClapton Q945GSE_1394 N ...

Страница 135: ...2GBII6 N160GB5 4KS N D18 5WXGA N N S1 NAS05 001 SO1GBII6 N160GB5 4KS N D18 5WXGA 56K MDM USB N PW NAT05 025 SO1GBII6 N160GB5 4KS NSM8XS D18 5WXGA N 802 11 b g mini card PW NAT05 024 SO1GBII6 N160GB5 4KS NSM8XS D18 5WXGA N 802 11 b g mini card PW NAT05 023 SO1GBII6 N160GB5 4KS NSM8XS D18 5WXGA N 802 11 b g mini card PW NAT05 022 SO1GBII6 N160GB5 4KS NSM8XS D18 5WXGA N 802 11 b g mini card PW NAT05 ...

Страница 136: ...6 001 SO1GBII6 N160GB5 4KS NSM8XS D18 5WXGA N N Acer Part no Keyboard Mouse OS Country Kit OS Country Kit Softload PW NAS05 015 PS2 eCooper2 PS2Opt PB XPH R06e XPHR06e EN FR DE PW NAS05 014 PS2 eCooper2 PS2Opt PB XPH R05e XPHR05e EN FR NL PW NAS05 013 PS2 eCooper2 PS2Opt PB XPH RA4e XPHRA4e NL PW NAS05 012 PS2 eCooper2 PS2Opt PB XPH R15e XPHR15e RU PW NAS05 011 PS2 eCooper2 PS2Opt PB XPH R03e XPHR...

Страница 137: ... LinuxXWME 3e01 EN FR DE IT ES TC SC TH PW NAT05 005 PS2 eCooper PS2Opt PB XPH R22e XPHR22e EN FR TR PW NAT0C 003 PS2 eCooper PS2Opt PB LinuxXW ME1e03 LinuxXWME 1e03 EN FR DE IT ES TC SC TH PW NAT05 004 PS2 eCooper PS2Opt PB XPH R23e XPHR23e EN FR TR PW NAT0C 002 PS2 eCooper PS2Opt PB LinuxXW ME2e01 LinuxXWME 2e01 EN FR DE IT ES TC SC TH PW NAT05 003 PS2 eCooper PS2Opt PB XPH R17e XPHR17e EN SV FI...

Страница 138: ...B XPH SGE02 XPHSGE02 EN S1 NAT05 002 PS2 eCooper2 PS2 eCooper XPH ZAe1 XPHZAe1 EN S1 NAT05 001 PS2 eCooper2 PS2 eCooper XPH ZAe1 XPHZAe1 EN S1 VA606 001 PS2 0810 PS2Opt PB XPP ZA1 XPPZA1 EN S1 VA706 001 PS2 0810 PS2Opt PB XPP ZA1 XPPZA1 EN Acer Part no Keyboard Mouse OS Country Kit OS Country Kit Softload ...

Страница 139: ...131 Appendix A ...

Страница 140: ...ctions are tested under Windows XP Home Windows XP Pro environment Refer to the following lists for components adapter cards and peripherals which have passed these tests Regarding configuration combination and test procedures please refer to the Aspire one series Compatibility Test Report released by the Acer Mobile System Testing Department Appendix B ...

Страница 141: ...s eClapton AIO 18 5 Black eMachines 18 5 AIO eClapton EZ1600 eClapton AIO Black chassis eMachines eClapton AIO 18 5 White eMachines 18 5 AIO eClapton EZ1600 eClapton AIO White chassis eMachines vClapton AIO 18 5 Black eMachines 18 5 AIO vClapton VZ280 vClapton AIO Black chassis CPU INTEL ATMN270B CPU Intel Atom N270 1 6G 512K 533 2 5W HDD HGST N160GB5 4KS HDD HGST 2 5 5400rpm 160GB HTS545016B9A300...

Страница 142: ... Russian white bottom cover CHICONY PS2 eCooper Keyboard CHICONY KB 0705 PS 2 Standard 104KS Black Simplified Chinese eCooper w Vista CHICONY PS2 eCooper2 Keyboard CHICONY KB 0705 PS 2 Standard 104KS Black Simplified Chinese white bottom cover CHICONY PS2 eCooper Keyboard CHICONY KB 0705 PS 2 Standard 104KS Black Thailand eCooper w Vista CHICONY PS2 eCooper2 Keyboard CHICONY KB 0705 PS 2 Standard ...

Страница 143: ...CHICONY PS2 eCooper Keyboard CHICONY KB 0705 PS 2 Standard 105KS Black Hungarian eCooper w Vista CHICONY PS2 eCooper2 Keyboard CHICONY KB 0705 PS 2 Standard 105KS Black Hungarian white bottom cover CHICONY PS2 eCooper Keyboard CHICONY KB 0705 PS 2 Standard 105KS Black Icelandic eCooper w Vista CHICONY PS2 eCooper2 Keyboard CHICONY KB 0705 PS 2 Standard 105KS Black Icelandic white bottom cover CHIC...

Страница 144: ...k Spanish white bottom cover CHICONY PS2 eCooper Keyboard CHICONY KB 0705 PS 2 Standard 105KS Black Swedish eCooper w Vista CHICONY PS2 eCooper2 Keyboard CHICONY KB 0705 PS 2 Standard 105KS Black Swedish white bottom cover CHICONY PS2 eCooper Keyboard CHICONY KB 0705 PS 2 Standard 105KS Black Swiss G eCooper w Vista CHICONY PS2 eCooper2 Keyboard CHICONY KB 0705 PS 2 Standard 105KS Black Swiss G wh...

Страница 145: ...1 PS 2 Standard 104KS Black Traditional Chinese PRIMAX PS2 eCooper2 Keyboard PRIMAX KB 0511 PS 2 Standard 104KS Black Traditional Chinese white bottom cover PRIMAX PS2 eCooper Keyboard PRIMAX KB 0511 PS 2 Standard 104KS Black US PRIMAX PS2 eCooper Keyboard PRIMAX KB 0511 PS 2 Standard 104KS Black US International PRIMAX PS2 eCooper2 Keyboard PRIMAX KB 0511 PS 2 Standard 104KS Black US Internationa...

Страница 146: ...AX KB 0511 PS 2 Standard 105KS Black Nordic PRIMAX PS2 eCooper2 Keyboard PRIMAX KB 0511 PS 2 Standard 105KS Black Nordic white bottom cover PRIMAX PS2 eCooper Keyboard PRIMAX KB 0511 PS 2 Standard 105KS Black Norwegian PRIMAX PS2 eCooper2 Keyboard PRIMAX KB 0511 PS 2 Standard 105KS Black Norwegian white bottom cover PRIMAX PS2 eCooper Keyboard PRIMAX KB 0511 PS 2 Standard 105KS Black Polish PRIMAX...

Страница 147: ... PS 2 Standard 105KS Black Turkish white bottom cover PRIMAX PS2 eCooper Keyboard PRIMAX KB 0511 PS 2 Standard 105KS Black UK PRIMAX PS2 eCooper2 Keyboard PRIMAX KB 0511 PS 2 Standard 105KS Black UK white bottom cover PRIMAX PS2 eCooper Keyboard PRIMAX KB 0511 PS 2 Standard 107KS Black Brazilian Portuguese PRIMAX PS2 eCooper2 Keyboard PRIMAX KB 0511 PS 2 Standard 107KS Black Brazilian Portuguese w...

Страница 148: ...1GBII6 Memory SAMSUNG SO DIMM DDRII 667 1GB M470T2864EH3 CE6 LF 64 16 0 055um SAMSUNG SO2GBII6 Memory SAMSUNG SO DIMM DDRII 667 2GB M470T5663EH3 CE6 LF 128 8 0 055um Modem Pro Nets 56K MDM USB Pro Nets VD56UL External USB Without any brand logo Rev 1 0 Mouse PS2 eCooper eMachines 3C2X PS2 910 000611 eMachines PS2 eCooper eMachines eCooper Mouse 20 14229G102 PS 2 3C2X Logitech USB 0810 Logitech 081...

Страница 149: ...141 Appendix B ...

Страница 150: ...formation on all of Acer s Notebook Desktop and Server models including Service guides for all models User s manuals Training materials Bios updates Software utilities Spare parts lists TABs Technical Announcement Bulletin For these purposes we have included an Acrobat File to facilitate the problem free downloading of our technical material Also contained on this website are Detailed information ...

Страница 151: ...ng 75 I Intermittent Problems 108 J Jumper and Connector Locations 109 Top View 109 K Keyboard Usage 9 L LCD Bezel Removing 49 Replacing 92 LCD Brackets Removing 54 Replacing 85 LCD Cable Removing 54 Replacing 85 LCD Module Removing 45 M Main Unit Disassembly Flowchart 35 Mainboard Removing 64 Memory Module Removing 68 Model Definition 122 O Online Support Information 142 P Panel 5 front 5 S Speak...

Страница 152: ...144 BIOS 17 27 28 W Windows 2000 Environment Test 132 WLAN Board Removing 62 Replacing 74 ...

Страница 153: ...145 ...

Страница 154: ...146 ...

Отзывы: