background image

English

21

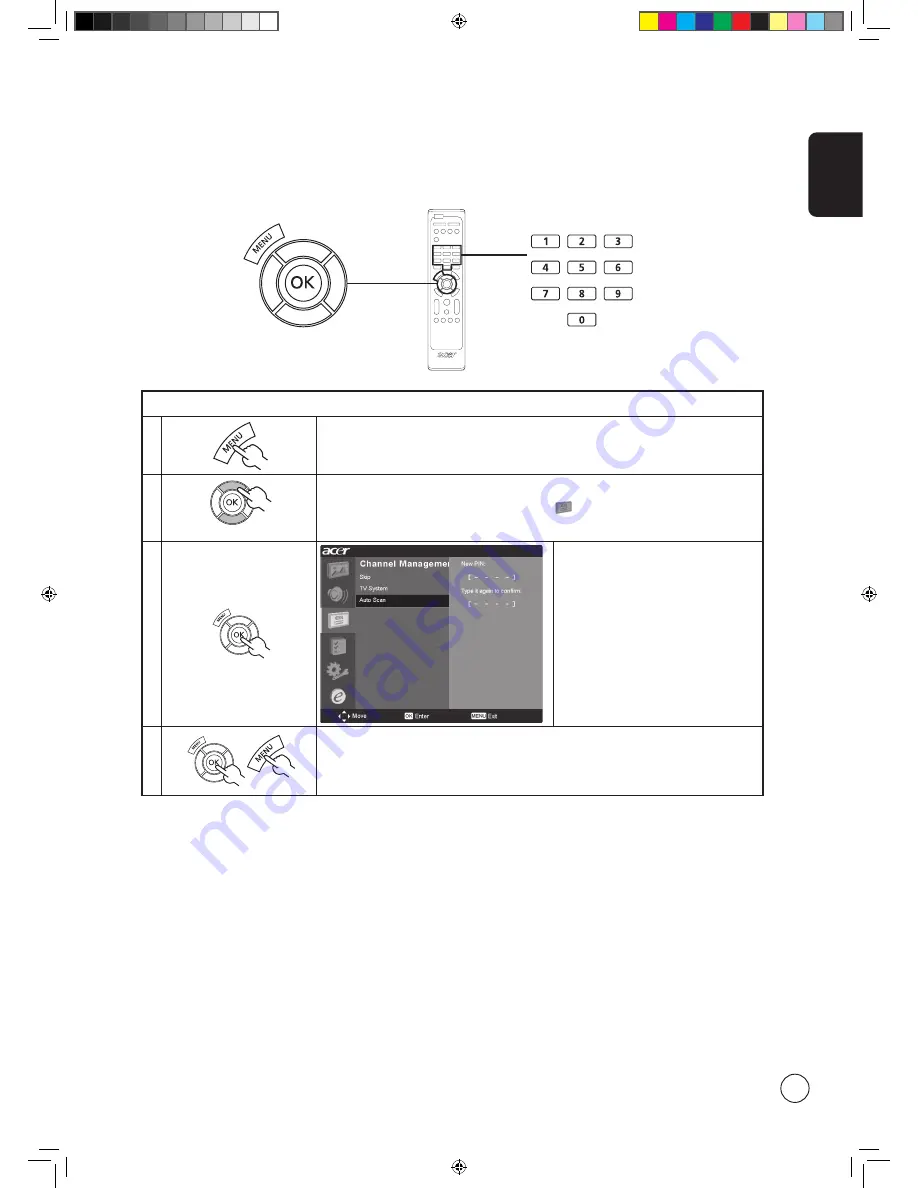
Scanning for channels

1

Press the 

MENU

 key on the remote control to bring up the OSD.

2

Use the 

directional keys

 to navigate and select 

Channel Management.

3

Highlight 

Auto Scan

. Then, select Start 

and press 

OK

 to begin.

4

Select 

OK

 and press 

MENU

 to exit.

Re-scan for channels

The first time you completed the setup wizard, all available channels were listed. If you need to re-scan for new channels, please 
follow the steps below:

Acer.TV.US.indb   21

6/22/2006   11:25:27 AM

Содержание AT2620A

Страница 1: ...onnecting a DVD VCR STB or audio video equipment 8 Connecting a camera camcorder or video game 9 Connecting a PC or notebook computer 9 Selecting the input source 9 OSD navigation 10 Navigating the OSD with the remote control 10 Adjusting the OSD settings 11 Empowering Technology 12 Set up Empowering mode 12 Default setting in different Empowering mode 13 Advanced features 14 PIP PBP POP 14 Lock T...

Страница 2: ...er purchase date and place of purchase information in the space provided below The serial number and model number are indicated on the label affixed to your device All correspondence concerning your unit should include the serial number model number and purchase information No part of this publication may be reproduced stored in a retrieval system or transmitted in any form or by any means electro...

Страница 3: ...a safety feature Make sure the AC outlet is properly grounded Do not defeat the safety purpose of the grounding type plug by trying to insert it into a non grounded outlet If you cannot insert the plug into the outlet contact your electrician to replace the obsolete outlet Disposal instructions Do not throw this electronic device into the trash when discarding To minimize pollution and ensure utmo...

Страница 4: ...hat they are all present If any of the items is missing then please contact your retailer Remote control x1 AAA batteries x2 Power cord x1 User s Guide Quick Guide Front panel view 1 Power On Off 2 Menu key 3 Channel up down 4 Volume 5 Input key Your LCD TV overview 2 MENU Menu key Turns the OSD menu ON and OFF 3 CH CH Channel up When the OSD is on functions the same as the Up arrow Channel down W...

Страница 5: ... Power switch 2 AC in 3 HDMI 4 VGA in 5 DVI D 6 PC Audio in 7 AV Audio L R COMPONENT 1 2 8 AV Audio L R CVBS 1 2 9 Analog antenna 4 3 2 1 AV2 AV1 S VIDEO COMPONENT 2 COMPONENT 1 8 7 6 5 9 Acer TV US indb 5 6 22 2006 11 25 01 AM ...

Страница 6: ...rectional keys OK VOL up down CH up down 12 WIDE Press to toggle scaling mode between 4 3 16 9 Panorama and Letterbox 1 2 3 modes 13 MTS Press to switch the sound system between stereo main and SAP Information is displayed in the top right hand corner 14 e Empowering Technology Press to activate Acer Empowering Technology See page 12 15 VOL Press to increase or decrease the volume 16 CH up down Pr...

Страница 7: ...remote control 2 Setup Wizard The first time you switch on the TV the Setup Wizard will guide you to complete the language selection and channel scanning Press the OK key to begin the setup process Step 1 Select the setup language you prefer Step 2 Please select country Step 3 Ensure that your co axial cables are connected correctly before proceeding Step 4 Scan for analog channels Step 5 Setup is...

Страница 8: ...s shown below Source IN Acer recommends the following priority for connection types HDMI DVI D Sub COMPONENT S Video Composite Y Yellow Red White Blue Green S video R W AV2 AV1 COMPONENT 2 COMPONENT 1 S VIDEO R R W B G COMPONENT R R W B G COMPONENT 1 2 in AUDIO R W R W AUDIO S S VIDEO S Y Y AV 1 2 in COMPOSITE or DVD VCR STB or HDMI D Sub D Sub DVI DVI DVI D Sub B G S Acer TV US indb 8 6 22 2006 1...

Страница 9: ... select the correct input source Press the corresponding button on the remote control to select the correct input source Input button guide 1 TV key Toggle Analog TV ATV between input sources 2 AV key Toggle AV1 AV2 and HDMI between input sources 3 COMPONENT key Toggle COMPONENT1 and COMPONENT2 between input sources 4 PC key Toggle VGA and DVI between input sources TV AV COMPONENT PC 1 2 3 4 For V...

Страница 10: ...these menus 1 Press the MENU button on the remote control or the MENU button on the control panel 2 Select your desired menu by using the up and down directional keys to switch between the six menus 3 Use the directional keys to interact with the menu The up down directions will scroll through the menu options while left right will adjust the different settings for example in the Picture menu sett...

Страница 11: ... the sliding scale Press OK to save 4 The Audio menu can also be used to adjust the treble balance sound effects and other important sound related settings Adjusting the channel management 1 Press the Menu key to bring up the OSD 2 Using the directional keys select Channel management from the OSD 3 Use the directional keys to navigate the menus 4 The Channel management menu can be used to set chan...

Страница 12: ... Technology Set up Empowering mode To change your Empowering Key s default setting The Empowering Key opens up the Acer Empowering Technology functions In TV mode the choice is between Scenario mode and Favorite channel see page 13 for details The default setting for both modes is Scenario mode TV mode Empowering Key settings menu More than 2 seconds Default setting in different mode Set up Empowe...

Страница 13: ...d and darker auditoriums Sports mode also brilliantly enhances colors and presents swiftly moving pictures without residual images All of this is achieved via specific Gamma corrections and saturation adjustments Precise audio can be heard Concert Concert mode places you in a virtual concert hall opera house or other dim environment by means of adaptive brightness and contrast adjustments Concert ...

Страница 14: ...ess the ACTIVE key to toggle between PIP screens TV AV COMPONENT PC 1b Press the TV AV COMPONENT or PC keys number keys or CH up or down to change the content of the active screen 2 Press the SWAP key to change the content between the primary and the subscreen PIP PIP Swap 3 Press the POSITION key to select the location of the subscreens from upper left upper right lower right lower left as shown ...

Страница 15: ...ens 1b Press the number keys or CH up or down to change the TV channel on the active screen 2 Press the SIZE MODE key to access the 1 5 or 1 12 picture on picture mode as shown in the image POP POP POP POP POP POP POP POP POP POP POP POP POP POP POP POP POP 1 5 1 12 1 In PIP and PBP the VGA and DVI sources only support input up to 1360x768 pixels at 60 Hz For resolutions higher than this Out of Ra...

Страница 16: ... MENU key on the remote control to bring up the OSD 2 Use the directional keys to navigate to the Settings menu Then select Set PIN see note 3 Enter a four digit password Type it again and press OK to reconfirm 4 Press MENU to exit To enable this feature Note The default PIN for this TV is 0000 First enter 0000 when you want to change the PIN If you forget your PIN please enter 6163 to reset Acer ...

Страница 17: ...NU key on the remote control to bring up the OSD 2 Use the directional keys to navigate to the Settings menu Then select Lock TV 3 Enter your PIN Type it again and press OK to reconfirm see page 16 note Acer TV US indb 17 6 22 2006 11 25 23 AM ...

Страница 18: ... reset the feature Enable Disable the V Chip The U S has two rating systems for viewing content TV parental guidelines and movie ratings Motion Picture Association of America MPAA ratings The MPAA system is used mainly for rating movies 1 To set MPAA use the following method to access Menu Settings TV Rating System MPAA Set Rating The categories are as follows Rating Description G General audience...

Страница 19: ...ngs Set Rating Click on a rating category to block it indicates the item is blocked 2 The TV Y7 TV PG TV 14 and TV MA settings have additional options for blocking content The TV content control menu will show the appropriate items for your current TV ratings setting Use the following method to alter the content settings Menu Settings TV Rating System TV Content Ctrl set content indicates the item...

Страница 20: ...has two systems for rating Television content Canadian English ratings and Canadian French ratings Canadian English ratings The categories are as follows Rating Description C Children under 7 years old C8 Children over 8 years old G General audiences PG Parental guidance suggested 14 Over 14 years old 18 Adults Canadian French ratings The categories are as follows Rating Description G Gernal 8ans ...

Страница 21: ...nd select Channel Management 3 Highlight Auto Scan Then select Start and press OK to begin 4 Select OK and press MENU to exit Re scan for channels The first time you completed the setup wizard all available channels were listed If you need to re scan for new channels please follow the steps below Acer TV US indb 21 6 22 2006 11 25 27 AM ...

Страница 22: ...ur widescreen modes including 4 3 16 9 Panorama and Letterbox 1 2 and 3 4 3 For 4 3 standard pictures A side bar appears on each side 16 9 In this mode the whole picture is stretched toward each side of the screen Panorama In this mode the picture is progressively stretched toward each side of the screen Letterbox 1 2 and 3 In this mode the picture is enlarged linearly to fit the screen The top an...

Страница 23: ...mera camcorder or other peripheral being connected at the same time Switch off one of the other peripherals The ghost or double image may be caused by obstruction to the antenna due to high rise buildings or hills Using a highly directional antenna may improve the picture quality The horizontal dotted lines shown on the pictures may be caused by electrical interference e g hair dryer nearby neon l...

Страница 24: ...m 814 x 610 x 261 944 x 692 x 261 1071 x 794 x 311 Weight Kg 17 7 23 9 32 3 Weight lbs 39 3 53 1 71 8 Gross weight Kg 21 1 28 38 6 Gross weight lbs 46 9 61 7 85 8 Wall Mounting 400mm x 200mm Analog TV system TV Color system NTSC Sound system M Stereo system BTSC A2 Closed Caption Yes V chip US Canada Analog TV tuner quantity 1 Terminal Analog Tuner In Yes AV1 CVBS S Video Audio R L AV2 CVBS S Vide...

Отзывы: