22
Chapter 1
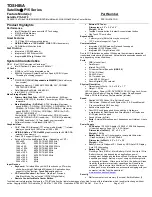
To choose your playback device, click the icon on the upper right side of
the Acer eAudio Management window.
Acer ePower Management
Acer ePower Management features a straightforward user interface for
configuring your power management options. To access this utility, select Acer
ePower Management from the Empowering Technology toolbar, run the
program from the Acer Empowering Technology program group in Start menu,
or right-click the Windows power icon in the system tray and select Acer ePower
Management.
AC Mode (Adapter mode)
The default setting is “Maximum Performance.” You can adjust CPU speed, LCD brightness and other
settings, or click on buttons to turn the following functions on/off: Wireless LAN, Bluetooth, CardBus, FireWire
(1394), Wired LAN and Optical Device if supported.
DC Mode (Battery mode)
There are four pre-defined profiles - Entertainment, Presentation, Word Processing, and Battery Life. You can
also define up to three of your own.
To create new power profile
1.
Change power settings as desired.
2.
Click “Save as...” to save to a new power profile.
3.
Name the newly created profile.
4.
Select whether this profile is for Adapter or Battery mode, then click OK.
5.
The new profile will appear in the profile list.
Battery status
For real-time battery life estimates based on current usage, referto the panel on the lower left-hand side of the
window.
Содержание Aspire 6920
Страница 6: ...VI ...
Страница 10: ...4 Chapter 1 System Block Diagram ...
Страница 11: ...Chapter 1 5 Board Layout ...
Страница 12: ...6 Chapter 1 ...
Страница 14: ...8 Chapter 1 Closed Front View ...
Страница 15: ...Chapter 1 9 Left View ...
Страница 16: ...10 Chapter 1 Right View ...
Страница 17: ...Chapter 1 11 ...
Страница 18: ...12 Chapter 1 Base view ...
Страница 30: ...24 Chapter 1 ...
Страница 62: ...62 Chapter 2 Then the HDD password will be unlocked and will auto into Windows after reboot ...
Страница 66: ...64 Chapter 3 ...
Страница 67: ...Chapter 3 65 Removing the Battery Pack 1 Release the battery 2 Slide the battery latch then remove the battery ...
Страница 77: ...Chapter 3 75 8 Remove the Inverter board 9 Loose four LCD hinge screws then remove two hinges from LCD panel ...
Страница 97: ...Chapter 5 97 Jumper and Connector Locations Chapter 5 ...
Страница 98: ...98 Chapter 5 Bottom View ...
Страница 99: ...Chapter 5 99 ...
Страница 100: ...100 Chapter 5 ...
Страница 102: ...100 Chapter 6 Aspire6920 Exploded Diagram ...
Страница 103: ...Chapter 6 101 ...
Страница 104: ...102 Chapter 6 ...
Страница 105: ...Chapter 6 103 ...