background image

Chapter 1

39

Removing the Middle Cover      

1.

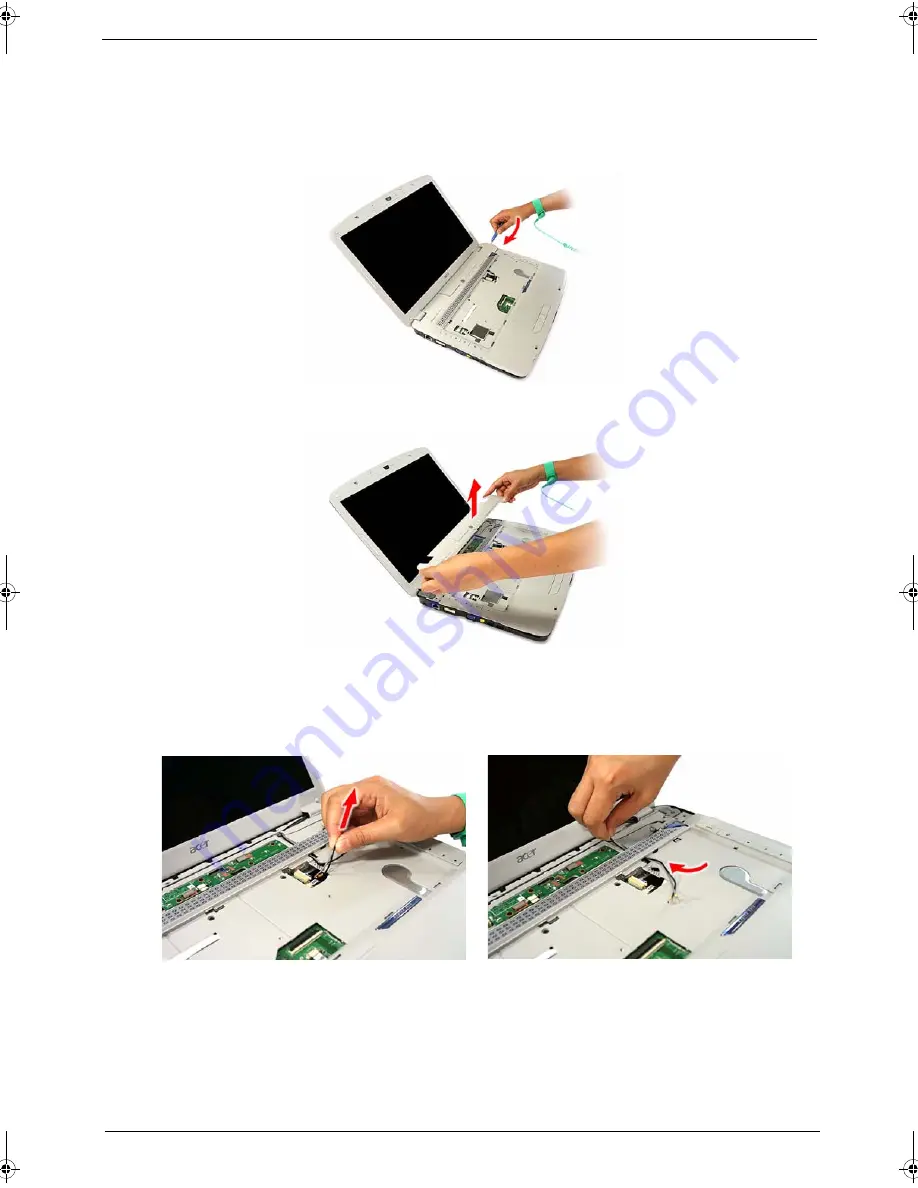
Open the LCD panel completely to facilitate the easy removal of the middle cover. 

2.

Use a plastic flat screwdriver to pry one end of the middle cover. Continue prying on the other side until 
the cover is released from the U-case. 

3.

Remove the middle cover from the main unit. 

Removing the LCD Module       

1.

Pull out the WLAN antennas from underneath the computer base, and then from under the speaker grill. 

Acer Aspire 5910 SG.book  Page 39  Tuesday, May 29, 2007  11:40 AM

Содержание Aspire 5910

Страница 1: ...Acer Aspire 5910 Notebook Computer Service Guide PRINTED IN TAIWAN Service guide files and updates are available on the Acer CSD web site at http csd acer com tw ...

Страница 2: ...II Revision History Refer to the table below for the updates made on this version of the Aspire 5910 Notebook Computer Service Guide Date Chapter Updates ...

Страница 3: ...spect to the contents hereof and specifically disclaims any warranties of merchantability or fitness for any particular purpose Any Acer Incorporated software described in this manual is sold or licensed as is Should the programs prove defective following their purchase the buyer and not Acer Incorporated its distributor or its dealer assumes the entire cost of all necessary servicing repair and a...

Страница 4: ...Gives additional information related to the current topic WARNING Alerts you to any physical risk or system damage that might result from doing or not doing specific actions CAUTION Gives precautionary measures to avoid possible hardware or software problems IMPORTANT Reminds you to do specific actions relevant to the accomplishment of procedures ...

Страница 5: ...h cases please contact your regional offices or the responsible personnel channel to provide you with further technical details FRU Information Please note WHEN ORDERING FRU PARTS that you should check the most up to date information available on your regional web or channel If for whatever reason a part number change is made it will not be noted in the printed Service Guide For ACER AUTHORIZED SE...

Страница 6: ...VI ...

Страница 7: ... Disassembly 25 External Modules Disassembly Flowchart 25 Removing the SD Dummy Card 26 Removing the ExpressCard 54 Dummy Card 26 Removing the Battery Pack 27 Removing the Lower Case Cover 28 Removing the Memory Modules 29 Removing the WLAN Board 29 Removing and Dismantling the HDD Assembly 31 Removing and Dismantling the ODD Assembly 32 Removing the Cooling Fan 33 Removing the Heat Sink 34 Removi...

Страница 8: ...ing the Microphones 60 Removing the WLAN Antennas 61 System Troubleshooting 63 Hardware Diagnostic Procedure 63 System Check Procedures 64 External Diskette Drive Check 64 External CD ROM Drive Check 64 Keyboard or Auxiliary Input Device Check 64 Memory Check 65 Power System Check 65 Touchpad Check 66 POST Error Indicators 67 POST Error Message 67 POST Beep Codes 70 Index of Symptom to FRU Error M...

Страница 9: ... GB system memory using two soDIMM modules T Supports dual channel memory mode T 1 MB flash BIOS and shadow RAM support Storage subsystem T SATA hard disk drives in 80 120 and 160 GB capacities higher HDD capacity supported T DVD Super Multi double layer drive or DVD CD RW combo drive T 5 in 1 card reader slot supports Secure Digital SD MultiMediaCard MMC Memory Stick MS Memory Stick Pro MS Pro an...

Страница 10: ...10 000 pixel camera supporting the Acer PrimaLite and Acer VisageON technologies t Acer PureZone audio technology for crisp uninterrupted voice communication T Multiple network connection options t WLAN via Acer InviLink 802 11b g Wi Fi CERTIFIED solution Acer SignalUp compatible t WPAN via Bluetooth 2 0 EDR Enhanced Data Rate interface t LAN via a Gigabit Ethernet port Wake on LAN ready t 56K ITU...

Страница 11: ... or 44W 4000 mAh Li ion battery pack 6 cell T Acer QuicCharge battery technology t 80 charge in 1 hour t 2 hour rapid charge system off t 3 hour charge in use T 3 pin 90W 19V AC adapter DIS T ACPI 3 0 CPU power management standard supports standby and hibernation modes Physical T Dimensions width x length x height 366 3 x 273 9 x 40 0 43 9 mm 14 4 x 10 8 x 1 6 1 7 in T Weight with 8 cell battery p...

Страница 12: ... Acer Arcade Deluxe DV Wizard DVDivine VideoMagician Play Movie and HomeMedia t Microsoft Works 8 5 with Office Home and Student 2007 Trial t Adobe Reader t CyberLink PowerProducer t NTI CD Maker t Norton Internet Security Environment T Temperature t Operating 5 C to 35 C t Non operating 20 C to 65 C T Humidity non condensing t Operating 20 to 80 t Non operating 20 to 80 Accessories T Acer Xpress ...

Страница 13: ...t 4 Power button Turns the computer on and off 5 Speaker grill Delivers Dolby quality audio output 6 Easy launch buttons Press to launch frequently used programs function Use Launch Manager to configure these keys 7 Keyboard For entering data into your computer 8 Palmrest Comfortable support area for your hands when you use the keyboard 9 Status indicators Light Emitting Diodes LEDs for monitoring...

Страница 14: ...Lock and Caps Lock functions Number Icon Item Description 1 Line in jack Accepts audio line in devices e g audio CD player stereo walkman 2 Microphone in jack Accepts an external microphone 3 Headphone jack Accepts audio line out devices e g speakers headphones S PDIF support provided 4 Volume control Adjust the system audio out volume 5 Lid latch Locks and releases the notebook lid 6 5 in 1 card ...

Страница 15: ... device with an S video input Supports both NTSC and PAL standards 6 USB 2 0 ports Connects to USB 2 0 devices e g USB mouse USB camera 7 IEEE 1394 ports Connects to a IEEE 1394 devices 8 ExpressCard 54 slot Accepts an ExpressCard 54 module Number Icon Item Description 1 Optical disc drive ODD Accepts CDs or DVDs drive type maybe slot load or tray load depending on model 2 ODD access indicator Lig...

Страница 16: ...r Icon Item Description 1 Ventilation slots and cooling fan Enable the computer to stay cool even after prolonged use Note Do not cover or obstruct the opening of the fan 2 Battery pack Provides power to the computer 3 Battery release latch Releases the battery pack for removal 4 Battery lock Secures the battery pack in position 5 Memory compartment Houses the computer s main memory 6 Subwoofer Em...

Страница 17: ...mputer is powered on T Flashing orange when the computer is in standby or hibernation mode 2 Battery charge Indicates the battery charging state It lights up T Orange when the computer is charging T Green when the computer is in AC mode 3 Hard drive activity Flashes blue when there is hard drive activity 4 Num Lock Lights up blue when the Num Lock function is activated 5 Caps Lock Lights up blue w...

Страница 18: ...t lights up T Blue when there is an active WLAN connection T Orange when there is no WLAN connection 2 Web browser Press to launch the preferred Internet browser 3 Mail Press to launch the preset E mail application 4 Bluetoothkey indicator Press to enable disable the Bluetooth function This key also indicates the Bluetooth status It lights up T Blue when there s an active Bluetooth connection T Or...

Страница 19: ...defective In this case the system cannot retain configuration values in CMOS Replace the RTC battery with a new one NOTE For ease of reading Phoenix TrustedCore Setup Utility will be simply referred to as Setup or Setup Utility in this Service Guide The screenshots used in this guide display default system values These values may not be the same as those in your computer In the descriptive tables ...

Страница 20: ... close all open applications then restart the computer 2 During POST press F2 If you fail to press F2 before POST is completed you will need to restart the computer The first page to be displayed will be the Information menu Use the left and right arrow keys to move between selections on the menu bar Menu bar Legend bar ...

Страница 21: ...d You can also use these keys to navigate through the multipage General Help window F5 or F6 or Space To select a value for the currently selected field only if it is user configurable Press F5 or to select the next lower value F6 or Space to select the next higher value A parameter that is enclosed in square brackets is user configurable Parameters are not user configurable for one of the followi...

Страница 22: ...O Model Name Displays the hard disk drive model IDEO Serial Number Displays the hard disk drive serial number ATAPI Model Name Displays the optical disc drive model System BIOS Version Displays the current system BIOS version VGA BIOS Version Displays the current VGA firmware version KBC Version Displays the current keyboard controller version Serial Number Displays the system serial number Asset ...

Страница 23: ...ideo Memory Displays the size of video memory detected during boot up 128 MB 256 MB Quiet Boot When enabled the Acer logo screen appears during boot up Disabled Enabled Network Boot When enabled remote host with appropriate boot image can boot this computer Only works with an Ethernet device Disabled Enabled F12 Boot Menu When enabled the Press F12 to enter Multi Boot Menu message is displayed dur...

Страница 24: ...is password will restrict a user s access to the Setup menus Only the following menus will be accessible T System Time T System Date T Boot menu options T All Exit menu options excluding Load Setup Defaults A supervisor password must first be set before creating a user password Set HDD Password When set this password will restrict a user s access to the internal hard disk drive It will be required...

Страница 25: ...1 Press or to highlight a set password field then press Enter The password box appears 2 Type a password then press Enter IMPORTANT Be very careful when typing your password because the characters do not appear on the screen Only shaded blocks representing each typed character are visible 3 Retype the password to verify the first entry then press Enter You will be prompted to save the new password...

Страница 26: ... field displays Clear to indicate that the password has been disabled 5 Press F10 to save the changes you made and close the Setup Utility To clear a lost password If you have forgotten the user password the computer will continue to function normally but you will have limited access to the Setup Utility If you have enabled the Password on Boot field and you forget the supervisor password you will...

Страница 27: ...10 Press F9 to load the system defaults 11 Press F10 to save the changes you made and close the Setup Utility Boot The Boot menu screen allows users to set the drive sequence in which Setup attempts to boot the operating system By default Setup searches for boot devices in the order shown in the screen below To set the boot drive sequence 1 Press or to select a bootable device 2 Press F6 to move t...

Страница 28: ...ges made and closes the Setup Utility Keyboard shortcut F10 Exit Discarding Changes Discards changes made and closes the Setup Utility Load Setup Defaults Loads the factory default settings for all Setup fields Keyboard shortcut F9 Discard Changes Discards all changes made to the Setup Utility and loads the previous configuration settings Save Changes Saves all changes made to the Setup Utility ...

Страница 29: ...he system from the bootable diskette The flash utility will automatically be executed 4 Follow the on screen instructions to finish the flashing of the BIOS BIOS Recovery If a BIOS flash procedure fails to complete perform a BIOS recovery procedure by using the Crisis Recovery Diskette During this procedure the system will force the BIOS to enter a special BIOS block called boot block to boot up t...

Страница 30: ...aunch Manager 2 Select which key to configure then click the Add button opposite it 3 You can set the key to open a particular file or program or display a Web site address Select the corresponding radio button then type or browse for your selection 4 If you ve entered a Web site address key in a descriptive label for the new easy launch key function 5 Click OK 6 Click OK to save the new settings ...

Страница 31: ...The disassembly procedure described in this chapter is a gradual process as illustrated in the flowcharts preceding each disassembly stage section This means that users need to observe the instructions in a step by step manner To illustrate removing the HDD assembly will require that you first remove the battery pack and the stylus Failure to observe the gradual flow of the process may result in c...

Страница 32: ...ug the power cord from the computer 3 Unplug all peripheral cables from the computer 4 Close the notebook lid and place the computer on a flat steady surface Screw Type Color Part Number A M2 x L8 BZN NYLOK Black 86 00D75 220 B M2 x L4 BZN Black 86 00A02 140 C M2 5 x L8 BZN NYLOK Black 86 00E34 738 D M2 x L4 BZN NYLOK Black 86 00E13 524 E M3 x L4 Silver 86 9A554 4R0 F M2 x L3 BZN NYLOK Black 86 00...

Страница 33: ... L4 BZN NYLOK 86 00E13 524 E M3 x L4 86 9A554 4R0 F M2 x L3 BZN NYLOK 86 00E25 723 G M2 x L2 5 BZN NYLOK 86 00D72 620 Turn off computer and disconnect power cord SD dummy card EXpressCard dummy card Battery pack L case cover Ax1 Bx7 Cx1 DIMM WLAN board Dx2 HDD assembly Hard drive shielding Ex2 Hard drive module ODD assembly ODD bracket Cx1 ODD module Fx2 Fan Dx1 Heat sink Dx4 Gx5 Processor VGA boa...

Страница 34: ...card as if you were pushing it further into the slot letting the card spring out 2 Pull the SD dummy card out of its slot Removing the ExpressCard 54 Dummy Card 1 Push against the card as if you were pushing it further into the slot letting the card spring out ...

Страница 35: ...essCard 54 dummy card out of its slot Removing the Battery Pack 1 Turn the unit over with the base facing upward 2 Slide the battery lock to the unlock position 3 Slide the battery release latch to pop up the battery from its bay ...

Страница 36: ...r Case Cover 1 Remove the screws securing the lower case cover 2 Pry the lower case cover from the main unit then remove it Step Type Quantity Color Torque 1 M2 x L8 BZN NYLOK 1 Black 1 6 kgf cm 15 M2 x L4 BZN 7 Black 1 6 kgf cm 15 M2 5 x L8 BZN NYLOK 1 Black 3 kgf cm 15 ...

Страница 37: ...out the latches on both sides of the exterior DIMM slot DM1 2 Remove the memory module from its slot 3 Repeat steps 1 and 2 to remove the second memory module Removing the WLAN Board 1 Peel off the end of the bar code tape securing the WLAN antennas ...

Страница 38: ...he antennas from the WLAN board then move them away from the board 3 Remove the screws securing the WLAN board 4 Remove the WLAN board from its slot MINI1 Step Type Quantity Color Torque 3 M2 x L4 BZN NYLOK 2 Black 1 6 kgf cm 15 ...

Страница 39: ...y 1 Partly peel off the mylar tape 1 and use it to pull the HDD assembly from its connector 2 SATA1 2 Remove the HDD assembly from the main unit 3 Remove the screws on the HDD module shielding Step Type Quantity Color Torque 3 M3 x L4 2 Silver 3 kgf cm 15 ...

Страница 40: ...and Dismantling the ODD Assembly 1 Remove the screw securing the ODD assembly to the main unit 2 Use a plastic flat screwdriver to push the ODD assembly out of the main unit then slide it out of its bay Step Type Quantity Color Torque 1 M2 5 x L8 1 Black 3 kgf cm 15 ...

Страница 41: ... ODD module Removing the Cooling Fan 1 Disconnect the fan cable from its system board connector FAN1 2 Remove the screw securing the fan Step Type Quantity Color Torque 3 M2 x L3 BZN NYLOK 2 Black 1 6 kgf cm 15 Step Type Quantity Color Torque 2 M2 x L4 BZN NYLOK 1 Black 1 6 kgf cm 15 ...

Страница 42: ...eat Sink 1 Remove the screws securing the heat sink Discrete model 2 Carefully pull the heat sink from its base then remove it from the system board Step Type Quantity Color Torque 1 M2 x L4 BZN NYLOK 4 Black 1 6 kgf cm 15 M2 x L2 5 BZN NYLOK 5 Black 1 6 kgf cm 15 ...

Страница 43: ...ock position note the unlock icon Torque value 3 kgf cm 15 2 Partly peel off the processor bar code tape 3 Hold the processor by its edges and remove it from its socket U36 IMPORTANT When installing a processor note the golden arrow on the corner to make sure the processor is properly oriented over the socket Refer to figure above ...

Страница 44: ...VGA Board 1 Remove the screws securing the VGA board to the system board 2 Hold the VGA board by its edges and pull it from its slot MXM1 Step Part Number and Type Quantity Color Torque 1 M2 x L3 BZN NYLOK 2 Black 1 6 kgf cm 15 ...

Страница 45: ...L3 BZN NYLOK 86 00E25 723 H M2 5 x L12 BZN NYLOK 86 00E67 63C I M2 5 x L4 BZN NYLOK 86 00D30 630 J M2 5 x L6 BZN NYLOK 86 00E33 736 K M2 X L2 NI 86 00D77 320 Main unit Keyboard Middle cover LCD module Cx2 Hx2 Power board Dx4 Upper case Ix1 Cx10 Jx2 Dx3 Lower case Power FPC cable Speaker case Dx3 Kx3 Launch board Dx2 Touchpad board bracket Dx3 Modem board Fx2 Bluetooth board Subwoofer USB board Dx1...

Страница 46: ...ecuring the keyboard to the upper case U case 2 Pry the keyboard off to release it from the upper case then turn it over the palmrest to gain access to the keyboard cable 3 Disconnect the keyboard cable from its system board connector KB1 to completely detach the keyboard from the main unit ...

Страница 47: ...ver 2 Use a plastic flat screwdriver to pry one end of the middle cover Continue prying on the other side until the cover is released from the U case 3 Remove the middle cover from the main unit Removing the LCD Module 1 Pull out the WLAN antennas from underneath the computer base and then from under the speaker grill ...

Страница 48: ... the unit over to the base side 4 Remove the lower case screws securing the LCD module 5 Turn the unit right side up and open the notebook lid again 6 Remove the hinge screws securing the LCD module Step Type Quantity Color Torque 4 M2 5 x L8 BZN NYLOK 2 Black 3 kgf cm 15 Step Type Quantity Color Torque 6 M2 5 x L12 BZN NYLOK 2 Silver 4 kgf cm 15 ...

Страница 49: ... 55 for instructions on how to disassemble the LCD module Removing the Power Board 1 Disconnect the power FPC cable from its power board connector PWRCN1 2 Remove the screws securing the power board Step Type Quantity Color Torque 2 M2 x L4 BZN NYLOK 4 Black 1 6 kgf cm 15 ...

Страница 50: ...42 Chapter 1 3 Remove the power board from the upper case Removing the Upper Case 1 Disconnect the following system cables from their connectors t Empowering Key board cable E_KEY1 t Speaker cable SPKR1 ...

Страница 51: ...Chapter 1 43 t Power FPC cable PWRCN1 t Launch board cable LAUNCHCN1 t Touchpad cable TPAD1 t Media FPC cable MEDIA1 ...

Страница 52: ...ain and remove the top upper case screws 5 Pry the upper case from its lower case latches to remove it Step Type Quantity Color Torque 4 M2 5 x L4 BZN NYLOK 1 Black 3 kgf cm 15 M2 5 x L8 BZN NYLOK 10 Black 3 kgf cm 15 Step Type Quantity Color Torque 2 M2 5 x L6 BZN NYLOK 2 Black 3 kgf cm 15 M2 x L4 BZN NYLOK 3 Black 1 6 kgf cm 15 ...

Страница 53: ... the power FPC cable from the upper case Removing the Speaker 1 Remove the screws securing the speaker 2 Remove the speaker from the lower case Step Type Quantity Color Torque 1 M2 x L4 BZN NYLOK 3 Black 1 6 kgf cm 15 M2 X L2 NI 3 Silver 1 6 kgf cm 15 ...

Страница 54: ... the E key Board 1 Disconnect the E key board cable E_KEY1 2 Remove the screws securing the E key board 3 Remove the E key board from the upper case Step Type Quantity Color Torque 2 M2 x L3 BZN NYLOK 3 Black 1 6 kgf cm 15 ...

Страница 55: ...oard 2 Remove the launch board from the upper case Removing the Touchpad Board 1 Remove the screws securing the touchpad board bracket Step Type Quantity Color Torque 1 M2 x L4 BZN NYLOK 2 Black 1 6 kgf cm 15 Step Type Quantity Color Torque 1 M2 x L4 BZN NYLOK 3 Black 1 6 kgf cm 15 ...

Страница 56: ...48 Chapter 1 2 Detach the touchpad FPC cable from the upper case adhesive tape 3 Remove the touchpad board bracket from the upper case 4 Disconnect the touchpad FPC cable ...

Страница 57: ... to detach it CAUTION The touchpad board is glued to the upper case Remove the touchpad board only if it is defective Removing the Modem Board 1 Disconnect the Bluetooth cable from its system board connector BLUE1 2 Peel off the tape protecting the Bluetooth and modem cables ...

Страница 58: ...emove the modem board from its card reader board connector MDC1 then disconnect the modem cable from the board Removing the Bluetooth Board T Remove the Bluetooth board from the lower case Step Type Quantity Color Torque 3 M2 x L3 BZN NYLOK 2 Black 1 6 kgf cm 15 ...

Страница 59: ...g the Subwoofer 1 Disconnect the subwoofer cable from its system board connector SPKR2 2 Remove the subwoofer from the lower case Removing the USB Board 1 Disconnect the USB FPC cable from its system board connector USBCN1 ...

Страница 60: ...sconnect the USB FPC cable from the its USB board connector 3 Remove the screw securing the USB board 4 Remove the USB board from the lower case Step Type Quantity Color Torque 3 M2 x L4 BZN NYLOK 1 Black 1 6 kgf cm 15 ...

Страница 61: ... cable from its system board connector DC1 2 Remove the screws securing the system board and the card reader board to the lower case 3 Carefully remove the system board from the lower case Step Type Quantity Color Torque 2 M2 x L4 BZN NYLOK 2 Black 1 6 kgf cm 15 ...

Страница 62: ...he card reader board to the system board 2 Turn the system board over and detach the card reader board from its connector CARDREADER1 Removing the DC in Jack T Remove the DC in jack from the lower case Step Type Quantity Color Torque 1 M2 x L3 BZN NYLOK 1 Black 1 6 kgf cm 15 ...

Страница 63: ...13 524 F M2 x L3 BZN NYLOK 86 00E25 723 J M2 5 x L6 BZN NYLOK 86 00E33 736 L M2 5 x L5 BZN NYLOK 86 00F19 735 M M2 5 x L3 BZN NYLOK 86 00D52 630 LCD module LCD bezel Jx6 LCD panel Lx4 Dx2 LCD chassis LCD panel brackets Fx6 Inverter board LCD CCD cable LCD module hinge Lx2 CCD board Internal microphone WLAN antennas Mx1 ...

Страница 64: ... Remove the rubber pads securing the LCD bezel screws 2 Remove the screws securing the LCD bezel 3 Carefully pry the LCD bezel open and remove it from the LCD module Step Type Quantity Color Torque 2 M2 5 x L6 BZN NYLOK 6 Black 3 kgf cm 15 ...

Страница 65: ...g the LCD panel 2 Disconnect the CCD board cable 3 Remove the LCD panel from its chassis then turn it over to gain access to the inverter board cables Step Type Quantity Color Torque 1 M2 5 x L5 BZN NYLOK 4 Black 3 kgf cm 15 M2 x L4 BZN NYLOK 2 Black 1 6 kgf cm 15 ...

Страница 66: ... T Disconnect the 2P and inverter cables from the inverter board Removing the LCD CCD Cable 1 Peel off the acetic tapes securing the LCD CCD cable to the LCD panel 2 Disconnect the LCD connector end of the LCD CCD cable from the LCD panel PCB ...

Страница 67: ...s Removing the LCD Module Hinges 1 Remove the screws securing the LCD module hinges 2 Remove the LCD module hinges from the LCD chassis Step Part Number and Type Quantity Color Torque M2 x L3 BZN NYLOK 6 Black 1 6 kgf cm 15 Step Type Quantity Color Torque 1 M2 5 x L5 BZN NYLOK 2 Black 3 kgf cm 15 ...

Страница 68: ... CCD Board T Remove the CCD board from the LCD chassis Removing the Microphones 1 Peel off the aluminum foil tabs and acetic tapes securing the microphone cables 2 Carefully remove the internal microphones from the LCD chassis ...

Страница 69: ... Peel off the aluminum foil tabs securing the WLAN antennas 2 Remove the screw securing the left antenna bracket 3 Carefully detach the WLAN antenna from the LCD chassis Step Type Quantity Color Torque 2 M2 5 x L3 BZN NYLOK 1 Black 3 kgf cm 15 ...

Страница 70: ...62 Chapter 1 ...

Страница 71: ...rough diagnostic tests or by repeating the same condition that precedes the symptoms 3 Refer the table below to determine which corrective action to perform Problem Symptom Section to Refer to Power failure The power indicator does light up or stay lit Power System Check on page 65 POST failure POST does not complete No beep or error codes issued POST Error Message on page 67 Undetermined Problems...

Страница 72: ... drive 1 Boot from the diagnostics diskette and start the diagnostics program 2 Check if the CD ROM Test is successful pass 3 Follow the instructions in the message window If an error occurs reconnect the CD ROM drive connector on the system board If the error still remains 1 Reconnect the CD ROM module 2 Replace the CD ROM module 3 Replace the system board Keyboard or Auxiliary Input Device Check...

Страница 73: ...r is supplied t If the failure is cause by a defective AC adapter refer to the Check the AC Adapter section t If the failure is cause by a defective battery pack refer to the Check the Battery Pack section Check the AC Adapter Unplug the AC adapter cable from the computer and measure the output voltage at the plug of the AC adapter cable Refer the figure below 1 If the voltage is not correct repla...

Страница 74: ...king the battery charge function 1 Use a discharged battery pack or a battery pack that has less than 50 of the total power remaining when installed in the computer 2 If the battery charge indicator does not light up remove the battery pack and allow it to return to room temperature then reinstall the battery pack 3 If the charge indicator still does not light up replace the battery pack Touchpad ...

Страница 75: ...m is not listed see Undetermined Problems on page 79 NOTE Most of the error messages occur during POST Some of them display information about a hardware device e g the amount of memory installed Others may indicate a problem with a device such as the way it has been configured IMPORTANT If the system fails after you make changes in the Setup Utility menus reboot the computer enter Setup then press...

Страница 76: ...eplace and run Setup Replace the RTC battery then access the Setup Utility to reconfigure the system time setttings System CMOS checksum bad Default configuration used RTC battery Run the Setup Utility to reconfigure the system time settings System timer error RTC battery Run the Setup Utility to reconfigure the system time settings System board Real time clock error RTC battery Run the Setup Util...

Страница 77: ...tem defaults RTC battery System board Operating system not found Run the Setup Utility and see if fixed disk and drive A are properly identified Diskette drive Hard disk drive System board Error Message FRU Action in Sequence No beep power indicator turns off and the LCD screen is blank Power source battery pack and power adapter Refer to the Power System Check section on page 65 Ensure every inte...

Страница 78: ...IN POST flag 0Ah Initialize CPU registers 0Bh Enable CPU cache 0Ch Initialize caches to initial POST values 0Eh Initialize I O component 0Fh Initialize the local bus IDE 10h Initialize Power Management 11h Load alternate registers with initial POST values 12h Restore CPU control word during warm boot 13h Initialize PCI Bus Mastering devices 14h Initialize keyboard controller 16h 1 2 2 3 BIOS ROM c...

Страница 79: ...d devices 4Ah Initialize all video adapters in system 4Bh QuietBoot start optional 4Ch Shadow video BIOS ROM 4Eh Display BIOS copyright notice 50h Display CPU type and speed 51h Initialize EISA board 52h Test keyboard 54h Set key click if enabled 58h 2 2 3 1 Test for unexpected interrupts 59h Initialize POST display service 5Ah Display prompt Press F2 to enter SETUP 5Bh Disable CPU cache 5Ch Test ...

Страница 80: ...skable Interrupts NMIs 8Ah Initialize Extended BIOS Data Area 8Bh Test and initialize PS 2 mouse 8Ch Initialize floppy controller 8Fh Determine number of ATA drives optional 90h Initialize hard disk controllers 91h Initialize local bus hard disk controllers 92h Jump to UserPatch2 93h Build MPTABLE for multi processor boards 95h Install CD ROM for boot 96h Clear huge ES segment register 97h Fixup M...

Страница 81: ...ror logging C3h Initialize error display function C4h Initialize system error handler C5h PnPnd dual CMOS optional C6h Initialize notebook docking optional C7h Initialize notebook docking late C8h Force check optional C9h Extended checksum optional D2h Unknown interrupt E0h Initialize the chipset E1h Initialize the bridge E2h Initialize the CPU E3h Initialize the system timer E4h Initialize system...

Страница 82: ...upt vectors F1h Initialize Run Time Clock F2h Initialize video F3h Initialize System Management Mode F4h 1 Output one beep before boot F5h Boot to Mini DOS F6h Clear Huge Segment F7h Boot to Full DOS Code Beeps POST Routine Description ...

Страница 83: ...color displayed Reconnect the LCD CCD cable LCD cable Inverter board LCD panel System board LCD has extra horizontal or vertical lines displayed Inverter board LCD CCD cable LCD panel System board Symptom Error Action in Sequence Power shuts down during operation Power source battery pack and power adapter Refer to the Power System Check section on page 65 Battery pack Power adapter System board T...

Страница 84: ... hibernation mode and emits four short beeps every minute Press Fn o and see if the computer enters hibernation mode Check the system hibernation settings Press the key then select ePower Management from the Empowering Technology interface Touchpad Keyboard Hard disk drive System board The system does not enter standby mode after closing the notebook lid Check the system hibernation settings Press...

Страница 85: ...y does not work correctly Press Fn F5 LCD CRT both display switching System board USB does not work correctly System board Print problems Run printer self test Printer driver Printer cable Printer System board Keyboard one or more keys does not work Reconnect the keyboard cable Keyboard System board Touchpad does not work Reconnect the touchpad cable Touchpad board System board Internal modem does...

Страница 86: ... discharge or software errors FRU replacement should be considered only when a recurring problem exists When analyzing an intermittent problem do the following 1 Run the advanced diagnostic test for the system board in loop mode at least ten times 2 If no error is detected do not replace any FRU 3 If any error is detected replace the FRU Rerun the test to verify that there are no more errors ...

Страница 87: ...te non defective FRU 1 Shut down the computer 2 Visually check the failing FRU for damage If any problems are found replace the FRU 3 Remove or disconnect all the following devices t Non Acer devices t Printer mouse and other external devices t Battery pack t Hard disk drive t DIMM t Optical drive diskette drive t Cards in the ExpressCard 54 and card reader slots 4 Power on the computer 5 Determin...

Страница 88: ...on materials for all of Acer notebook desktop and server models including T Service guides for all models T User s manuals T Training materials T BIOS updates T Software utilities T Spare parts lists T Technical Announcement Bulletins TABs For these purposes we have included an Acrobat File to facilitate a hassle free downloading of our technical materials The following are also available in the S...

Страница 89: ...Chapter 5 81 System Block Diagram System Block Diagram and Board Layout Chapter 5 ...

Страница 90: ...onnector 3 KB1 Keyboard cable connector 12 PWRCN1 Power FPC cable connector 4 TPAD1 Touchpad board cable connector 13 U4 BCM5787M Gigabit Ethernet controller 5 SPKR2 Subwoofer cable connector 14 INTMIC1 Microphone cable connector 6 BLUE1 Bluetooth board cable connector 15 SPKR1 Speaker cable connector 7 RTC1 CMOS battery RTC battery 16 LCD1 LCD CCD cable connector 8 NEW1 Card reader slot 17 DC1 DC...

Страница 91: ...onnector 7 DMI soDIMM slots 2 MXM1 VGA board slot 8 MINI1 WLAN board slot 3 CARD READER1 Card reader board connector 9 BAT1 Battery pack connector 4 U47 Keyboard controller 10 U40 Intel MCH north bridge 5 SATA1 Hard drive connector 11 U36 Intel LGA775 socket 6 ODD1 Optical drive connector ...

Страница 92: ...he supervisor password you will not be able to boot up the computer The same thing applies if you forget an HDD password Your Aspire notebook has a hardware dip switch SW1 for clearing lost system passwords Go to page 18 for instructions on how to use this dip switch PSW_CLR 2 1 G55 GAP OPEN ...

Страница 93: ...D D 55 4U002 091G AMD VRAM 128 MB Camera module Camellia Camera CMOS 0 3M CN0314 OV03 U 56 18012 041 Suyin Hard disk drive 80 GB SGT ST980811AS KH 08001 030 Seagate Optical disc drive Sony Super Multi drive 12 7 mm Tray DL 8X AD 7560A LF w o bezel PATA Gbase KU 0080E 005 Sony Inverter board 15 17 VK 21189 801 19 21066 101 Darfon Battery pack Sony AS 2007B Li Ion 3S2P Sony 6 cell 4000 mAh Main Comm...

Страница 94: ...D D 55 4U002 091G AMD VRAM 128 MB Camera Camellia Camera CMOS 0 3M CN0314 OV03 U 56 18012 041 Suyin Hard disk drive 120 GB Toshiba MK1237GSX KH 12004 006 Toshiba Optical disc drive 8X Super Multi DL HLDS GSA T20N LF Gbase KU 0080D 027 HLDS Inverter board 15 17 T62I249 00 19 21030 P01 Foxconn Battery pack Simplo AS 2007B Li Ion 3S2P Panasonic 6 cell 4000 mAh Main Common PSS cell BT 00607 010 Simplo...

Страница 95: ...RAM 128 MB Camera Camellia Camera CMOS 0 3M CN0314 OV03 U 56 18012 041 Suyin Hard disk drive 160 GB SGT ST9160821AS KH 16001 026 Seagate Optical disc drive Pioneer Super Multi Drive 12 7 mm Tray DL 8X DVR K17RS LF w o bezel PATA Gbase KU 00805 038 Pioneer Inverter board 15 17 YNV W10 19 21072 101 YEC Battery pack Simplo AS 2007B Li Ion 4S2P Panasonic 8 cell 4800 mAh Main Common BT 00807 014 Simplo...

Страница 96: ...mera Camellia Camera CMOS 0 3M CN0314 OV03 U 56 18012 041 Suyin Hard disk drive 160 GB SGT ST9160821AS KH 16001 026 Seagate Optical disc drive Pioneer Super Multi Drive 12 7 mm Tray DL 8X DVR K17RS LF w o bezel PATA Gbase KU 00805 038 Pioneer Inverter board 15 17 YNV W10 19 21072 101 YEC Battery pack Simplo AS 2007B Li Ion 4S2P Panasonic 8 cell 4800 mAh Main Common BT 00807 014 Simplo Power cord U...

Страница 97: ... DVI Acer AL1721 17 LCD monitor DVI ViewSonic VD201b 20 LCD DVI I DVI D D sub Westinghouse W37G HDMI HP LP2065 20 TFT monitor DVI Port HP S9500 19 monitor DVI Port Projector Dell 3300MP projector USB Port Test USB mouse Logicool USB mouse OWCM USB Logitech USB wheel mouse Logitech First Wheel Mouse Dell by logitech HP USB Optical Austin Mouse Belkin MiniGlow optical USB mouse HP USB optical mouse ...

Страница 98: ... 80 GB HDD 1394 camera Sony DV 1394 hub ATEN FH 600 Firewire 6 port expansion hub WLAN Access Point Test Access point 802 11b Cisco Aironet 350 Cisco Aironet 1230 Access point 802 11a Intel Pro Wireless 5000 Netgear HE102 Access point 802 11g Wireless 108AG Access Point Access point 802 11n D Link WiFi 802 11n Rangebooster N 650 BUFFALO WZR G144N AirStation Wireless IEEE 802 11n g b Belkin N1MIMO ...

Страница 99: ...mory Stick Pro Duo Lexar High speed 1 GB Memory Stick Pro Duo SanDisk 1GB Memory Stick Pro Sony High speed 2 GB Memory Stick Pro Dou Sony 2 GB Memory Stick Pro MultiMedia Card MMC SanDisk 32MB MMC Apacer 128 MB MMC Transcend 64 128 MB MMC Transcend 128 MB MMC Transcend 256 MB MMC SanDisk 128 MB RS MMC PQI 256 MB RS MMC Mobile Transcend 512 MB MMC A DATA Turbo 200X 2 GB MMC CompactFlash Apacer 256 ...

Страница 100: ...6 CD 04 216 q Nascar Thunder 2004 CD 04 113 q Nascar SimRacing CD 04 228 q NBA LIVE 2006 CD 04 214 WKS q Tiger Woods PGA Tour 2006 CD 04 199 q Medal of Honor Allied Assault Spearhead Expansion Pack CD 04 122 1 q FIFA World Cup GERMANY 2006 CD 04 234 q Sports FIFA 2006 Soccer CD 04 236 Microsoft q Flight Simulator 2004 A Century of Flight CD 04 074 q Halo CD 04 078 q Rise of Nations 1 0 CD 04 079 W...

Страница 101: ...e voltage 1 0375 1 30V Socket type LGA775 Core logic Mobile Intel 945PM Express Chipset T North bridge 82945PM MCH T South bridge 82801GBM GHM ICH7 M Technologies T Intel Virtualization Technology T5500 does not support this technology T Enhanced Intel SpeedStep T Intel 64 bit architecture T Execute Disable Bit System Controllers Item Specification Storage controller Intel ICH7 M Memory controller...

Страница 102: ...talled in both DIMM slots DIMM type DDR II synchronous DRAM Provider Hynix Nanya Model HYMP564S64C P6 Y5 AB HYMP512S64C P8 Y5 AB NT512T64UH8B0FN 3C DIMM size 512 MB 1 GB 512 MB DIMM speed 667 MHz Slot 1 Slot 2 Total Memory 0 MB 256 MB 256 MB 0 MB 512 MB 512 MB 0 MB 1024 MB 1024 MB 0 MB 2048 MB 2048 MB 256 MB 256 MB 512 MB 256 MB 512 MB 768 MB 256 MB 1024 MB 1280 MB 256 MB 2048 MB 2304 MB 512 MB 25...

Страница 103: ...udio integrated in the Intel ICH7 M T Dolby SurroundSound T Dolby Home Theater T S PDIF T MS Sound USB Interface Item Specification USB controller Integrated in the Intel ICH7 M USB specification 2 0 Number of USB port 4 two each on the left and right sides Keyboard Item Specification Keyboard controller Winbond WPC8768L Keyboard layout 88 89 93 key keyboard with international language support Fea...

Страница 104: ...or interface Mini Card form factor based on PCIe electrical interface LEDs Output Link Activity Single LED Operating temperature 0 to 80 C Humidity Non operating 50 to 92 RH non condensing at temperatures of 25 C to 80 C 50 to 90 RH non condensing at temperatures of 25 C to 35 C Operating system Microsoft Windows XP Professional Home Tablet 2000 Microsoft Windows 2000 XP 32 64 bit and Vista 32 64 ...

Страница 105: ...o Bluetooth 1 2 when SIG specification is ratified Interface USB 1 1 Connector type USB Battery Pack Item Specification Type Lithium ion Li ion Vendor Panasonic Sanyo Sony Simplo Number of cells 6 8 6 8 6 8 6 8 Capacity mAh 4000 4800 4000 4800 4000 4800 4000 4800 AC Adapter Item Specification Specification Vendor Delta Lite On Model Name SADP 65KB DBE ADP 90SB BBEA LF PA 1650 02WR PA 1900 24AR DC ...

Страница 106: ...ata heads 4 Interface ATA7 Serial ATA 1 0a Seek time average 12ms Rotational speed 5 400 0 1 rpm Data transfer rate Internal Buffer to Host 335 to 613 Mb s 300 MB s Buffer 8 MB Dimensions mm Height Width Depth 9 5 69 85 100 0 Weight 102g max Allowable voltage 5V 5 Temperature Operating Non operating 5 to 55 C 40 to 60 C Humidity non condensing 8 90 R H Vibration Operating Non operating 9 8m s2 1G ...

Страница 107: ...RW CD ROM CD ROM XA CD DA CD I CD Extra CD Text Photo CD Video CD Buffer memory 2 MB Power supply 5V DC LCD Panel Specification Provider CMO AUO Samsung Model name N154I2 B154EW02 V1 LTN154AT01 001 G can t locate this model Screen size 15 4 wide 15 4 wide Resolution H x V 1280x800 WXGA 1280x800 WXGA Color support 262K 262K Brightness nits 200 200 Contrast ratio 400 1 400 1 Viewing angle 20 45 45 4...

Страница 108: ...I 2 2 or later T System HDD Password Security Control T INT 13h Extensions T PnP BIOS 1 0a T SMBIOS 2 4 or later T BIOS Boot Specification Compal Phoenix Intel T Simple Boot Flag 1 0 T Boot Block T PCI Bus Power Management Interface Specification T USB Specification 1 1 2 0 T IEEE 1394 1 0 T USB 1394 CD ROM Boot Up support T PC Card Standard 1995 PCMCIA 3 0 Compliant Device T IrDA 1 0 T Support In...

Страница 109: ...n this state T S3 Sleeping State T CPU set power down T VGA suspend T Audio power down T Hard disk power down T Optical drive power down T Card reader function suspend T S4 Sleeping State hibernation mode All system states and data are saved onto disk before power shutdown The same session is restored the next time the system is powered on Processor power management states To further conserve powe...

Страница 110: ...102 Chapter 1 ...

Страница 111: ...ifications 100 vendor 100 Version 100 BIOS Supports protocol 100 Bluetooth compatibility test 90 interface 2 key indicator 10 Bluetooth board cable connector 82 removing 50 boot up options drive sequence 19 multi boot menu 15 power on password 16 Quiet Boot 15 remote boot 15 C card reader board connector 83 board removing 54 cable connector 82 compatibility test 90 location 6 supported formats 1 C...

Страница 112: ...9 H hard disk drive activity indicator 9 compartment 8 D2D recovery 15 password 16 hardware configuration utility 11 default configuration settings 20 disassembly procedures 23 information display 14 technical specifications 93 HDD assembly module connector 83 removing 31 HDD module shielding removing 32 HDD see hard disk drive 8 headphone jack 6 heat sink removing 34 hibernation mode 101 I IEEE 1...

Страница 113: ...ne cable connector 82 line in jack 6 location 5 removing 60 middle cover removing 39 modem port location 7 removing 49 N north bridge 83 O ODD see optical disc drive 7 Online Support Information 80 operating system 4 optical disc drive access indicator 7 bracket removing 33 drive options 1 eject button 7 emergency eject hole 7 location 7 module connector 83 removing 32 troubleshooting 64 P palmres...

Страница 114: ...orts 2 keyboard 2 memory 1 operating system 4 power 3 status indicators 3 storage 1 utilities 4 system passwords changing 18 HDD password 16 lost password 18 power on password 16 reminders 17 removing 18 resetting 18 setting 17 status 16 supervisor password 16 user password 16 system security system specifications environmental 4 physical 3 system time 15 system tour base view 8 easy launch keys 1...

Страница 115: ...removing 51 user password 16 V VGA board removing 36 slot location 83 VGA port 7 Voice and Video over Internet Protocol 2 volume control switch 6 VVoIP see Voice and Video over Internet Protocol 2 W wireless LAN compatibility test 90 key indicator 10 solution 2 WLAN antennas disconnecting 30 removing 61 WLAN board removing 29 slot location 83 ...

Отзывы: