background image

Chapter 1

7

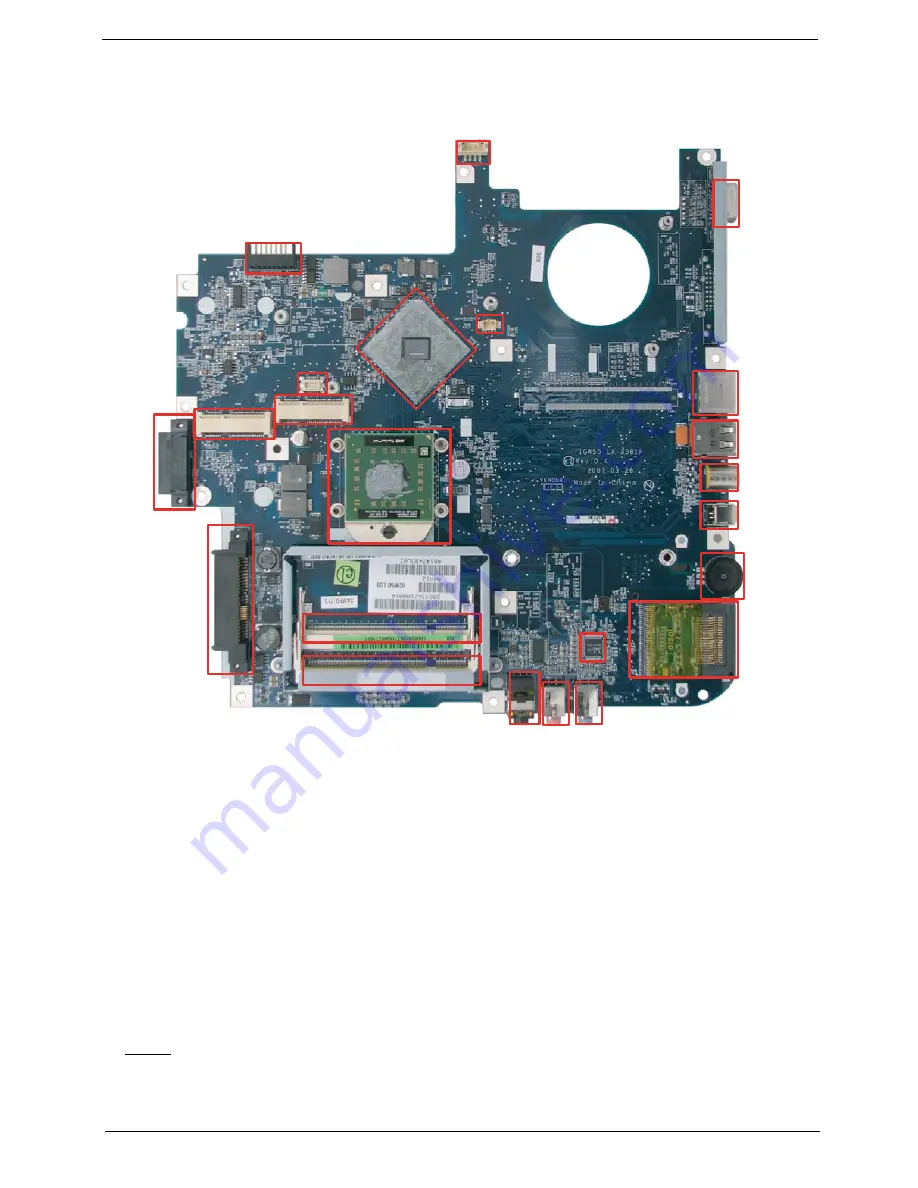
Bottom View

1

PJP1

DC-in Power Jack

13

JP26

IEEE1394 Connector

2

PJP2

Battery Connector

14

JP22

CPU Socket

3

JP14

D-Sub CRT Connector

15

JP27

SATA HDD Connector

4

JP25

ODD Connector

16

SW1

Volume Control

5

JP20

Mini Card (TV-Tuner) Connector

17

JP28

DDRII Memory Socket

6

JP20

Mini Card (WLAN) Connector

18

JP29

DDRII Memory Socket

7

JP21

Mini Card (TV-Tuner) Socket

19

U29

Audio Codec Controller

8

U23

North Bridge

20

JP30

Memory Card Reader

9

JP16

Internal Fan Connector

21

JP31

Line-Out/Headphone/SPDIF Jackt

10

JP18

RJ45 (LAN) Connector

22

JP32

Mic-in Jack

11

JP23

USB (Dual) Connectors

23

JP33

Line-in Jack

12

JP24

S-video/TV-out Connector

1

1

2

3

4

2

3

4

5

7

8

9

6

5

7

8

9

10

10

14

14

12

12

13

13

15

15

16

16

11

11

10

14

12

13

15

16

17

17

18

18

19

19

20

20

22

22

17

18

19

20

22 23

23

23

21

21

21

11

6

Содержание Aspire 5520 Series

Страница 1: ...Aspire 5520 5220 Series Service Guide PRINTED IN TAIWAN Service guide files and updates are available on the ACER CSD web for more information please refer to http csd acer com tw ...

Страница 2: ...II Revision History Please refer to the table below for the updates made on Aspire 5520 5220 service guide Date Chapter Updates ...

Страница 3: ...pect to the contents hereof and specifically disclaims any warranties of merchantability or fitness for any particular purpose Any Acer Incorporated software described in this manual is sold or licensed as is Should the programs prove defective following their purchase the buyer and not Acer Incorporated its distributor or its dealer assumes the entire cost of all necessary servicing repair and an...

Страница 4: ... bits and pieces of additional information related to the current topic WARNING Alerts you to any damage that might result from doing or not doing specific actions CAUTION Gives precautionary measures to avoid possible hardware or software problems IMPORTANT Reminds you to do specific actions relevant to the accomplishment of procedures ...

Страница 5: ... NOT be covered in this generic service guide In such cases please contact your regional offices or the responsible personnel channel to provide you with further technical details 2 Please note WHEN ORDERING FRU PARTS that you should check the most up to date information available on your regional web or channel If for whatever reason a part number change is made it will not be noted in the printe...

Страница 6: ......

Страница 7: ... InviLink 802 11b g Wi Fi CERTIFIED solution supporting Acer SignalUp wireless technology q Acer InviLink 802 11b g Wi Fi CERTIFIED solution supporting Acer SignalUp wireless technology q Core logic North Bridge NVIDIA nForce 610M MCP67 MV Single chip q Up to 2GB of DDR2 677 MHz memory upgradeable to 4GB using two soDIMM modules dual channel support TV tuner q Acer TV tuner options Digital TV tune...

Страница 8: ...ital Dolby Digital Live Dolby PRO LOGIC II Dolby Digital Stereo Creator Dolby Headphone and Dolby Virtual Speaker technologies q High Definition Audio support q S PDIF Sony Philips Digital Interface support for digital speakers q Dolby Digital Live and DTS Neo PC support q MS Sound compatible q Built in microphone Storage subsystem q 80 120 160 200 250 GB or larger hard disk drive q Optical drive ...

Страница 9: ... selected models q AV in port for selected models q Headphones speaker line out port with S PDIF support q Microphone in jack q Line in jack q Ethernet RJ 45 port q Modem RJ 11 port q DC in jack for AC adapter Options and accesories q Acer Xpress VoIP phone featuring Acer Video Conference Manager q Acer Media Center remote control q 512 MB 1 or 2GB DDR2 667 MHz soDIMM modules q 8 cell Li ion batte...

Страница 10: ...f your PC depends on the model purchased Environment q Temperature Operating 5ºC to 35ºC Non operating 20ºC to 65ºC q Humidity non condensing Operating 20 80 Non operating 20 80 Environment q Wi Fi q ACPI q Mobile PC 2002 q DMI 2 0 Environment q One year International Travelers Warranty ITW NOTE The specifications listed above are for reference only The exact configuration of your PC depends on th...

Страница 11: ...Chapter 1 5 System Block Diagram ...

Страница 12: ...2 LED1 Power Suspend LED 5 JP6 Touchpad Connector 13 LED2 Battery Charge Discharge LED 6 JP5 Keyboard Connector 14 JP13 Mainboard to Audio Board Connector 7 JP2 Button Board Connector 15 JP11 Mainboard to USB TV Board Connector 8 JP36 LED Board Connector 16 JP12 Bluetooth Module Connector 1 1 2 3 4 2 3 4 5 7 8 9 6 5 7 8 9 10 10 14 14 12 12 13 13 15 15 16 16 11 11 10 14 12 13 15 16 11 6 ...

Страница 13: ...onnector 18 JP29 DDRII Memory Socket 7 JP21 Mini Card TV Tuner Socket 19 U29 Audio Codec Controller 8 U23 North Bridge 20 JP30 Memory Card Reader 9 JP16 Internal Fan Connector 21 JP31 Line Out Headphone SPDIF Jackt 10 JP18 RJ45 LAN Connector 22 JP32 Mic in Jack 11 JP23 USB Dual Connectors 23 JP33 Line in Jack 12 JP24 S video TV out Connector 1 1 2 3 4 2 3 4 5 7 8 9 6 5 7 8 9 10 10 14 14 12 12 13 1...

Страница 14: ...for video communication 2 Power button Turns the computer on and off 3 Easy launch buttons Buttons for launching frequently used programs 4 Wirelesscommunication button indicator Enables disables the wireless function Indicates the status of wireless LAN communication 5 Bluetooth communication button indicator Enables disables the Bluetooth function Indicates the status of Bluetooth communication ...

Страница 15: ...nology toolbar 13 Speaker Left and right speakers deliver stereo audio output 14 Palmrest Comfortable support area for your hands when you use the computer Icon Item Description 1 Power indicator Indicates the computer s power status 2 Battery indicator Indicates the computer s battery status 3 Line in jack Accepts audio line in devices e g audio CD player stereo walkman 4 Microphone in jack Accep...

Страница 16: ...creases and decreases the volume 8 5 in 1 card reader Accepts Secure Digital SD MultiMediaCard MMC Memory Stick MS Memory Stick PRO MS PRO xD Picture Card xD 9 PCI Express Card slot Accepts an Express Card 54 module Note Express Cards are third generation of PC cards hot swapable and smaller than previous PC Cards Designed for both desktop and mobile use Express Cards use either USB 2 0 or a singl...

Страница 17: ...on model 3 Optical disk access indicator Lights up when the optical drive is active 4 Optical drive eject button Ejects the optical disk from the drive 5 Emergency eject hole Ejects the optical drive tray when the computer is turned off 6 Modem RJ 11 port Connects to a phone line Icon Item Description 1 DC in jack Connects to an AC adapter 2 Ventilation slots Enable the computer to stay cool even ...

Страница 18: ...escription 1 Battery bay Houses the computer s battery pack 2 Battery release latch Releases the battery for removal 3 Battery lock Locks the battery in position 4 Hard disk bay Houses the computer s hard disk secured with screws 5 Ventilation slots and cooling fan Enable the computer to stay cool even after prolonged use Note Do not cover or obstruct the opening of the fan ...

Страница 19: ...ns are pre set to email and Internet programs but can be reset by users To set the Web browser and mail buttons run the Launch Manager Icon Function Description Power Lights up when the computer is on Battery Lights up when the battery is being charged Wireless LAN Indicates the status of wireless LAN communication Bluetooth Indicates the status of Bluetooth communication HDD Indicates when the ha...

Страница 20: ...movements hence the lighter the touch the better the response Tapping too hard will not increase the touchpad s responsiveness Launch Button Default application Acer Empowering Technology user programmable Web browser Internet browser user programmable Mail Email application user programmable Arcade Windows Media Center Function Left Button 1 Right Button 4 Main touchpad 2 Center button 3 Execute ...

Страница 21: ...l alphabetic characters typed are in uppercase Num lock Fn F11 When Num Lock is on the embedded keypad is in numeric mode The keys function as a calculator complete with the arithmetic operators and Use this mode when you need to do a lot of numeric data entry A better solution would be to connect an external keypad Scroll lock Fn F12 When Scroll Lock is on the screen moves one line up or down whe...

Страница 22: ...nction Tab Activates next taskbar button E Opens the My Computer window F1 Opens Help and Support F Opens the Search All Files dialog box R Opens the Run dialog box M Minimizes all windows Shift M Undoes the minimize all windows action Application key This key has the same effect as clicking the right mouse button it opens the application s context menu Hot Key Icon Function Description Fn F1 Hot ...

Страница 23: ...faq12 htm for more information Fn F5 Display toggle Switches display output between the display screen external monitor if connected and both Fn F6 Screen blank Turns the display screen backlight off to save power Press any key to return Fn F7 Touchpad toggle Turns the internal touchpad on and off Fn F8 Speaker toggle Turns the speakers on and off Fn x Brightness up Increases the screen brightness...

Страница 24: ...pen a text editor or word processor 2 Either directly press the key at the bottom right of the keyboard or hold Shift and then press the 4 key at the upper center of the keyboard NOTE This function varies by the operating system version ...

Страница 25: ...ngs For more information press the key to launch the Empowering Technology toolbar then click on the appropriate utility and select the Help or Tutorial function Empowering Technology password Before using Acer eLock Management and Acer eRecovery Management you must initialize the Empowering Technology password Right click on the Empowering Technology toolbar and select Password Setup to do so If ...

Страница 26: ...h to the appropriate profile when you move from one location to another Settings stored include network connection settings IP and DNS settings wireless AP details etc as well as default printer settings Security and safety concerns mean that Acer eNet Management does not store username and password information ...

Страница 27: ...Bluetooth CardBus FireWire 1394 Wired LAN and Optical Device if supported DC Mode Battery mode There are three pre defined profiles Balanced Power Saver and High Performance You can also define the power plan optimized for your needs To create new power plan 1 Select a predefined power plan and click the icon shown on the lower left hand side 2 Enter the name for the newly created power plan 3 Sel...

Страница 28: ...al power options click More Power option Acer ePresentation Management Acer ePresentation Management lets you project your computer s display to an external device or project using the hot key Fn F5 If auto detection hardware is implemented in the system your system display will be automatically switched out when an external display is connected to the system ...

Страница 29: ...utlook The Acer eDataSecurity Management setup wizard will prompt you for a supervisor password and default encryption This encryption will be used to encrypt files by default or you can choose to enter your won file specific password when encrypting a file NOTE The password used encrypt a file is the unique key that the system needs to decrypt it If you lose the password the supervisor password i...

Страница 30: ...24 Chapter 1 ...

Страница 31: ...plugged into the system q Optical drive devices includes any kind of CD ROM or DVD ROM drives q Floppy disk drives 3 5 inch disks only q Interfaces includes serial ports parallel port infrared IR and Bluetooth To activate Acer eLock Management a password must be set first Once set you can apply locks to any of the devices Lock s will immediately be set without any reboot necessary and will remain ...

Страница 32: ... set recovery point q Back up to CD DVD q Image data recovery tools q Recover from a hidden partition factory defaults q Recover from the HDD most recent user defined recovery point q Recover from CD DVD For more information please refer to Acer eRecovery Management NOTE If your computer did not come with a Recovery CD or System CD please use Acer eRecovery Management s System backup to optical di...

Страница 33: ...us Furthermore Acer eSettings Management enables you to optimize your Windows operating system so your computer runs faster smoother and better Acer eSettings Management also q Provides a simple graphical user interface for navigating q Displays general system status and advanced monitoring for power users Getting to know your Acer OrbiCam 1 2 3 3 ...

Страница 34: ...re resolution click the displayed resolution button to select the desired resolution Using the Acer OrbiCam as webcam The Acer OrbiCam is automatically selected as the capture device of any instant messenger IM application To use the Acer OrbiCam as a webcam open the IM service then select the video webcam feature You can now broadcast from your location to an IM partner anywhere in the world No I...

Страница 35: ...ss this function please go to Start All Programs and click on Acer GridVista You may choose any one of the four display settings indicated below Double vertical Triple primary at left Triple primary at right or Quad Acer Gridvista is dual display compatible allowing two displays to be partitioned independently Acer Gridvista is dual display compatible allowing two displays to be partitioned indepe...

Страница 36: ...Manager allows you to set the four easy launch buttons see their locations mentioned in Easy Launch Buttons You can access the Launch Manager by clicking Start All Programs Launch Manager to start the application Note Easy launch buttons on page 24 Start All Programs Launch Manager Note Easy launch buttons on page 24 Start All Programs Launch Manager ...

Страница 37: ... Level Core 0 Core 1 rpm dBA 86 86 3700 39 88 88 3450 36 5 91 91 3150 34 5 95 95 2800 31 BIOS Item Specification BIOS vendor InsydeH2O BIOS Version BIOS ROM type Flash ROM BIOS ROM size 512KB BIOS package 32 pin PLCC Supported protocols ACPI 1 0b 2 0 3 0 PCI 2 2 System HDD Password Security Control INT 13h Extensions PnP BIOS 1 0a SMBIOS 2 4 Simple Boot Flag 1 0 Boot Block PCI Bus Power Management...

Страница 38: ...z Supports DIMM voltage 1 8V and 0 9V Supports DIMM package 200 pin soDIMM Memory module combinations You can install memory modules in any combinations as long as they match the above specifications Memory Combinations Slot 1 Slot 2 Total Memory 0MB 128MB 128MB 0MB 256MB 256MB 0MB 512MB 512MB 0MB 1024MB 1024MB 0MB 2048MB 2048MB 128MB 128MB 256MB 128MB 256MB 384MB 128MB 512MB 640MB 128MB 1024MB 11...

Страница 39: ...8MB Max available 895MB 256MB Dedicated 256MB 2048MB 1023MB 2048MB Max available 1023MB 512MB Dedicated 512MB 2048MB 1279MB 2048MB Max available 1279MB 4096MB 128MB Dedicated 128MB 4096MB 1919MB 4096MB Max available 1919MB 256MB Dedicated 256MB 4096MB 2047MB 4096MB Max available 2047MB 512MB Dedicated 512MB 4096MB 2303MB 4096MB Max available 2303MB LAN Interface Item Specification Chipset Broadcom...

Страница 40: ...22AS Toshiba MK1237GSX WD WD1200BEVS 22RST0 HGST HTS541616J9SA00 Seagate ST9160821AS Toshiba MK1637GSX WD WD1600BEVS 22RST0 Toshiba MK2035GSS Capacity MB 80000 120000 160000 200000 Bytes per sector 512 512 512 512 Data heads 2 3 for Hitachi and Seagate 4 for Toshiba 4 for Hitachi 3 for Seagate Drive Format Disks 1 1 1 1 Spindle speed RPM 5400 RPM 5400 RPM 5400 RPM 4200 RPM Performance Specificatio...

Страница 41: ...Text 2 Reads data in Photo CD single and Multi session 3 Reads standard CD DA 4 Reads and writes CD R discs 5 Reads and writes CD RW discs 6 Reads and writes in each DVD R RW Ver 1 1 7 Reads data in each DVD ROM and DVD R Ver 2 0 for Authoring 8 Reads and writes in each DVD R Ver 2 0 for general DVD RW and DVD R RW Ver1 1 Loading mechanism Load Manual Release a Electrical Release Release Button b ...

Страница 42: ...V Zoomed Video port No ZV support Supports 32 bit CardBus Yes System Board Major Chips Item Controller Core logic North Bridge NVIDIA MCP67 MV Single chip LAN Realtek RTL8211B USB 2 0 Built in ICH8M Super I O controller NS 87383 MODEM Connexant MDC 1 5 Card Bluetooth Broadcom 2045 Bluetooth 2 0 EDR Wireless LAN Broadcom 4311 4312 or Atheros XB63 Fox BRM 4311 Minicard BG PCMCIA TI PCI 7412 Audio Re...

Страница 43: ...lution pixels 1440x900 WXGA 1440x900 WXGA 1440x900 WXGA 1440x900 WXGA Pixel Pitch 0 297x0 297 0 099x0 297 0 297x0 297 Pixel Arrangement R G B Vertical Stripe R G B Vertical Stripe R G B Vertical Stripe R G B Vertical Stripe Display Mode Normally White Normally White Normally White Normally White Typical White Luminance cd m2 also called Brightness 300 300 300 300 Luminance Uniformity N A N A 70 70...

Страница 44: ...rush current 220A 115VAC 220A 230VAC Efficiency 82 min 115VAC input full load System Power Management ACPI mode Power Management Mech Off G3 All devices in the system are turned off completely Soft Off G2 S5 OS initiated shutdown All devices in the system are turned off completely Working G0 S0 Individual devices such as the CPU and hard disc may be power managed in this state Suspend to RAM S3 CP...

Страница 45: ...e without entering BIOS Setup Utility please set the parameter to enabled Press F12 during POST to enter multi boot menu In this menu user can change boot device without entering BIOS SETUP Utility PhoenixBIOS Setup Utility CPU Type AMD Turion tm 64 X2 Mobile Technology TL 60 CPU Speed System BIOS Version V0 07 VGA BIOS Version V60 84 07 00 02 Serial Number Asset Tag Number Product Name Manufactur...

Страница 46: ...d this item q Press while you are in any of the menu options to go to the Exit menu q In any menu you can load default settings by pressing t You can also press u to save any changes made and exit the BIOS Setup Utility NOTE You can change the value of a parameter if it is enclosed in square brackets Navigation keys for a particular menu are shown on the bottom of the screen Help for parameters ar...

Страница 47: ...mber Asset Tag Number Product Name Manufacturer Name UUID XXXXXXXXXXXXXXXXXXXXXXXXXXXX F1 Help Select Item F5 F6 Change Values F9 Setup Defaults Esc Exit Select Menu Enter Select Sub Menu F10 Save and Exit HDD Model Name ST9160821AS PM HDD Serial Number 5MAOTKSQ 2000 MHz Information Main Advanced Boot Power Exit Security Memory ATAPI Model Name OptiarcDVDRWAD 75 SM HDD Model Name None HDD Serial N...

Страница 48: ...ame of devices installed on the secondary IDE master The hard disk drive or optical drive model name is automatically detected by the system ATAPI Serial Number Displays the serial number of devices installed on secondary IDE master The hard disk drive or optical drive model name is automatically detected by the system System BIOS Version Displays the system BIOS version VGA BIOS Version Displays ...

Страница 49: ...r PhoenixBIOS Setup Utility Item Specific Help Tab Shift Tab or Enter selects field F1 F5 F6 F9 Setup Defaults Esc Enter Select Sub Menu F10 Save and Exit System Time 19 03 49 System Date 01 01 2007 Video Memory 256 MB Quiet Boot Enabled Network Boot Enabled F12 Boot Menu Disabled System Memory 634 KB Extended Memory 766 MB Wake On Lan Enabled D2D Recovery Enabled Help Exit Select Item Select Menu...

Страница 50: ...ays the total size of the installed memory Video Memory Displays the video memory size Quiet Boot Determines if the Customer Logo and Summary Screen will be displayed or not during boot up Enabled Customer Logo is displayed and Summary Screen is disabled Disabled Customer Logo is not displayed and Summary Screen is enabled Option Enabled or Disabled Network Boot Enables disables system boot from L...

Страница 51: ...each hot plug slot 1M 2M 4M 8M 16M 32M 64M or None Pre fetchable Memory Sets the amount of pre fetchable memory assigned to each hot plug slot 1M 2M 4M 8M 16M 32M 64M or None Watchdog Timer Enables disables the watchdog timer function Disabled or Enabled Integrated Devices This sub menu displays all options and settings for integrated devices See the following page for a description of each settin...

Страница 52: ...lt 17 Device Power Good Time in MS Sets the interval between power on and system availability following a reset Enter numeric value Default 100 Attach Signal Debounce in MS Sets the debounce interval after a USB device is connected Enter numeric value Default 100 Parameter Description Option USB Control Enables disables USB controllers USB1 1 USB2 USB1 1 or Disabled USB2 Control Enables disables U...

Страница 53: ... 634 KB Cache System BIOS area uncached Cache Base 0 512k uncached Cache Video BIOS area uncached Cache Base 0 512k 640k uncached Cache Extended Memory Area uncached Extended Memory 784896 KB Memory Cache Enabled Cache A000 AFFF Disabled Cache B000 BFFF Disabled Cache C800 CBFF Disabled Cache CC00 CFFF Cache D000 C3FF Cache D400 D7FF Disabled Disabled Disabled Information Main Advanced Boot Power ...

Страница 54: ...ts control of video BIOS caching to improve video performance uncached Write Through Write Protect or Write Back Cache Base 0 512K Sets control of base memory caching up to 512K uncached Write Through Write Protect or Write Back Cache Base 512K 640K Sets control of base memory caching between 512K 640K uncached Write Through Write Protect or Write Back Cache Extended Memory Area Sets control of sy...

Страница 55: ...isor Password Set User Password Password on Boot Disabled Supervisor Password controls access to the setup utility It can be used to boot up when Password on boot is enabled F1 Help Select Item F5 F6 Change Values F9 Setup Defaults Esc Exit Select Menu Enter Select Sub Menu F10 Save and Exit Enter Enter Set SATA Port 0 HDD Password Enter SATA Port 0 Disk Status Clear Information Main Advanced Boot...

Страница 56: ...ve the changes and exit the BIOS Setup Utility Parameter Description Option Supervisor Password Is Shows whether the Supervisor Password is set or not Clear or Set User Password is Is Shows whether the User Password is set or not Clear or Set SATA Port 0 Disk Status Shows whether the HDD Password is set or not Clear or Set Set Supervisor Password Press Enter to set the supervisor password When set...

Страница 57: ...IOS Setup Utility Changing a Password 1 Use the w and y keys to highlight the Set Supervisor Password parameter and press the e key The Set Supervisor Password box appears 2 Type the current password in the Enter Current Password field and press e 3 Type a password in the Enter New Password field Retype the password in the Confirm New Password field 4 Press e After setting the password the compute...

Страница 58: ...current password entered does not match the actual current password the screen will show you the Setup Warning If the new password and confirm new password strings do not match the screen will display the following message ...

Страница 59: ...c Help Use or to select a device then press F6 to move it up the list or F5 to move it down the list Press Esc to escape the menu F1 F5 F6 F9 Setup Defaults Esc Enter Select Sub Menu F10 Save and Exit Help Exit Select Item Select Menu Change Values Boot priority order 1 IDE 4 ST9160821AS S1 2 IDE 5 3 IDE 0 Optiarc DVD RW AD 7530A P 4 PCI BEV NVIDIA Boot Agent 244 0538 5 USB HDD 6 USB CDROM 7 USB F...

Страница 60: ...tected and disables C2 C3 if dual core is detected F1 F5 F6 F9 Setup Defaults Esc Enter Select Sub Menu F10 Save and Exit C State Configuration Auto C1E Configuration Auto PCIE Spread Spectrum Disabled PState Configuration Enabled SATA Spread Spectrum Disabled USB CSC Resume Disabled DIPM Disabled CPU Spread Spectrum Disabled CPU Throttle Disabled iGPU Spread Spectrum Disabled HIPM Enabled PCI Clo...

Страница 61: ...00 Triangular Center or 3 00 Triangular Center PCIE Spread Spectrum Enables disables the PCIE Spread Spectrum function Disabled or Triangular Down SATA Spread Spectrum Enables disables the SATA Spread Spectrum funtion Disabled or Triangular Down PState Configuration Enables disables ACPI Pstate support Enabled or Disabled USB CSC Resume Enables disables USB CSC resume Disabled or Enabled DIPM Enab...

Страница 62: ... 16 USB2 Clock Ratio Sets the USB2 clock ratio Enter numeric value Default 16 Aggressive L1 PD Enables disables clocck clamp function in L1 Disabled or Enabled SPI Output PD Enables disables SPI data and clock pads when not in use Enabled or Disabled IDE Clock Ratio Sets the IDE clock ratio Enter numeric value Default 16 SATA Clock Select Sets the SATA clock speed 133Mhz or 200Mhz SATA Clock Ratio...

Страница 63: ...tup Defaults Load default values for all SETUP item Discard Changes Load previous values from CMOS for all SETUP items Save Changes Save Setup Data to CMOS PhoenixBIOS Setup Utility Item Specific Help Exit System Setup and save your changes to CMOS F1 F5 F6 F9 Setup Defaults Esc Enter Execute Command F10 Save and Exit Help Exit Select Item Select Menu Change Values Exit Saving Changes Exit Discard...

Страница 64: ...ery Diskette before you use the Phlash utility NOTE Do not install memory related drivers XMS EMS DPMI when you use the Phlash NOTE Please use the AC adapter power supply when you run the Phlash utility If the battery pack does not contain enough power to finish BIOS flash you may not boot the system because the BIOS is not completely loaded Follow the steps below to run the Phlash 1 Prepare a boo...

Страница 65: ...r preventing electrostatic discharge q Small Philips screw driver q Philips screwdriver q Plastic flat head screw driver q Tweezers NOTE The screws for the different components vary in size During the disassembly process group the screws with the corresponding components to avoid mismatch when putting back the components When you remove the stripe cover please be careful not to scrape the cover Ch...

Страница 66: ... Begin Before proceeding with the disassembly procedure make sure that you do the following 1 Turn off the power to the system and all peripherals 2 Unplug the AC adapter and all power and signal cables from the system 3 Remove the battery pack ...

Страница 67: ...tart Thermal Door HDD Door LCD Module Middle Cover HDD Bracket Keyboard Battery Pack F 2 D 5 F 1 B 4 C 2 LCD hinges to logic D 2 LCD hinges to logic C 2 on bottom side C 8 upper case assembly to lower case assembly on bottom side C 2 upper case assembly to lower case assembly on upper side Lower Case Assembly Modem Board Switch Board for AS models Upper Case Assembly Main Board H 4 Speaker Set ODD...

Страница 68: ... 5 Ni NL MA0000012G0 H SCREW M M 3 0D 3 0L K MAAA03032G0 I SCREW M 2 5D 4 15L K 5 5D ZK NL MA0000005G0 J SCREW M 2 5D 3 2L K 6D NI MA000006C00 K SCREW ICW50_CPU_T HERMAL_SCR AM010000300 L SCREW M M 2 0D 3L K 5D MA0000096G0 M SCREW F 4 5L K 4 5D ZK NL MA000002NG0 LCD Module LCD Inverter LCD Panel Wireless Antenna Set LCD Bezel G 1 for 15 G 2 for 15 4 B 4 B 2 G 2 for 15 4 F 8 4 on left 4 on right LC...

Страница 69: ...Chapter 3 72 Removing the Battery Pack 1 Unlock the battery lock move the battery lock to the unlock position as shown 2 Slide the battery release latch then remove the battery ...

Страница 70: ...the two screws fastening the HDD cover 2 Detach the HDD cover from the main unit 3 Pull the tab to remove the HDD module in the direction of the arrow Removing the Memory 1 Remove the four screws holding the thermal cover 2 Detach the thermal cover from the main unit 3 Pop out the memory from the DIMM socket then remove it If the notebook has two memory then repeat this step ...

Страница 71: ...e antennae from the wireless LAN card 2 Remove the two screws fastening the wireless LAN card 3 Then take out the wireless LAN card from the main unit 4 Remove the screw fastening the modem card and detach the modem card from the main board 5 Disconnect the RJ 11 cable and remove the modem card ...

Страница 72: ... from the main board 2 Remove the three screws holding the system fan 3 Remove the four spring screws holding the CPU thermal module 4 Then detach the CPU thermal module as shown 5 Use a flat screwdriver to release the CPU lock Turn counter clock wire 6 Remove the CPU from the CPU socket carefully ...

Страница 73: ... remove it 4 Gently pull up the keyboard to release it from the four snaps as shown 5 Turn over the keyboard as the image shows Then disconnect the keyboard cable from the main board 6 Remove the keyboard from the main unit 7 Disconnect the LCD cable and microphone cable from the main board 8 Pull out the wireless LAN antennas free from the main unit as shown 9 Remove the four screws securing the ...

Страница 74: ...77 Chapter 3 10 Detach the LCD module from the main unit ...

Страница 75: ...ule outwards and gently pull it out as shown 3 Press and release the PC dummy card from the PC slot as shown 4 Then press the release the memory dummy card from the 5 in 1 card reader slot as shown 5 Remove the eight screws fastening the upper case and the lower case assembly on the bottom 6 Remove the eight screws fastening the upper case assembly and the lower case assembly on the front side ...

Страница 76: ...Remove the screw fastening the USB board and take out the board and its cable from the lower case 3 Then detach the USB cable from the USB board 4 Disconnect the Bluetooth cable from the main board 5 Take out the Bluetooth module and its cable from the lower case as shown 6 Then detach the Bluetooth cable from the Bluetooth module 7 Disconnect the right speaker cable from the main board 8 Remove t...

Страница 77: ...er 3 80 9 Remove the screw fastening the main board to the lower case 10 Detach the main board from the lower case as shown 11 Turn the main board over then remove the DC in connector from the board as shown ...

Страница 78: ...astening the button board 3 Detach the button board with FFC from the upper case as shown 4 Remove the two screws fastening the LED board 5 Detach the LED board with FFC from the upper case as shown 6 Remove the two screws fastening the left speaker 7 Remove the left speaker from the upper case as shown ...

Страница 79: ... from the LCD module carefully 4 Remove the four screws holding the LCD to the LCD panel 5 Detach the CCD cable connector from the CCD board 6 Take out the CCD module from the LCD panel 7 Remove the screw fastening the CCD board to the CCD bracket 8 Lift out the LCD from the LCD panel as shown 9 Detach the two inverter cable connectors from the inverter board ...

Страница 80: ...pter 3 10 Remove the four screws fastening the left LCD bracket and detach it 11 Remove the four screws fastening the right LCD bracket and detach it 12 Disconnect the LCD cable from the rear side of the LCD ...

Страница 81: ...Remove the four screws holding the HDD hard disk drive case two on each side 2 Carefully slide out the hard disk drive from the HDD case Disassembling the ODD Module 1 Remove the three screws holding the optical bracket 2 Then remove the optical bracket from the optical disk drive ...

Страница 82: ......

Страница 83: ...hich page to go to Symptoms Verified Go To Power failure The power indicator does not go on or stay on Power System Check on page 88 POST does not complete No beep or error codes are indicated Power On Self Test POST Error Message on page 91 Undetermined Problems on page 103 POST detects an error and displayed messages on screen Error Message List on page 92 Other symptoms i e LCD display problems...

Страница 84: ...label can cause damage to the drive or can cause the drive to fail Do the following to select the test device 1 Boot from the diagnostics diskette and start the diagnostics program 2 See if CD ROM Test is passed when the program runs to CD ROM Test 3 Follow the instructions in the message window If an error occurs reconnect the connector on the System board If the error still remains 1 Reconnect t...

Страница 85: ...ns in the message window NOTE Make sure that the DIMM is fully installed into the connector A loose connection can cause an error Power System Check To verify the symptom of the problem power on the computer using each of the following power sources 1 Remove the battery pack 2 Connect the power adapter and check that power is supplied 3 Disconnect the power adapter and install the charged battery ...

Страница 86: ...e following q Replace the System board q If the problem is not corrected see Undetermined Problems on page 103 q If the voltage is not correct go to the next step NOTE An audible noise from the power adapter does not always indicate a defect 3 If the power on indicator does not light up check the power cord of the power adapter for correct continuity and installation 4 If the operational charge do...

Страница 87: ...battery pack that has less than 50 of the total power remaining when installed in the computer If the battery status indicator does not light up remove the battery pack and let it return to room temperature Re install the battery pack If the charge indicator still does not light up replace the battery pack If the charge indicator still does not light up replace the DC DC charger board Touchpad Che...

Страница 88: ...xt possible FRU to be replaced when servicing a computer If the symptom is not listed see Undetermined Problems on page 103 The following lists the error messages that the BIOS displays on the screen and the error symptoms classified by function NOTE Most of the error messages occur during POST Some of them display information about a hardware device e g the amount of memory installed Others may i...

Страница 89: ...ault Settings in BIOS Setup Utility Hard disk drive System board Stuck Key see Keyboard or Auxiliary Input Device Check on page 87 Keyboard error see Keyboard or Auxiliary Input Device Check on page 87 Keyboard Controller Failed see Keyboard or Auxiliary Input Device Check on page 87 Keyboard locked Unlock key switch Unlock external keyboard Monitor type does not match CMOS Run Setup Run Load Defa...

Страница 90: ... Setup Utility System cache error Cache disabled System board CPU ID System board DMA Test Failed DIMM System board Software NMI Failed DIMM System board Fail Safe Timer NMI Failed DIMM System board Device Address Conflict Run Load Default Settings in BIOS Setup Utility RTC battery System board Allocation Error for device Run Load Default Settings in BIOS Setup Utility RTC battery System board Fai...

Страница 91: ...source battery pack and power adapter See Power System Check on page 88 Reconnect the LCD connector Hard disk drive LCD inverter ID LCD cable LCD Inverter LCD System board No beep power on indicator turns on and LCD is blank But you can see POST on an external CRT Reconnect the LCD connectors LCD inverter ID LCD cable LCD inverter LCD System board No beep power on indicator turns on and a blinking...

Страница 92: ...efore memory autosize 18h 8254 timer initialization 1Ah 8237 DMA controller initialization 1Ch Reset Programmable Interrupt Controller 20h 1 3 1 1 Test DRAM refresh 22h 1 3 1 3 Test 8742 Keyboard Controller 24h Set ES segment register to 4 GB 26h Enable A20 line 28h Autosize DRAM 29h Initialize POST Memory Manager 2Ah Clear 215 KB base RAM 2Ch 1 3 4 1 RAM failure on address line xxxx 2Eh 1 3 4 3 R...

Страница 93: ... Enable external and CPU caches 69h Setup System Management Mode SMM area 6Ah Display external L2 cache size 6Bh Load custom defaults optional 6Ch Display shadow area message 6Eh Display possible high address for UMB recovery 70h Display error messages 72h Check for configuration errors 76h Check for keyboard errors 7Ch Set up hardware interrupt vectors 7Eh Initialize coprocessor if present 80h Di...

Страница 94: ...key lock A4h Initialize Typematic rate A8h Erase F2 prompt AAh Scan for F2 key stroke ACh Enter SETUP AEh Clear Boot flag B0h Check for errors B2h POST done prepare to boot operating system B4h 1 One short beep before boot B5h Terminate QuietBoot optional B6h Check password optional B9h Prepare Boot BAh Initialize DMI parameters BBh Initialize PnP Option ROMs BCh Clear parity checkers BDh Display ...

Страница 95: ...uge Segment E9h Initialize Multi Processor EAh Initialize OEM special code EBh Initialize PIC and DMA ECh Initialize Memory type EDh Initialize Memory size EEh Shadow Boot Block EFh System memory test F0h Initialize interrupt vectors F1h Initialize Run Time Clock F2h Initialize video F3h Initialize System Management Mode F4h 1 Output one beep before boot F5h Boot to Mini DOS F6h Clear Huge Segment...

Страница 96: ...s displayed LCD inverter ID LCD inverter LCD cable LCD System board Indicator Related Symptoms Symptom Error Action in Sequence Indicator incorrectly remains off or on but system runs correctly Reconnect the inverter board Inverter board System board Power Related Symptoms Symptom Error Action in Sequence Power shuts down during operation Power source battery pack and power adapter See Power Syste...

Страница 97: ...no sound Speaker System board Power Management Related Symptoms Symptom Error Action in Sequence The system will not enter hibernation See Save to Disk S4 on page 45 Keyboard if control is from the keyboard Hard disk drive System board The system doesn t enter hibernation mode and four short beeps every minute Press Fn oand see if the computer enters hibernation mode Touchpad Keyboard Hard disk co...

Страница 98: ...F5 LCD CRT Both display switching System board USB does not work correctly System board Print problems Ensure the Parallel Port in the Onboard Devices Configuration of BIOS Setup Utility is set to Enabled Onboard Devices Configuration Run printer self test Printer driver Printer cable Printer System Board Serial or parallel port device problems Ensure the Serial Port in the Devices Configuration o...

Страница 99: ...c discharge or software errors FRU replacement should be considered only when a recurring problem exists When analyzing an intermittent problem do the following 1 Run the advanced diagnostic test for the system board in loop mode at least 10 times 2 If no error is detected do not replace any FRU 3 If any error is detected replace the FRU Rerun the test to verify that there are no more errors ...

Страница 100: ...operating correctly See Power System Check on page 88 1 Power off the computer 2 Visually check them for damage If any problems are found replace the FRU 3 Remove or disconnect all of the following devices q Non Acer devices q Printer mouse and other external devices q Battery pack q Hard disk drive q DIMM q CD ROM Diskette drive Module q PC Cards 4 Power on the computer 5 Determine if the problem...

Страница 101: ... JP6 Touchpad Connector 13 LED2 Battery Charge Discharge LED 6 JP5 Keyboard Connector 14 JP13 Mainboard to Audio Board Connector 7 JP2 Button Board Connector 15 JP11 Mainboard to USB TV Board Connector 8 JP36 LED Board Connector 16 JP12 Bluetooth Module Connector 1 1 2 3 4 2 3 4 5 7 8 9 6 5 7 8 9 10 10 14 14 12 12 13 13 15 15 16 16 11 11 10 14 12 13 15 16 11 6 Jumper and Connector Locations Chapte...

Страница 102: ...AN Connector 18 JP29 DDRII Memory Socket 7 JP21 Mini Card TV Tuner Socket 19 U29 Audio Codec Controller 8 U23 North Bridge 20 JP30 Memory Card Reader 9 JP16 Internal Fan Connector 21 JP31 Line Out Headphone SPDIF Jackt 10 JP18 RJ45 LAN Connector 22 JP32 Mic in Jack 11 JP23 USB Dual Connectors 23 JP33 Line in Jack 12 JP24 TV out Connector 1 1 2 3 4 2 3 4 5 7 8 9 6 5 7 8 9 10 10 14 14 12 12 13 13 15...

Страница 103: ...s made it will not be noted on the printed Service Guide For ACER AUTHORIZED SERVICE PROVIDERS your Acer office may have a DIFFERENT part number code from those given in the FRU list of this printed Service Guide You MUST use the local FRU list provided by your regional Acer office to order FRU parts for repair and service of customer machines NOTE To scrap or to return the defective parts you sho...

Страница 104: ...4 0AH 7 01K 0FA BT 00605 015 BATTERY LI ION 6CELLS 4KMAH SANYO SA 3S2P 4AH 7 01K 0FA BT 00603 033 BATTERY LI ION 6CELLS 4KMAH SIMPLO SP PA 3S2P 4 0AH 7 01K 0FA BT 00607 010 BATTERY LI ION 6CELLS 4KMAH SONY SY 3S2P 4 0AH 7 01K 0FA BT 00604 018 BATTERY LI ION 8CELLS 4 8MAH PANASONIC PA 4S2P 4 8AH 7 01K 0FA BT 00805 011 BATTERY LI ION 8CELLS 4 8MAH SANYO SA 4S2P 4 8AH 7 01K 0FA BT 00803 024 BATTERY L...

Страница 105: ... KI KDN01 003 MINI WLAN B INTEL 802 11 4965ANG JP MM 886437 KI KDN01 004 BUTTON BOARD W CABLE 15 4 55 AHE02 001 LED BOARD W CABLE 15 4 55 AHE02 002 USB BOARD FOR TV 55 AHE02 003 USB BOARD FOR W O TV 55 AHE02 004 RF BOARD FOR DTV 55 AHE02 005 VGA BOARD M71M 128MB VG 71M02 002 VGA BOARD M71M 256MB W HDCP VG 71M02 001 CABLE RJ11 CABLE 15 4 50 AHE02 001 FFC CABLE T P TO MB 50 AHE02 002 BLUE TOOTH CABL...

Страница 106: ...D DENMARK 3 PIN 27 TAVV5 008 POWER CORD JP 3 PIN 27 TAVV5 009 POWER CORD SOUTH AFRICA 3 PIN 27 TAVV5 010 POWER CORD KOERA 3 PIN 27 TAVV5 011 POWER CORD ISRAEL 3 PIN 27 TAVV5 012 POWER CORD INDIA 3 PIN 27 TAVV5 013 POWER CORD TWN 3 PIN 27 TAVV5 014 CASE COVER BRACKET ASSEMBLY MIDDLE COVER 15 4 42 AHE02 001 UPPER CASE ASSY 15 4 W TP TP BRACKET TP FFC DIS 60 AHE02 001 UPPER CASE ASSY 15 4 W TP TP BRA...

Страница 107: ...KC 71001 DTP INTEL CPU MEROM DUAL CORE T5450 1 66G LF80537GF0282M QWNW M0 SLA4F KC 54501 DTP COMBO MODULE DVD CDRW 24X COMBO MODULE 6M AHE02 001 DVD CDRW COMBP DRIVE HLDS GCC T10N VISTA 0FA KO 0240D 005 DVD CDRW COMBP DRIVE SONY CRX880A VISTA 0FA KO 0240E 005 ODD BEZEL COMBO 42 AHE02 003 ODD BRACKET 15 4 33 AHE02 001 DVD RW DRIVE DVD SUPER MULTI MODULE TRAY IN 6M AHE02 002 DVD SUPER MULTI DRIVE PI...

Страница 108: ... SATA LF F W DL230J KH 08004 010 HDD SATA 80G 5400RPM WD WD800BEVS 22RST0 ML80 SATA LF F W 04 01G04 KH 08008 033 HDD SATA 120G 5400RPM HGST HTS541612J9SA00 SURUGA B LF F W C70P KH 12007 010 HDD SATA 120G 5400RPM SEAGATE ST9120822AS SATA 8MB LF 3 ALD KH 12001 031 HDD SATA 120G 5400RPM TOSHIBA MK1237GSX Gemini BS SATA LF F W DL130J KH 12004 006 HDD SATA 120G 5400RPM WD WD1200BEVS 22RST0 ML80 SATA LF...

Страница 109: ...ISH KB INT00 042 KEYBOARD 14_15KB FV2 89KS WHITE SPANISH KB INT00 043 KEYBOARD WHITE 15 4 SLOVAK KB INT00 045 KEYBOARD WHITE 15 4 SLO CRO KB INT00 046 KEYBOARD 14_15KB FV2 88KS WHITE RUSSIAN KB INT00 047 KEYBOARD 14_15KB FV2 89KS WHITE PORTUGUESE KB INT00 048 KEYBOARD 14_15KB FV2 89KS WHITE NORWEGIAN KB INT00 050 KEYBOARD 14_15KB FV2 88KS WHITE KOREAN KB INT00 052 KEYBOARD 14_15KB FV2 93KS WHITE J...

Страница 110: ... INT00 069 LCD ASSY LCD MODULE 15 4 IN WXGA GLARE W ANTENNA CCD 6M AHE02 003 LCD 15 4 WXGAG LPL LP154WX4 TLB2 G 8ms 220nits Nanking LK 15408 025 LCD 15 4 WXGAG CMO N154I2 L05 Glare 220nits 8ms 0 6mm Asahi LK 1540D 017 LCD 15 4 WXGAG AUO B154EW02 V7 G 8ms 220nits HW0A LK 15405 021 LCD 15 4 WXGAG AUO B154EW02 V7 HW1A 154 WX G 0FA LK 15405 023 LCD 15 4 WXGAG AUO B154EW08 V1 LK 15405 025 LCD 15 4 WXGA...

Страница 111: ...5405 025 LCD 15 4 WXGAG SAMSUNG LTN154AT01 001 G 220nits 8ms LK 15406 021 INVERTER BOARD 15 4 19 AHE02 001 LCD WIRESET 15 4 50 AHE02 006 LCD COVER ASSY 15 4 IN LOGO W MIC W ANTENNA 60 AHE02 007 LCD BEZEL ASSY 15 4 FOR W O CCD FUNCTION 60 AH902 003 LCD BRACKET SET R L 15 4 33 AHE02 003 MAINBOARD MAINBOARB GM965 UMA W CARD READER_EXPRESS CARD W O CPU MEMORY MB AHE02 001 MAINBOARB PM965 DISCRETE W CA...

Страница 112: ...HE02 007 ANTENNA L 15 4 50 AHE02 008 MIC SET 15 4 23 AHE02 004 ACCESSORY REMOTE CONTROLLER EU LZ 20400 004 REMOTE CONTROLLER TS LZ 20400 005 REMOTE CONTROLLER SC LZ 20400 006 REMOTE CONTROLLER EN LZ 20400 007 MISCELLANEOUS THERMAL DOOR FRONT RUBBER 15 4 47 AHE02 005 THERMAL DOOR RUBBER 15 4 47 AHE02 006 LOWER CASE RUBBER 15 4 47 AHE02 007 THERMAL PAD 47 AHE02 008 NAMEPALTE AS5720 40 AHE02 001 NAME...

Страница 113: ...M2 5 12 NL 86 AHE02 003 SCREW M2 2 2 86 AHE02 004 SCREW M2 3 NL 86 AHE02 005 SCREW M2 5 Ni NL 86 AHE02 006 SCREW M 2 5D 3 2L K 6D NI 86 AHE02 007 SCREW M M 2 0D 3L K 5D NI 86 AHE02 008 SCREW F 4 5L K 4 5D ZK NL CR3 86 AHE02 009 SCREW M2 5 K 5 2X0 85 4 NL R00 86 AHE02 010 Category No Part Name and Description Acer Part No ...

Страница 114: ......

Отзывы: