Chapter 3
47
4.
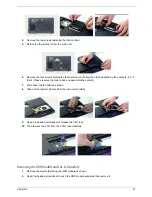
Remove the two screws fastening the thermal door.
5.
Detach the thermal door from the main unit.
6.
Remove the four screws holding the thermal module. (Follow the order indicated by the numbers: 4, 3, 2
then1. Please reverse the order when you assemble the system).
7.
Disconnect the fan cablle as shown.
8.
Take out the thermal module from the main unit carefully.
9.
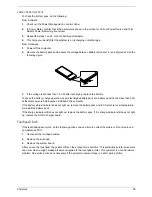
Use a flat headed screwdriver to release the CPU lock.
10.
Then remove the CPU from the CPU socket carefully.
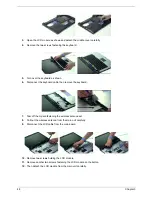
Removing the ODD Module and the LCD module
1.
Remove the screws fastening the ODD module as shown.
2.
Use a flat headed screwdriver to push the ODD module outwards then remove it.
Содержание Aspire 5500
Страница 6: ...VI ...
Страница 14: ...6 Chapter 1 JP23 Modem Cable Connector JP39 ODD Connector ...
Страница 36: ...28 Chapter 1 ...
Страница 48: ...40 Chapter 2 ...
Страница 57: ...Chapter 3 49 ...
Страница 81: ...Chapter 5 73 JP19 RJ11 RJ45 JP31 DDR2 Socket JP23 Modem Cable Connector JP39 ODD Connector ...
Страница 82: ...74 Chapter 5 ...
Страница 84: ...76 Chapter 6 Exploded Diagram The System 011 012 013 ...
Страница 85: ...Chapter 6 77 Upper Case Assembly ...
Страница 86: ...78 Chapter 6 Lower Case Assembly ...
Страница 87: ...Chapter 6 79 LCD Module ...
Страница 88: ...80 Chapter 6 HDD Module ODD Module ...
Страница 103: ...Index 104 ...

