


4-12
Troubleshooting
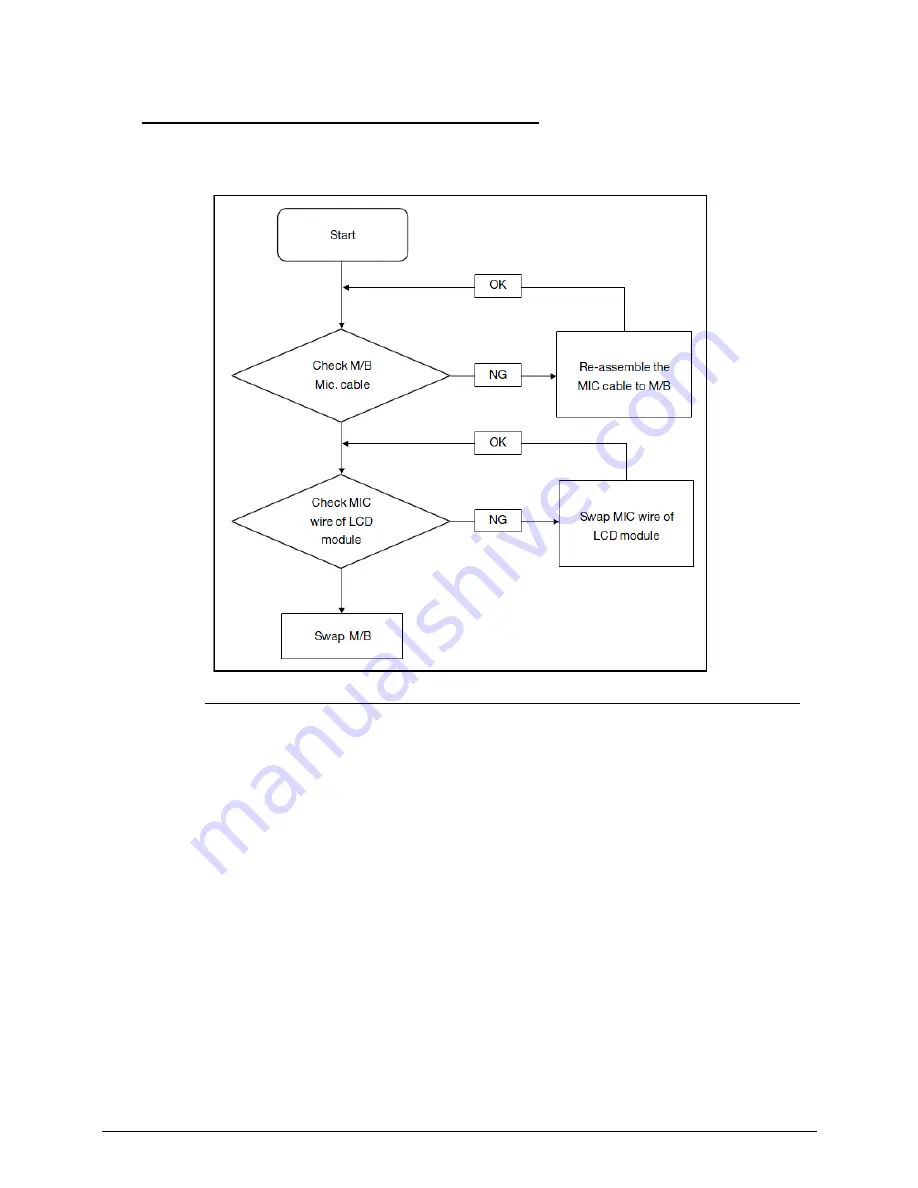
Microphone Failure
0
If internal or external Microphones fail, perform the following, one at a time.
Figure 4-7.
Microphone Failure
1.
Check that the microphone is enabled. Navigate to Start
Control Panel
Hardware
and Sound
Sound and select the
Recording
tab.
2.
Right click on the
Recording
tab and select
Show Disabled Devices
(clear by
default). The microphone appears on the
Recording
tab.
3.
Right click on the microphone and select
Enable
.
4.
Select the microphone then click
Properties
. Select the
Levels
tab.
5.
Increase the volume to the maximum setting and click
OK
.
6.
Test the microphone hardware:
Select the microphone and click
Configure
.
Select
Set up microphone
.
Select the microphone type from the list and click
Next
.
Follow the on-screen prompts to complete the test.
7.
If the Issue is still not resolved, refer to
Online Support Information
.
Содержание Aspire 4743
Страница 1: ... Aspire 4743 4743G 4743Z 4743ZG SERVICEGUIDE ...
Страница 10: ...10 ...
Страница 11: ...CHAPTER 1 Hardware Specifications ...
Страница 14: ...1 4 ...
Страница 32: ...1 22 Hardware Specifications and Configurations System Block Diagram Figure 1 10 System Block Diagram ...
Страница 50: ...1 40 Hardware Specifications and Configurations ...
Страница 51: ...CHAPTER 2 System Utilities ...
Страница 70: ...2 20 System Utilities ...
Страница 71: ...CHAPTER 3 Machine Maintenance ...
Страница 74: ...3 4 ...
Страница 82: ...3 12 Machine Maintenance 4 Lift the base door to remove Figure 3 9 Base Door ...
Страница 85: ...Machine Maintenance 3 15 6 Detach the bracket from the HDD Figure 3 14 HDD Bracket ...
Страница 87: ...Machine Maintenance 3 17 4 Pull the WLAN module out of the slot Figure 3 17 WLAN Module ...
Страница 95: ...Machine Maintenance 3 25 8 Open the connector latch then detach cable to remove keyboard Figure 3 30 Keyboard ...
Страница 100: ...3 30 Machine Maintenance 6 Lift the speakers from the upper cover Figure 3 40 Speaker Cable ...
Страница 106: ...3 36 Machine Maintenance 4 Lift the USB board from the lower cover Figure 3 50 USB Board ...
Страница 113: ...Machine Maintenance 3 43 4 Remove the thermal module from the mainboard Figure 3 62 Thermal Module Screws ...
Страница 136: ...3 66 Machine Maintenance 3 Secure the bezel with the two 2 screw covers Figure 3 102 LCD Bezel Screw Covers ...
Страница 151: ...Machine Maintenance 3 81 3 Connect and lock the touchpad cable to the touchpad board Figure 3 128 Touchpad Cable ...
Страница 156: ...3 86 Machine Maintenance 5 Connect the speaker cable to the power button board Figure 3 137 Speaker Cable ...
Страница 172: ...3 102 Machine Maintenance Remove the Dummy Card 0 1 Insert the dummy card into the slot until it clicks into place ...
Страница 174: ...3 104 Machine Maintenance ...
Страница 175: ...CHAPTER 4 Troubleshooting ...
Страница 207: ...CHAPTER 5 Jumper and Connector Locations ...
Страница 208: ...2 2 Clearing Password Check and BIOS Recovery 5 5 Clearing Password Check 5 5 Performing a BIOS recovery 5 6 ...
Страница 215: ...CHAPTER 6 FRU List ...
Страница 216: ...6 2 Aspire 4743 4743G 4743Z 4743ZG Exploded Diagrams 6 4 Main Assembly 6 4 LCD Assembly 6 5 ...
Страница 234: ...6 20 FRU List ...
Страница 235: ...CHAPTER 7 Model Definition and Configuration ...
Страница 236: ...7 2 Aspire 4743 4743G 4743Z 4743ZG 7 3 ...
Страница 270: ...7 36 Model Definition and Configuration ...
Страница 338: ...7 104 Model Definition and Configuration ...
Страница 339: ...CHAPTER 8 Test Compatible Components ...
Страница 340: ...8 2 Microsoft Windows 7 Environment Test 8 4 ...
Страница 351: ...CHAPTER 9 Online Support Information ...
Страница 352: ...9 2 Introduction 9 3 ...
Страница 354: ...9 4 Online Support Information ...


