background image

 Peripherals and options

56

En

glish

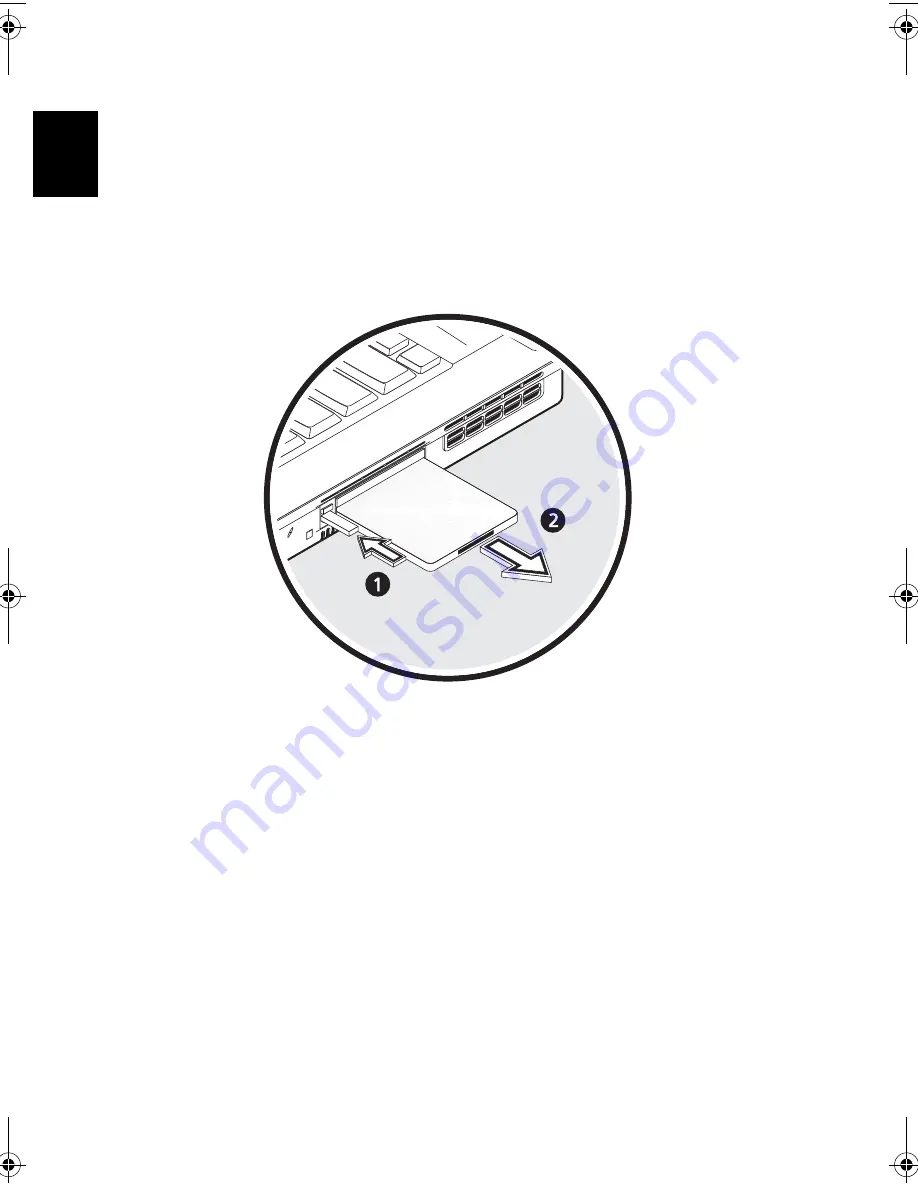
To remove a PC card:

1

Close the application that is using the PC card.

2

Double click on the PC card icon on the taskbar, and then select the option to 
safely remove the card. Wait for the message telling you that it is now safe to 
remove the card.

3

Press the PC card eject button to partially eject the card from the slot (1).

4

Pull the card from the slot (2).  

As1600_E.book  Page 56  Thursday, January 16, 2003  11:01 AM

Содержание Aspire 1600 series

Страница 1: ...Acer Aspire 1600 series User s guide ...

Страница 2: ...ed on the label affixed to your computer All correspondense concerning your unit should include the serial number model number and purchase information No part of this publication may be reproduced stored in a retrieval system or transmitted in any form or by any means electronic mechanical photocopy recording or otherwise without the prior written permission of Acer Incorporated Model Number ____...

Страница 3: ...ad basics 21 Launch keys 23 Storage 25 Inserting and ejecting a diskette 25 Ejecting the optical drive tray 26 Emergency ejection of the optical drive tray 28 Connectivity options 29 Ethernet and LAN 29 Fax data modem 29 Audio 31 Adjusting the volume 31 Securing your computer 32 Security slot 32 Passwords 32 Operating on battery power 35 Battery pack 37 Battery pack characteristics 37 Installing a...

Страница 4: ...oving with your computer 63 Disconnecting from the desktop 65 Moving around 66 Preparing the computer 66 What to bring to short meetings 66 What to bring to long meetings 66 Taking the computer home 67 Preparing the computer 67 What to bring with you 67 Special considerations 67 Setting up a home office 68 Traveling with the computer 69 Preparing the computer 69 What to take with you 69 Special co...

Страница 5: ...glish BIOS Utility 74 Information 75 Main 77 Advanced 78 Security 83 Boot 85 Exit 86 Troubleshooting 89 Frequently asked questions 91 Error messages 94 Appendix A Specifications 99 Appendix B Notices 103 Index 113 ...

Страница 6: ...vi English ...

Страница 7: ...re information on our products services and support please visit our web site www global acer com The Just for starters poster shows you how to set up your computer This User s Guide provides clear and concise information on using your computer productively You are advised to read it thoroughly and keep it handy for future reference ...

Страница 8: ... Turning your computer on and off To turn on your computer open the lid 1 2 and press the power button 3 above the keyboard To turn the power off you can do any of the following Click on the Start button in Windows and then select Shut Down on the popup menu ...

Страница 9: ...the usual way press and hold the power switch for more than four seconds You should then wait at least two seconds before turning the computer on again Taking care of your computer Your computer will serve you well if you take care of it Do not expose the computer to direct sunlight Do not place it near sources of heat such as a radiator Do not expose the computer to temperatures below 0 C 32 F or...

Страница 10: ...total ampere ratings of equipment plugged into a power strip should not exceed the ampere rating for that power strip Taking care of your battery pack It is also important that you look after your computer s battery pack Use the correct battery model for your computer Do not use other kinds of batteries Turn the power off before removing or replacing the battery Do not tamper with the battery Keep...

Страница 11: ...xi English English You spill liquid on the computer The computer does not operate normally ...

Страница 12: ...xii English ...

Страница 13: ...Getting familiar with your computer ...

Страница 14: ...k computer combines solid performance versatility multimedia capabilities and portability with a stylish design Increase your productivity by working wherever you are This chapter provides an in depth tour of your computer s features ...

Страница 15: ...omputer as illustrated in the Just for starters poster take a few minutes to explore the unit Top view Item Description 1 Display Large liquid crystal display LCD provides visual output 2 Status indicators Light emitting diodes LED that show the status of the computer and its components ...

Страница 16: ...ng typed data 6 Touchpad Touch sensitive pad that functions like a computer mouse 7 Click buttons scroll key Right and left buttons that provide the same functions as the buttons on a computer mouse The scroll key scrolls the contents of a window up and down left and right 8 Palm rest Provides a comfortable platform for your hands when typing on the keyboard 9 Launch keys Buttons that can be progr...

Страница 17: ...ing diode LED that indicates when an optical disc is being read 3 Optical drive Depending on your model the optical drive is one of the following CD ROM drive for reading CDs DVD ROM drive for reading CDs and DVDs DVD CD RW combo drive for reading CDs and DVDs and writing to CD Rs and CD RWs 4 Eject button Ejects the optical drive tray from the drive 5 Latch Locks and releases the lid ...

Страница 18: ...oppy disk eject button Press the eject button to remove a diskette from the floppy disk drive 4 Kensington lock slot For attaching a security connector 5 IEEE 1394 port Port for connecting IEEE 1394 devices 6 Line out jack Connects headphones or external speakers for audio output 7 Line in jack Connects an external microphone for audio input 8 Volume control Controls the volume of the speakers 9 S...

Страница 19: ...Description 1 Speaker Delivers stereo audio output 2 PC card eject button Press the eject button to remove a PC card from the PC card slot 3 PC card slots The slots supports two standard Type II or one Type III PC card PCMCIA or CardBus ...

Страница 20: ...eo port Connects to a television or dislay device with S video input 3 External display port Connects an external VGA display monitor 4 Modem jack Connects the built in fax data modem to a phone line 5 Network jack Connects the computer to an Ethernet 10 100 based network 6 USB ports 4 ports for connecting USB devices ...

Страница 21: ... battery 3 Battery lock unlock latch Use to lock and unlock the battery bay 4 Optical media bay Houses the removable optical media drive module e g CD ROM DVD ROM or DVD CD RW combo drive 5 Optical media bay release latch Unlatches the optical media drive for removal or swapping 6 Memory compartment Removable cover provides access to the memory slots for upgrading the computer s memory ...

Страница 22: ...tereo speakers Audio input and output jacks Connectivity Integrated 10 100Mbps Ethernet connection Built in 56Kbps fax data modem 4 universal serial bus USB ports 2 0 1 IEEE 1394 4 pin port Human centric design and ergonomics All in one design incorporating hard drive optical drive and floppy disk drive Rugged yet extremely portable construction Stylish appearance Full size keyboard with 4 program...

Страница 23: ...omputer features an ATI accelerated graphics port AGP with 32 64 MB video memory This provides a robust solution while enabling high quality video output Simultaneous display Your computer s large display combined with its multimedia capabilities makes it ideally suited to delivering presentations You can also connect an external monitor or projector and then choose to use the computer s LCD panel...

Страница 24: ...e indicators show the status of the computer and its components The indicators located above the keyboard provide the following status information Icon Function Description Wireless Communication Lights when the Wireless LAN capabilities are enabled Power Lights when the computer is on Sleep Lights when the computer enters Sleep mode Media Activity Lights when the floppy drive hard disk or optical...

Страница 25: ...13 English English Battery Charge Lights when the battery is being charged Caps Lock Lights when Caps Lock is activated Num Lock Lights when Num Lock is activated Icon Function Description ...

Страница 26: ...k When Caps Lock is on all alphabetic characters are typed in uppercase Toggle on and off by pressing the Caps Lock key on the left side of the keyboard Num Lock When Num Lock is on the embedded numeric keypad can be used Toggle on and off by pressing the Fn F11 keys simultaneously Scroll Lock When Scroll Lock is on the screen toggles up or down one line at a time when the up and down cursor contr...

Страница 27: ...d on the following actions are possible Desired Access Num lock On Num lock Off Number keys on embedded keypad Type numbers using embedded keypad in the normal way Cursor control keys on embedded keypad Hold down the Shift key while using the cursor keys on the embedded keypad Hold Fn key while using cursor control keys Main keyboard keys Hold down the Fn key while typing letters using the embedde...

Страница 28: ...launches the Start menu It can also be used with other keys to provide a variety of functions Tab activates the next Taskbar button E opens the My Computer window F1 opens Help and Support F opens the Find All Files dialog box M minimizes all windows Shift M undoes the minimize all windows M action R opens the Run dialog box Applications key This key has the same effect as clicking the right mouse...

Страница 29: ...the following hot keys Hot key Function Description Fn F1 Hot Key Help Displays help on hot keys Fn F2 System Properties Accesses the computer s system properties Fn F3 Power Scheme Toggle Switches the power management scheme used by the computer function available if supported by operating system Fn F4 Sleep Puts the computer in Sleep mode Fn F5 Display Toggle Switches display output between the ...

Страница 30: ...uro key Fn F6 Screen Blank Turns the display screen backlight off to save power Press any key to return Fn F7 Touchpad Toggle Turns the internal touchpad on and off Fn F8 Speaker Toggle Turns the speakers on and off Fn Brightness up Increases the screen brightness Fn Brightness down Decreases the screen brightness Hot key Function Description ...

Страница 31: ... English Keyboard ergonomics The wide palm rest area provides a comfortable platform for your hands when typing on the keyboard The ergonomic design enables you to adopt a relaxed yet very efficient typing style ...

Страница 32: ...nt on its surface The cursor responds to your finger movements on the touchpad In addition the two click buttons provide the same functionality as a computer mouse while the scroll key enables easy scrolling in documents and web pages The touchpad is located in the middle of the palm rest area providing maximum comfort and efficiency ...

Страница 33: ...4 way scroll 2 key top bottom left right to scroll a page up down left or right This button mimics your cursor pressing on the vertical and horizontal scroll bars of Windows applications Function Left button Right button 4 way scroll key Tap Execute Click twice quickly Tap twice at the same speed as double clicking a mouse button Select Click once Tap once Drag Click and hold then use finger to dr...

Страница 34: ...y The touchpad is sensitive to your finger movements the lighter your touch the better the response Tapping hard will not increase the touchpad s responsiveness Access context menu Click once Scroll Click and hold the button in the desired direction up down left right Function Left button Right button 4 way scroll key Tap ...

Страница 35: ...ation and key 2 is used to launch the Internet browser Keys 3 4 and 5 start the Launch Manager application The Wireless LAN button cannot be set by the user it is used to turn the function on and off To set the other launch keys run the Acer Launch Manager Description Default application Wireless LAN 802 11a 802 11b wireless LAN Optional Email Launches your email application Web browser Launches y...

Страница 36: ...Getting familiar with your computer 24 English P2 User programmable P3 User programmable Description Default application ...

Страница 37: ... drive Depending on your model you have a CD ROM DVD ROM or DVD CD RW combo drive The optical drive provides increased storage capacity as well as offering a host of multimedia possibilities See the section entitled A tour of your computer on page 3 for the locations of these drives Inserting and ejecting a diskette To insert a diskette in the floppy disk drive Push the diskette into the drive Mak...

Страница 38: ...ed and partially pop out of the drive Pull the diskette from the drive Ejecting the optical drive tray To eject the optical drive tray With the computer turned on press the optical drive eject button The tray will be released and partially pop open Gently pull the tray out to its limit To load an optical disc ...

Страница 39: ... drive is set to a region code it will play DVD discs of that region only You can set the region code a maximum of five times including the first time after which the last region code set will remain permanent Recovering your hard disk does not reset the number of times the region code has been set Refer to the table below for DVD movie region code information Note To change the region code insert...

Страница 40: ...h Emergency ejection of the optical drive tray If you need to eject the optical drive tray when the computer is turned off push a straightened paper clip into the optical drive emergency eject hole The tray will be released and partially pop open ...

Страница 41: ...mputer s network jack and then connect the other end to a network jack or hub on your network See Windows Help for information on setting up a network connection Fax data modem Your computer features a built in fax data modem enabling you to communicate over a phone line This means that you can connect to the Internet via a dialup account with an ISP log in to your network from a remote location o...

Страница 42: ...Getting familiar with your computer 30 English To use the fax data modem plug a phone cable into your computer s modem jack and then connect the other end to a telephone jack ...

Страница 43: ... connected See A tour of your computer on page 3 for the location of the audio ports For information on connecting external devices see Audio devices on page 54 in the section entitled Peripherals and options on page 45 Adjusting the volume Ajusting the volume on the computer is easy with a rotary volume control knob on the left panel Turn the knob in the appropriate direction 1 to increase the vo...

Страница 44: ...object such as a drawer handle on a file cabinet or a table leg Insert the lock into the slot on the computer turn it 90 and then lock it in place Passwords Passwords protect your computer from unauthorized access When set no one can access the computer without entering the correct password There are three types of passwords you can set Supervisor Password secures your computer against unauthorize...

Страница 45: ...Important Do not forget your Setup and Hard Disk password If you forget your password please get in touch with your dealer or an authorized service center Setting a password You can set the password using the BIOS Utility ...

Страница 46: ...Getting familiar with your computer 34 English ...

Страница 47: ...Operating on battery power ...

Страница 48: ...ur Aspire 1600 series notebook computer operates on battery or AC power This chapter provides information for operating on battery power as well as information on how your computer manages and saves power ...

Страница 49: ...ry will come in handy when you travel or during a power failure It is advisable to have an extra fully charged battery pack available as backup Maximizing the battery s life Like all other batteries your computer s battery will degrade over time This means that the battery s performance will diminish with time and use To maximize your battery s life you are advised to adhere to the recommendations...

Страница 50: ... useful lifespan of the battery is adversely affected by the following usage patterns Using the computer on constant AC power with the battery inserted If you want to use constant AC power you are advised to remove the battery pack after it is fully charged Not discharging and recharging the battery to its extremes as described above Frequent use the more you use the battery the faster it will rea...

Страница 51: ...39 English English 2 Slide the battery into the battery bay 1 and gently push until the battery clicks in place 2 To secure the battery slide the battery lock unlock latch to the lock position 3 ...

Страница 52: ...t it is correctly installed in the battery bay Plug the AC adapter into the computer and connect to a mains power outlet You can continue to operate your computer on AC power while your battery is charging However charging the battery with the computer turned off results in a significantly faster charge time Note You are advised to charge the battery before retiring for the day Allowing the batter...

Страница 53: ...is 10 C to 30 C Higher temperatures cause the battery to self discharge faster Excessive recharging decreases the battery life Look after your AC adapter and battery See Taking care of your AC adapter on page x and Taking care of your battery pack on page x Battery low warning When using battery power pay attention to the Windows Power Meter Warning Connect the AC adapter as soon as possible after...

Страница 54: ...3 Shut down the operating system to turn off the computer 4 Replace the battery pack 5 Turn on the computer and resume work The AC adapter or a power outlet is unavailable You have no spare battery pack 1 Save all necessary files 2 Close all applications 3 Shut down the operating system to turn off the computer Situation Recommended Action ...

Страница 55: ...is detected for a period of time the settings are controlled in Windows Power Management the computer turns off some or all of these devices in order to conserve power Your computer employs a power management scheme that supports ACPI Advanced Configuration and Power Interface enabling maximum power conservation without compromising system performance ACPI allows Windows to control the amount of p...

Страница 56: ...Operating on battery power 44 English ...

Страница 57: ...Peripherals and options ...

Страница 58: ...erals to expand your system It also describes how to upgrade key components to enhance system performance and keep your computer in step with the latest technology You are advised to consult your dealer for information on peripherals In addition make sure that you read the manuals and other documentation provided with new hardware ...

Страница 59: ... computer s external display port See the section entitled Display for information on using the computer s simultaneous display and multi display features Use the Fn F5 hot key to toggle the display setting between the computer s LCD panel and the external display device See Hot keys for more information ...

Страница 60: ... options 48 English S video The S video port allows you to output to a television or display devices that support S video input This is important if you want to do some presentations or watch movies on a bigger screen ...

Страница 61: ...addition the USB ports can be used to connect many other peripheral devices such as digital cameras printers and scanners See Expansion devices for more information on connecting USB devices External keyboard Your computer features a full size keyboard However if you prefer you can connect an external keyboard to one of your computer s USB ports This enables you to enjoy the ...

Страница 62: ...hen inputting typed data on your notebook computer External keypad Your computer features an embedded keypad that when combined with the Num Lock feature enables you to easily input typed numeric data Alternatively you can connect a 17 key numeric keypad to one of your computer s USB ports This enables ...

Страница 63: ...51 English English you to enjoy the benefits of a numeric keypad without interfering with your use of the computer s keyboard for typing text ...

Страница 64: ...pointing device Your computer features a sensitive touchpad pointing device with two click buttons and a scroll key However if you prefer to use a conventional mouse or other pointing device you can connect it to one of your computer s USB ports ...

Страница 65: ...he necessary drivers in Windows Operating instructions To use a USB printer simply connect the device to one of your computer s USB ports and then wait for Windows to find the new hardware To connect a parallel printer first shut down the operating system Connect the printer to the parallel port and then restart the computer Wait for Windows to find the new hardware ...

Страница 66: ...ition to the integrated devices the two audio ports on the left side of the unit enable you to connect external audio input and output devices You can plug an cd player into your computer s line in jack This offers the convenience of greater freedom of movement as well as improved audio input quality Connect external speaker to the line out jack for improved audio output quality ...

Страница 67: ...card options for your computer Note Refer to your card s manual for details on how to install and use the card To insert a PC card 1 Align the card with your computer s PC card slot Make sure that the edge with the connectors is facing the slot and that the card is the right way up Many cards are marked with an arrow to help you insert them correctly 2 Slide the card into the slot and then push ge...

Страница 68: ...the PC card 2 Double click on the PC card icon on the taskbar and then select the option to safely remove the card Wait for the message telling you that it is now safe to remove the card 3 Press the PC card eject button to partially eject the card from the slot 1 4 Pull the card from the slot 2 ...

Страница 69: ...oard keypad mouse or printer Other common USB devices include digital cameras scanners and external storage devices USB is plug and play which means that you can connect and start using a USB device without having to restart your computer You can also disconnect the device at any time A further advantage of USB is the ability to use USB hubs This means that several devices can share a USB port sim...

Страница 70: ...Peripherals and options 58 English IEEE 1394 devices The computer s fast IEEE 1394 port allows you to connect IEEE 1394 supported devices like a digital video camera ...

Страница 71: ... computer This greatly increases your productive range when you are on the move AC adapter Having a spare AC adapter allows you to keep one in two different places For example you could have one AC adapter at home and another at work This means that you don t have to carry an AC adapter when traveling between your two base locations ...

Страница 72: ...t your authorized dealer if you decide to perform a key component upgrade Memory upgrade Your computer features two memory slots that accept soDIMMs Small Outline Dual Inline Memory Modules The memory slots support PC 2100 2700 266 333 MHz DDR Double Data Rate The memory slots are easily accessible allowing you to upgrade your computer s memory To install memory 1 Turn off the computer Make sure t...

Страница 73: ...61 English English 2 Turn the computer over to access the memory compartment on the bottom of the unit Remove the screw from the memory compartment door and then lift the door off ...

Страница 74: ...ry compartment door and fasten the screw The computer automatically detects the new module and reconfigures the memory Hard disk upgrade It is possible to replace your hard disk with a higher capacity drive when you need more storage space Your computer uses a 9 5mm 2 5 inch Enhanced IDE hard disk Consult your dealer if you need to perform a hard disk upgrade ...

Страница 75: ...Moving with your computer ...

Страница 76: ...Your Aspire 1600 series notebook computer is ideal for taking with you when you move around This chapter provides tips on things to consider when traveling with your computer ...

Страница 77: ...ons 2 Shut down Windows to turn off your computer 3 Unplug the AC adapter from the mains outlet and then disconnect it from the computer 4 Disconnect any external devices such as a keyboard mouse or printer that are attached to your computer 5 If you are using a security lock cable disconnect the lock from the computer 6 Pack your computer in a strong waterproof bag or case ...

Страница 78: ...your computer again open the lid and then press the power button to bring it out of Standby mode What to bring to short meetings If your battery is fully charged you probably won t need to take anything else with you to the meeting What to bring to long meetings For longer meetings take along the AC adapter You can use mains power throughout the meeting or you can run down your battery first and t...

Страница 79: ...ge to the screen What to bring with you If you don t have spare items at home it is advisable to take along the AC adapter and this User s Guide Special considerations To protect your computer in transit it is advisable to pay attention to the following Minimize the effect of temperature changes Keep your computer with you instead of placing it in storage holds Avoid leaving your computer in a hot...

Страница 80: ...computer at home as well as at work it may be worthwhile purchasing a second AC adapter This will allow you to travel lighter as you can keep an AC adapter in each location You might also find it worthwhile keeping a second set of peripherals at home such as a keyboard keypad mouse and printer ...

Страница 81: ... with you AC adapter Spare fully charged battery packs Additional printer driver files if you plan to use another printer Phone and network cables if you plan to use the computer s modem and network connections Special considerations In addition to the considerations for taking your computer home keep the following in mind Always take your computer as carry on luggage If possible have your compute...

Страница 82: ... you plan to use the computer s modem and network connections Check that your modem is suitable for the telephone system in the countries you plan to visit You might have to use a PC card modem in some locations Special considerations In addition to the considerations for normal travel with your computer keep the following in mind when traveling internationally Check that your power cord is suitab...

Страница 83: ...Software ...

Страница 84: ...Your Aspire 1600 series notebook computer includes system utilities This chapter provides information on the important software that comes with your computer ...

Страница 85: ...ick on the Start button Next select the appropriate folder and then click on the application icon To learn about the software and utility make use of the online help provided by the software Launch Manager Launch Manager allows you to set the launch keys located above the keyboard See Launch keys on page 23 for the location of the launch keys You can access the Launch Manager by clicking on Start ...

Страница 86: ...this utility However you may need to change the BIOS settings if you encounter configuration problems in the future Refer to Troubleshooting if a problem arises Navigating the BIOS Utility These are the menu options Information Main Advanced Security Boot and Exit To enter a menu highlight the item using the keys Within a menu navigate through the BIOS Utility by following these instructions Press...

Страница 87: ...rmation screen displays a summary of your computer hardware information Note The screen above is for reference only Actual values may differ The table below describes the parameters in this screen Parameter Description CPU Type Describes the type of CPU installed in the system CPU Speed Shows the speed of the CPU System Memory Shows the system memory size Total Memory Shows the total memory size ...

Страница 88: ... system BIOS version VGA BIOS Version Shows the video graphics accelerator BIOS version KBC Version Shows the current keyboard controller KBC version Serial Number Shows the system serial number Asset Tag Number Shows the asset tag number Product Name Shows the product name Manufacture Name Shows the name of the manufacturer UUID Shows the universally unique identifier number Parameter Description...

Страница 89: ...e second System Date Sets the system date Format MM DD YYYY month day year Boot Display Sets the display device when the computer starts up Options Simultaneous or Auto Screen Expansion When enabled the screen will automatically adjust the display image to fit the screen when the resolution is set to 640x480 Options Enabled or Disabled QuickBoot Mode Quick Boot allows your computer to skip certain...

Страница 90: ...tions Enabled or Disabled Hotkey Beep When enabled the computer gives off a beep when a hotkey key combination is pressed See Hotkeys on page 17 for more details Option Enabled or Disabled Auto Dim When enabled the system will automatically dim the LCD screen when system is running on battery power Option Enabled or Disabled F12 Multi Boot When enabled the Fn F12 for multi boot message will be dis...

Страница 91: ...sub menu Secondary Master Shows the Secondary Master information Press Enter to access the sub menu PCI IRQ Routing Press Enter to access and set the PCI IRQ Routing sub menu Resume on LAN Modem Access When enabled resume activity upon access from LAN Options Enabled or Disabled Reset Configuration Data Select Yes to clear the extended system configuration data ESCD Options No or Yes System Boot F...

Страница 92: ...u contains parameters related to the primary hard disk Caution The parameters in this screen are for advanced users only Typically you do not need to change the values in this screen The default setting of Auto optimizes all the settings for your hard disk drive ...

Страница 93: ...ns parameters related to the optical drive installed in your system Caution The parameters in this screen are for advanced users only Typically you do not need to change the values in this screen The default setting of Auto optimizes all the settings for your optical drive ...

Страница 94: ...e PCI IRQ Routing sub menu allows you to set the IRQs for PCI devices Caution The parameters in this screen are for advanced users only Typically you do not need to change the values in this screen because these values are already optimized ...

Страница 95: ...t this password protects the BIOS Utility from unauthorized entry Press Enter to set this password Set User Password When set this password protects the computer from unauthorized entry during boot up Press Enter to set this password Password on Boot When enabled a password is requested when the system boots up Options Enabled or Disabled Set Primary Hard Disk Password When set this password preve...

Страница 96: ...s A Z a z 0 9 Important Be very careful when typing your password because the characters do not appear on the screen 3 Retype the password to verify your first entry and press Enter After setting the password the computer automatically enables the chosen password parameter and a dialog box appears confirming the changes 4 Press Esc to return to the previous menu Processor Serial Number The process...

Страница 97: ...sword Retype your new password to verify your first entry Removing a password To remove a password follow step 1 in Setting a password on page 84 Enter the current password then leave the Enter New Password and Cofirm New Password blank Boot The Boot menu contains parameter values that determine in what order the bootable devices in your computer startup ...

Страница 98: ... see Advanced on page 78 then change the boot sequence to make D2D Recovery the first in the list The D2D Recovery option is not available if System Boot From Hard Disk Recovery is disabled Exit This menu contains the exit options Parameter Description Exit Saving Changes Saves your changes and exits the BIOS Utility Exit Discarding Changes Discards your changes and exits the BIOS Utility Load Set...

Страница 99: ...87 English English Discard Changes Discards your changes Save Changes Saves your changes Parameter Description ...

Страница 100: ...Software 88 English ...

Страница 101: ...Troubleshooting ...

Страница 102: ... system problems Please read it before calling a technician Solutions to more serious problems may require opening the computer Do not attempt to open and service the computer by yourself Contact your dealer or an authorized service center for assistance ...

Страница 103: ...the Windows startup disk and then press Ctrl Alt Del to restart the system Windows will diagnose your system and make necessary fixes Nothing appears on the screen The computer s power management system automatically blanks the screen to save power Press any key to turn the display back on If pressing a key does not turn the display back on check the following The brightness level might be too low...

Страница 104: ... eject the optical drive tray with my computer turned off The computer needs to be turned on for the optical drive eject button to function If you need to eject the optical drive tray when the computer is turned off push a straightened paper clip into the optical drive emergency eject hole See Ejecting the optical drive tray on page 26 for more information The keyboard does not respond Try attachi...

Страница 105: ...eaning kit The printer does not work Check the following Make sure that the printer is connected to a power outlet and it is turned on Check that the cable is properly connected to the appropriate ports on both the computer and the printer I want to set up my location to use the internal modem Follow these steps Click on Start and then click on Control Panel Double click on Phone and Modem Options...

Страница 106: ...tive Action 0200 Failure Fixed Disk Fixed disk is not working or not configured properly Check to see if fixed disk is attached properly Run Setup Find out if the fixed disk type is correctly identified 0210 Stuck key Stuck key on keyboard 0211 Keyboard error Keyboard not working 0212 Keyboard Controller Failed Keyboard controller failed test May require replacing keyboard controller 0213 Keyboard...

Страница 107: ...lt values and offers to run Setup If the failure was caused by incorrect values and they are not corrected the next boot will likely fail On systems with control of wait states improper Setup settings can also terminate POST and cause this error on the next boot Run Setup and verify that the wait state configuration is correct This error is cleared the next time the system is booted 0281 Memory Si...

Страница 108: ...he memory test Each 1 one in the map indicates a failed bit See errors 230 231 or 232 above for offset address of the failure in System Extended or Shadow memory Invalid System Configuration Data Problem with NVRAM CMOS data I O device IRQ conflict I O device IRQ conflict error One or more I2O Block Storage Devices were excluded from the Setup Boot Menu There was not enough room in the IPL table t...

Страница 109: ... it cannot locate the address it displays nnnn Press F1 to resume F2 to Setup F3 for previous Displayed after any recoverable error message Press F1 to start the boot process or F2 to enter Setup and change the settings Press F3 to display the previous screen usually an initialization error of an Option ROM i e an add on card Write down and follow the information shown on the screen Run the I2O Co...

Страница 110: ...Troubleshooting 98 English ...

Страница 111: ...Appendix A Specifications ...

Страница 112: ...This appendix lists the general specifications of your computer ...

Страница 113: ... Extended Graphics Array XGA resolution or 1400 x 1050 Super Extended Graphics Array SXGA Simultaneous LCD and CRT display Audio 16 bit stereo audio AC 97 Two built in stereo speakers Audio ports for microphone in and headphones Keyboard and pointing device 88 90 key Windows keyboard Ergonomically centered touchpad pointing device I O ports One type III or two type II PC Card slots PCMCIA and Card...

Страница 114: ... H mm Environment Temperature Operating 5 C 35 C Non operating 20 C 65 C Humidity non condensing Operating 20 80 RH Non operating 10 90 RH Operating system Microsoft Windows XP Power 86W 12 cell Li ion battery pack 120 Watt 20V AC adapter auto sensing 100 240Vac 50 60Hz Options 256 512 MB memory upgrade module Additional AC adapter Additional battery pack ...

Страница 115: ...Appendix B Notices ...

Страница 116: ...This appendix lists the general notices for your computer ...

Страница 117: ...ferent from that to which the receiver is connected Consult the dealer or an experienced radio television technician for help Notice Shielded cables All connections to other computing devices must be made using shielded cables to maintain compliance with FCC regulations Notice Peripheral devices Only peripherals input output devices terminals printers etc certified to comply with the Class B limit...

Страница 118: ... affect the proper functioning of your equipment If they do you will be notified in advance to give you an opportunity to maintain uninterrupted telephone service If this equipment should fail to operate properly disconnect the equipment from the phone line to determine if it is causing the problem If the problem is with the equipment discontinue use and contact your dealer or vendor TBR 21 This e...

Страница 119: ...into the wall outlet does not exceed the fuse rating 9 Never push objects of any kind into this product through cabinet slots as they may touch dangerous voltage points or short out parts that could result in a fire or electric shock Never spill liquid of any kind on the product 10 Do not attempt to service this product yourself as opening or removing covers may expose you to dangerous voltage poi...

Страница 120: ...LA CLASE I ADVERTENCIA RADIACIÓN LÁSER INVISIBLE AL SER ABIERTO EVITE EXPONERSE A LOS RAYOS ADVARSEL LASERSTRÅLING VEDÅBNING SE IKKE IND I STRÅLEN VARO LAVATTAESSA OLET ALTTINA LASERSÅTEILYLLE VARNING LASERSTRÅLNING NÅR DENNA DEL ÅR ÖPPNAD ÅLÅ TUIJOTA SÅTEESEENSTIRRA EJ IN I STRÅLEN VARNING LASERSTRÅLNING NAR DENNA DEL ÅR ÖPPNADSTIRRA EJ IN I STRÅLEN ADVARSEL LASERSTRÅLING NAR DEKSEL ÅPNESSTIRR IK...

Страница 121: ...otection notice This product incorporates copyright protection technology that is protected by method claims of certain U S patents and other intellectual property rights owned by Macrovision Corporation and other rights owners Use of this copyright protection technology must be authorized by Macrovision Corporation and is intended for home and other limited viewing uses only unless otherwise auth...

Страница 122: ...ipment has been tested and found to comply with the limits for a Class B digital device pursuant to Part 15 of the FCC Rules These limits are designed to provide reasonable protection against harmful interference in a residential installation This equipment generates uses and can radiate radio frequency energy and if not installed and used in accordance with the instructions may cause harmful inte...

Страница 123: ...ith Part 15 of the FCC Rules Operation is subject to the following two conditions 1 This device may not cause harmful interference and 2 this device must accept any interference received including interference that may cause undesired operation ...

Страница 124: ...Appendix B Notices 112 English ...

Страница 125: ...rity menu 83 brightness hotkeys 18 C caps lock 14 on indicator 13 care battery pack x computer ix CD troubleshooting 93 charging checking level 41 cleaning computer x computer bringing to meetings 66 caring for ix cleaning x disconnecting 65 features 10 moving around 66 on indicator 12 security 32 setting up a home office 68 taking home 67 traveling internationally 70 traveling on local trips 69 t...

Страница 126: ...ory compartment 9 installing 60 62 upgrade slot 9 upgrading 60 messages error 94 microphone troubleshooting 92 modem setting location 93 mouse connecting externally 52 N notice DVD copyright protection 109 num lock 14 on indicator 13 numeric keypad embedded 15 O optical drive 25 options hard disk upgrade 62 memory upgrade 60 PC Cards 55 spare AC adapter 59 spare battery 59 P palm rest 19 password ...

Страница 127: ...de hotkey 17 software bundled 73 speakers hotkey 18 troubleshooting 92 Standby mode hotkey 17 status indicator 12 status indicators 12 status LCD 12 storage 25 floppy drive 25 hard disk 25 optical drive 25 system properties hotkey 17 T time setting in BIOS Utility 77 top view 3 touchpad 20 hotkey 18 using 21 22 travel international flights 70 local trips 69 U USB connecting 57 utility BIOS Setup 7...

Страница 128: ...116 ...

Отзывы: