3-26
Machine Maintenance Procedures
3.
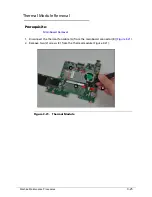
Remove the thermal module from the mainboard as shown in Figure 3-22.
Figure 3-22.
Thermal Module Removal
Thermal Module Installation
0
IMPORTANT
:
+
Apply approved thermal grease and ensure all heat pads are in position
before replacing
module.
CAUTION
:
!
Use caution when applying thermal grease. Thermal grease may cause
damage to the mainboard.
The following thermal grease types are approved for use:
Silmore GP50
Honeywell
Jet Motor 7762
The following thermal pads are approved for use:
Eapus XR-PE
1.
Remove all traces of thermal grease from CPU using a lint-free cloth or cotton swab
and Isopropyl Alcohol, Acetone, or other approved cleaning agent.
2.
Apply small amount of thermal grease to center of CPU.
NOTE:
NOTE
:
Force used during installation of thermal module is sufficient to spread grease
evenly over CPU top.
3.
Install and secure two (2) non-captive screws (C) in numerical order from one (1) to
four (2) to mainboard. Refer to
Figure 3-21
.
4.
Connect thermal module cable (A) to mainboard connector (B). Refer to
Figure 3-21
.
5.
Install mainboard.
Содержание AOHAPPY2
Страница 1: ...Aspire One D257 Happy 2 SERVICEGUIDE ...
Страница 10: ...x ...
Страница 11: ...CHAPTER 1 Hardware Specifications ...
Страница 14: ...1 4 ...
Страница 55: ...CHAPTER 2 System Utilities ...
Страница 81: ...CHAPTER 3 Machine Maintenance Procedures ...
Страница 83: ...3 3 Camera Module Installation 3 40 ...
Страница 84: ...3 4 ...
Страница 107: ...Machine Maintenance Procedures 3 27 ID Size Quantity Screw Type C M2 0 3 0 NI 2 ...
Страница 116: ...3 36 Machine Maintenance Procedures Figure 3 33 LCD Panel ...
Страница 121: ...CHAPTER 4 Troubleshooting ...
Страница 127: ...Troubleshooting 4 7 9 If the issue is still not resolved refer to Online Support Information ...
Страница 128: ...4 8 Troubleshooting LCD Failure 0 If the LCD fails perform the following Figure 4 3 LCD Failure ...
Страница 144: ...4 24 Troubleshooting ...
Страница 145: ...CHAPTER 5 Jumper and Connector Locations ...
Страница 152: ...5 8 Jumper and Connector Locations ...
Страница 153: ...CHAPTER 6 FRU Field Replaceable Unit List ...
Страница 154: ...6 2 Exploded Diagrams 6 4 FRU List 6 7 Screw List 6 28 ...
Страница 181: ...CHAPTER 7 Model Definition and Configuration ...
Страница 182: ...1 2 Aspire One D257 7 1 Aspire One Happy 2 7 109 ...
Страница 388: ...7 206 Model Definition and Configuration ...
Страница 389: ...CHAPTER 8 Test Compatible Components ...
Страница 390: ...8 2 Microsoft Windows 7 Environment Test 8 4 ...
Страница 398: ...8 10 Test Compatible Components ...
Страница 399: ...Test Compatible Components 8 11 ...
Страница 400: ...8 12 Test Compatible Components ...
Страница 401: ...CHAPTER 9 Online Support Information ...
Страница 402: ...9 2 Introduction 9 3 ...
Страница 404: ...9 4 Online Support Information ...

