B
Installing your headset.
Please note that in some Windows XP system, you may be prompt at this point
asking you about Windows Logo testing issues, simply ignore this message and
click
Continue Anyway
to continue installation.
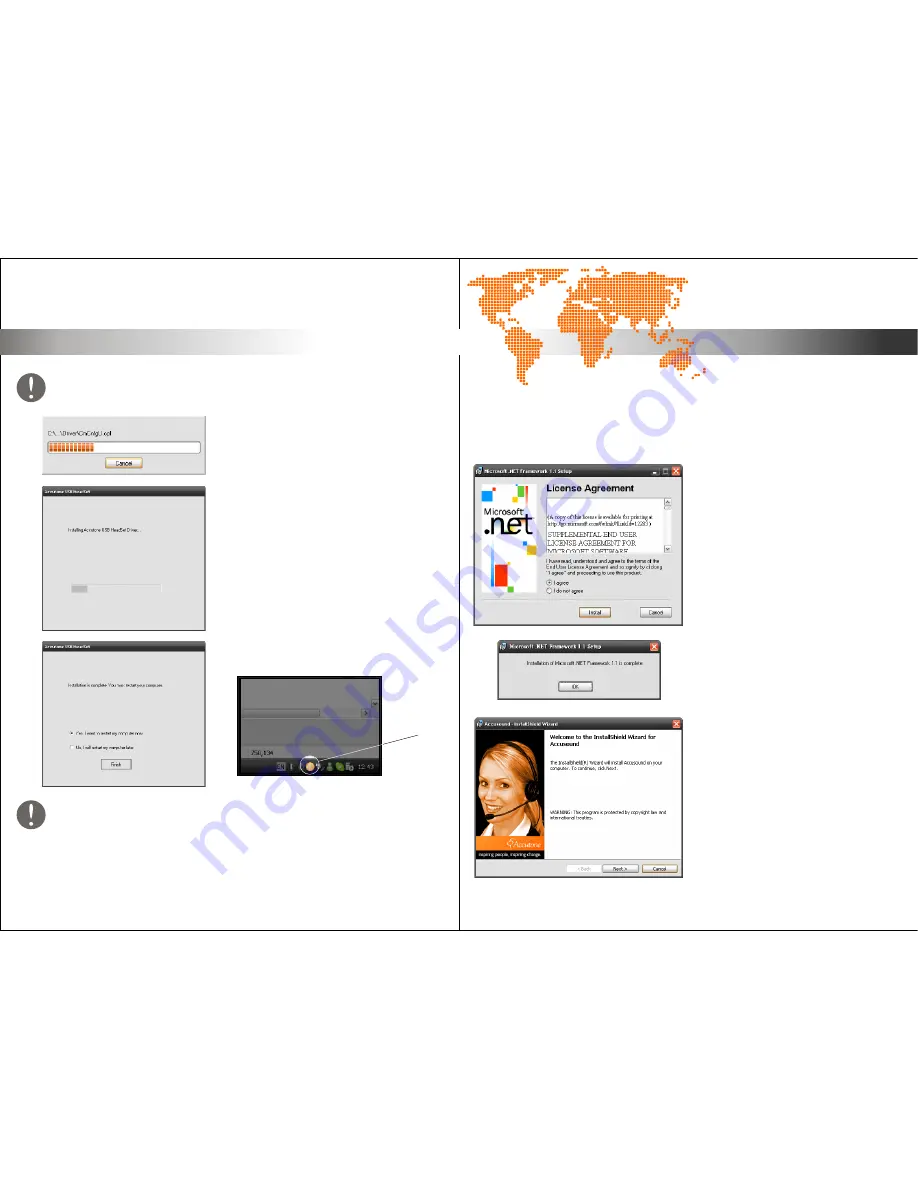
the setup program should begin to
copy files into your system,
after copying all the files, the
program will automatically install the
required drivers into your system,
please be patient as this may take a
little while.
after successful installation of the
drivers, you will have to reboot your
system, and when you do, you should
be able to see the accutone orange
logo displayed on the bottom right
corner icon tray.
The USB400 driver will only operate when connected to the USB port which you
have installed with. If your computer has more than one USB port, you can
determine if the port is the correct one by checking whether the orange
Accutone icon is in the icon tray as shown above.
USB400 - Installation Guide & User Manual
9
10
USB400 - Installation Guide & User Manual
[ inspiring people, inspiring change ]
TM
B5. installing AccuSound Software
All Accutone USB headset comes with a proprietary-designed software for Digital Audio
TM
Status Indication (DASI), called AccuSound . This program will show the current muting
status of the selected USB Audio device, as well as the volume output level.
After that, if your PC already have
Microsoft .NET installed, this screen
will pop up.
Click
next
to install AccuSound
TM
Click
OK
to continue installation of
TM
AccuSound .
USB
Software
Icon
connecting the computer
adjusting the headset
multi-status LED indications
installing driver & software
TM
installing AccuSound software
Installation.
Installation.
Within the zip file you’ve downloaded
in the last section, there is another
folder named AccuSound. Extract it and
launch the setup file accusound.exe.
If your PC doesn’t have Microsoft .NET
installed, this program will install it
automatically.
Click install to install .NET Framework.


