background image

AU Industrial Brush Cutter

Rev. 7:17   

Page 3 

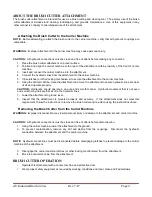
ABOUT THE BRUSH CUTTER ATTACHMENT 

The brush cutter attachment is intended for use as a brush cutting and clearing tool.  The primary use of the brush 

cutter  attachment  includes  land  clearing,  landscaping,  and  grounds  maintenance.    Use  of  this  equipment  in  any 
other manner is contrary to the intended use of the attachment. 


Attaching the Brush Cutter to the Carrier Machine  

NOTE:  

Before attempting to attach the brush cutter to the carrier machine, verify that all hydraulic couplings are 

compatible.   


WARNING:  

Improper attachment to the carrier machine may cause personal injury. 

CAUTION:  

All hydraulic connections must be clean and free of debris before making any connection.  

1.

Place the brush cutter attachment on a level surface.

2.

Position and align the carrier machine to the rear of the attachment, within proximity of the front of carrier
machine.

3.

Insert and connect the carrier machine into the attachment.

4.

Connect the hydraulic lines from the attachment to the carrier machine.

5.

Close latches (or other locking mechanisms) to secure the attachment to the carrier machine.

6.

Using the carrier machine, raise the attachment and move the attachment to ensure hydraulic lines are clear
of air and operate properly.

CAUTION:  

Hydraulics should operate in an even and smooth manner.  Hydraulic movement that is not even 

and smooth may indicate that air is in the hydraulic lines.  


7.

Lower the attachment to ground level.

8.

Inspect  that  the  attachment  is  mounted  properly  and  securely.    If  the  attachment  does  not  meet  this
requirement, follow the instructions to remove the brush cutter and re-attach using the instructions above.

Removing the Brush Cutter from the Carrier Machine  

WARNING:  

Improper disconnection may result personal injury or damage to the attachment and carrier machine. 

CAUTION:  

All hydraulic connections must be clean and free of debris before disconnection.  

1.

Using the carrier machine, lower the attachment to the ground.

2.

To  prevent  contamination,  remove  any  dirt  and  debris  from  the  couplings.    Disconnect  the  hydraulic
connection between the attachment and the carrier machine.

NOTE:  

Hydraulic connections must be disconnected before disengaging latches to prevent damage to the carrier 

machine or the attachment.  


3.

Disengage the carrier machine latches (or other locking mechanisms) from the attachment.

4.

Move the carrier machine from the attachment.

BRUSH CUTTER OPERATION 

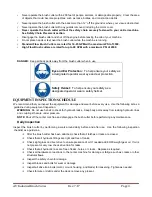
Operate this attachment with a carrier machine and protective door.

Wear proper safety equipment as required by working conditions and local, state, and Federal laws.

Содержание AU-01-1455

Страница 1: ...on and Maintenance Manual Standard Flow Closed Front Starting Serial Number Standard Flow Open Front Starting Serial Number OFM000952843 High Flow Closed Front Starting Serial Number High Flow Open Fr...

Страница 2: ...thly Inspection 5 Inspection Checklist 5 Safety Chain Placement 6 PARTS DIAGRAMS AND LISTS 7 Brush Cutter Diagram A 7 Brush Cutter Parts List A 7 Drive Assembly Diagram B 9 Drive Assembly Parts List B...

Страница 3: ...conducting maintenance on this equipment it is important to wear proper protection Recommended minimum safety equipment when operating and maintaining this equipment includes earplugs eye protection a...

Страница 4: ...ensure hydraulic lines are clear of air and operate properly CAUTION Hydraulics should operate in an even and smooth manner Hydraulic movement that is not even and smooth may indicate that air is in...

Страница 5: ...safety helmet EQUIPMENT INSPECTION SCHEDULE We recommend that you inspect the equipment for damage and wear before every use Use the following list as a guideline during equipment inspection WARNING...

Страница 6: ...xcessive wear Check skid plates for wear Inspect the bolts on the motor Tighten if required Check that all bolts are tight Inspection Checklist Are all safety notices and warning stickers in proper lo...

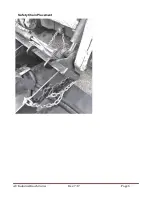
Страница 7: ...AU Industrial Brush Cutter Rev 7 17 Page 6 Safety Chain Placement...

Страница 8: ...Cutter Diagram A ITEM NO PART NUMBER DESCRIPTION QTY 1 612 2 0020 3 Body Open Front 1 1 612 2 0006 3 Body Closed Front Not Shown 1 3 612 2 0005 2 Bearing Housing Assembled 1 4 612 2 0008 2 Wire Protec...

Страница 9: ...025 Inspection Cover 1 11 612 3 0060 Motor Standard Flow 1 14 612 2 0013 Hose Assembly 2 15 612 3 0067 Hose Sleeve 1 17 612 3 0069 Hose Clamp 1 18 612 3 0070 Female Quick Coupler 1 19 612 3 0071 Male...

Страница 10: ...AU Industrial Brush Cutter Rev 7 17 Page 9...

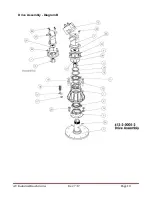
Страница 11: ...AU Industrial Brush Cutter Rev 7 17 Page 10 Drive Assembly Diagram B...

Страница 12: ...2 3 0111 Motor Mounting Plate High Flow 1 7 612 3 0111 20 Motor Mounting Plate Standard Flow 1 8 612 3 0110 20 Hub Stannard Flow 1 9 612 3 0063 2 Seal Protection 1 10 612 3 0051 2 Jam Nut Retainer 1 1...

Страница 13: ...Flow 8 23 HDW 1 2 20 x 1 25 SHCS 1 2 20 X 1 1 4 SHCS standard Flow 8 24 HDW 1 2 20 x 1 25 Ferry Cap Screw 1 2 20 X 1 1 4 Ferry Cap Screw Standard Flow 4 25 HDW 1 2 20 x 1 50 Ferry Cap Screw 1 2 20 X...

Страница 14: ...EM PART NUMBER DESCRIPTION QTY 1 612 3 0147 Fly Wheel Plate 1 1 612 2 0037 Mulcher Flywheel Optional Not Shown 1 3 612 2 0025 Drive Shaft 1 4 612 3 0013 Blade 4 5 612 2 0007 2 Wire Protection Lower 2...

Страница 15: ...gram D Warning Decals Parts List D ITEM PART NAME DESCRIPTION QTY 1 Warning Decal Warning Keep Hands and Feet Away 4 2 Warning Decal DANGER Debris Discharge Area Stay Back 200 Feet 2 3 Warning Decal D...

Страница 16: ...r when dry These values do not apply if lubricants are used BOLT SIZES SAE TORQUE INCHES POUNDS FOOT NC Threads Grade 5 Grade 8 POUNDS FOOT NF Threads Grade 5 Grade 8 1 4 7 11 9 13 5 16 15 22 17 24 3...

Страница 17: ...AU Industrial Brush Cutter Rev 7 17 Page 16 BOLT SIZES METRIC TORQUE MILLIMETERS POUNDS FOOT NEWTONS METER M6 10 13 M8 22 30 M10 40 54 M12 59 80 M14 93 126 M16 130 176 M18 168 228 M20 205 278...

Страница 18: ...e owner shall rely solely on the warranty if any of the respective manufacturers thereof This warranty does not cover damages resulting from abuse accidents alterations use of the Accessories Unlimite...

Страница 19: ...AU Industrial Brush Cutter Rev 7 17 Page 18 PO BOX 982 Alexandria MN 56308 1457 Eagle Street Detroit Lakes MN 56501 Phone 218 844 8622 www a u llc com sales a u llc com...

Отзывы: