AC&NC JetStor 742F Скачать руководство пользователя страница 32

JetStor SAS 742FD RAID Subsystem


User Manual 

41 


d.


Insert each disk tray with disk drive one by one, 14 disk trays or one row first, 

and then lock each disk tray. Then do the same for the next 14 disk trays or 
row. 


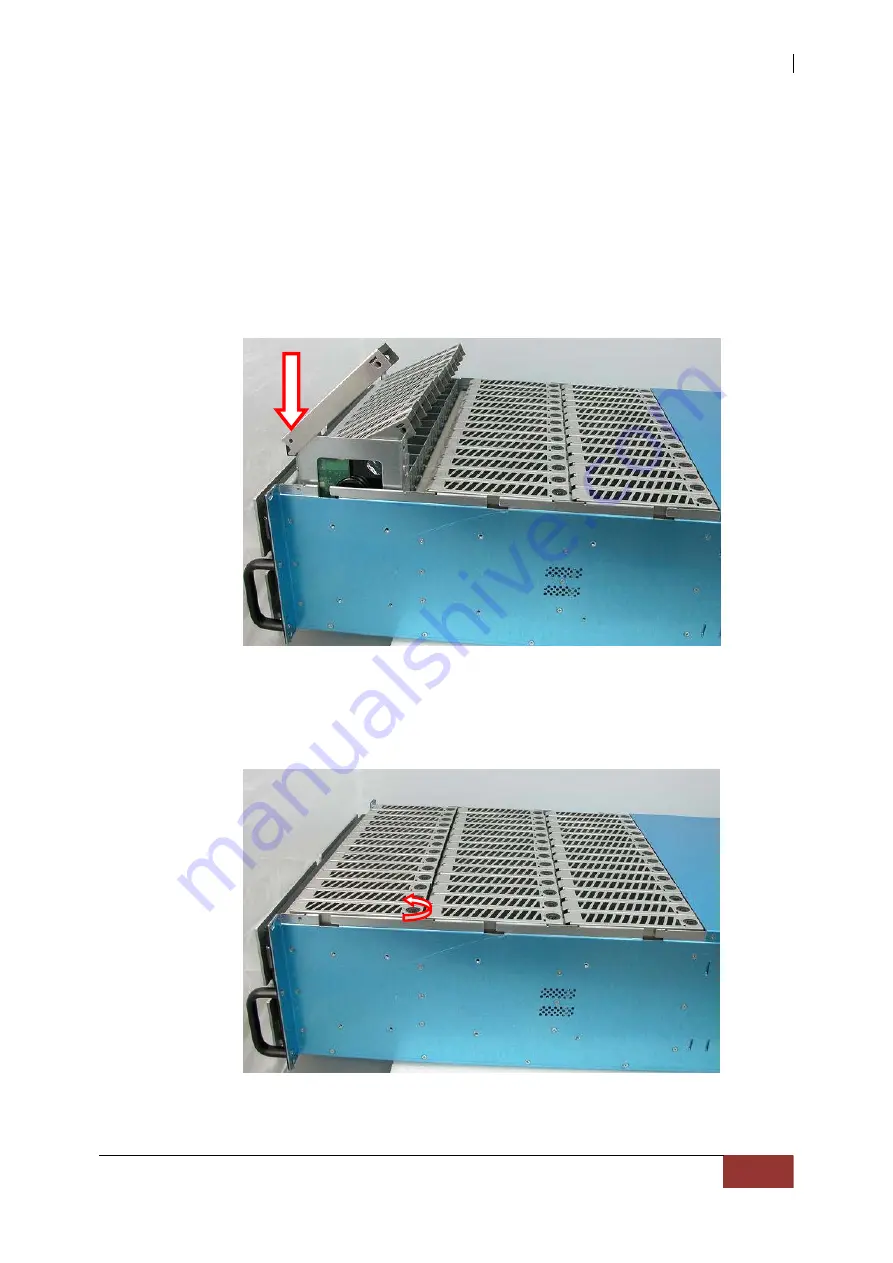
To install the disk tray into the disk slot, insert it first in the 
slot.  
 
Then push down the latch part of disk tray as indicated in 
the picture below until it reached a full stop.  


Close the lever handle then use the Key for Disk Tray Lock 
and turn the disk tray lock into “locked” position.


Содержание JetStor 742F

Страница 1: ...742F Service Manual...

Страница 2: ...tStor SAS 742F 2 Table of Contents Section Page 1 How to Replace the RAID Controller ARC8006 13 2 HowtoReplacethePowerSupplyFanModule PSFM 23 3 How to Replace the Turbo Fan Fan 06 1 28 4 How to Replac...

Страница 3: ...so they won t be lost or mixed up during servicing When servicing some parts need to be replaced in power off state Please see table below Hot Swappable Parts Can be replaced while online Not Hot Swa...

Страница 4: ...Expander module fails and the replacement is not yet available in order to maintain proper airflow within the enclosure the failed module can be disconnected just about an inch but not entirely remove...

Страница 5: ...le Function Description Expander Module 1 1 for Controller 1 Monitors Enclosure 1 Disk slots 1 to 21 Power Supply 01 1 Fans 01 1 02 1 03 1 04 1 and 05 1 and Turbo Fan 06 1 Note 1 means enclosure 1 Exp...

Страница 6: ...onnected or already replaced but the problem still exists replace the LCD display module Refer to Section 2 The LCD Display Panel has blue background light but does not show any character 1 Check firs...

Страница 7: ...ace it first Refer to Section 10 3 If the RAID controller s can start up normally check if the switch cable and LCD cable are properly connected to the LED front panel module Refer to Section 1 step E...

Страница 8: ...eplace the failed expander module Refer to Section 10 4 If all 4 expander modules are good verify if each individual RAID controller is working fine Power off the enclosure remove one RAID controller...

Страница 9: ...s 1 Make sure that the Fibre cable s is are properly connected to the Fibre HBA and to the Fibre host port s 2 Make sure the Fibre HBA and SFP module s are working fine 3 Verify Fibre Channel Config i...

Страница 10: ...tch cable if properly connected but enclosure still does not power on replace the main power switch Refer to Section 3 One Power Supply failed The alarm beeper sounds the controller log shows Ex Power...

Страница 11: ...and try again the disk drive in another slot 3 Make sure the firmware version of Expander modules and RAID controller expander are all the same If not upgrade each expander to the same common version...

Страница 12: ...er to Section 11 step C 3 If a replacement Turbo Fan module is available replace the Turbo Fan module Refer to Section 11 One or both RAID controllers and one or both power supply modules are not dete...

Страница 13: ...will be blinking red indicating controller failure Shutdown the Raid System Loosen the thumbscrews on the sides of the failed RAID controller Loosen the 2 thumbscrews on both sides of the failed cont...

Страница 14: ...ual JetStor SAS 742F 39 C Pull the handle bar of the controller drawer about 90 and then remove the controller drawer from the slot NOTE The picture is not from actual machine model but from similar R...

Страница 15: ...the controller drawer into the controller slot The FLT LED will still be blinking red NOTE Don t tighten yet the 2 thumbscrews The replacement Controller is inserted NOTE The picture is not from actua...

Страница 16: ...towards the side of the controller drawer and make sure the handle bar is well attached to the controller drawer side And then properly tighten the 2 thumbscrews NOTE When the thumbscrews are tightene...

Страница 17: ...the inserted controller has taken over the original IO jobs of the failed controller the alarm sound will be off B controllers will be back to normal operational mode NOTE To verify the status of the...

Страница 18: ...the Power Supply Fan Module PSFM NOTE Each Power Supply Fan Module PSFM has one Power Supply and five Fans PSFM 1 has Power 01 1 Fan 01 1 Fan 02 1 Fan 03 1 Fan 04 1 and Fan 05 1 and PSFM 2 has Power 0...

Страница 19: ...Service Manual JetStor SAS 742F 64 Power 01 1 and Fan 01 1 to 05 1 NOTE Fan 06 1 is included in fans being monitored in Enclosure 1...

Страница 20: ...he Power Supply will not power on immediately The Fans in the PSFM will spin up until the RPM becomes stable When Fan RPM is already stable the RAID controller will then power on the Power Supply This...

Страница 21: ...tor SAS 742F 66 A Loosen the thumbscrews of the Power Supply Fan Module B Pull the handle of the Power Supply Fan Module The Power Supply Fan Module will move out from the slot C Prepare the new Power...

Страница 22: ...Insert the replacement Power Supply Fan Module and push inwards With the handle in open position close the handle until the lock is engaged E Tighten the 2 thumbscrews of the PSFM F Reconnect the powe...

Страница 23: ...Service Manual JetStor SAS 742F 84 3 How to Replace the Turbo Fan Fan 06 1...

Страница 24: ...dule B Pull the handle to remove the Turbo Fan module from the slot C Insert the replacement Turbo Fan module NOTE If only the fan board will be replaced disconnect first the fan cable loosen the scre...

Страница 25: ...Service Manual JetStor SAS 742F 86 D Insert and push the Turbo Fan module until it is fully inserted E Tighten the 2 screws of the Turbo Fan module...

Страница 26: ...ystem User Manual 35 2 6 Disk Tray The Disk Tray houses a 3 5 inch hard disk drive It is designed for maximum airflow and incorporates a carrier locking mechanism to prevent unauthorized access to the...

Страница 27: ...d in the disk slots If all disk trays will be used to install all 42 disk drives for quicker and easier installation of disk drives in the RAID subsystem it is recommended to install first each disk d...

Страница 28: ...disk in a disk tray is the same with SAS disk HDD Single Controller Dual Controller SATA No need dongle board Need dongle board SAS No need dongle board No need dongle board NOTE In this model it is r...

Страница 29: ...isk drive into the disk tray then turn the disk tray upside down To secure the disk drive into the disk tray tighten 4 screws on the holes of the disk tray Note in the picture below where the screws s...

Страница 30: ...e in a disk tray 1 Use the Key for Disk Tray Lock to unlock a disk tray 2 Place the disk drive into the disk tray 3 Turn the disk tray upside down To secure the disk drive into the disk tray tighten 4...

Страница 31: ...slots a Loosen two screws on both sides of the top cover on the front panel side b Use the Top Cover Key to unlock the key lock on the front panel side c Hold the front part of the top cover and slide...

Страница 32: ...disk tray Then do the same for the next 14 disk trays or row To install the disk tray into the disk slot insert it first in the slot Then push down the latch part of disk tray as indicated in the pic...

Страница 33: ...lled and locked put the top cover back and place it about half an inch away Then push the top cover towards the rear f Use the Top Cover Key to lock the key lock on the front panel side g To secure th...

Отзывы: