background image


37 

English 

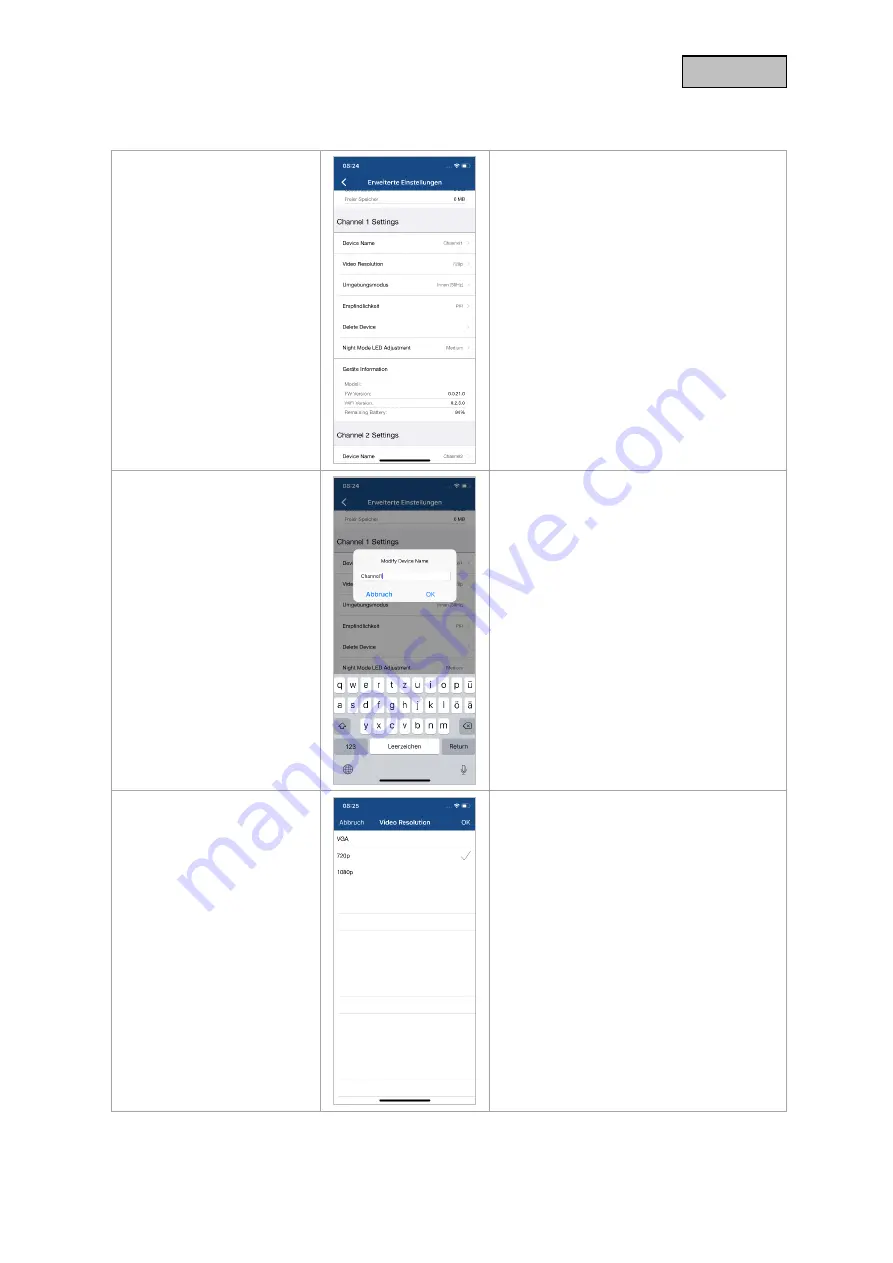
4.8.5. Advanced Settings Camera 


Camera Settings 


Make the settings for the cameras here. 

The  changes  in  the  settings  are  only 
accepted after leaving the menu.


Camera Name 


Change the camera name of the paired 
cameras here. 

The name is displayed in the live view as 
well as in the push notifications. 


Video Resolution 


Here you have the possibility to change 
the resolution for the live view. 

At a lower resolution, you can get a 
smoother image with external access, but 
less image detail is available. 


The value set here has no effect on the 
recording, which is always stored in Full 
HD. 

PPIC90000 

Содержание PPIC90200

Страница 1: ... Bedienungsanleitung Wichtige Hinweise und FAQs zu diesem Produkt und weiteren Produkten finden Sie auf der Internetseite www akku cam abus com Version 1 3 Originalbedienungsanleitung in deutscher Sprache Für künftige Verwendung aufbewahren ...

Страница 2: ...herung unterliegt länderspezifischen Datenschutzrichtlinien Warnhinweis im Sinne des 201 StGB Wer unbefugt das nichtöffentlich gesprochene Wort eines anderen auf einen Tonträger aufnimmt und eine so hergestellte Aufnahme gebraucht oder einem Dritten zugänglich macht kann mit Freiheitsstrafe oder Geldstrafe bestraft werden Ebenso kann bestraft werden wer unbefugt das nicht zu seiner Kenntnis bestim...

Страница 3: ...inzufügen 21 4 2 4 Neue Kamera in eine Basisstation einlernen 21 4 3 App2Cam Plus Kompatibilität 22 4 4 App2Cam Plus Übersicht 22 4 4 1 Menüleiste 23 4 4 2 Kameraleiste 23 4 4 3 Info App Einstellungen 23 4 5 App2Cam Plus Liveansicht 24 4 5 1 Liveansicht Funktionen 24 4 5 2 Aktiv Deaktiv Funktion 25 4 5 3 Kamera Indikatoren 25 4 5 4 Stream Indikatoren 26 4 6 App2Cam Plus Ereignisliste Wiedergabe 27...

Страница 4: ...utsch 5 Firmware aktualisieren 40 5 1 Aktualisierung über Server 40 5 2 Manuelle Aktualisierung 40 5 3 Aktuelle Firmware Version 40 6 Übersicht Sprachbefehle 41 7 Akku FAQs 42 8 Tipps zur Fehlerbehebung 43 ...

Страница 5: ...one 6 Reset Tool 7 Montagematerial 8 PPIC90200 2x WLAN Akku Cam 1 Basisstation 2 2x Halterung 3 USB Steckernetzteil 4 USB auf micro USB Kabel 5 Bohrschablone 6 2x Reset Tool 7 2x Montagematerial 8 PPIC90010 Basisstation 2 USB Steckernetzteil 4 PPIC90520 WLAN Akku Cam 1 Halterung 3 USB auf micro USB Kabel 5 Bohrschablone 6 Reset Tool 7 Montagematerial 8 ...

Страница 6: ...or 2 innenliegende Antenne 3 Objektiv 4 Mikrofon 5 PIR Sensor Passiv Infrarot Sensor 6 Weißlicht LED leuchtet blau während des Einlern Prozesses 7 Lautsprecher Funk Frequenz 2 4Ghz 802 11 b g n Max Sendeleistung 20dBm Radio Frequency 2 4Ghz 802 11 b g n Max Transmission power 20dBm ...

Страница 7: ... mit Gewinde unterstützt Achtung Bei einem permanenten Betrieb mit dem Micro USB Kabel erlischt die Wetterschutzfähigkeit der Kamera Laden der Kamera Nehmen Sie die Kamera von der Halterung und schließen Sie das beigefügte Micro USB Kabel an Verwenden Sie für das Laden der Kamera einen Netzstecker mit 5VDC 2A das Steckernetzteil der Basisstation ist für das Schnellladen der Kamera geeignet Die Kam...

Страница 8: ...nslot max 128 GB 2 Pairing Taste Drücken Sie die Pairing Taste ca 3 Sekunden gedrückt bis die LED rot leuchtet 3 Reset Taste Halten Sie die Reset Taste ca 5 Sekunden gedrückt bis die Status LED rot blinkt 4 Innenliegende Antenne 5 Status LED 6 Lautsprecher und Lüftungsöffnungen 7 USB Anschluss für Spannungsversorgung ...

Страница 9: ... um Überblendungen zu vermeiden Die Kamera sollte nicht auf einem Glasregal platziert werden da es zu Reflektionen kommen kann Aufstellungsort Die Kamera ist sowohl für den Einsatz im Außenbereich als auch für den Einsatz im Innenbereich geeignet Platzieren Sie die Kamera nicht in direkter Nähe von Heizungen Öfen anderen Wärmequellen oder unter direkter Sonneneinstrahlung Betreiben Sie das Gerät n...

Страница 10: ...onneneinstrahlung zu vermeiden Die Kamera sollte nicht direkt gegen eine Lichtquelle oder gegen die Sonne gerichtet werden 3 3 Ausrichtung und Erfassungsbereich der Kamera Der Passiv Infrarot Sensor PIR der Kamera hat einen maximalen Erfassungsbereich von 8 Metern dieser kann erreicht werden bei einer Installationshöhe von 2 Metern und einem Neigungswinkel von 12 5 Der PIR Blickwinkel liegt bei 11...

Страница 11: ...Max PIR Reichweite 1 5 m 0 8 Meter 2 0 m 12 5 8 Meter 3 0 m 24 7 Meter 4 0 m 34 6 Meter 5 0m 43 5 Meter 6 0 m 50 4 5 Meter Der Blickwinkel der Kamera ist größer als der PIR Blickwinkel Bei einer Installation kann es vorkommen dass Personen zwar auf dem Livebild sichtbar sind jedoch keine Aufnahme auslösen Da die Person sich außerhalb des PIR Erfassungsbereichs von 8 Metern befindet ...

Страница 12: ...en um das Objekt länger in der Videosequenz aufzuzeichnen Wenn die Bewegung im vorderen Bereich des PIR Erfassungsbereichs detektiert wird kann es dazu führen dass das Objekt evtl nicht komplett auf der Videosequenz sichtbar ist Bitte beachten Sie dass eine Detektion nur in dem angegeben PIR Detektionsbereich erfolgt Objekte die sich außerhalb des PIR Bereichs bewegen lösen keine Aufnahme aus könn...

Страница 13: ...zen sie die wie unten dargestellt ein und achten Sie darauf dass diese einrastet Stecken Sie als nächstes die Basisstation an dem USB Steckernetzteil ein und stecken Sie dieses an einer Steckdose ein Achtung Platzieren Sie die Basisstation so dass diese nicht von Objekten verdeckt wird Sorgen Sie für eine optimale Lüftung der Basisstation ...

Страница 14: ...Einlernen der Basisstation in die App wird unter 4 App2Cam Plus Erster Zugriff beschrieben Für einen externen Zugriff auf die Kamera benötigen Sie einen 2 4 GHz Router mit Internetzugriff Hinweis Platzieren Sie die Basisstation so dass diese nicht von Objekten verdeckt wird Sorgen Sie für eine optimale Lüftung der Basisstation Router mit 5 GHz Frequenz werden nicht unterstützt Bei Dual Frequenz Ro...

Страница 15: ...sich in optimaler Reichweite zum Router befindet Auf die Basisstation kann nur bei ausreichendem WLAN Signal zum Router zugegriffen werden Idealerweise installieren Sie die Basisstation in nächster Nähe zu der Kamera Bitte beachten Sie dass bauliche Gegebenheiten die Übertragung beeinflussen können Akku Cam Basisstation Router Beispielaufbau ...

Страница 16: ...e Basisstation mittig platziert werden so dass beide Kameras sich in der Reichweite dieser befinden Die Reichweite der einzelnen Kamera zur Basisstation wird im Livebild der Kamera anhand dem Icon dargestellt Akku Cam Basisstation Router Akku Cam Beispielaufbau ...

Страница 17: ...Installationen in größeren Objekten mit zwei oder mehr Kameras wird eine zweite Basisstation PPIC90010 zur Optimierung der Reichweite empfohlen Router Akku Cam 2 Basisstation 2 Basisstation 1 Akku Cam 1 Beispielaufbau ...

Страница 18: ...er Power On Taste auf der Rückseite an Öffnen Sie die App und klicken Sie auf das um eine die Basisstation hinzuzufügen klicken Sie dann auf die Akku Cam Klicken Sie auf Neue Kamera bei der Erstinstallation Basisstationen die bereits mit dem Netzwerk verbunden sind können Sie durch Klicken auf Existierendes Gerät hinzufügen Scannen Sie im nächsten Schritt den QR Code auf der Rückseite der Basissta...

Страница 19: ...k muss den 2 4 GHz Standard nutzen Stellen Sie nun die Medien Lautstärke ihres Smartphone auf mindestens 70 Die App überträgt im nächsten Schritt die Sound Informationen an die Basisstation Bitte beachten Sie dass der Abstand zwischen Basisstation und Smartphone nicht mehr als 30 cm betragen darf Hinweis Bitte beachten Sie dass äußere Umgebungsgeräusche die Sound Informationen übertönen können Ver...

Страница 20: ...sstation hinzuzufügen Klicken Sie auf Alternative Installation um die Basisstation hinzuzufügen Gehen Sie wie in der App beschrieben zu den Netzwerkeinsellungen Ihres Gerätes und verbinden sich mit dem WLAN Access Point der Basisstation Diesen erkennen Sie an dem Namen HD XXXXXX Das Passwort für den WLAN Access Point der Basisstation lautet 12345678 Wenn die Verbindung besteht klicken Sie in der A...

Страница 21: ...Sicherheitscode der Kamera lautet 123456 Sollte die Basisstation bereits eingerichtet worden sein tragen Sie den vergebenen Sicherheitscode der Basisstation ein Drücken Sie auf die Schaltfläche Bestätigen um die Kamera hinzuzufügen Hinweis Wird die Basisstation mit dem Standard Sicherheitscode 123456 hinzugefügt muss dieser beim ersten Zugriff auf die Liveanischt der Kamera geändert werden Hinweis...

Страница 22: ...chten Sie dass einige erklärte oder gezeigte Funktionen in dieser Anleitung womöglich nicht mit Kameras älterer Generationen kompatibel sind oder die Funktionalitäten der Kameras aufgrund von Hardware Unterschieden voneinander abweichen 4 4 App2Cam Plus Übersicht Hinweis Die angezeigten Screenshots und Icons wurden aus der iOS App entnommen Es können leichte Abweichungen zur Android App in der Bes...

Страница 23: ...abe eines App Pins Wenn aktiviert und vergeben wird dieser bei jedem App Start verlangt Über Über Informieren Sie sich hier über die aktuelle App Version Datenschutzrichtlinie und API Version Benutzerhandbuch Anleitung Anleitungen Rufen Sie hier die Produktseite der ausgewählten Kamera auf Hier können Sie im Downloadsektor die Anleitung herunterladen Videobeschleunigung Nur Android Hardware Decodi...

Страница 24: ...odell zur Verfügung Die Funktionen sind zusätzlich im Landscape Modus verfügbar Klicken Sie auf das Vorschaubild der Kamera um in die Liveansicht zu gelangen 4 5 1 Liveansicht Funktionen Snapshot erstellen Hier haben Sie die Möglichkeit einen Screenshot Ihres Livebildes zu machen Das Bild wird anschließend in Ihrer Fotogalerie auf Ihrem Mobilgerät gespeichert Die gespeicherten Bilder werden mit ei...

Страница 25: ...meraübersicht 4 5 2 Aktiv Deaktiv Funktion Durch den Klick auf die Arm oder Disarm Schaltfläche können Sie die Kamera aktiv oder deaktiv schalten Es wird stets die Eingabe des Admin Passworts benötigt sobald die Auto Anmeldung in den Einstellungen aktiviert wird wird auch hier nicht erneut nach dem Passwort gefragt Kamera ist aktiv Im Arm Zustand zeichnet die Kamera bei erkannten Bewegungen auf un...

Страница 26: ...ten vom Server beziehen kann Dadurch wird eine Verzögerung des Streams verursacht Niedrig Normal Gut Anzeige der momentanen Einschätzung der Verbindung Dies stellt die Verbindung zwischen Basisstation und Router dar xxx KB s Anzeige der momentan verbrauchten Kilobit pro Sekunde Hinweis Wenn die Verbindung zu Ihrer Kamera stets über den Relay Server getätigt wird prüfen Sie bitte folgende Einstellu...

Страница 27: ...erden alle Ereignisse in der Liste gelöscht Einzelne Ereignisse löschen Löschen Sie einzelne Ereignisse aus der Liste Ereignisfilter erneut einstellen Um Ereignisse besser zu filtern können Sie hier den Zeitraum erneut einstellen Hinweis Während einer Aufnahme kann nicht auf die Aufzeichnungen zugegriffen werden 4 6 3 Modus nur iOS Durch den Klick auf die Schaltfläche Modus können Sie wählen ob Si...

Страница 28: ...auf Ihr Endgerät heruntergeladen Wir empfehlen Ihnen deshalb vorwiegend über WLAN die Wiedergabe zu bedienen um den Verbrauch des Datenvolumens gering zu halten 4 7 1 Wiedergabe Funktionen Snapshot erstellen Hier haben Sie die Möglichkeit einen Screenshot Ihrer Wiedergabe zu machen Das Bild wird anschließend in Ihrer Fotogalerie auf Ihrem Mobilgerät gespeichert Die gespeicherten Bilder werden mit ...

Страница 29: ...ssystemen iOS und Android unterschiedlich abgespeichert iOS Die Ereignisse werden auf dem Gerät gepeichert und können nur mit dem iTunes wiedergegeben werden Andorid Die gespeicherten Daten finden Sie im Gerätemanager unter interner Speicher record Kamera DID 4 8 Erweiterte Einstellungen 4 8 1 Anmeldedaten In den Einstellungen können Sie die Anmeldedaten der Basisstation manuell ändern System Name...

Страница 30: ...iterten Einstellungen zu verwehren 4 8 3 Automatische Anmeldung Bei der Eingabe des Admin Passworts können Sie über die Schaltfläche Auto Anmeldung das Admin Passwort auf Ihrem Endgerät speichern sodass Sie dieses beim nächsten Aufrufen der erweiterten Einstellungen auf Ihrem Endgerät nicht mehr eingetragen werden muss Dies gilt nicht für einen Zugriff von anderen Endgeräten 4 8 4 Erweiterte Einst...

Страница 31: ...tellungen geändert werden Wenn Sie ihr Passwort vergessen haben sollten können Sie die Basisstation durch drücken der Reset Taste für ca 5 Sekunden zurücksetzen Achtung Alle Einstellungen inkl der Netzwerkverbindung gehen verloren Geräte Sicherheitscode Der Sicherheitscode dient der Einrichtung der Basisstation in die App Das Standardcode lautet 123456 und muss bei der Erstinstallation geändert we...

Страница 32: ...eigenes WLAN Passwort ein Das Fenster für die Passworteingabe zeigt Ihnen zusätzlich die Signalstärke zum Netzwerk an achten Sie auf eine ausreichende Signalstärke um Übertragungsprobleme zu vermeiden Geben Sie das Passwort ein und bestätigen Sie mit OK Die Einstellungen werden erst nach Verlassen des Menüs übernommen Um den Zugriff durch fremde Personen zu vermeiden schützen Sie Ihr Netzwerk durc...

Страница 33: ... E Mail Provider SMTP Server Tragen Sie hier die SMTP Server Adresse ein z B smtp test com SMTP Port Tragen Sie hier den SMTP Port ein z B 465 Benutzername Tragen Sie hier die Sender E Mail Adresse ein z B xxx test com Passwort Tragen Sie hier das Passwort der Sender E Mail ein Empfänger Tragen Sie hier die Empfänger E Mail Adresse ein z B xxxx123 test com Speichern Sie die Einstellungen mit OK Be...

Страница 34: ...t Speichern Sie durch klicken auf Fertig Für die Endzeit drücken Sie erneut auf das Plussymbol Geben Sie nun die Endzeit den Namen und die Wiederholung ein Bitte wählen Sie bei Aktion den Gegensatz zur vorherigen aus und speichern sie durch klicken auf Fertig z B Startzeit 21 00 Uhr von Mo Fr Aktion Aktivierung Endzeit 06 00 von Mo Fr Aktion Deaktivierung Die Kamera zeichnet nur in dem Zeitraum zw...

Страница 35: ...e Ereignisse auf der SD Karte zu überschreiben AUS Sobald die SD Karte voll ist werden keine weiteren Aufzeichnungen mehr gespeichert Unbegrenzt Wenn diese Funktion aktiviert ist werden die älteste Aufzeichnungen mit neueren überschreiben sobald die SD Karte voll ist 3 7 30Tage Die Daten auf der SD Karte werden nach der ausgewählten Tagesanzahl gelöscht bzw überschrieben Aufnahme ohne Audio Aktivi...

Страница 36: ...net Bitte beachten Sie dass sich bei einer höheren Aufnahmezeit die Akku Laufzeit verringert Liveansicht Kameraauswahl Falls zwei Kameras mit dem Gerät verbunden sind können Sie hier entscheiden welche Kamera standardmäßig als erstes in der Liveansicht angezeigt werden soll Auto Die Basisstation zeigt automatisch die Kamera an welche als Kamera 1 eingelernt ist Kamera 1 2 Auswahl der Kamera welche...

Страница 37: ...r eingelernten Kameras Der Name wird in der Liveansicht als auch in den Push Benachrichtigungen angezeigt Video Auflösung Sie haben hier die Möglichkeit die Auflösung für die Liveansicht zu ändern Bei einer geringeren Auflösung können Sie bei einem externen Zugriff ein flüssigeres Bild erhalten jedoch sind weniger Bilddetails verfügbar Der hier eingestellte Wert hat keine Auswirkung auf die Aufzei...

Страница 38: ...zu Fehlalarmen kommen Wärmequellen wie Heizungen oder Heizlüfter können zu Fehlalarmen führen bitte richten Sie die Kamera nicht auf diese aus Gerät Löschen Sie haben die Möglichkeit eine Kamera aus der Basisstation zu löschen Bestätigen Sie den Löschvorgang durch klicken auf OK Um eine Kamera in einer Basisstation einzulernen drücken Sie auf die Pairing Taste auf der Basisstation und warten Sie d...

Страница 39: ...D einstellen Passen Sie die LED Intensität anhand der Umgebungsbedingungen an Sobald sich Gegenstände in näherer Umgebung der Kamera befinden empfiehlt es sich die Intensität auf gering zu stellen um Reflektionen im Bild zu vermeiden die Reichweite der LED verringert sich jedoch dadurch ...

Страница 40: ...ss die Firmware der Kamera automatisch 5 2 Manuelle Aktualisierung Sie können alternativ die neueste Firmware von dem Reiter Downloads auf der Produktwebsite www abus com product Artikelnummer herunterladen Beispiel www abus com product PPIC90000 Kopieren Sie die beiden Dateien rootfs SMH T1R img rootfs SMH T1R md5 auf eine leere MicroSD Karte Trennen Sie nun die Basisstation von der Steckdose und...

Страница 41: ...Im Anschluss drücken Sie auf der Rückseite der Kamera 3 mal die Power Taste Kameraverbindung erfolgreich abgeschlossen Die Kameraverbindung war erfolgreich und die Kamera ist nun in der Basisstation eingelernt Kameraverbindung fehlgeschlagen Der Einlernprozess der Kamera in die Basisstation war nicht erfolgreich Wiederholen Sie den Vorgang Maximale Kameraanzahl erreicht Kamera in der App löschen u...

Страница 42: ...en sinkt die Akkulaufzeit um ein Vielfaches Sie können dies verbessern indem Sie die Kamera anders ausrichten Installation im Außenbereich Geringe Temperaturen im Außenbereich können die Akkulaufzeit der Kamera negativ beeinflussen Sie werden in diesem Fall einen schnelleren Abfall der Kapazität verzeichnen bitte prüfen Sie in den Einstellungen der Kamera den Status und laden Sie die Kamera früh g...

Страница 43: ...llungen setzen Drücken Sie für mindestens 5 Sekunden die Reset Taste auf der Basisstation Die LED auf der Front fängt an rot zu blinken Sobald die Werkseinstellungen geladen sind und die Basisstation bereit für die Einrichtung ist wird der Sprachbefehl Bereit für das Verbinden mit dem Netzwerk ausgegeben Manuelles Update der Basisstation nicht möglich Bitte laden Sie die Update Dateien auf eine le...

Страница 44: ...f reflektierenden Flächen wie z B Glas oder weißen Flächen reflektiert Platzieren Sie die Kamera nicht vor Glasflächen und achten Sie darauf diese in geschützten Außenbereichen zu installieren Was könnten die Ursachen für einen SD Karten Fehler sein Bitte prüfen Sie folgendes 1 Stellen Sie sicher dass die SD Karte richtig eingesetzt und formatiert wurde Bitte speichern Sie wichtige Daten vor der F...

Страница 45: ...0 PPIC90520 Instruction manual Important notes and FAQs about this product and other products can be found on the webpage https akku cam abus com Version 1 3 Original operating instructions in English language Keep for future use ...

Страница 46: ...Data storage is subject to country specific data protection guidelines Warning in the sense of 201 StGB Anyone who unauthorizedly records the non publicly spoken word of another person on a sound carrier and uses such a recording or makes it available to a third party can be punished with imprisonment or a fine Similarly an unauthorised person may be punished if he or she intercepts with a tapping...

Страница 47: ... already configured base station 21 4 2 4 Pairing a new camera with a base station 21 4 3 App2Cam Plus Compatibility 22 4 4 App2Cam Plus Overview 22 4 4 1 Menu bar 23 4 4 2 Camera bar 23 4 4 3 Info App Settings 23 4 5 App2Cam Plus Live view 24 4 5 1 Live View Functions 24 4 5 2 Active Deactive Function 25 4 5 3 Camera Indicators 25 4 5 4 Stream Indicators 26 4 6 App2Cam Plus Event List Playback 27...

Страница 48: ...4 English 5 Firmware update 40 5 1 Update via server 40 5 2 Manual update 40 5 3 Current firmware version 40 6 Overview voice commands 41 7 Battery FAQs 42 8 Troubleshooting tips 43 ...

Страница 49: ...6 Reset tool 7 Mounting material 8 PPIC90200 2x Wi FI Battery Cam 1 Base station 2 2x wall bracket 3 USB power supply 4 USB to micro USB cable 5 Drilling template 6 2x reset tool 7 2x mounting material 8 PPIC90010 Base station 2 USB power supply 4 PPIC90520 Wi Fi Battery Cam 1 wall bracket 3 USB to micro USB cable 5 Drilling template 6 Reset tool 7 Mounting material 8 ...

Страница 50: ... 2 Internal antenna 3 Lens 4 Microphone 5 PIR Sensor Passive Infrared Sensor 6 White light LED lights up blue during the pairing process 7 Loudspeakers Radio frequency 2 4Ghz 802 11 b g n Max Transmitting power 20dBm Radio frequency 2 4Ghz 802 11 b g n Max Transmission power 20dBm ...

Страница 51: ...thread is supported Attention If the Micro USB cable is used permanently the weather protection capability of the camera will expire Loading the Camera Remove the camera from the bracket and connect the included Micro USB cable Use a 5VDC 2A power plug to charge the camera the base station s AC adapter is suitable for quick charging of the camera The camera will be fully charged in about 4 hours D...

Страница 52: ... slot max 128 GB 2 Pairing button Press the Pairing button for approx 3 seconds until the LED lights up red 3 Reset button Press and hold the reset button for approx 5 seconds until the status LED flashes red 4 Internal antenna 5 Status LED 6 Loudspeakers and ventilation openings 7 USB connector for power supply ...

Страница 53: ...at no objects are placed directly in front of the camera lens to avoid crossfades The camera should not be placed on a glass shelf as reflections may occur installation site The camera is suitable for both outdoor and indoor use Do not place the camera near heaters stoves other heat sources or in direct sunlight Operate the device only in locations with temperatures within the permissible ambient ...

Страница 54: ...laced directly at a light source or the sun 3 3 Alignment and detection range of the camera The passive infrared sensor PIR of the camera has a maximum detection range of 8 meters this can be achieved at an installation height of 2 meters and an tilt angle of 12 5 The PIR viewing angle is 112 The PIR reacts to heat movement and triggers an image upon detection Optimum alignment The higher the came...

Страница 55: ... meters 4 0 m 34 6 meters 5 0m 43 5 meters 6 0 m 50 4 5 meters The viewing angle of the camera is larger than the PIR viewing angle During an installation it can occur that people are visible on the live image but do not trigger a recording Since the person is outside the PIR detection range of 8 meters ...

Страница 56: ...angle in order to record the object longer in the video sequence If the movement is detected in the front area of the PIR detection range the object may not be completely visible on the video sequence Please note that detection only takes place in the specified PIR detection range Objects that move outside the PIR range will not trigger recordings but may be visible when the camera image is viewed...

Страница 57: ...s optionally available Please insert as shown below and make sure that it clicks into place Next plug the base station into the USB power supply and plug it into a wall outlet Attention Place the base station so that it is not covered by objects Ensure optimum ventilation of the base station ...

Страница 58: ...The pairing process of the base station into the app is described under 4 App2Cam Plus First Access For external access to the camera you need a 2 4 GHz router with Internet access reference Place the base station so that it is not covered by objects Ensure optimum ventilation of the base station Routers with 5 GHz frequency are not supported For dual frequency routers it is recommended to separat...

Страница 59: ...he base station is within optimal range of the router The base station can only be accessed if the Wi Fi signal to the router is sufficient Ideally install the base station close to the camera Please note that structural conditions can influence the transmission Battery Cam Base station Router example setup ...

Страница 60: ...e station should be centered so that both cameras are within range of the base station The range of the individual camera to the base station is shown in the live image of the camera by the icon Battery Cam Base station Router Battery Cam example setup ...

Страница 61: ...h For installations in larger objects with two or more cameras a second base station PPIC90010 is recommended to optimize the range Router Battery Cam 2 Base station 2 Base station 1 Battery Cam 1 example setup ...

Страница 62: ...amera by pressing the Power On button on the back panel Open the app and click on the to add a base station then click on the Battery Cam Click on New Camera during the initial installation Base stations that are already connected to the network can be added by clicking on Existing device In the next step scan the QR code on the back of the base station Now connect it to the USB power supply and p...

Страница 63: ... least 70 In the next step the app transmits the sound information to the base station Please note that the distance between the base station and the smartphone must not exceed 30 cm Note Please note that external ambient noise may drown out the sound information Try performing the installation in a quiet environment Click on Send sound information now to start the transmission If the transmission...

Страница 64: ... This can be recognized by the name HD XXXXXX The password for the Wi Fi access point of the base station is 12345678 When the connection is established click OK in the app Select the WLAN of your home network from the list of Wi Fi networks and enter the password of the Wi Fi of your home network Press OK to establish the connection The base station will now connect to the network This can take u...

Страница 65: ...ess the Confirm button to add the camera Note If the base station with the default security code 123456 is added it must be changed the first time the camera s Live screen is accessed Note If a base station has already been set up from another phone or user select this method to add base stations that have already been set up 4 2 4 Pairing a new camera with a base station Press the pairing button ...

Страница 66: ...the camera functionality may differ due to hardware differences 4 4 App2Cam Plus Overview Note The displayed screenshots and icons were taken from the iOS App There may be slight differences compared with the Android App in the description arrangement or functionality This is described in the respective points or mentioned with an addition iOS only or Android only In the overview you can open the ...

Страница 67: ...very app start About About Check here for the latest app version privacy policy and API version User Manual Instruction instructions Go to the product page of the selected camera Here you can download the manual in the download sector Video Ccceleration Android only Activate Deactivate Hardware Decoding Hardware decoding is available for Android Some Android devices have special hardware features ...

Страница 68: ... images are timestamped and saved in the Photo Gallery Activate deactivate audio Here you can activate or deactivate audio for live view Starting Manual Recording Here you have the possibility to start a manual recording on SD card The recording time for one camera is changeable for two cameras it is fixed on 15 seconds The icon appears during recording Switching between Camera 1 and Camera 2 If t...

Страница 69: ...ked again Camera is active In the arm state the camera records detected movements and sends messages push or e mail Camera is disabled In the Disarm state the camera does not perform any further actions on detected movements 4 5 3 Camera Indicators Name of the base station Channel 1 2 displays the currently selected camera You can change the names of the base station cameras in the advanced settin...

Страница 70: ...so that your device can obtain the data from the server This causes a delay in the stream Low normal good Display of the current assessment of the connection This is the connection between the base station and the router xxx KB s Display of currently consumed kilobits per second Note If the connection to your camera is always made via the relay server please check the following settings Check if U...

Страница 71: ...nts With this selection all events in the list are deleted Delete individual events Delete individual events from the list Set event filter again To filter events better you can set the period again here Note The recordings cannot be accessed during a recording 4 6 3 Mode iOS only By clicking on the Mode button you can choose whether you want to view the files on the SD card in the specified perio...

Страница 72: ...atically downloaded to your mobile device We therefore recommend that you operate the playback primarily via Wi Fi in order to keep the consumption of data volume low 4 7 1 Playback Functions Create Snapshot Here you have the possibility to take a screenshot of your played video The image will then be stored in your photo gallery on your mobile device The saved images are timestamped and saved in ...

Страница 73: ...and can only be played back with iTunes Andorid The stored data can be found in the Device Manager under Internal Memory Record Camera DID 4 8 Advanced Settings 4 8 1 Login data In the settings you can change the base station login data manually System name Change the name of the base station here DID Here you can manually change the DID of the base station Security code Enter the security code of...

Страница 74: ...ton to save the admin password on your terminal device so that it no longer has to be entered on your terminal device the next time you call up the advanced settings This does not apply to access from other devices 4 8 4 Advanced settings Base station Note The arrangement of the individual points differs from Android Despite this the functionalities are available and identical on both platforms No...

Страница 75: ...e accessed If you have forgotten your password you can reset the base station by pressing the reset button for about 5 seconds Attention All settings including the network connection will be lost Security Code The security code is used to set up the base station in the app The default code is 123456 and must be changed during the initial installation If you have forgotten your security code you ca...

Страница 76: ...and enter your own Wi Fi password The password entry window also shows you the signal strength to the network make sure you have enough signal strength to avoid transmission problems Enter the password and confirm with OK The settings are only accepted after leaving the menu To avoid access by unauthorized persons protect your network by encrypting it with WPA WPA2 WPA2 PSK The settings are only a...

Страница 77: ... server address here e g smtp test com SMTP port Enter the SMTP port here e g 465 Username Enter the sender e mail address here e g xxx test com Password Enter the password of the sender e mail here Receiver Enter the recipient s e mail address here e g xxxx123 test com Press OK to save the settings When leaving the advanced settings press Confirm Only then will the e mail settings be accepted We ...

Страница 78: ...again for the end time Now enter the end time the name and the reaction Please select the contrast to the previous one and save it by clicking on Done e g Start time 21 00 hrs from Mon Fri action activation End time 06 00 from Mon Fri action deactivation The camera records only between 9 p m and 6 a m when motion is detected time zone The world time zones are listed in the selection list Select th...

Страница 79: ... the events on the SD card OFF Once the SD card is full no more recordings will be saved Unlimited When this function is enabled the oldest recordings will be overwritten with newer ones as soon as the SD card is full 3 7 30 days The data on the SD card are deleted or overwritten after the selected number of days Recording without audio Activate the function to save the recordings without audio Du...

Страница 80: ...15 seconds by default Please note that a longer recording time reduces the battery life Live view Camera selection If two cameras are connected to the device you can decide here which camera should be displayed first in the live view by default Auto The base station automatically displays the camera that has been programmed as camera 1 Camera 1 2 Select the camera to be displayed first for the liv...

Страница 81: ...name of the paired cameras here The name is displayed in the live view as well as in the push notifications Video Resolution Here you have the possibility to change the resolution for the live view At a lower resolution you can get a smoother image with external access but less image detail is available The value set here has no effect on the recording which is always stored in Full HD PPIC90000 ...

Страница 82: ...is can lead to false alarms Heat sources such as heaters or fan heaters can cause false alarms so do not point the camera at them Delete device You can delete a camera from the base station Confirm the deleting process by clicking OK To pair a camera in a base station press the pairing button on the base station and wait for the voice command Ready for camera connection Now press the power button ...

Страница 83: ...nsity of the white light LED Adjust the LED intensity according to the environmental conditions As soon as objects are in the near of the camera it is recommended to set the intensity to low to avoid reflections in the image but the range of the LED will be reduced ...

Страница 84: ...he camera automatically 5 2 Manual update Alternatively you can download the latest firmware from the Downloads tab on the product website www abus com product Artikelnummer Example www abus com product PPIC90000 Copy the two files rootfs SMH T1R img rootfs SMH T1R md5 to an empty MicroSD card Now disconnect the base station from the socket and insert this MicroSD card into it Now plug the base st...

Страница 85: ... pairing button and wait for the voice command to output Then press the power button 3 times on the back of the camera Camera pairing successful The camera connection was successful and the camera is now taught in in the base station Camera pairing failed The pairing process of the camera into the base station was not successful Repeat the process Maximum amount of cameras reached Remove camera in...

Страница 86: ... this is influenced by environmental circumstances With frequent releases the battery life decreases many times over and you can improve this by reorienting the camera Outdoor installation Low outdoor temperatures can adversely affect the battery life of the camera In this case you will see a faster drop in capacity please check the status in the camera settings and reload the camera early enough ...

Страница 87: ...ed How can I set my base station to factory settings Press the reset button on the base station for at least 5 seconds The LED on the front will start flashing red Once the factory settings are loaded and the base station is ready for setup the voice command Ready to connect to the network is issued Manual update of the base station not possible Please load the update files onto an empty microSD c...

Страница 88: ...ht is reflected on reflecting surfaces such as glass or white surfaces Do not place the camera in front of glass surfaces and be sure to install it in protected outdoor areas What could be the cause of an SD card error Please check the following 1 Make sure that the SD card is properly inserted and formatted Please save important data before formatting they will not be available afterwards 2 Be su...

Отзывы: