background image


54

(o) 

MENU 

- Press to open the OSD menu 

(p) 

J.SHUT 

- Press to activate the jog-shuttle. 


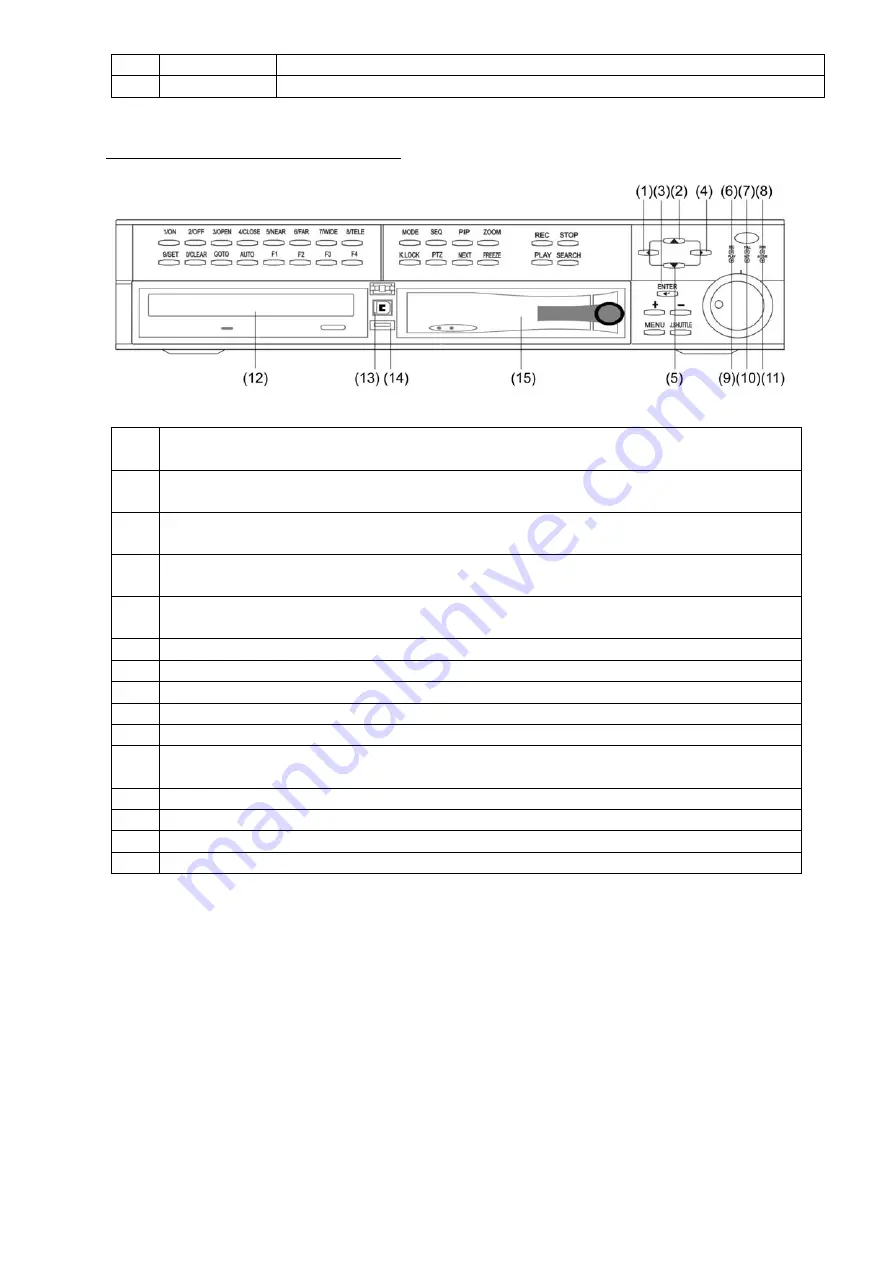
Description of control keys and LEDs 


(1) 

- In playback mode: Press to switch playback from forwards to reverse. 
- In programming mode: Press to move the cursor to the left. 

(2) 

- In playback mode: Press to increase playback speed. 
- In programming mode: Press to move the cursor up. 

(3) 

- In search mode:  Start playback. 
- In programming mode: Press to confirm your selection. 


- In playback mode: Press to switch playback from reverse to forwards. 
- In programming mode: Press to move the cursor to the right. 

(5) 

- In playback mode: Press to increase playback speed. 
- In programming mode: Press to move the cursor down 

(6) 

- REC: The LED lights up red during recording.  

(7) 

- FULL: The LED lights up red if the hard disk is full.   

(8) 

- RUN: The LED lights up red when jog-shuttle is used. 

(9) 

- PLAY: The LED lights up green during playback. 

(10)  - NET: The LED lights up yellow if a LAN connection is active. 
(11)  - ACTIVE: The LED lights up yellow if an option is activated 

  (PTZ control, search function, rotating wheel …). 

(12)  - CD-R Writer 
(13)  - USB Port for firmware upgrade. 
(14)  - USB Port USB backup 
(15)  - Hard disk housing 


Содержание Eytron JPEG2000

Страница 1: ...Eytron JPEG2000 Dual Codec DVR User manual TV8931 TV8933 Version 1 0 03 2008 ...

Страница 2: ...tion 60 6 7 Power plugging 60 7 Operation 61 7 1 Display 61 7 2 Channel selection 62 7 3 PIP Picture in Picture view 63 7 4 Freeze view 63 7 5 View in sequence 63 7 6 Zoom in view 64 7 7 Key lock 64 7 8 Playback 64 7 9 Search 64 7 10 Mouse operation 66 8 OSD On Screen Display Menu 68 8 1 LOG IN 68 8 2 System menu 68 8 2 1 DISPLAY SETUP 69 8 2 2 CONFIGURATION 70 8 2 4 BACK UP 81 8 2 5 EXTERNAL DEVI...

Страница 3: ...eously record signals from up to 16 connected video sources depending on the model With the help of the built in CD drive or use of the USB Port you can save image data transfer it to a PC and view and archive complete video sequences Thanks to H 264 video compression for network streaming the recorder can easily be accessed from any point in the world Data storage is subject to local national dat...

Страница 4: ... and colour cameras High resolution display recording 720 x 288 pixels PAL Adjustable recording quality level Adjustable recording speed Manual scheduled and event controlled recording with integrated motion sensor Video signal loss display 4 8 16 looped through video inputs 2 video outputs Monitor and spot monitor 4 8 16 alarm inputs 1 alarm output Adjustable display formats Ethernet port for LAN...

Страница 5: ...r more than 40 C The device is designed for indoor use only The maximum humidity must not exceed 90 non condensing Ensure that the voltage is disconnected when performing work on the device Please observe the following regulations to ensure trouble free operation of your device The Eytron digital recorder is supplied by a 12V DC transformer The device should be connected via a separate fused line ...

Страница 6: ...3 PANIC REC Press to start recording 14 STOP Press to end the current function and switch to standby mode 15 During programming press to increase a value 16 During programming press to reduce a value a 9 SET Press to define a preset position for PTZ camera control only b 10 CLEAR Press to clear a predefined preset position for PTZ camera control only c 11 GOTO Press to call the previously saved pr...

Страница 7: ...witch playback from reverse to forwards In programming mode Press to move the cursor to the right 5 In playback mode Press to increase playback speed In programming mode Press to move the cursor down 6 REC The LED lights up red during recording 7 FULL The LED lights up red if the hard disk is full 8 RUN The LED lights up red when jog shuttle is used 9 PLAY The LED lights up green during playback 1...

Страница 8: ...ted when inserting VGA module TV8934 3 Ethernet connection for LAN or Internet access 4 Not used 5 4 8 16 BNC Camera inputs 4 8 16 BNC Camera outputs looped through 6 BNC Monitor output BNC Spot monitor output This output will show every channel in sequence If an alarm is triggered the according camera will be shown 7 DC 12V power input 8 Power Switch 9 PS 2 connector to connect a mouse ...

Страница 9: ...ommand or select next camera channel or next spilt screen display 7 Press REC to activate emergency record This recording will always be at best resolution and in Super Fine quality 8 Press STOP to stop emergency recording and return to schedule recording or to stop playback and return to Live mode 9 Press PLAY to playback the recording directly Press PAUSE to pause playback Press REW to fast rewi...

Страница 10: ...re the camera installation is done 6 2 Monitor and SPOT Monitor installation Connect the MONTIOR BNC Output of the DVR back panel to the Video In port of the monitor Connect the Spot Monitor BNC Output to a second monitor All camera channels will be shown in sequence if an alarm is triggered the channel will pop up ...

Страница 11: ...LARM D5 2 RS 485 D 7 GND 12 ALARM D4 3 RELAY COM 8 ALARM D8 13 ALARM D3 4 RELAY NC 9 ALARM D7 14 ALARM D2 5 RELAY NO 10 ALARM D6 15 ALARM D1 FUNCTION 1 RS 485 D 14 ALARM D11 2 RS 485 D 15 ALARM D10 3 GND 16 ALARM D9 4 RELAY COM 17 GND 5 RELAY NC 18 ALARM D8 6 RELAY NO 19 ALARM D7 7 GND 20 ALARM D6 8 ALARM D16 21 ALARM D5 9 ALARM D15 22 GND 10 ALARM D14 23 ALARM D4 11 ALARM D13 24 ALARM D3 12 GND 2...

Страница 12: ...the circuit is closed NC COM are a normally closed circuit Alarm is triggered when the circuit is opened 6 4 PTZ camera installation Connect the PTZ s D to the DVR s RS 485 D and the PTZ s D to the DVR s RS 485 D After the connection and the related setup are done users are able to control the PTZ camera using the front panel buttons or included software NO NC COM POWER SUPPLY 12V GND ...

Страница 13: ...with two screws on the left and two screws on the right of the HDD frame and then close the frame with the upper cover 5 Step Insert the HDD frame back into the slot push it until engages and turn the handle to the right Now lock the hard disk with the key 6 6 Mouse installation Connect mouse to the PS 2 port at rear side in order to control the DVR by mouse It is also possible to use a USB mouse ...

Страница 14: ...ent date Shows in Playback Mode recorded date in playback 3 Displays the camera title of every channel 4 Displays the recording quality LOW HYPER 5 Displays if a client is connected Disconnected Connected 6 Shows in Live Mode the used HDD capacity in percentage Shows in Playback Mode the current position of recorded data in percentage ...

Страница 15: ...144 PAL 480IPS 360X120 NTSC 8 Displays the current Recording Mode Alarm Recording Motion Recording Continuous Recording 9 Displays the Recording Status Emergency Record Scheduled Record Recording stopped 7 2 Channel selection Press the number button to switch to the corresponding channel for its full screen view Press the Mode button to switch among different split mode displays 4 6 8 9 13 16 spli...

Страница 16: ...lect the corresponding channel to freeze Press the number again to cancel freeze In full screen mode press FREEZE to freeze the channel and press FREEZE again to cancel 7 5 View in sequence Sequence display of all channels can be activated by pressing the button SEQ By pressing the SEQ button again the sequence display will be stopped Sequence time is adjustable in system setup Freeze ...

Страница 17: ...ime To unlock press and hold K LOCK and enter admin s password 7 8 Playback Press the PLAY button to start immediate playback or press the SEARCH button to open the search selection dialog To enter Playback or Search mode the admin s password has to be entered 7 9 Search SEARCH SEARCH BAR TIME DATE EVENT LIST SELECT MENU ENTER SEARCH BAR Here you can search by appointing a recording percentage Usi...

Страница 18: ...recording INPUT DATE TIME Enter the appointed time and date to start playback Select the time and date by key to adjust numbers and by ef key to adjust the cursor position Press Enter to start playback EVENT LIST EVENT LIST CH EVENT TIME DATE 001 009 01 MOT 21 08 2008 14 12 52 01 LOS 21 08 2008 14 11 30 04 ALM 21 08 2008 14 11 08 03 MOT 21 08 2008 14 10 52 SEARCH ENTER EXIT MENU CH Shows the chann...

Страница 19: ...button Double click Display mouse control interface Mouse wheel Keep pressed for 2 seconds to hide mouse control interface Control mouse interface By double clicking the right mouse button the control interface will pop up To change assigned screen division click left button of mouse once According to the different models screen division can be different Icon Left click Right click Icon Left click...

Страница 20: ...Backward Step play Slow backward Adjust speed Fast backward Adjust speed Play Fast forward Adjust speed Slow forward Adjust speed Pause forward Step play Pause REC Stop Icon Left click Right click Wheel Icon Left click Right click Wheel UP Change channel DOWN Change channel LEFT UP RIGHT UP LEFT RIGHT LEFT DOWN RIGHT DOWN ZOOM IN ZOOM OUT ZOOM IN OUT FOCUS NEAR FOCUS FAR FOCUS NEAR FAR MENU NEXT C...

Страница 21: ... not reset the password to the default In order to reset password please contact your local dealer 8 2 System menu SYSTEM MENU SYSTEM MENU DISPLAY SETUP CONFIGURATION RECORD SETUP BACK UP EXTERNAL DEVICE FACTORY DEFAULT LANGUAGE ENGLISH LANGUAGE SELECT SELECT MENU ENTER DISPLAY SETUP Includes SCREEN DISPLAY and MONITOR SETUP VGA SETUP CONFIGURATION Includes HDD MANAGEMENT TIME DATE SETUP CAMERA SE...

Страница 22: ...LECT MENU ENTER LIVE Following information can be displayed in LIVE mode TIME DATE Shows current time and date ICON DISPLAY Shows the OSD icons DVR STATUS Shows the recording status of the DVR REC PLAY BAR Shows the recording percentage of HDD CAMERA TITLE Shows the camera titles PLAYBACK Following information can be displayed in PLAYBACK mode TIME DATE Shows time and date of recording DVR STATUS ...

Страница 23: ...ETUP SYSTEM INFORMATION SELECT MENU ENTER HDD MANAGEMENT Includes HDD SETUP HDD INFORMATION and HDD REPLACEMENT SETUP TIME DATE SETUP Here you can set time and date CAMERA SETUP Includes CAMERA TITLE CAMERA COLOR SETUP CAMERA ACTIVE SETUP and MOTION SETUP INTERVAL SETUP Here you can set the interval for sequence switching and event recording ALARM SETUP Here you can setup the alarm inputs EVENT PO...

Страница 24: ... the physical information of HDD Master Slave HDD REPLACEMENT SETUP Includes SAVE DVR INFO and LOAD DVR INFO HDD REPLACEMENT SETUP HDD REPLACEMENT SETUP SAVE DVR INFO LOAD DVR INFO SELECT MENU ENTER In order to change HDD s of the same JPEG2000 DVR model the information of the recorded has to be saved SAVE DVR INFO Press the ENTER button on SAVE DVR INFO to save the DVR information to HDD If the D...

Страница 25: ...isplay format DATE FORMAT Asia American European TIME FORMAT 12 hours 24 hours MONTH FORMAT English Numeric When installing a HDD or changing time or date the HDD has to be deleted afterwards CAMERA SETUP CAMERA SETUP CAMERA TITLE CAMERA COLOR SETUP CAMERA ACTIVE SETUP MOTION SETUP SELECT MENU ENTER CAMERA TITLE Here you can enter a title max 8 characters for every camera Use or and or to change v...

Страница 26: ...TUP MOTION SETUP MOTION CONFIGURATION MOTION MASK SETUP SELECT MENU ENTER MOTION CONFIGURATION Here you can set for every camera motion detection MOTION MASK SETUP Here you can set the mask area for motion detection MOTION CONFIGURATION MOTION CONFIGURATION CHANNEL 01 SENSITIVITY GRADE 1 MOTION DISPLAY TYPE OFF RECORD DURATION 05 SEC NUMBER OF CELLS TO DETECT 01 SELECT MENU CHANGE VALUE CHANNEL Se...

Страница 27: ... is marked not to detect motion is Grey Use the direction buttons to move the cursor and press ENTER to mark the area Press the MODE button to change editing mode 1 Cell Move to the desired location and press ENTER to activate or deactivate the motion detection in the marked area cell by cell 2 ALL ON Change the mode to ALL ON and press ENTER to activate the motion detection in the whole window 3 ...

Страница 28: ...p of Event Update Time whenever there is an event the DVR records the starting time and information of the event in the Event Log and ignores the following events within the duration set in the Event update time The setting range of the Event Update time is from 10 seconds to 990 seconds ALARM SETUP ALARM SETUP CHANNEL CH1 ALARM INPUT 01 SEC DURATION 01 SEC 600 SEC N O NORMAL OPEN N C NORMAL CLOSE...

Страница 29: ...ent that will trigger the POPUP A Alarm M Motion AM Alarm or Motion DURATION Select the duration for the POPUP 1 60 seconds BUZZER SETUP BUZZER SETUP ALL KEY BEEP ON VIDEO LOST ON ALARM ACTIVE ON MOTION DETECT ON SELECT MENU ENTER ALL Turn ON OFF all buzzer sounds KEY BEEP Turn on off the beep while operating the front panel VIDEO LOST Turn on off the beep if the video signal is lost ALARM ACTIVE ...

Страница 30: ...ect the user to change password USER PW Enter the current password NEW PW Enter the new password CONFIRM Confirm new password Default password Admin blank Manager 1 User 1 2 User 2 3 User 3 4 User 4 5 User 5 6 User 6 7 User 7 8 User 8 9 The three user levels have different authorities to operate the DVR Change Settings Clear HDD Change Password Playback Search Remote Access Admin Manager U U User ...

Страница 31: ...AY SELECT MENU ENTER RECORD CONFIGURATION Here you can setup overwrite recording mode picture quality resolution and recording speed SCHEDULE SETUP Here you can setup the recording schedule HOLIDAY Here you can setup up to max 100 holidays RECORD CONFIGURATION RECORD CONFIGURATION OVERWRITE ON MULTIPLEX DUPLEX QUALITY SUPER FINE RESOLUTION 50IPS 702X240 RECORD IN ALARM 1 1X RECORD IN MOTION 1 1X C...

Страница 32: ...CH NTSC 120IPS 720 240 240IPS 360 240 480IPS 360 120 PAL 100IPS 720 288 200IPS 360 288 400IPS 360 144 16CH NTSC 120IPS 720 240 240IPS 360 240 480IPS 360 120 PAL 100IPS 720 288 200IPS 360 288 400IPS 360 144 RECORN IN ALARM Here you can set the recording speed when an alarm is triggered RECORD IN MOTION Here you can set the recording speed when motion is detected CONTINUOUS RECORD Here you can set t...

Страница 33: ...e First page shows the hours from 00 12 the second page shows the hours 12 24 Recording modes A ALARM REC M MOTION REC C CONTINUOUS REC No schedule recording A Set as Alarm record When there is an alarm triggered the DVR records at the speed set in RECORD IN ALARM M Set as Motion record When there is motion detected the DVR records at the speed set in RECORD IN MOTION C Set as Continuous record Th...

Страница 34: ...kup recorded data onto a CD USB BACKUP Select this menu point to backup recorded data onto a USB Stick CD R BACKUP CD R BACKUP HDD 15 07 2008 12 14 53 20 07 2008 18 05 14 CD R 15 07 2008 12 14 53 15 07 2008 12 19 53 SIZE 647MB BURN SELECT MENU ENTER HDD Shows the start and the end recording date and time of the HDD s CD R Select a starting date and time for backup Press ENTER and use to move the c...

Страница 35: ...08 12 19 53 SIZE 400MB BURN SELECT MENU ENTER HDD Shows the start and the end recording date and time of the HDD s USB Select a starting date and time for backup Press ENTER and use to move the cursor Use or J Shuttle to change the value SIZE Connect the USB media to the front USB port and the DVR will automatically check the size and display it on the screen Press ENTER to enter the SIZE selectio...

Страница 36: ...OLLER SETUP Adjust the settings for the remote controller FACTORY DEFAULT Reset settings to default values TCP IP SETUP TCP IP SETUP IP CONFIG SETUP DDNS SETUP CONNECTION SETUP DHCP SETUP EVENT SERVER SETUP NVS SETUP SELECT MENU ENTER IP CONFIG SETUP Here you can adjust the basic IP settings DDNS SETUP Here you can adjust the DDNS settings CONNECTION SETUP Here you can adjust the client connection...

Страница 37: ...tomatic you cannot change any IP settings in this page To turn off the DHCP automatic detection exit this page and go to DHCP SETUP to change the setting DDNS SETUP DDNS SERVER SETUP DDNS ON OFF OFF DDNS SERVER 062 153 088 107 INTERVAL D 00 H 00 M 20 REGISTER DDNS STATUS IP ADDRESS IP PORT REMIAN D 00 H 00 M 00 LAST REGISTRATION DATE SELECT MENU ENTER DDNS ON OFF Turn the DDNS Server function ON O...

Страница 38: ...e is from 1 millisecond to 12 750 seconds RETRY COUNT Here you can enter the times that the client tries to reconnect to the DVR The client will quit trying to reconnect to the DVR after all the attempts fail The setup range is from 0 to 20 attempts DHCP SETUP DHCP SETUP DHCP MODE AUTOMATIC DETECT IP DNS SERVER 192 168 001 001 IP ADDRESS 192 168 001 028 SUBNET MASK 255 255 255 000 GATEWAY 192 168 ...

Страница 39: ...t from 1 60 minutes EVENT GMT TYPE Here you can set GMT of currently installed location of the DVR NVS SETUP NVS SETUP BIT RATE 0500Kb GOP 001 FRAME RATE 01 RESOLUTION 640 480 SELECT MENU ENTER The settings to be made here are for H 264 transmission and can also be set in H 264 client software BIT RATE Here you can adjust the data size of the NVS The bigger the value the better the quality but it ...

Страница 40: ...Z cameras COMMAND SETUP COMMAND SETUP CHANNEL 01 MODEL PELCO D PTZ ID 001 BAUDRATE 9600 BPS CMD DELAY 1 MSEC COMMAND PAN LEFT LENGTH 07 CODE FF 00 01 01 00 00 00 00 SELECT MENU ENTER CHANNEL Select there the channel the PTZ is connected to MODEL Select here the transmission protocol PTZ cameras from Security Center use PELCO D PTZ ID Set here the same ID as set in the PTZ camera BAUDRATE Set here ...

Страница 41: ...SELECT MENU CHANGE VALUE SWITCHING INTERVAL Here you can adjust interval time of sequence display in full mode ALARM POP UP Here you can setup whether to output to spot monitor when alarm is triggered MOTION POP UP Here you can setup whether to output to spot monitor when motion is triggered EVENT POP UP DURATION Here you can adjust how long the pop up lasts REMOTE CONTROLLER SETUP REMOTE CONTROLL...

Страница 42: ...RUN button to set factory default values Entered password will not be affected 8 2 7 LANGUAGE SYSTEM MENU DISPLAY SETUP CONFIGURATION RECORD SETUP BACK UP EXTERNAL DEVICE FACTORY DEFAULT LANGUAGE ENGLISH LANGUAGE SELECT SELECT MENU ENTER Move the cursor to the menu point LANGUAGE and change it by press or 9 Software DDNS Server Since we constantly optimize our software you can find the updated man...

Страница 43: ...r 12 KB 16 KB 20 KB 24 KB 28 KB 250 101 76 61 51 43 400 162 121 97 81 69 500 202 152 121 101 87 1 000 405 303 243 202 173 8 16 Channel recorder Possible recording time shown in hours PAL HDD Size GB Quality Low Mid High Super Hyper 14 KB 19 KB 24 KB 29 KB 32 KB 250 52 38 30 25 23 400 83 61 49 40 36 500 104 77 61 50 46 1 000 208 153 121 100 91 Possible recording time shown in hours NTSC HDD Size GB...

Страница 44: ...20IPS PAL 100IPS 8 16CH NTSC 240IPS PAL 200IPS QUAD 4CH NTSC 240IPS PAL 200IPS 8 16CH NTSC 480IPS PAL 400IPS Compression JPEG2000 Quality LOW NTSC 12 KB 720 240 PAL 14 KB 720 288 MID NTSC 16 KB 720 240 PAL 19 KB 720 288 HIGH NTSC 20 KB 720 240 PAL 24 KB 720 288 SUPER NTSC 24 KB 720 240 PAL 29 KB 720 288 HYPER NTSC 28 KB 720 240 PAL 32 KB 720 288 Storage Device 2 x SATA HDD Playback Record Mode Rea...

Страница 45: ...HDD Power Switching Power DC 12V 6 67Amp 12 FAQ Frequently asked questions Question Why are all pictures after installation displayed in B W and not clearly although all cameras are color Answer The recorder supports PAL and NTSC mode If no cameras are detected at booting the recorder the DVR will automatically go into NTSC mode If then color PAL cameras are detected the picture will be displayed ...

Страница 46: ... and hold PLAY The message PLAY ONLY MODUS will be shown The user can now playback the recorded data The functions search by date or event are deactivated In order to save data image loop through the camera outputs to a second recorder and record the images there Contact your local dealer for further assistance It is necessary that after deleting the HDD the HDD is as less as possible used deleted...

Отзывы: