


Agile with recommended conference equipment
Bruksanvisning / Use Instructions ver 1.0
A
Page 4 of 6
5
6
7
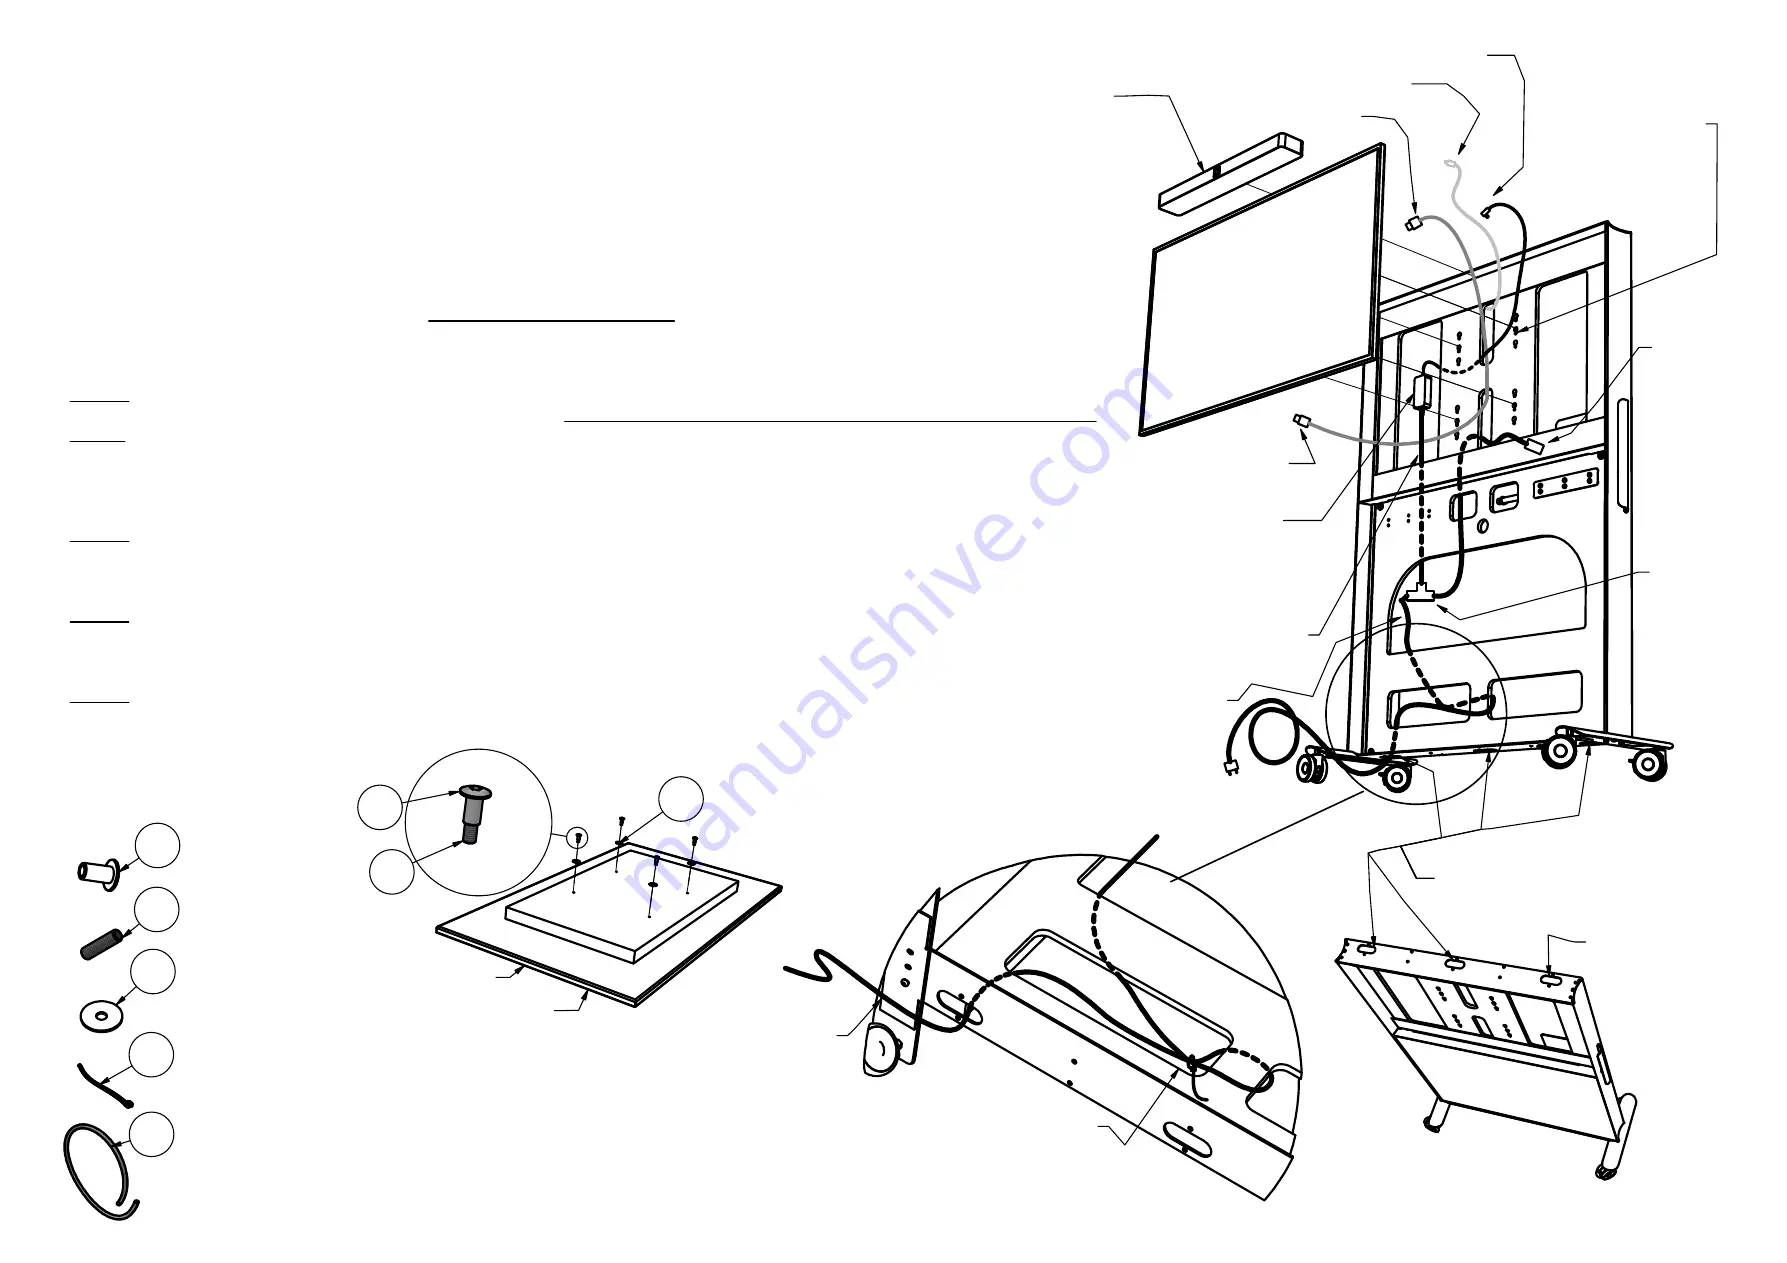
Cap nut (4 pcs)
Pin screw (4
pcs)
Washer 4 (pcs)
Place Bose
VB1 Power
Supply onto
double-
sided tape.
Use middle
holes for
Bose VB1 above
display screen.
Bose VB1.
(See Bose's
manual for mounting instruction.)
Place on soft material
to protect the screen!
NEC Display screen
Preparing cables and power supply
Exchange the USB-C cable to the one coming with Bose VB1
(See page 3)
. Install all the cables and fasten the Bose VB1 Power
Supply to the double sided tape with the DC output cable upwards. Arrange cable excesses with the plastic covered wires, so they
won´t interfere with movable parts inside. This preparation can be arranged for alternative solutions. One is shown in the pictures
on this page. When all equipment is in place:
Secure the main power cable with the plastic tube (9) and strap it tight to a
loop around the board with a cable tie (8) so it won´t become damaged at sharp edges!
(See picture below)
Mounting Bose VB1 (Sound Bar)
Step 1.
Decide if you want the sound bar above or underneath the display screen
(See the two alternatives on page 5)
. Mount the
sound bar (Bose VB1) according to the Bose VB1 manual, but
use the four shortest screws that comes in a separate package
or bag
. Before drilling and screwing, measure out a good gap between top of the sound bar and the inside of the frame above if
sound bar above screen. A good gap is 10 mm. If placed underneath a 10 mm gap between panel metal top and the bottom of the
sound bar is good. Also measure out that it is centered.
Tips!
Add on a bright tape strip to make the drill marks on. Drill and mount
the wall bracket included with the VB1-package when you have the position correct.
Use a 3 mm drill.
Step 2.
Hold the sound bar and connect DC power, USB-C and HDMI connector to it, and place it onto the wall bracket. Fixate the
sound bar with two of the shortest screws. Arrange cables so they won´t interfere with the movable parts inside.
Mounting NEC Display Screen
Step 1.
Remove the handles on the backside of the display screen. First mount pin screws (6) and cap nuts (5) together and
screw them all the way till it stops. Then mount them into the threaded holes on the backside of the display screen together with
the washers (7).
Step 2.
Be two or three persons while hanging up the display screen. Hold the screen near to the cables and connect them. Hook
on the display screen to four of the keyholes on the board. Use the middle holes for VB1 on top and the upper holes for VB1
underneath screen. Make sure all four hanging points are in place by slightly pulling each corner of the screen. See that it hangs
straight.
Alternative ways for Power cable.
5
6
Not recommended
for cables!
7
Parts included with Agile
Split and put plastic tube
around power cable to
protect from damage at
metal edges.
Strap cable and plastic tube
to a loop around the board, tight
with a cable tie. Use a location
that fits your needs and will lock
the cable and tube.
DC power to VB1.
Power to
display
screen.
HDMI to display
screen.
HDMI to VB1
9
Splitted plastic
tube (1 pcs)
8
Cable tie
(1 pcs)
USB-C to VB1
Attention!
For mounting Bose VB1, use the four shortest
screws in separate package! Make sure that the screws
and the drilling don´t damage cables on the backside!
Secure main power cable!
Power cable
to VB1 driver.
Wieland
T-connector
Main power
cable


