background image

DRIVING OPERATION:

Steering Trim and Speed Switch:

Use Steering-Trim to adjust the vehicle's straight run.
To do this, drive slowly away from you and turn the
control knob until the vehicle goes straight.
Use the Speed Switch control (throttle trim) to reduce
the top speed of the vehicle.

TIP: In the beginning, set the Speed Switch
to slow speed to get used to the vehicle.

FIRST DRIVE:

1 . Switch on the transmitter (1). The
     red LED starts blinking.
2. Connect the battery with the car and
    switch on (2). The connection
    process takes place and the LED
    lights up constantly.
3. Carefully test throttle/brake and
    steering and make any necessary
    trim adjustments before driving.
4. Exit: first turn off the car and then
    turn off the transmitter.
5. Disconnect the battery from the car.

AFTER THE DRIVE...!

After using your vehicle, you should perform the following maintenance tasks on a regular basis:
Check your car for obvious damage and repair it before the next use.
Check the vehicle for loose bolts/nuts and tighten them after each ride.
Check the wiring, connectors and battery for damage.
Check the steering servo. If accurate steering trim is no longer possible, the servo must be replaced due
to wear.
Clean the vehicle completely and remove any moisture to prevent corrosion.
Remove batteries from transmitter and vehicle when not in use.

Содержание FUN MAKER

Страница 1: ...1 16 SCALE 4WD Brushless On Road BENDIENUNGSANLEITUNG MANUAL MODE D EMPLOI...

Страница 2: ......

Страница 3: ...unktionen f hren kann Verwenden Sie f r den Betreib nur die original Fahrzeug Batterie und das originale Ladeger t Halten Sie Fahrzeug und Sender von hei er und feuchter Umgebung fern ELEKTRONIK Speed...

Страница 4: ...t ca 2 Stunden Trennen Sie die Batterie vom Ladeger t sobald der Ladevorgang abgeschlossen ist INSTALATION DER BATTERIE IM FAHRZEUG Entfernen Sie die vier Karosserieklammern und nehmen Sie die Karosse...

Страница 5: ...die Lenkung und nehmen Sie ggf Trim Einstellungen vor 4 Zum Beenden schalten Sie zuerst das Fahrzeug aus und dann den Sender 5 Trennen Sie den Akku vom Fahrzeug NACH DER FAHRT Nach der Benutzung Ihres...

Страница 6: ......

Страница 7: ......

Страница 8: ...ly the original vehicle battery and charger for operation Keep the vehicle and transmitter away from hot and humid environments ELECTRONIC Speed Switch Steering Trim Power LED Steering Reverse On Off...

Страница 9: ...e charger as soon as the charging process is complete INSTALLING THE BATTERY IN THE CAR Remove the four body clips and remove the body Fix the battery in the bracket provided for this purpose Connect...

Страница 10: ...3 Carefully test throttle brake and steering and make any necessary trim adjustments before driving 4 Exit first turn off the car and then turn off the transmitter 5 Disconnect the battery from the c...

Страница 11: ......

Страница 12: ......

Страница 13: ......

Страница 14: ...onnements N utilisez que la batterie et le chargeur d origine du v hicule Tenez le v hicule et l metteur l cart des environnements chauds et humides LECTRONIQUE Interrupteur de vitesse Trim de directi...

Страница 15: ...z la batterie du chargeur d s que la charge est termin e INSTALLATION DE LA BATTERIE DANS LE V HICULE Retirez les quatre attaches de la carrosserie et enlevez la carrosserie Fixez la batterie dans le...

Страница 16: ...rection et proc dez des r glages de trim si n cessaire 4 pour terminer teignez d abord le v hicule puis l metteur 5 d branchez la batterie du v hicule APR S LA CONDUITE Apr s avoir utilis votre v hicu...

Страница 17: ......

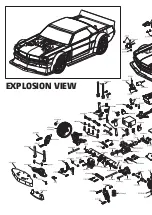
Страница 18: ...1610033 1610077 1610015 1610005 1610004 1610021 1610076 1610038 1610035 1610068 1610005 1610007 1610069 1610033 1610053 1610003 1610003 1610069 1610053 1610012 1610060 1610072 1610077 1610006 1610015...

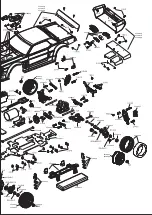
Страница 19: ...076 1610010 1610068 1610022 1610094 1610023 1610095 1610069 1610053 1610038 1610038 1610069 1610028 1610028 1610074 1610074 1610071 1610023 1610095 1610034 1610075 1610034 1610034 1610017 1610067 1610...

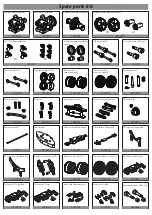
Страница 20: ...transmission cup set CVD drive shaft 2 Front wheel axle 23 5mm 2 Rear drive shafts 2 Tires and sponge set 2 Plastic rim set copper coloured 2 Plastic wheel set copper coloured 2 Steering post set Ste...

Страница 21: ...scews 10 M2 4 set screws 10 M2 5 round head socket screws 10 M2 8 pan head selt tapping screws 10 M3 6 button head screws 10 M2 6 6 pan head selt tapping screws 10 M2 6 8 pan head selt tapping screws...

Страница 22: ...4V 15C 1500mAh Li Po Charger 20W 800mAh Steering rods body post set Steering cup rear hub set Set of Body post Steering Rod Ball head Steering arm set Wheel hex nuts servo mount motor mount set Batter...

Страница 23: ......

Страница 24: ...Absima GmbH Gibitzenhofstr 127a RG 90443 N rnberg Germany Web www absima com...

Отзывы: