background image

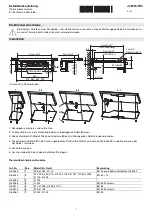
The Sealing function:

1. Cut bag material to appropriate size you desired, Be sure to cut 

straight and flat.

2. Open the lid,place one end of bag on the sealing wire

.Be sure 

to stretch the end of bag flat.

3. Press the lid down firmly on both sides at the same time until you 

hear a click, which indicates the vacuum sealer is completely locked.

4. Connect the power supply, press the “Seal” button 

 to initiate the 

sealing function,at the same time the green indicator is light up, after 

11 seconds, It stops automatically when finished sealing,the green 

indicator is off. 

5. At the same time, Press the two release button 

④ 

to open the lid, 

take out the sealed bag.

Notes: *Allow the vacuum sealer to cool down for 30seconds after 

each time it is used.

Removing Air from a Bag

Avoid wrinkles when inserting the bag into the Vacuum Channel

Wrinkles in seal may cause leakage and allow air to return into bag. 

To eliminate any wrinkles while inserting bag, gently slide bag curl 

down into the Vacuum Channel, and hold bag with two hands gently 

stretching bag flat until vacuum pump begins. If you find wrinkles 

after sealing bag, simply cut bag open and vacuum seal again.

If motor runs for more than 30 seconds without stopping, consider the 

following:

If you are vacuum sealing with a bag, make sure one end of the bag 

is properly sealed. If vacuum sealing with an accessory, check 

Handheld Sealer connections to ensure a tight fit.

05

Содержание V69

Страница 1: ...USER MANUAL VACUUM SEALER V69 MANUALE UTENTE BEDIENUNGSANLEITUNG MANUEL D UTILIZATION MANUAL DEL USUARIO www aboxtek com...

Страница 2: ...Contents 01 08 09 17 18 26 27 34 35 42 43 50...

Страница 3: ...children or someone who cannot understand the product s performance make sure one skilled operator oversees the use of the equipment to ensure safety 3 Do not leave the vacuum sealer alone during ope...

Страница 4: ...Button Soft mode 3 Seal button Seal 4 Lid Lock Release Buttons 5 Indicator light Vac seal 6 Indicator light Soft model 7 Indicator light Seal 8 Sealing foam 9 Rubber bar 10 Air suction hole 11 Heatin...

Страница 5: ...ruit and cooked food 1 Fill the vacuum bag with the food to be vacuum sealed and leave enough space between bag contents and top of bag 2 Open the lid and place open side of bag into vacuum chamber l...

Страница 6: ...off Notice 1 The vacuum sealer is not suitable for vacuuming liquid food 2 The maximum width of the vacuum bag pouch is 30cm 300mm 3 Please use the vacuum sealing bags or bags with folded sides or ba...

Страница 7: ...tton to open the lid take out the sealed bag Notes Allow the vacuum sealer to cool down for 30seconds after each time it is used Removing Air from a Bag Avoid wrinkles when inserting the bag into the...

Страница 8: ...the canister is fully closed and air can t enter into it 2 2 Take out accessories vacuum hose insert the sharp end into the air suction hole remove the end with round screw thread another sharp end wi...

Страница 9: ...acuum channel after each use with a piece of cloth or paper 6 After each use place the paper stand between the upper lid and lower lid to prevent sealing foam compression Problems Solution Vacuum seal...

Страница 10: ...rheating heat strip will melt the bag Please lift the lid and let the heat strip cool down for few minutes 2 Wrinkle and moisture or food materials along seal prevents bag from sealing well In general...

Страница 11: ...stung des Produkts nicht verstehen k nnen Stellen Sie sicher dass ein qualifizierter Bediener die Verwendung der Ger te berwacht um die Sicherheit zu gew hrleisten 3 Lassen Sie den Vakuumierer w hrend...

Страница 12: ...oft mode 3 Versiegelungstaste Seal 4 Ein Ausschalter des Deckel 5 Anzeigelampe Vac seal 6 Anzeigelampe Soft mode 7 Kontrollleuchte Seal 8 Dichtungsschaum 9 Gummistange 10 Luftansaug ffnung 11 Heizdrah...

Страница 13: ...ckel und legen Sie die offene Seite des Beutels in die Vakuumkammer l Stellen Sie sicher dass sich der Beutel vollst ndig im Vakuumkanal befindet 3 Dr cken Sie den Deckel auf beiden Seiten gleichzeiti...

Страница 14: ...n Sie dann auf Siegeln um die Versiegelungsfunk tion zu aktivieren sobald der Beutel versiegelt ist Der Vorgang stoppt automatisch und die gr ne Anzeige erlischt Beachten 1 Der Vakuumierer ist nicht z...

Страница 15: ...tnehmen Sie den versiegelten Beutel Hinweise Lassen Sie den Vakuumierer nach jedem Gebrauch 30 Sekunden lang abk hlen Luft aus einem Beutel entfernen Vermeiden Sie Falten beim Einf hren des Beutels in...

Страница 16: ...Rand des Beh lters schlie en und den Knopf des Beh lters zum Verschlie en drehen Stellen Sie sicher dass der Beh lter vollst ndig geschlossen ist und keine Luft eindringen kann 2 2 Zubeh r Unterdrucks...

Страница 17: ...meln oder Speiseresten in den Vakuumierkanal gezogen werden Leeren Sie den Vakuumierkanal nach jedem Gebrauch mit einem St ck Stoff oder Papier 6 Setzen Sie den Papierst nder nach jedem Gebrauch zwisc...

Страница 18: ...ige Minuten abk hlen 2 Falten und Feuchtigkeit oder Lebensmittelmaterialien entlang der Versiegelung verhindern dass der Beutel gut versiegelt Warten Sie in der Regel immer 30 Sekunden zwischen den Si...

Страница 19: ...llte es so bald wie m glich gegessen werden 2 Die beste L sung ist den K hlschrank mit Gefrierfach langsam aufzutauen anstatt hei es Wasser oder W rme zuzuf hren 3 Es ist gef hrlich das Gew rz sp ter...

Страница 20: ...ou guider leur utilisation du produit et assurer leur s curit 3 Lorsque le produit est branch ne le laissez pas sans surveillance 4 Lorsque la proc dure d tanch it est termin e ne touchez pas imm diat...

Страница 21: ...Mode Doux 3 Bouton Sceller 4 Serrures gauche et droite 5 Indicateur Sceller sous vide 6 Indicateur Mode Doux 7 Indicateur Sceller 8 ponge d tanch it 9 Bande d tanch it chaud 10 Trou d aspiration 11 F...

Страница 22: ...le c t ouvert du sac dans la chambre vide assurez vous que le sac est bien dans le canal de vide 3 Appuyez fermement sur le couvercle des deux c t s en m me temps jusqu ce que vous entendiez un d clic...

Страница 23: ...Seal pour le transf rer sur la fonction de scellage Une fois le sac scell il s arr tera automatiquement et le voyant vert s teindra Remarque 1 La machine sous vide ne convient pas pour aspirer des ali...

Страница 24: ...es Laisser refroidir la machine sous vide pendant 30 secondes apr s chaque utilisation Retirer l Air d un Sac Sous Vide vitez les plis lorsque vous ins rez le sac dans la chambre vide Des rides dans l...

Страница 25: ...nt est compl tement ferm et que l air ne peut y p n trer 2 2 Retirez le tuyau d aspiration des accessoires ins rez l extr mit tranchante dans le trou d aspiration d air retirez l extr mit avec un file...

Страница 26: ...de miettes ou de particules d aliments peuvent tre attir es par inadvertance dans la chambre vide Videz la chambre vide apr s chaque utilisation avec un chiffon ou du papier 6 Apr s chaque utilisation...

Страница 27: ...et l humidit des aliments pendant le scellage emp che le sac de bien se sceller 3 En g n ral attendez toujours 30 secondes entre les scell s Probl mes Solutions La machine sous vide ne fonctionne pas...

Страница 28: ...d s que possible 2 La meilleure solution consiste d congeler lentement dans le r frig rateur cong lateur au lieu de le mettre dans de l eau chaude ou en le chauffant 3 Il sera dangereux de manger l al...

Страница 29: ...ble para ni os o alguien que no puede entender el rendimiento del producto aseg rese de que un operador especializado supervise el uso del equipo para garantizar la seguridad 3 No deje la envasadora a...

Страница 30: ...t n de Sellar 4 Bloqueo de la cubierta 5 Indicador de luz Aspirar y sellar 6 Indicador Modo suave 7 Indicador de luz Sellar 8 Esponja de sellado 9 Barra de goma 10 Agujero de aspiradora 11 Alambre de...

Страница 31: ...ecos o duros como carne nueces y otros alimentos Modo Suave para alimentos blandos o sensibles como frutas blandas y alimentos cocidos 1 Llene la bolsa de vac o con la comida que se va a sellar al vac...

Страница 32: ...cualquier bot n para detener la succi n al vac o y luego presione SEAL para transferirlo a la funci n de sellado una vez que la bolsa est sellada se detendr autom ticamente y El indicador verde se ap...

Страница 33: ...saque la bolsa de la aspiradora Notas Deje que la m quina de vac o se enfr e durante 30 segundos despu s de cada uso Extracci n de aire de la bolsa de vac o Evite las arrugas al insertar la bolsa en e...

Страница 34: ...l contenedor est completa mente cerrado y que el aire no pueda penetrarlo 2 2 Saque los accesorios de la manguera de vac o inserte el extremo afilado en el orificio de aspiraci n de aire retire el ext...

Страница 35: ...ada uso coloque el soporte de papel entre la tapa Problemas Soluci n La envasadora al vac o no funciona 1 Aseg rese de que la envasadora al vac o est enchufado aseg rese de que el tomacorriente de par...

Страница 36: ...tamiento derretir la bolsa Levante la tapa y deje que la banda de calor se enfr e durante unos minutos 2 La arruga y la humedad o los materiales alimenticios a lo largo del sello evitan que la bolsa s...

Страница 37: ...sicurarsi che un operatore esperto controlla l uso dell apparecchiatura per garantire la sicurezza 3 Non lasciare la macchina sottovuoto da solo durante il processo di funzionamento 4 Non toccare la s...

Страница 38: ...di Sigilla 4 Blocco del coperchio 5 Indicatore di Aspira Sigillal 6 Indicatore di Modalit Delicata 7 Indicatore di Sigilla 8 Spugna di sigillatura 9 Striscia di sigillatura a caldo 10 Foro di aspirato...

Страница 39: ...come carne noci e altri alimenti Modalit delicata per alimenti morbidi o sensibili come frutti di bosco e cibi cotti 1 Riempire il sacchetto sottovuoto con il cibo da sigillare sottovuoto e lasciare u...

Страница 40: ...remere SEAL per trasferirlo nella funzione di sigillatura una volta sigillato il sacchetto si fermer automaticamente e l indicatore verde si spegner Note 1 La macchina sottovuoto non adatto per gli al...

Страница 41: ...re la macchina sottovuoto raffreddare per 30 secondi dopo ogni volta che viene utilizzato Rimozione dell Aria dal Sacchetto Sottovuoto Evitare le pieghe quando si inserisce il sacchetto nella camera d...

Страница 42: ...in sigillo assicurarsi che il contenitore sia completamente chiuso e che l aria non possa penetrarvi 2 2 Togliere il tubo flessibile di aspirazione degli accessori inserire l estremit affilata nel fo...

Страница 43: ...igillatura e la striscia di sigillatura a caldo si deformnoi sotto pressione e compromettano l uso Problemi Soluzioni Macchina sottovuoto non funziona 1 Assicurarsi che la macchina sottovuoto sia coll...

Страница 44: ...essere sigillato correttamente 1 La striscia a caldo surriscaldata scioglier il sacchetto Sollevare il coperchio e lasciare raffreddare la striscia a caldo per alcuni minuti 2 La ruggine e l umidit oi...

Страница 45: ...ABOX 02 03 04 05 06 07 08 09 10 11 12 13 14 15 16 17 43 JP...

Страница 46: ...1 4 4 2 3 5 6 7 8 9 10 11 12 13 15 14 01 02 03 04 05 06 07 08 09 10 11 12 13 14 15 16 44...

Страница 47: ...AC 100V 50 60HZ 90W 55KPa 20 3KPa 30 2 75Db 300mm 373 77 56 mm 1 1 2 3 4 5 6 1 30 2 3 45...

Страница 48: ...2 1 2 3 4 1 30 2 3 3 1 2 3 4 11 5 30 1 2 30cm 3 4 5 1 2 21 8mm 3 4 1 46...

Страница 49: ...01 02 03 04 05 06 07 08 1 2 3 4 5 6 5 47...

Страница 50: ...1 2 3 4 1 2 3 30 1 1 2 3 4 5 48...

Страница 51: ...16 20 6 2 3 1 2 12 12 12 6 8 5 3 1 3 3 5 10 15 7 10 18 20 30 50 16 20 6 6 6 15 20 10 12 18 24 49...

Страница 52: ...01 02 03 04 01 02 03 04 2 3 05 50...

Отзывы: