background image


2.2.1 Operating Range 

The signal range of 

WLP-01

 depends on the operating environment. Obstacles such as walls 

and metal barriers could reflex or absorb radio signals. Devices such as microwave oven can 
also interfere the wireless network tremendously.   

802.11b:

 Indoor 130ft (40m), outdoor (LOS, Light-of-Sight) 1000ft (310m) 

802.11g:

 Indoor 80ft (30m), outdoor (LOS, Light-of-Sight) 200ft (60m) 

By default, the 

WLP-01

 automatically adjusts the data rate. The closer the wireless stations 

are, the better signal and transmit speed they receive. To improve your wireless transmission, 
move your wireless stations closer to the 

WLP-01

2.3 Driver Installation 

Place the “Driver & Utility CD” into the CD-ROM drive in your system. The following installation 
auto-run screen appears. If not, browse the root directory of the CD-ROM via the File Manager, 
and double click the “AUTORUN” file. 

The contents of the “Driver & Utility CD” packed with 

WLP-01

 are subject to change without 

notice. Visit the 

abit

 website for driver/utilities updates. 

If your computer is using Windows operating system, it will automatically detect the 

WLP-01


when system boots and displays an “Add New Hardware Wizard” window. Click [Cancel] and 
then proceed with the following procedures. 

To install the 

WLP-01

 driver: 

1.  Place its “Driver & Utility CD” into the CD-ROM drive.


2.  The “Driver & Utility CD” automatically displays the Drivers menu if the “AUTORUN” 

function is enabled in your computer. Click the wireless driver and follow the on-screen 
instructions to install the 

WLP-01

 driver.


※ 

If the “AUTORUN” function is disabled in your computer, locate the Wireless 
folder under the root directory of the “Driver & Utility CD”, then double click the 
[Setup.exe] file to start installation. 

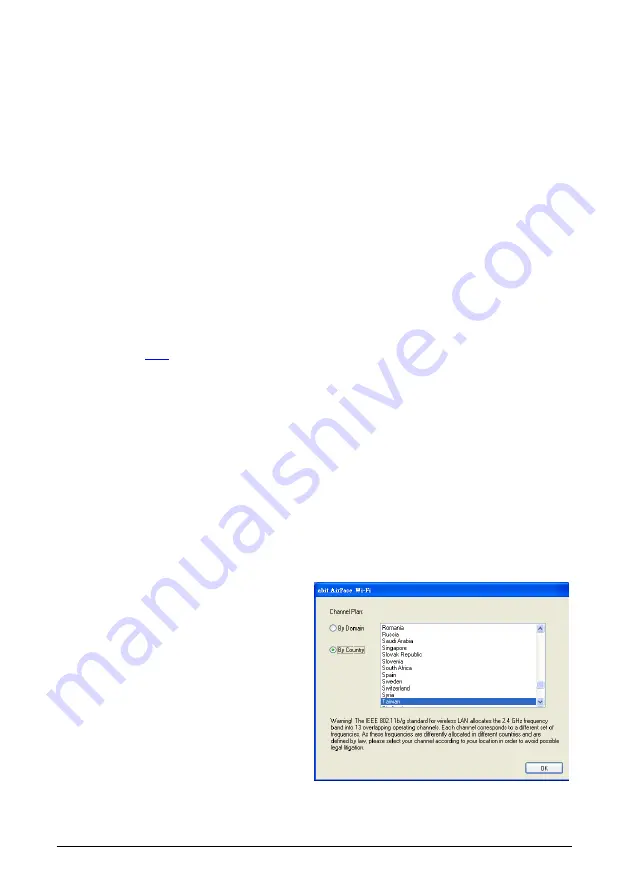
3.  Make sure to select the correct 

operating-channel plan according to your 
residence so as to avoid possible legal 
litigation. 

※ 

To use the “Soft AP” function, you may need to install Ethernet adapter driver. 

WLP-01 

Содержание WLP-01

Страница 1: ...IEEE 802 11b g PCI E X1 54Mbps WLAN Card WLP 01 User s Manual...

Страница 2: ...WLP 01 User s Manual English 1st Edition December 2006 ii WLP 01...

Страница 3: ...2 2 1 Operating Range 8 2 3 Driver Installation 8 3 Network Connecting 9 4 Setup 11 4 1 About the Setup Wizard and Setup Utility 11 4 2 Setup Wizard 12 4 2 1 Create a wireless access point 12 4 2 2 J...

Страница 4: ...S Light of Sight 802 11g Indoor 80ft 30m Outdoor 200ft 60m LOS Light of Sight The range varies upon environments Supported Network Ad Hoc Mode Infrastructure Mode Software Access Point Soft AP Number...

Страница 5: ...e along with complementary code keying to provide data rates of 1 2 5 5 and 11Mbps with long or short preamble A high speed Fast Fourier Transform FFT Inverse Fast Fourier Transform IFFT combined with...

Страница 6: ...hment The application utility of WLP 01 automatically searches and reports the hot spots found along with their signal quality and WEP capability You can choose the most suitable wireless node to conn...

Страница 7: ...een LED for transmission status and an antenna port to connect to the external antenna LED Status Indication On Power on no data activity Off Power off no wireless connection Fast Blinking Transmittin...

Страница 8: ...g it up The following illustrations are for reference only and may not match exactly the same as your actual network configuration 1 4 1 Ad Hoc mode In the Ad Hoc mode the WLP 01 brings your computer...

Страница 9: ...wireless LAN enabled computer within the range of the access point can communicate with other wireless LAN enabled computers within the valid range of signal from the access point Roaming A wireless...

Страница 10: ...quirements of choosing Soft AP mode 1 Windows XP Server 2003 operating system 2 A system with Internet or Intranet connected through another Ethernet LAN adapter The Soft AP mode is ideal for home net...

Страница 11: ...card This picture is for reference only and may have size shape or parts differences in the antenna or WLAN card itself 2 Locate one available PCI E X1 slot on your motherboard Due to each motherboard...

Страница 12: ...he contents of the Driver Utility CD packed with WLP 01 are subject to change without notice Visit the abit website for driver utilities updates If your computer is using Windows operating system it w...

Страница 13: ...alogue appears Click item View Available Wireless Networks 2 Choose a wireless network in range and then click Connect button to start connecting 3 Wait while the Windows connects to the wireless netw...

Страница 14: ...5 The wireless network you choose is now connected 6 You may view the Wireless Network Connection Status by clicking item Status in the pop up dialogue 10 WLP 01...

Страница 15: ...Wizard and the Setup Utility The Setup Wizard helps you to 1 create a wireless access point or 2 join an existing wireless network The Setup Utility helps you to 1 view Network Monitor Status Statist...

Страница 16: ...reate a wireless access point box to create a wireless access point and then click Next button to start creating 2 Type in your SSID name and or specify a network key to your network 3 Select the conn...

Страница 17: ...ded Click Finish button to complete the setup wizard 5 The network mode is switching to AP Mode please wait 6 Your network is in AP Mode 4 2 2 Join an existing wireless network Please use Windows auto...

Страница 18: ...cs Advanced and Internet Connection Sharing ICS The ICS icon is grayed out in Station Mode 2 At the left column you may click the icon to switch either to Access Point Mode or Station Mode 3 The netwo...

Страница 19: ...e you can change the SSID select the communication channel and specify the network security Click Close button to finish the setup 6 At the left column you may also click the icon to enable or disable...

Страница 20: ...work Connection icon in the Control Panel or right click the network icon located at the desktop shortcut the pop up dialogue appears Click item Open Network Connections 2 Double click the abit AirPac...

Страница 21: ...the Use Windows to configure my wireless network settings box Click the Advanced button to enter the settings 4 Check the Computer to computer ad hoc networks only box and then click Close button to...

Страница 22: ...Wireless Networks tab click the Add button to establish your own network 6 Type in your SSID name decide your network security and then click OK button to finish settings 7 Your network is in Ad Hoc M...

Страница 23: ...gary Iceland India Indonesia Ireland Italy Kuwait Latvia Lebanon Liechtenstein Lithuania Luxembourg Macedonia The Former Yugoslav Republic of Malaysia Morocco Netherlands New Zealand Nigeria Norway Pa...

Страница 24: ...t complies with FCC RF radiation exposure limits set forth for an uncontrolled environment This device and its antenna must not be co located or operating in conjunction with any other antenna or tran...

Страница 25: ...European standards dictate maximum radiated transmit power of 100mW EIRP and frequency range 2 400 2 4835GHz In France the equipment must be restricted to the 2 4465 2 4835GHz is herewith confirmed to...

Страница 26: ...96 EC on Waste Electric and Electronic Equipment WEEE This document contains important information for users with regards to the proper disposal and recycling of abit products Consumers are required t...

Страница 27: ...Denmark Norway Sweden Finland Switzerland Universal ABIT NL B V Jan van Riebeeckweg 15 5928LG Venlo The Netherlands Tel 31 77 3204428 Fax 31 77 3204420 Chamber of Commerce Venlo number 12062448 Austr...

Страница 28: ...Rev 1 00 http www abit com tw...

Отзывы: