background image

18 

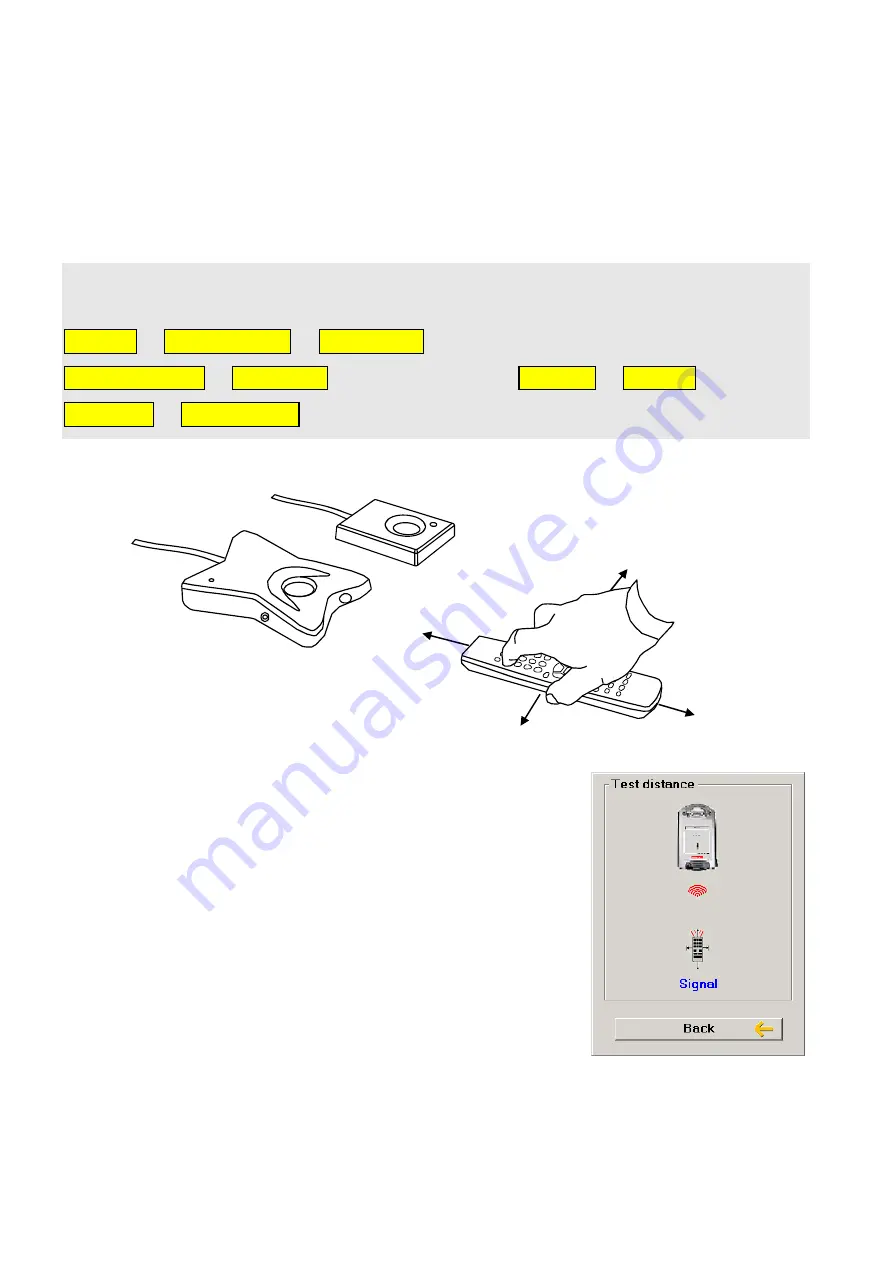
Testing the Distance 

The distance between the remote control unit and the transmitting unit must be 
correct, in order to obtain good results when recording IR codes. This distance 
differs from one remote control unit to another, and thus you should check the 
distance before recording new IR codes from the remote control unit. Direct the 
remote control unit at the transmitting unit, exactly as is shown in the figure. 
  

Determine the correct distance during recording by the following 
procedure: 

Settings 

 Pages/buttons 

 Select page 

 browse among the pages 


Select this page 

 Edit button 

 Select a button 

  Function 

 Send IR 


Record IR 

 Test distance 


When you have selected “Test distance” proceed as 
follows: 
Press and hold down any button on the remote control 
unit while moving the remote control unit to the left until 
”No signal” is displayed on the screen. Then move the 
remote control unit to the right until “No signal” is 
displayed on the screen. The best position is then 
located between these positions.  
Now move the remote control unit backwards until “No 
signal” is displayed on the screen (around 1 metre for 
certain units). The best position is then 

between 

the 

transmitting unit and the most distant position.  
 
Note! Certain types of remote control units send only instantaneously when a 
button is pressed. In this case, you must press the button many times, rather 
than pressing it and holding it down. 

Содержание Progress Micro USB

Страница 1: ...Rev I GB English manual for Progress PC Progress Star USB and Progress Micro USB Manual...

Страница 2: ...nd Volume 13 Auditory Feedback 13 Auditory Scanning 13 Making a Back up and Default Settings 14 Making a Back up 14 Restoring a Back up 14 Default Setting 14 Managing Pages 15 Adding a Completed Page...

Страница 3: ...Places 25 Miscellaneous Topics 26 Checking the Version 26 Usage Conditions 26 Cleaning 26 Completed Pages 27 Brief Guide to Programming the Jupiter Loudspeaker Telephone with Progress PC 34 GewaLink...

Страница 4: ...unction Advantages of Progress PC Progress PC makes it possible to learn IR codes from most IR remote control units on the market to place up to 256 IR channels in its memory to create IR macros to cr...

Страница 5: ...itter unit can be either a Progress Star USB or a Progress Micro USB When any of these transmitting units is connected all functions available in Progress PC can be used It is also possible to connect...

Страница 6: ...Micro USB or USB serial adapter if it has been connected 3 Go to Abilia website and download the software Progress PC Search for Progress PC 4 Click on the installation file 5 Double click to extract...

Страница 7: ...ressing on M1 if a telephone is connected and the settings are correct Press on the image of the blue telephone handset in order to end the call Return to the start page by pressing on the image of th...

Страница 8: ...8 can be added speech can be recorded etc Press the tools icon in order to obtain access to the Settings menu...

Страница 9: ...the mouse pressing the screen or using scanning The Settings menu can only be accessed from the screen shown in the figure Language Selection Progress PC is delivered with English as the selected lang...

Страница 10: ...w Page on Page 15 The various scanning methods are as follows Automatic scanning Progress PC steps forward automatically following a press on the control switch Manual scanning Progress PC steps forwa...

Страница 11: ...row 2 etc Change the scanning method by the following procedure Settings Scanning Method Follow the plan below to select the type of scanning desired Row Column automatic 1 switch Linear automatic Me...

Страница 12: ...anning Speed Factory default 1 step sec Number of scans A scan is completed when Progress PC has stepped through a page and starts again from the beginning The number of scans can be adjusted between...

Страница 13: ...e word lamp or it may be simply a click If recorded sound has been selected but no sound has been recorded a click sound will be heard instead Change the auditory feedback by the following procedure S...

Страница 14: ...is possible provided that a back up has been made of the previous settings See the section Making a back up Restore a back up copy by the following procedure Settings System Back up Restore Default Se...

Страница 15: ...button on the starting page If no button is available a new row is created The text on the button can be exchanged for an image See the section Adding Images page 24 Add a completed page by the follo...

Страница 16: ...ed can also be removed by the same procedure Remove a page by the following procedure Settings Pages buttons Add remove a page Remove page browse among the pages Remove page Remove Adding or Removing...

Страница 17: ...pages Export a page by the following procedure Settings Pages buttons Export page browse among the pages Export this page Select whether to export with a new name or to overwrite an existing file Foll...

Страница 18: ...ton Function Send IR Record IR Test distance When you have selected Test distance proceed as follows Press and hold down any button on the remote control unit while moving the remote control unit to t...

Страница 19: ...be a case of a single button or all the buttons on a unit Select recording by the Alternative method if recording by the standard method does not work Rapid Recording If many IR codes are to be recor...

Страница 20: ...otal of 256 memory locations are available but these must be shared with learned IR codes IR macros and 4096 codes Insert a GewaLink channel by the following procedure Settings Pages buttons Select pa...

Страница 21: ...ge Edit button Select the button on which the IR macro is to be stored Function Send IR IR macro Start macro recording Press the buttons that are to be included in the IR macro Creating the Go to Page...

Страница 22: ...buttons Select page Select the page on which the recorded sound is to be placed Choose this page Edit button Select the button on which the recorded sound is to be placed Function Sound Start recordi...

Страница 23: ...utput and GewaLink channel Alarm function on any button The alarm function can be placed on any button in Progress PC An image and a sound signal are chosen at the same time as the function is chosen...

Страница 24: ...ating system Edit an image in Paint by the following procedure 1 Open the Paint image processing program by clicking on Start Program Accessories Paint 2 Click on File Open 3 Browse to the folder in w...

Страница 25: ...ooks on the button Write text for a button by the following procedure Settings Pages buttons Select page Select the page on which the button to be edited is located Select this page Edit button Select...

Страница 26: ...d Windows 3 The software for the transmitting unit Check all forms of versions by the following procedure Settings System Version Usage Conditions Progress Star or Progress Micro is intended to be use...

Страница 27: ...other items such as a TV All GewaLink channels are used only once on these completed pages in order to avoid one channel controlling several functions Many pages contain short cuts for answering the...

Страница 28: ...control with up to 8 functions Some lamps etc CD changer Short cuts on the upper row CD changer CD DVD DVD CD control Can be used with a HiFi page DVD control Short cuts on the upper row DVD control...

Страница 29: ...AL GL 16 47 1 Ring individual numbers with Jupiter Functions with Gewa Jupiter s factory defaults GewaLink 16 31 Short cuts on the upper row 2 Ring individual numbers with Jupiter Set Jupiter to use G...

Страница 30: ...r channel 7 Short cuts on the upper row 3 4 See Page 34 for instructions on programming Jupiter JUP DIR KEY ALT 7 JUP DIR KEY GL 16 47 JUP DIR KEY GL 16 47 4 Direct dialling buttons for Jupiter Set Ju...

Страница 31: ...Direct dialling buttons for Jupiter Set Jupiter to use GewaLink 96 127 Short cuts on the upper row A 4096 code must be created 5 3 See Page 34 for instructions on programming Jupiter JUP DIR KEY GL 9...

Страница 32: ...he Text TV button can be used for linking to Text TV Short cuts on the upper row TV SIMPLE TV TEXT TV TEXT Simple TV control The Text TV button can be used for linking to Text TV Included as a standar...

Страница 33: ...on the upper row Simple TV page Control of TV and decoder Short cuts on the upper row TV DECODER VCR VCR DVD control Simple page for a video player Short cuts on the upper row Simple page for a video...

Страница 34: ...ator lamp on Jupiter flashes red 5 Press 0 within 3 seconds on Jupiter 6 Press 3 4 on Jupiter The indicator lamp now flashes three times as a confirmation 2 These pages use GewaLink channels 16 47 div...

Страница 35: ...irmation 4 This page only uses a number of directly dialled numbers Use this page by following this procedure 1 Add this pages to Progress PC 2 Go to the same page which allows the user to control Jup...

Страница 36: ...5 05 21 37 53 69 85 101 117 6 06 22 38 54 70 86 102 118 7 07 23 39 55 71 87 103 119 8 08 24 40 56 72 88 104 120 9 09 25 41 57 73 89 105 121 0 10 26 42 58 74 90 106 122 11 27 43 59 75 91 107 123 12 28...

Страница 37: ...37 Images and Symbols The following images and symbols are included with Progress All the images are grouped into various categories BED DVD...

Страница 38: ...38 HIFI...

Страница 39: ...39 NUMBERS SYMBOLS...

Страница 40: ...40 PICTOGRAMS TELEPHONE...

Страница 41: ...41 TV...

Страница 42: ...42 VCR...

Страница 43: ...9 x 54 x 20 mm Dimensions L x W x H Progress Micro 46 x 36 x 16 mm Temperature range 0 40 C Connection USB port The Medical Device Directive Progress PC Progress Star USB and Progress Micro USB are ma...

Страница 44: ...44...

Страница 45: ...45 Abilia AB Kung Hans v g 3 Sollentuna Box 92 191 22 Sollentuna Sweden Phone 46 0 8 594 694 00 Fax 46 0 8 594 694 19 info abilia se www abilia org uk 808592 Manual Progress PC GB RevI Sep 2015...

Отзывы: