Call Toll Free:
877-788-7253
Email:
9
Initial Setup
Fig 1.
Fig 5.
Fig 3.
Fig 2.
Fig 6.
Fig 4.
Mobile shutter
Black threaded
bushing
M30 nut
Slide threaded bushing thru
hole in bottom of hopper.
Fasten guard onto
main support frame.
Welded tab on Main support
frame (both sides).
Guard faces opposite direction
than long welded brackets on
main frame support.
ABI recommends assembling the broadcast spreader be
done by 2 people.
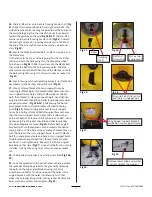
1.
Locate the hopper, mobile shutter, black threaded
bushing and the M30 nut (
Fig 1
).
2.
Slide the black threaded bushing through the bottom
hole of the hopper (
Fig 2
). Place the mobile shutter on the
bottom of the hopper with the black threaded bushing going
thru the hole in the mobile shutter (make sure the sliding
grooves on the mobile shutter are facing away from the
hopper and in the same direction as the hole pointed out
on the side of the hopper shown in
Fig 2
). Hold the black
threaded bushing by reaching thru the square hole in the
mobile shutter to keep it from spinning while threading the
M30 nut onto the black threaded bushing and tighten using
two large adjustable wrenches (one person will need to be
on the inside of the hopper holding the hex portion of the
threaded bushing with an adjustable wrench while the 2nd
person is on the outside of the hopper tightening the M30
nut with an adjustable wrench while keeping the mobile
shutter facing the direction as the hole in the side of the
hopper) (
Fig 3 & 4
). Then set aside.
3.
Locate curved guard, Main support frame, (2) M8x20 bolts,
(2) Ø8 flat washers and (2) M8 nuts (
Fig 5
).
4.
Fasten the curved guard onto the frame using the M8x20
bolts, Ø8 washers and M8 nuts (hand tighten only at this
time) (
Fig 6
).
5.
Locate spreader disc, main support frame, flat cotter pin
and hopper assembly (
Fig 7
).
6.
Slide the spreader disc onto the outgoing shaft with the
"X" shaped ribs on the spreader disc facing toward the end
of the outgoing shaft (
Fig 8
). Line up holes in spreader disc
and outgoing shaft and secure with flat cotter pin (
Fig 9
).
Slide end of outgoing shaft into black threaded bushing on
bottom of hopper assembly.
Depending on which broadcast spreader that was
purchased, there is either an M8x40 carriage bolt (on the
103-130 and 106-130 models) or an M8x45 carriage bolt
(on the 103-230 and 106-230 models). Insert the M8x40 (or
M8x45 depending which model was purchased) carriage
bolt from the inside of the hopper thru the hole pointed out
in (
Fig 2
) then thru the hole in the main support frame (
Fig
11
). Slide the fender washer and lockwasher onto the end
of bolt. Thread the M8 nut onto the bolt and tighen using a
13mm wrench or socket set (
Fig 12
).
NOTE:
Since the carriage bolt has a square section under
its head, the carriage bolt head will not fully seat onto the
inside surface of the hopper wall which may not allow
enough room after sliding it thru the frame to add the fender
washer and lock washer and still thread the nut on.


