background image

American Beer Equipment 


2001 SW 6

th

 St. 


Lincoln, NE 68522 

32 


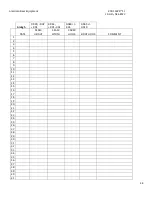
Figure 24 Main Timing Saves Screen with Second Row Selected 


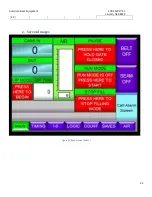
Figure 25 Main Time Saving Screen Asking to Read from PLC 

Different time setting profiles, or recipes, can be saved on the CraftCan system. This is valuable for different beers or 

cans. Once you like a specific profile, you can go back to it. 

Saved setup screen 

Pressing “Main Timing Saves” button brings up spreadsheet screen. 

Select left column number to highlight entire row 

Edit button will be black. Select edit button and it turns white and “read PLC” Button becomes live. 

Select read PLC button and you will be asked “Read Data from PLC and Overwrite Selected Row?” 

Choose “OK” to proceed. 

All current data is saved in the selected row. 

Содержание CraftCan 15

Страница 1: ...ich is confidential proprietary privileged and exempt from disclosure Unless written consent is provided by the Legal Department any copying or distribution of this communication is strictly prohibited CraftCan 15 35 User Guide Ver 1 3 Copyright 2016 American Beer Equipment 2001 S W 6th St Lincoln NE 68522 402 475 BEER ...

Страница 2: ...e a comprehensive quality assurance and inspection process prior to final packaging and shipment to you Any residues you see on the surfaces of the CraftCan are a result of this testing process and are to be considered normal Your beverage tubes may have CIP chemical residue in them from when they were cleaned before shipping Please read this entire manual prior to installing and operating your Cr...

Страница 3: ... Filling 6 b Seaming 9 a Double Seam Setup Procedures 10 d Seaming Adjustment Guide 13 5 Cleaning 16 6 Dissolved Oxygen 17 Troubleshooting 17 7 Tips 18 a Filling 18 a Too Much Foam 18 i Too Little Foam 18 i Seaming 19 8 Maintenance 20 a Seamer 20 i Roller bearing grease 20 ii Cylinders 20 iii Bearings 20 b Filler 20 c Other 20 9 Troubleshooting 21 a Filler 21 i Fill Times 21 ii Beer Lines 22 iii N...

Страница 4: ... Other 25 f Mac Valves Manifold Videos 25 10 Height Changeover 27 a Nozzle Cylinder Height 27 b Lid Escapement Height 28 c Seamer s 29 11 SAVED SETUP RECIPES 31 12 Appendix 33 a Time Settings 33 b Main Connections 34 c Troubleshooting Double Seam Guide 35 d Double Seam Specifications 36 e Screen Images 45 f Clock Adjustment 51 g Checklists 54 ...

Страница 5: ... the machine is running Doing so may be harmful Warning Before installing or servicing system always turn off main power to system There may be more than one 1 disconnect switch Electrical Shock can cause personal injury or death a Uncrating the CraftCan a Uncrate the CraftCan and inspect the system for shipping damage If damage is discovered contact your shipping carrier prior to start up The sys...

Страница 6: ...e best possible canning experience possible Insufficient air demands will not allow for an optimal experience 3 CIP Procedures a The CraftCan System has the ability for CIP The tubing is rated for up to 165 degrees Fahrenheit To start CIP place cans below the nozzles and hit CIP on the Main screen Figure 1 The nozzle cylinder will extend and the nozzles will open The CIP time duration can be alter...

Страница 7: ...dy to start canning go to Input Outputs on the HMI screen Figure 1 a Click Enable Testing Must always be depressed first for any action to take place b Cycle Can Push and Push to Seam to make sure the cylinders are running smoothly If they are not see if beer has dried on the shafts Hot water and FDA approved silicon spray will produce a smooth cylinder operation c Use the CIP button to cycle the ...

Страница 8: ...ms may be compromised if the pressure drops below the recommended Your machine will wait for your compressor to catch up before canning may resume iv Note The PAUSE button is on the main screen to prevent cans from entering the filler You may press this button at any time to prevent more cans from entering the filler v Note You may also prevent can movement at any time by pressing the CONVEYOR but...

Страница 9: ...wer than the average nozzle If an individual nozzle is too quick or slow alter the nozzle s time setting accordingly E C02 Pulse can be turned off or on via the time setting screen a Typically a small jet around 020 seconds provides the correct amount of extra CO2 3 4th of the way up the can to promote an extra layer of foam This foam will allow lids to lie atop the foamy head and prevent dissolve...

Страница 10: ...g sure the can seam falls within the manufacturer s double seam specifications is of utmost importance Follow the procedures below to make sure your can is in spec after installing a new roller operation die If your seams were previously in spec but are now on the outside range please refer to the Double Seam Setup Procedures Proper maintenance of your rollers will prolong repeatable and accurate ...

Страница 11: ...n manually with hand until it touches chuck lip a back off 1 8 turn aprx 003 on Figure 4 5 Bring 2nd Op roller in to chuck Input Output Screen Figure 31 a Adjust the stroke of the connected seaming cylinder until it is 0 003 0 005 away from the chuck X1 on Figure 4 6 Rotate 2nd Op roller down manually with hand until it touches chuck lip a back off 1 4 turn aprx 009 015 Figure 4 7 Check 1st Op rol...

Страница 12: ...American Beer Equipment 2001 SW 6th St Lincoln NE 68522 11 Figure 4 Roller Chuck Y1 X1 ROLLER LIP CHUCK LIP ...

Страница 13: ... Two seaming pucks are included with your machine Typically one of the two pucks will fit the bottom of your can profile The can bottom should rest fully onto the puck with minimal slop If the can does not rest fully onto the puck the other puck should be swapped out and tested Please contact ABE Customer Service for further help if needed ...

Страница 14: ...o chuck Long Body Hook Lift table high Pressure high Die 1 too far from chuck Long Cover Hook Die 1 too close to chuck Short Body Hook Lift table low Pressure low Die 1 too close to chuck Die 2 too far from chuck Short Cover Hook Lift table too high Die 1 too far from chuck A more comprehensive table provided by Ball Beverage can be found in Figure 28 Figure 6 Pin Gauge Height Pin Gauge Height ...

Страница 15: ...r tightening the adjustment knob Figure 8 Roller Assembly Roller height can be adjusted by loosening the socket head cap screw and turning the roller assembly in or out The roller s position can be fixed by tightening the socket head cap screw to 14 5 ft lbs LIFT TABLE COVER LIFT TABLE PUCK SOCKET HEAD CAP SCREW SEAMING CYLINDER ROLLER PIN HEIGHT ADJUSTMENT KNOB ...

Страница 16: ...0 lower than specification 4 Do not over grease rollers a Over greasing may lead to deadhead b Use Kluber nh1 14 261 grease or similar 0 grade 5 Take 3 seam measurements 120 degrees apart 6 Adjustments not needed unless consistently out of range specs Figure 9 Chuck and roller assembly Extending cylinder red arrow will extend the roller into the chuck You may thread the cylinder shaft into the fem...

Страница 17: ...s should not be exposed to liquids such as beer and water Similarly valve manifolds should not have direct exposure to liquids such as beer and water Every effort must be made to avoid spraying of liquid in the electrical box vents or near any of the valve manifolds Failure to adhere to these restrictions may negatively affect components and hinder the performance of your CraftCan system c Without...

Страница 18: ...ypically attributed to a loose fitting which has beer passing through it If a fitting is not tight oxygen may enter the system and higher than preferred dissolved oxygen levels may result Furthermore there cannot be oxygen in the headspace of the can The headspace must be filled with CO2 The headspace should not be filled with product as this overfills the can Consult your specific dissolved oxyge...

Страница 19: ...s e After the CraftCan has reached a stable temperature and is no longer warm the fill times should remain consistent If inconsistent fill levels are seen please check the brite tank head pressure If the brite pressure fluctuates so too will your fill levels Please contact ABE if you would like to get information on the Watch Dog unit which monitors your brite pressure and adjusts accordingly to p...

Страница 20: ...on dimensions are correct does not mean the cover hook and body hook are correct It is the responsibility of the customer to ensure proper seams as specified by the lid manufacturer iii Please view a very thorough video on seaming from Crown DBL Seamer Training https www youtube com watch v WGyb wknUSY A If you watch the above you will have a very high understanding of the entire seaming process B...

Страница 21: ...ld especially be considered 2 Check shuttle cylinder cylinder which provides cans into seamer Replace after 2 million cans per seamer if needed 4 million cans for two seamers Change out requires approximately 45 minutes 3 Check 1 3 4 bore seamer cylinders Replace after 20 million cans per seamer if needed Changeout takes approximately 15 minutes 4 Check filler cylinder Replace after 28 million can...

Страница 22: ...fill outside of the can This can cause high dissolved oxygen in the can In order to get this time setting in place you need to adjust nozzle probe debounce and extend fill so that the nozzle starts to rise out of the can with the beer shutting off when the nozzle is about to out of the can This will provide the least amount of displacement and ensure you are getting a full can of beer You can also...

Страница 23: ...enter of the nozzle tube The most probable cause may be the ball has worn itself into the stainless tube a bit and the cylinder needs to retract the ball up into the nozzle body a bit more This will ensure a tighter seal between the nozzle body and ball There are two threaded areas Figure 12 which have adjustment in the form of threads coupling and rod Either section can provide a tighter seal In ...

Страница 24: ...height is too short the pin gauge distance needs to be increased by moving the puck down ii Shuttle to Seamer If your seamer shuttle cylinder is not responding correctly make sure a lid is not interfering with the sensor A lid can false trigger the sensor Also make sure water or beer is not on the lens The sensor will light up and display a value higher than 120 when it is activated when a lid is ...

Страница 25: ...is centered above the can Also make sure the lid is positioned properly above the can the can needs to be centered between the lid s pocket as shown in Figure 13 Make sure this area is clean and free of sticky beer Clean and lube before each run Precise adjustments can be made by adjusting the wedge rod in Figure 15 Figure 14 Proper Can and Lid Alignment ...

Страница 26: ... the can s top edge Caution Exceeding 60 psi may result in damage to the lid tap cylinder and will not be covered by warranty e Other a Exahusting flow controls are used on many cylinders a Increasing flow turning counterclockwise will increase the flow exiting from the cylinder port b Decreasing flow turning clockwise will decrease the amount of flow exiting the cylinder f Mac Valves Manifold Vid...

Страница 27: ...16 Emergency Stop h Air Pressure monitor a If air pressure drops below minimum pressure value run mode will deactivate It is wise to keep this minimum no less than 90psi as the seam of the can relies on the system pressure being above 90 Figure 17 Air Pressure Screen ...

Страница 28: ...r smaller diameter other changes may be required Your machine can also fill and seam 24 oz cans Several other modifications may be required Please contact ABE for more information a Nozzle Cylinder Height There is a sensor at the top of the cylinder s stroke as well as the bottom When adjusting for different height cans typically only the top sensor is adjusted Therefore the top sensor needs to li...

Страница 29: ...justed so that the can fits perfectly in the pocket of the lid as shown The wedge makes the adjustment process very convenient Just loosen the jam nut at the top twist the wedge and then tighten back down the nut If the lids are too low the cans will likely run into the lids and too many lids will fall out at a time If the lid chute is too high no lids will be picks Figure 19 Lid Escapement showin...

Страница 30: ...d translates up and down while the front of the skimmer pivots The end should be slightly lower than the height of a seamed can Adjustments for the height can be made using the adjustment knobs behind the black UHMW skimmer c Seamer s Seamer height adjustment is done by inserting or taking out an adapter machined to the correct difference between the can sizes Figure 21 After the heights are chang...

Страница 31: ...American Beer Equipment 2001 SW 6th St Lincoln NE 68522 30 Figure 21 Seamer height difference between a 12 oz can right and 16 oz can left with the adapters shown in the middle ...

Страница 32: ...American Beer Equipment 2001 SW 6th St Lincoln NE 68522 31 11 SAVED SETUP RECIPES Figure 42 Saved Setup Screen Figure 23 Main Timing Saves Screen ...

Страница 33: ...le for different beers or cans Once you like a specific profile you can go back to it Saved setup screen Pressing Main Timing Saves button brings up spreadsheet screen Select left column number to highlight entire row Edit button will be black Select edit button and it turns white and read PLC Button becomes live Select read PLC button and you will be asked Read Data from PLC and Overwrite Selecte...

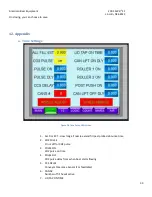
Страница 34: ...re 26 Time Setup HMI Screen 1 ALL FILL EXT How long all nozzle extend fill past probe debounce time 2 CO2 PULSE On or off for CO2 pulse 3 PULSE ON CO2 pulse on time 4 PULSE DLY CO2 pulse delay from when beer starts flowing 5 CCS DELAY Conveyor Clearance Sensor For feedtable 6 CANS Number of fill heads active 7 LID TAP ON TIME ...

Страница 35: ...time after the shuttle pushes a can in to when the cylinder lifts to seam 9 ROLLER 1 ON Time roller one cylinder is extended 10 ROLLER 2 ON Time roller two cylinder is extended 11 CAN LIFT OFF DLY Amount of time before can is dropped after roller two is retracted b Main Connections Figure 27 Main Connections Main Air Co2 ...

Страница 36: ...American Beer Equipment 2001 SW 6th St Lincoln NE 68522 35 c Troubleshooting Double Seam Guide Figure 28 Seam Troubleshooting Provided by Ball Corporation ...

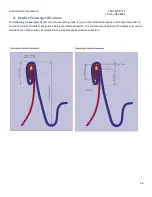
Страница 37: ...g are examples of common double seam guides It is up to the individual brewery and can end provider to ensure the correct double seam guide is being used and adhered to It is also the responsibility of the brewery to ensure maintenance of the seamer as outlined in the Preventative Maintenance Section ...

Страница 38: ...American Beer Equipment 2001 SW 6th St Lincoln NE 68522 37 ...

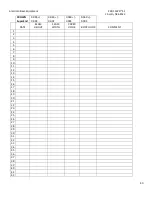
Страница 39: ...oln NE 68522 38 CROWN LOE 0 098 0 003 0 043 0 002 0 053 MIN 0 065 0 010 DATE SEAM HEIGHT SEAM WIDTH COVER HOOK BODY HOOK COMMENT 1 2 3 4 5 6 7 8 9 10 11 12 13 14 15 16 17 18 19 20 21 22 23 24 25 26 27 28 29 30 31 32 33 34 35 36 37 38 39 40 41 42 ...

Страница 40: ...American Beer Equipment 2001 SW 6th St Lincoln NE 68522 39 ...

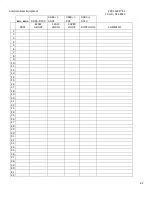
Страница 41: ...NE 68522 40 CROWN SuperEnd 0 095 0 003 0 043 0 002 0 060 0 005 0 060 0 005 DATE SEAM HEIGHT SEAM WIDTH COVER HOOK BODY HOOK COMMENT 1 2 3 4 5 6 7 8 9 10 11 12 13 14 15 16 17 18 19 20 21 22 23 24 25 26 27 28 29 30 31 32 33 34 35 36 37 38 39 40 41 42 ...

Страница 42: ...American Beer Equipment 2001 SW 6th St Lincoln NE 68522 41 ...

Страница 43: ...ln NE 68522 42 BALL 86 GA 0 096 0 100 0 044 0 001 0 060 005 0 065 0 010 DATE SEAM HEIGHT SEAM WIDTH COVER HOOK BODY HOOK COMMENT 1 2 3 4 5 6 7 8 9 10 11 12 13 14 15 16 17 18 19 20 21 22 23 24 25 26 27 28 29 30 31 32 33 34 35 36 37 38 39 40 41 42 ...

Страница 44: ...American Beer Equipment 2001 SW 6th St Lincoln NE 68522 43 ...

Страница 45: ...coln NE 68522 44 Ardagh 0 099 002 001 0 044 001 002 0 060 005 0 065 0 010 DATE SEAM HEIGHT SEAM WIDTH COVER HOOK BODY HOOK COMMENT 1 2 3 4 5 6 7 8 9 10 11 12 13 14 15 16 17 18 19 20 21 22 23 24 25 26 27 28 29 30 31 32 33 34 35 36 37 38 39 40 41 ...

Страница 46: ...American Beer Equipment 2001 SW 6th St Lincoln NE 68522 45 42 e Screen Images Figure 29 Main Screen HOME ...

Страница 47: ...American Beer Equipment 2001 SW 6th St Lincoln NE 68522 46 Figure 30 Timing Setup ...

Страница 48: ...American Beer Equipment 2001 SW 6th St Lincoln NE 68522 47 Figure 31 Inputs and Outputs Screen ...

Страница 49: ...American Beer Equipment 2001 SW 6th St Lincoln NE 68522 48 Figure 32 Diagnostics Screen ...

Страница 50: ...American Beer Equipment 2001 SW 6th St Lincoln NE 68522 49 Figure 33 Can Count ...

Страница 51: ...American Beer Equipment 2001 SW 6th St Lincoln NE 68522 50 Figure 34 Saved Setups for Custom Recipes ...

Страница 52: ...American Beer Equipment 2001 SW 6th St Lincoln NE 68522 51 f Clock Adjustment If you would like to change the PLC clock time Figure 33 perform the following Figure 35 Adjusting the Clock ...

Страница 53: ...American Beer Equipment 2001 SW 6th St Lincoln NE 68522 52 Figure3 5 Setting Menu ...

Страница 54: ...American Beer Equipment 2001 SW 6th St Lincoln NE 68522 53 Figure36 Accessing the System Setup Screen ...

Страница 55: ...ething happens you have a log for how far back to look for the problem Crown Checklist Record Seam Height and Width every 15 minutes Perform tear down hourly Target dims must be taken from YOUR double seam guide Ball Checklist Record Seam Height and Width every 15 minutes Perform tear down hourly Target dims must be taken from YOUR double seam guide Rexam Checklist Record Seam Height and Width eve...

Страница 56: ...Beer Pre Start Checklist Task Number Leader Initials Operator Initials Pre Run Set Up Task Description with Specific Detail Relative to Task Measurements Settings outcomes critical to quality safety etc 1 Is the bacteria level on the filler nozzle acceptable 2 Is the carbonation level of the beer acceptable 3 Is the dissolved oxygen of the beer acceptable 4 Is the brite tank pressure correct 5 Is ...

Страница 57: ... Figure 1 3 3 Ensure seaming chuck set including screw is tight Spare Parts Figure 2 11 and visually inspect the chuck for tightness if it is tight there will be no gap between the chuck and upper adapter 4 Ensure the complete seamer cylinder and lower bearing assembly bolts are tight 130 Nm Spare Parts Figure 2 13 5 Ensure lower seamer puck is not loose or wobbly Spare Parts Figure 2 16 6 Ensure ...

Страница 58: ...ning line 13 Perform Seam Check on three cans per seamer Remove cans and conduct tear down Measure to ensure seam is in spec Record data on can checklist 12 Double Seam Specs 14 Ensure cans are present on the seamer pucks Spare Parts Figure 2 16 Task Number Detailed explanation comments required for any task not completed or partially completed If a fastener is loose the threads must be cleaned wi...

Страница 59: ...American Beer Equipment 2001 SW 6th St Lincoln NE 68522 58 ...

Страница 60: ...American Beer Equipment 2001 SW 6th St Lincoln NE 68522 59 ...

Страница 61: ...American Beer Equipment 2001 SW 6th St Lincoln NE 68522 60 ...

Страница 62: ...American Beer Equipment 2001 SW 6th St Lincoln NE 68522 61 ...

Страница 63: ...American Beer Equipment 2001 SW 6th St Lincoln NE 68522 62 ...

Страница 64: ...American Beer Equipment 2001 SW 6th St Lincoln NE 68522 63 ...

Страница 65: ...American Beer Equipment 2001 SW 6th St Lincoln NE 68522 64 ...

Страница 66: ...American Beer Equipment 2001 SW 6th St Lincoln NE 68522 65 ...

Страница 67: ...American Beer Equipment 2001 SW 6th St Lincoln NE 68522 66 ...

Страница 68: ...American Beer Equipment 2001 SW 6th St Lincoln NE 68522 67 ...

Страница 69: ...American Beer Equipment 2001 SW 6th St Lincoln NE 68522 68 2 0 0 1 S W 6 t h S t L i n c o l n N E 6 8 5 2 2 4 0 2 4 7 5 B E E R ...

Отзывы: