UniVer G12
Istruzioni per installazione, l'esercizio e la manutenzione
Installation, service and maintenance instructions
Страница 1: ...UniVer G12 Istruzioni per installazione l esercizio e la manutenzione Installation service and maintenance instructions ...
Страница 2: ......
Страница 3: ...12 3 3 Maintenance operations 12 3 4 Putting back into service 12 Indice Pag 1 Descrizione 2 1 1 Generalità 2 1 1 1 Caratteristiche funzionali 2 1 1 2 Caratteristiche elettriche 2 1 1 3 Rispondenza alle norme 2 1 1 4 Costruzione dello scomparto base 2 1 2 Blocchi 3 1 2 1 Sull interruttore 3 1 2 2 Sul sezionatore di terra 3 1 2 3 Sulla porta posteriore cella linea 3 1 3 Manovre normali 4 1 3 1 Sull...
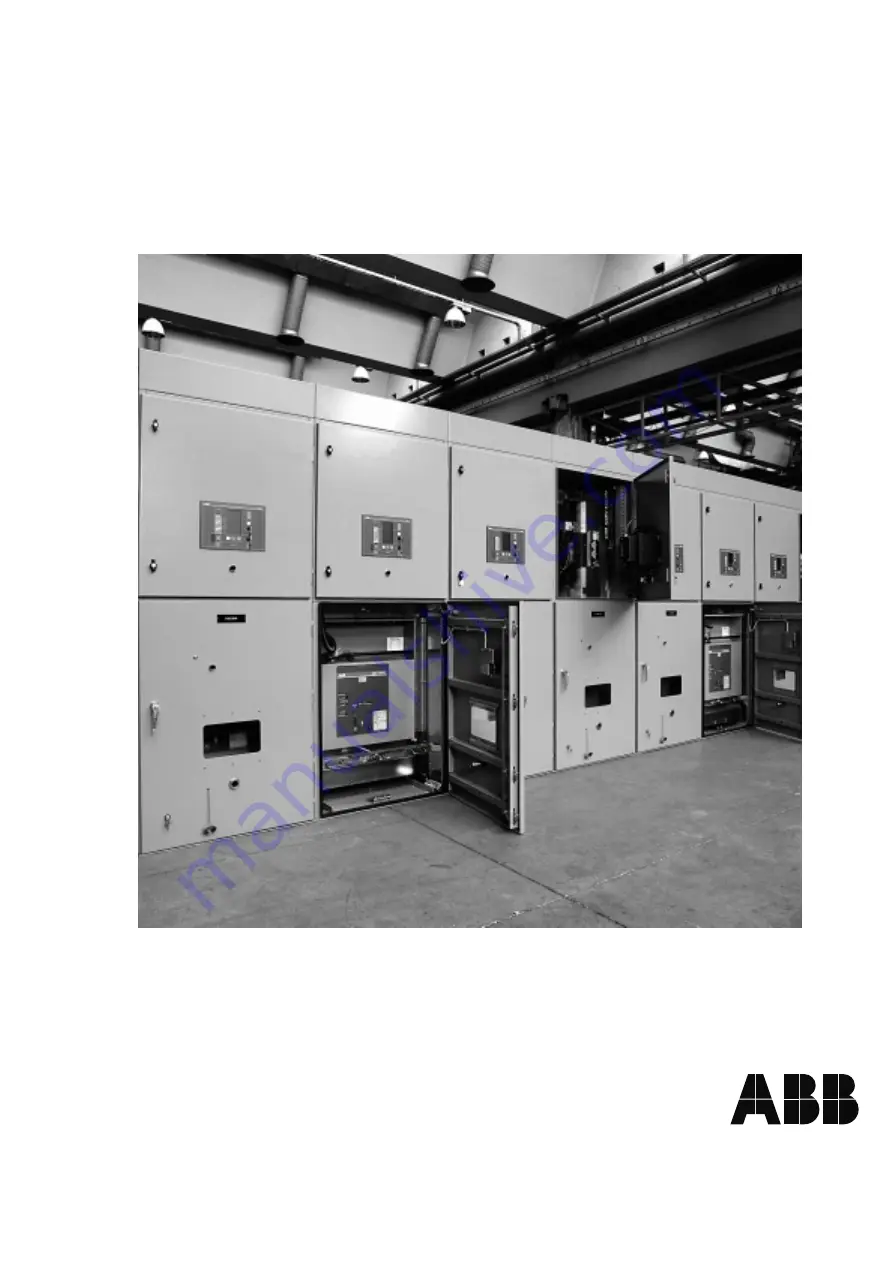
Страница 4: ...s compartment E VT compartment if provided F external auxiliary cable duct if provided 1 Descrizione 1 1 Generalità I quadri Univer G12 vengono costruiti con l impiego di conteni tori che possono ricevere interruttori serie Esafluor HA tipo HA1 SG HA2 SG HA3 NF sG 1 1 1 Caratteristiche funzionali Massima continuità di servizio Sicurezza per il personale Sicurezza contro l incendio Semplicità di ma...
Страница 5: ... Impedisce l apertura se non è stata chiusa la porta posterio re cella linea N 1 2 3 Sulla porta posteriore cella linea a Impedisce l apertura se non è chiuso il sezionatore di terra N 1 2 Locks The most common locks which can be fitted in the switchboard are listed Those marked N are standard supply whereas those marked R are only supplied on request 1 2 1 On the circuit breaker a Prevents connec...
Страница 6: ...alora si voglia effettuare l apertura con la porta posteriore aperta premere a fondo il perno di blocco fig 4a e contemporaneamente inserire la leva di comando come scritto al punto 1 3 2 1 3 Normal operations 1 3 1 On the circuit breaker a Connection before carrying out the operation check that the lock described in point 1 2 1 is inactivated and that the instructions for the enclosure are follow...
Страница 7: ...t be opened with the earthing switch open turn the release screw fig 5a about 90 clockwise using the tool turning the handle at the same time and open the door 1 4 4 On the circuit breaker compartment door a When the front door fitted with electric lock must be opened remove the round headed M10 screw from the door insert the screwdriver fig 6 handling it carefully and without forcing it horizonta...
Страница 8: ...nti verso l alto e avvitando la vite di posizionamento fig 9a 3 Agganciare la grù e sollevare l unità fig 10 È sconsigliabile far scorrere gli scomparti su rulli di tubo perché potrebbero danneggiare le basi degli scomparti 2 Installation 2 1 Checking on receipt 2 1 1 Packing Each switchboard is packed in several sturdy wooden crates containing one or more cubicles onto which the circuit breakers ...
Страница 9: ... to withstand a maximum overload of 250 kg on four metal wheels each wheel has Ø 80 and 2 x 8 mm tread width for the circuit breaker in the racked out position and when it is being moved 2 4 1 Slab drilling For drilling the slab for power and auxiliary cable passage refer to the foundation diagram normally sent with the switchboard documentation 2 4 2 Fixing cubicles without base irons Level the f...
Страница 10: ...e irons by means of the blocks 650594 fig 002 starting from the centre of the switchboard After fixing the initial cubicles repeat the operation for all the others which will be placed side by side towards the two ends of the switchboard The base irons must be joined together by means of welded metal plates not supplied by SACE It is advisable for the floor surface in front of the switchboard to r...
Страница 11: ...e le superfici di contatto con straccio asciutto e ingrassare con un velo di vaselina b La coppia di serraggio raccomandata è circa 8 kgm Assembly a Mount the busbars in the RST sequence fig 13 taking care to clean the contact surfaces carefully with a dry cloth and grease them with a thin layer of vaseline b Should the silver plated contact surfaces be blackened by sulphur dioxide clean them with...
Страница 12: ...nd dirt preferably with a vacuum cleaner c Clean all the insulating parts with clean rags or dry brushes d Inspect the isolating contacts Should the contact surfaces be blackened clean them with alcohol or another similar solvent and then protect them with a thin later of vaseline e Check that the bolts of the main and auxiliary circuits are tight 2 6 3 Sbarra di terra Per il suo posizionamento e ...
Страница 13: ...ormalmente verificati e collaudati in officina ma per ragioni di trasporto o altro possono subire alterazioni è perciò opportuno prima della messa in servizio fare un controllo accurato 2 9 1 Sull interruttore a Verificareseèpossibileinserirel interruttoreconsezionatore di terra chiuso eventualmente intervenire sulle regolazioni vedere punto 2 10 2 b Effettuare sull interruttore quelle manovre pre...
Страница 14: ...tions required for putting into service 2 11 3 Funzionalità Effettuare prove sui circuiti secondari per verificare il funziona mento a distanza del comando delle segnalazioni delle prote zioni e di tutti gli altri circuiti collegati a componenti esterni al quadro Verificare il buon funzionamento dei riscaldatori e degli even tuali ventilatori per i valori di taratura degli interruttori termici con...
Страница 15: ......
Страница 16: ... technical development of the product ITNIE 650091 001 it en 10 98 ABB Trasmissione Distribuzione S p A Divisione Sace T M S Via Friuli 4 I 24044 Dalmine Tel 39 035 395111 Fax 39 035 395874 E mail sacetms tipm it abb com Internet www abb com ABB Calor Emag Mittelspannung GmbH Oberhausener Strasse 33 D 40472 Ratingen Tel 49 0 2102 12 0 Fax 49 0 2102 12 1777 E mail calor info de abb com Internet www...