background image


AMS 500 


ABSOLUTE MARKING SYSTEM


28 

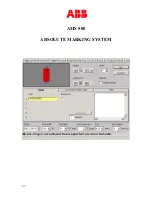
Restore basic settings 


If you change parameters (font types, text height, number of lines, etc.), for each element this 
data will be stored in a separate file. If you choose this element again, you will find the 
previously used parameter settings. Click “Basic settings”, if you want to restore the original 
settings. 
 

Hint: 
 
After updating the AMS software the user’s specific parameters remain valid. 


Single, Sequence, and Row modes 


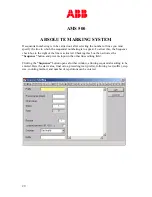
Choosing the tab for single, sequence, and row modes, corresponding sequences of text, 
numbers, characters and symbols can be entered. On the top of the marking win dow you will 
find a large choice of symbols, which can be selected with the mouse. The number of lines 
opened for editing corresponds to the number of lines set per tag. 
  
Text can now be entered. The number of tags to be labeled with the same text should  be 
entered in the 

Repeat field

. The data input is shown in the preview window. 

 
If the number of repetitions exceeds the number of tags available, the following warning is 
displayed 

“Increase Number of Tags for Labeling”

, and the number of repetitions must be 

corrected by either deleting some data entries or adding more tags or plates. Clicking O.K 
transfers the labeling to the tags. 
 

Hint: If you have planned your project and say, you have 125 tags to be marked, you 
would have selected (2) ABB marker cards  on the template. In the repeat box you can 
enter 125 and the text will fill up 2 cards, up to 125 markers. 


Содержание AMS 500

Страница 1: ...AMS 500 ABSOLUTE MARKING SYSTEM 1 USER MANUAL ...

Страница 2: ...rminology 13 14 Plotter Calibration 15 Using The Software New and existing projects 16 21 How To Select Markers 22 23 How to Position ABB Marker Card On The Template 24 Marking The Tags 25 Basic Settings 25 26 Single Sequence and Serial Marking 27 Glossary Of Terms Used In Serial Mode 28 29 Copying Functions 30 31 Importing Files 32 33 Endless Strips RTM 34 36 Printing Tags ...

Страница 3: ...1 2 3 4 1 Automatic Pen Station goes down to load the pen and up when ready to plot The pen stays in the station all the time the tip will remain moist thanks to the silicone rubber positioned in each location 2 Pen Head 3 Pen Carriage 4 Plotter Control ...

Страница 4: ... family is proud to bring to you this new marking system that will give you years of good service The plotter kit part number XUSP01136 Mutoh Roland XUSP02636 AMS500 only is composed of the following Plotter with base plate template for Entrelec terminal blocks markers XUSP01654 XUSP02634 AMS500 only Templates RC RCT XUSP02628 Roland and Mutoh XUSP02633 AMS500 Software Roland and Mutoh XUSP01131 X...

Страница 5: ...rmation Poison Center Göttingen Tel 49 0 551 19240 2 Chemical characterization information on ingredients Chemical characterization composition of solvent and dyestuff Dangerous ingredients CARN content symbol R phrases 1 Methoxy 2 propanol 107 98 2 90 10 3 Possible hazards Special risks concerning human beings and the environment flammable 4 First aid measures General hints Upon inhalation supply...

Страница 6: ... ca 95 C Boiling point ca 120 C Flash point 35 C Ignition temperature 270 C Danger of self ignition Fire promoting properties Explosion hazards formation of explosive vapor air mixtures possible Lower explosion limit ca 2 Vol Upper explosion limit ca 2 Vol Vapor pressure 20 C ca 15 hPa Density 20 C ca 0 93 g ml Solubility in water 20 C miscible pH value 20 C n a Viscosity 25 C ca 2 mPas 10 Stabili...

Страница 7: ...f children 24 avoid contact with skin 16 Further information n a Not applicable n o Not observed The foregoing information reflects our current knowledge and does not have the purpose of guaranteeing product properties INK MSDS Safety data sheet According to 91 155 EEC Date of printing 09 05 03 EK Ink Cartridge P 1 0 Bottle R595 617 Date of revision 11 02 99 1 Name of product and firm Product name...

Страница 8: ...t empty into drains and waters Proceedings for cleaning taking up bind by means of absorbent material and dispose appropriately 7 Handling and storage Handling make sure of sufficient ventilation keep away from sources of ignition Storage keep container tightly closed and store in a cool place 8 Threshold limits and personal protective equipment Hints for the arrangement of technical equipment Ing...

Страница 9: ...cts no data Further information 13 Information on waste treatment Product recommendation according to local regulations combustion as special waste Dirty packaging Recommendation according to local regulations deposit combustion 14 Information on transport ADR RID and GGVS GGVE name class number letter hazard nr material nr flammable 3 3b 1993 Liquid IMDG GGVSee name class UN nr PG EMS nr MFAG mar...

Страница 10: ...ion First close all other applications Insert the CD into the CD ROM drive of your PC Installation will start automatically Please follow the on screen instructions If the auto start feature has been switched off on your PC please start the setup program by double clicking When installation is complete connect the plotter to the PC s printer port with the parallel interface cable and switch the pl...

Страница 11: ...ging your cursor over the marker card click and hold the left button of the mouse A pop up window appears and shows the Labeling direction example Labeling direction Upper Left Upper Right This indicates that the leader is the upper left marker For other cards you may see Labeling Direction Lower Left Lower Right Labeling Marking X and Y Coordinates The direction of the plotter arm up down being Y...

Страница 12: ...ARY OF TERMS Print Same as above except the data are interpreted by a printer Output Device The plotter that will be used the software list the choices Example of a RC610 ABB marker card Marker Tab Field Marker Tab Example of a Marker Leader ...

Страница 13: ... AMS500 plotter For the users of Mutoh plotter The plotter must now be calibrated so those tags and other marking elements can be printed out correctly To do the calibration insert the enclosed plotter Calibration Disk into the floppy disk drive of your PC Then select on the toolbar Output Devices and in the sub menu Auto Calibration Now click the Read Calibration Data button After successfully re...

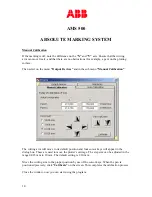
Страница 14: ... menu Manual Calibration The writing arm will move to its default position and four cursor keys will appear in the dialog box These are used to move the plotter s carriage The step size can be adjusted in the range 0 025 mm to 10 mm The default setting is 1 10 mm Move the writing arm to the proper position by use of the cursor keys When the pen is positioned precisely click Calibrate on the screen...

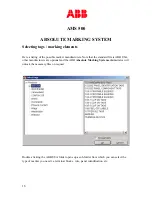
Страница 15: ...his system the software recognizes the template and enables the markers that can be marked only The markers folder will automatically open Make your selection Roland and Mutoh users Choose File New or File Open from the menu bar If you open an existing project locate the project and click open the existing project will then appear If New was chosen a window opens Double clicking on the white porti...

Страница 16: ...te that the standard file is ABB USA other manufacturers are optional and the ABB Absolute Marking Systemadministrator will unlock the necessary files on request Double clicking the ABB USA folder opens up a sub folder from which you can select the type of marker you need i e terminal blocks wire panel identification etc ...

Страница 17: ...AMS 500 ABSOLUTE MARKING SYSTEM 17 Double clicking again on one of the elements opens up another window ...

Страница 18: ...AMS 500 ABSOLUTE MARKING SYSTEM 18 Double clicking again on one of the marker style will open a another window ...

Страница 19: ...AMS 500 ABSOLUTE MARKING SYSTEM 19 Double click on the marker of your choice or select the O K button ...

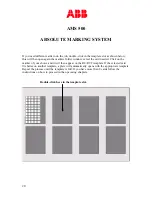
Страница 20: ...card needed Click on the marker of your choice and it will then appear on the RC RCT template If the selected card fits better on another template a plate will automatically opens with the appropriate template Repeat the process until the template is full If you have more than 8 cards follow the instructions on how to proceed in the upcoming chapters Double click here in the template slot ...

Страница 21: ...AMS 500 ABSOLUTE MARKING SYSTEM 21 If more than one card of the same type are necessary to do the job click on All Segments and a full template will appear ...

Страница 22: ...AMS 500 ABSOLUTE MARKING SYSTEM 22 Here a full template RC RCT is shown with 8 marker cards type RC610 ...

Страница 23: ...ate Another base plate will appear on the screen and can be used for additional marking Up to 16 plates can be used You can switch from one plate to another by clicking the individual plates displayed at the bottom of the screen You can copy the text from one similar plate to another i e 2 RC RCT templates no matter what cards are on the template or from one job to another Number of plates is indi...

Страница 24: ...nts First you need to find out the leader tag To do that bring your cursor over the card click a marker with the left button of the mouse and hold the button A message window opens and gives you the location of the leader i e RC RCT ABB marker leader is the upper left marker ...

Страница 25: ...the terminal block With the card positioned in such a way that the card tab bearing the Entrelec logo in on your left side the tabs under the upper left marker should lean against the upper left angle of the slot on the template See below a magnified portion of the marker card location In red the upper left angle of the template slot in blue the marker tabs ...

Страница 26: ...ag can also be specified here Note that the program will only allow options that are appropriate for the selected element marker cards The various tabs for different methods of data input and import appear in the middle of the box This is where you can enter all the data and text for single sequence and row marking The font font width font size line spacing tip width of the plotter pen and plottin...

Страница 27: ...AMS 500 ABSOLUTE MARKING SYSTEM 27 ...

Страница 28: ...arge choice of symbols which can be selected with the mouse The number of lines opened for editing corresponds to the number of lines set per tag Text can now be entered The number of tags to be labeled with the same text should be entered in the Repeat field The data input is shown in the preview window If the number of repetitions exceeds the number of tags available the following warning is dis...

Страница 29: ... the Sequence check box to the right of the line is activated Checking this box then activates the Sequence button and prevents input in the other lines editing field Clicking the Sequence button opens a further window allowing sequential marking to be entered Here the start value final value preceding text prefix following text suffix step size counting method and number of repetitions can be ent...

Страница 30: ...ence of numbers using base 8 i e 1 2 3 4 5 6 7 10 11 etc Hexadecimal A sequence of numbers using base 16 i e 1 2 3 4 5 6 7 8 9 A B C D E F Suffix Letter or symbol following a range of values If the labeling job specified exceeds the number of tags available the following warning is displayed Increase Number of Tags for Labeling The sequence must either be reduced for example by changing the final ...

Страница 31: ...ing sequences 2 To copy several sequences you can use the Shift key to extend and select the area to be copied Copy and paste as described above Note Simultaneous copying of multiple sequences to other types of tags is not possible Example you have a sequence 1 10 on 5 rows on a RC610 you can copy them on another RC610 but not on a RC510 Copying parts of marking sequences 3 To copy individual mark...

Страница 32: ...segment by clicking on it Press the right mouse button and select Copy segment Go to the destination segment and click the mouse to select the empty slot on the template where the segment will be inserted Now press the right mouse button and choose Insert Segment or use the menu bar and click on Edit and choose within the sub menus Copying an entire base plate 6 Choose Edit from the menu bar follo...

Страница 33: ...r your own sign The original setting can be restored at any time If you want to import an Excel or an Access file the program will automatically recognize the format and open the first worksheet for importing This is the default setting You can also select other sheets from the file You can now copy either part or the entire table and use it for marking by copying and pasting directly on the marke...

Страница 34: ... by using the shortcut menu which pops up after clicking the right mouse button You can edit the data in the preview window It is possible to delete texts insert empty lines and special symbols or additional texts After the data has been transferred to the preview window it can be modified as required Available functions include deleting data inserting data etc Clicking OK transfers the labeling t...

Страница 35: ...o various sections First put in the width of the strip you want to use ex terminal block ABB M4 6 is 6mm wide and then the amount of elements terminal blocks required in that width and confirm by pressing the button Append Thereafter you can select and add further sections with different widths If you wish to insert a section between other sections you have to mark out the section before which you...

Страница 36: ...king strip section Mark out the strip section you want to work on by clicking on the particular section of the strip you want to work with Via Menu Edit Marking Strip Section you can open the marking window and can select the print This function allows you to completely utilize the available element width Note that once you are in the labeling window you can see the number of portions of the strip...

Страница 37: ...he tags can be printed Click the printer icon on the toolbar at the top of the window This opens a dialog box displaying print information In the top part of the window the output device plotter and communication port are shown Immediately below the elements to be printed are displayed in the according segment ...

Страница 38: ...ion and choose the speed required Note that the maximum speed is attained only on straight lines that are much longer than the one permissible on such a smaller surface In other words the plotter speed has basically no effect 20mm per second is recommended Only Selected Tags will be printed If you select this option only those tags previously selected will be printed Only selected segment to be pr...

Страница 39: ...Marking cuts will be printed after each tag Final Only one marking cut will be printed at the end of the marked tags Change of the printer interface With a double click at LPT1 you can select another plotter port Clicking OK starts the print job Roland and Mutoh plotters To cancel a current print job click the cancel print icon on the toolbar This completely flushes the print data from the print s...

Отзывы: