


26 Mechanical installation
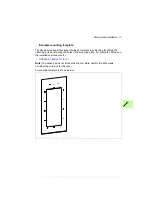
9. See chapter
for the dimensions of the flange and the
required opening in the mounting plate. Attach the mounting template from the
flange mounting kit package onto the mounting plate.
Note:
Mounting templates are different (size, number and position of holes) for
different frame sizes.
Note:
The delivery does not include Rivet or Kalei nuts for the M6 mounting
screws.
Make the opening and drill the holes for the mounting screws. Consider the hole
size for the Rivet or Kalei nuts. Remove the mounting template.
Содержание ACX580-01 R1
Страница 1: ...ABB drives Supplement ACX580 01 R1 R3 Flange mounting kit installation ...
Страница 4: ......
Страница 12: ...12 Hardware description ...
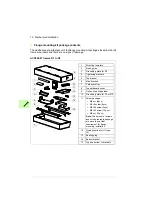
Страница 30: ...30 Dimension drawings ACX580 01 frame R1 Flange mounting kit 3AXD50000131310 ...
Страница 31: ...Dimension drawings 31 Hood is needed for UL Type 12 drives 3AXD50000131242 ...
Страница 32: ...32 Dimension drawings Attaching points and hole dimensions 3AXD50000038098 ...
Страница 33: ...Dimension drawings 33 ACX580 01 frame R2 Flange mounting kit 3AXD50000131327 ...
Страница 34: ...34 Dimension drawings Hood is needed for UL Type 12 drives 3AXD50000130863 ...
Страница 35: ...Dimension drawings 35 Attaching points and hole dimensions 3AXD50000038111 ...
Страница 36: ...36 Dimension drawings ACX580 01 frame R3 Flange mounting kit 3AXD50000131143 ...
Страница 37: ...Dimension drawings 37 Hood is needed for UL Type 12 drives 3AXD50000130870 ...
Страница 38: ...38 Dimension drawings Attaching points and hole dimensions 3AXD50000038117 ...
Страница 40: ...Contact us www abb com drives www abb com drivespartners 3AXD50000119189 RevA EN 2017 10 10 ...


